 TMP36温度传感器的使用

概述
这些传感器使用固态技术来确定气温。也就是说,它们不使用汞(例如旧温度计),双金属条(例如在某些家用温度计或火炉中),也不使用热敏电阻(对温度敏感的电阻器)。取而代之的是,他们利用温度升高的事实,二极管两端的电压以已知的速率增加。 (从技术上讲,这实际上是晶体管的基极和发射极之间的电压降-Vbe。)通过精确地放大电压变化,很容易生成与温度成正比的模拟信号。该技术已有一些改进,但本质上是如何测量温度。
好消息是,所有复杂的计算都在内部进行 芯片-它只是吐出温度,供您使用!
因为这些传感器没有活动部件,所以它们精确,永不磨损,不需要校准,在许多环境条件下工作且在传感器之间保持一致和阅读。此外,它们非常便宜并且易于使用。
一些基本统计数据
这些统计数据适用于Adafruit商店中的温度传感器,即TMP36(-40至150C)。它与LM35/TMP35(摄氏输出)和LM34/TMP34(华氏输出)非常相似。我们使用‘36而不是’35或‘34的原因是该传感器具有非常宽的范围,并且不需要负电压即可读取低于零的温度。否则,功能基本相同。
尺寸: TO-92封装(约0.2“ x 0.2” x 0.2“),带有三根引线
价格:在Adafruit商店中为1.50美元
温度范围::-40°C至150°C/-40°F至302° F
输出范围: 0.1V(-40°C)至2.0V(150°C),但在125°C之后精度会降低
数据表
如何测量温度
使用TMP36很简单,只需连接左引脚接电源(2.7-5.5V),右引脚接地,然后中间引脚将具有与温度成正比(线性)的模拟电压,该模拟电压与电源无关。
要转换电压电压只需使用以下基本公式即可:
以°C为单位的温度= [(以VV为单位的Vout)-500 ] /10
因此,例如,如果输出电压为1V,则表示温度为((1000 mV-500)/10)= 50°C
如果使用LM35或类似产品,在上图中使用“ a”行和公式:以°C为单位的温度=(以mV为单位的Vout) /10
多个传感器可能遇到的问题:如果,添加更多传感器时,您会发现温度不一致,这表明在将模拟读取电路从一个引脚切换到另一个引脚时,传感器会相互干扰。您可以通过延迟阅读两次并扔掉第一个阅读器来解决此问题
有关更多信息,请参阅此帖子
测试温度传感器
测试这些传感器非常容易,但是您需要电池组或电源。
连接2.7-5.5 V电源(2-4节AA电池工作出色),以便将接地线连接到第3针(右引脚),并且将电源连接到第1针(左引脚)
然后用直流电压连接万用表模式接地,其余引脚2(中间)。如果您拥有TMP36及其大约室温(25°C),则电压应约为0.75V。请注意,如果您使用的是LM35,则电压为0.25V
传感器指示温度为26.3°C,也称为79.3°F
您可以通过用手指按压传感器的塑料外壳来更改电压范围,您将看到温度/电压升高。
用我的手指在传感器上加热一点,现在温度读数为29.7°C/85.5°F
或者您可以用冰块触摸传感器,最好将其放在塑料袋中,以免电路上积水,并查看温度/电压降。
我将冰块压在传感器上,以将温度降至18.6°C/65.5°F
使用温度传感器
温度传感器。这些传感器中几乎没有芯片,尽管它们不那么精密,但确实需要正确处理。处理静电时要小心静电,并确保电源正确连接并且在2.7至5.5V DC之间-因此,请勿尝试使用9V电池!
它们带有“ TO”字样-92英寸封装,这意味着芯片被封装在具有三个支脚的塑料半圆柱体内。支脚可以轻松弯曲,以将传感器插入面包板。您也可以焊接到引脚以连接长导线。如果您需要对传感器进行防水处理,则可以在下面看到有关如何制作出色保护套的说明。
读取模拟温度数据与我们研究过的FSR或光电传感器不同,TMP36和朋友并不像电阻器那样工作。因此,实际上只有一种方法可以从传感器读取温度值,即将输出引脚直接插入模拟(ADC)输入。
请记住,您可以使用2.7V至5.5V之间的任何电压作为电源供应。在此示例中,我显示的是5V电源,但请注意,您可以轻松地将其与3.3v电源一起使用。无论您使用哪种电源,模拟电压读数的范围都将在大约0V(地)到大约1.75V之间。
如果您使用的是5V Arduino,并将传感器直接连接到模拟引脚,您可以使用以下公式将10位模拟读数转换为温度:
引脚上的电压,单位为毫伏=(从ADC读取)*(5000/1024 )
此公式将ADC的数字0-1023转换为0-5000mV(= 5V)
如果您使用的是3.3V Arduino,则需要使用
引脚上的电压(单位为毫伏)=(从ADC读取)*(3300/1024)
此公式将数字转换为0- 1023从ADC转换为0-3300mV(= 3.3V)
然后将毫伏转换为温度,请使用以下公式:
摄氏度温度= [(模拟电压mV)-500]/10
Arduino Sketch-简单温度计
此示例代码显示了Arduino一种快速创建温度传感器的方法,它只需在串行端口上打印摄氏温度和华氏温度的当前温度即可。
下载:文件
复制代码
//TMP36 Pin Variables
int sensorPin = 0; //the analog pin the TMP36’s Vout (sense) pin is connected to
//the resolution is 10 mV / degree centigrade with a
//500 mV offset to allow for negative temperatures
/*
* setup() - this function runs once when you turn your Arduino on
* We initialize the serial connection with the computer
*/
void setup()
{
Serial.begin(9600); //Start the serial connection with the computer
//to view the result open the serial monitor
}
void loop() // run over and over again
{
//getting the voltage reading from the temperature sensor
int reading = analogRead(sensorPin);
// converting that reading to voltage, for 3.3v arduino use 3.3
float voltage = reading * 5.0;
voltage /= 1024.0;
// print out the voltage
Serial.print(voltage); Serial.println(“ volts”);
// now print out the temperature
float temperatureC = (voltage - 0.5) * 100 ; //converting from 10 mv per degree wit 500 mV offset
//to degrees ((voltage - 500mV) times 100)
Serial.print(temperatureC); Serial.println(“ degrees C”);
// now convert to Fahrenheit
float temperatureF = (temperatureC * 9.0 / 5.0) + 32.0;
Serial.print(temperatureF); Serial.println(“ degrees F”);
delay(1000); //waiting a second
} //TMP36 Pin Variables
int sensorPin = 0; //the analog pin the TMP36‘s Vout (sense) pin is connected to
//the resolution is 10 mV / degree centigrade with a
//500 mV offset to allow for negative temperatures
/*
* setup() - this function runs once when you turn your Arduino on
* We initialize the serial connection with the computer
*/
void setup()
{
Serial.begin(9600); //Start the serial connection with the computer
//to view the result open the serial monitor
}
void loop() // run over and over again
{
//getting the voltage reading from the temperature sensor
int reading = analogRead(sensorPin);
// converting that reading to voltage, for 3.3v arduino use 3.3
float voltage = reading * 5.0;
voltage /= 1024.0;
// print out the voltage
Serial.print(voltage); Serial.println(“ volts”);
// now print out the temperature
float temperatureC = (voltage - 0.5) * 100 ; //converting from 10 mv per degree wit 500 mV offset
//to degrees ((voltage - 500mV) times 100)
Serial.print(temperatureC); Serial.println(“ degrees C”);
// now convert to Fahrenheit
float temperatureF = (temperatureC * 9.0 / 5.0) + 32.0;
Serial.print(temperatureF); Serial.println(“ degrees F”);
delay(1000); //waiting a second
}
获得更高的精度为获得更好的结果,使用3.3v参考电压作为ARef而不是5V会更精确,并且少噪音
光照和温度数据记录教程中的此示例有一个光电管,但是您可以忽略它
请注意,我们已将TMP36更改为A1
要将3.3v引脚用作模拟参考,请不要忘记在设置中像代码中那样指定“ analogReference(EXTERNAL)”下方:
下载:文件
复制代码
/* Sensor test sketch
for more information see http://www.ladyada.net/make/logshield/lighttemp.html
*/
#define aref_voltage 3.3 // we tie 3.3V to ARef and measure it with a multimeter!
//TMP36 Pin Variables
int tempPin = 1; //the analog pin the TMP36’s Vout (sense) pin is connected to
//the resolution is 10 mV / degree centigrade with a
//500 mV offset to allow for negative temperatures
int tempReading; // the analog reading from the sensor
void setup(void) {
// We‘ll send debugging information via the Serial monitor
Serial.begin(9600);
// If you want to set the aref to something other than 5v
analogReference(EXTERNAL);
}
void loop(void) {
tempReading = analogRead(tempPin);
Serial.print(“Temp reading = ”);
Serial.print(tempReading); // the raw analog reading
// converting that reading to voltage, which is based off the reference voltage
float voltage = tempReading * aref_voltage;
voltage /= 1024.0;
// print out the voltage
Serial.print(“ - ”);
Serial.print(voltage); Serial.println(“ volts”);
// now print out the temperature
float temperatureC = (voltage - 0.5) * 100 ; //converting from 10 mv per degree wit 500 mV offset
//to degrees ((volatge - 500mV) times 100)
Serial.print(temperatureC); Serial.println(“ degrees C”);
// now convert to Fahrenheight
float temperatureF = (temperatureC * 9.0 / 5.0) + 32.0;
Serial.print(temperatureF); Serial.println(“ degrees F”);
delay(1000);
} /* Sensor test sketch
for more information see http://www.ladyada.net/make/logshield/lighttemp.html
*/
#define aref_voltage 3.3 // we tie 3.3V to ARef and measure it with a multimeter!
//TMP36 Pin Variables
int tempPin = 1; //the analog pin the TMP36’s Vout (sense) pin is connected to
//the resolution is 10 mV / degree centigrade with a
//500 mV offset to allow for negative temperatures
int tempReading; // the analog reading from the sensor
void setup(void) {
// We‘ll send debugging information via the Serial monitor
Serial.begin(9600);
// If you want to set the aref to something other than 5v
analogReference(EXTERNAL);
}
void loop(void) {
tempReading = analogRead(tempPin);
Serial.print(“Temp reading = ”);
Serial.print(tempReading); // the raw analog reading
// converting that reading to voltage, which is based off the reference voltage
float voltage = tempReading * aref_voltage;
voltage /= 1024.0;
// print out the voltage
Serial.print(“ - ”);
Serial.print(voltage); Serial.println(“ volts”);
// now print out the temperature
float temperatureC = (voltage - 0.5) * 100 ; //converting from 10 mv per degree wit 500 mV offset
//to degrees ((volatge - 500mV) times 100)
Serial.print(temperatureC); Serial.println(“ degrees C”);
// now convert to Fahrenheight
float temperatureF = (temperatureC * 9.0 / 5.0) + 32.0;
Serial.print(temperatureF); Serial.println(“ degrees F”);
delay(1000);
}
带有CircuitPython的TMP36
使用CircuitPython,可以使用板载内置的模拟I/O模块和模数转换器轻松读取TMP36传感器。您只需使用几行Python代码就可以轻松地将TMP36输出电压转换为精确的温度读数。
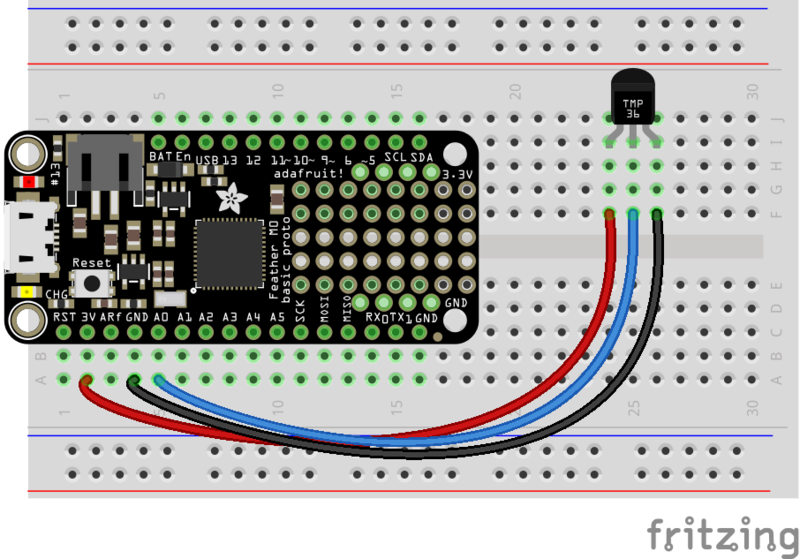
要遵循此页面,请确保如上图所示将TMP36传感器连接到CircuitPython板上页。 A0模拟输入将用作TMP36温度输出的输入。这是一个在A0模拟输入上连接到TMP36的Feather M0的示例:
注意:发现以下简单电路给出了错误的提示由于CircuitPython读取模拟值的速度很快,因此可以使用CircuitPython进行读数。要解决此问题,请在TMP36的输出和接地引脚之间添加一个0.01uF或0.1uF的电容以及一个47k的电阻。
div》
Fritzing Source
首先连接到开发板的串行REPL,因此您位于CircuitPython的》》》 提示符下。
接下来导入必要的 board 和 analogio 模块:
下载:文件
复制代码
import board
import analogio import board
import analogio
现在为板上的A0引脚创建一个模拟输入:
下载:文件
复制代码
tmp36 = analogio.AnalogIn(board.A0) tmp36 = analogio.AnalogIn(board.A0)
这时,您可以读取TMP36传感器输出的原始ADC值。就像模拟I/O指南中提到的那样,该值的范围将与传感器输出的电压成正比,范围是0到65535(从0到电路板的模拟参考电压,通常是3.3V到5V)。例如,尝试读取原始ADC值:
下载:文件
复制代码
tmp36.value tmp36.value

您可以使用上一页中提到的类似公式将此值转换为电压(以毫伏为单位)。但是,有一个很小的变化将值的范围从1023增加到65535-这是必要的,因为CircuitPython为ADC输入使用了更大范围的值。此外,通过CircuitPython,您可以直接访问电路板的模拟参考电压,因此一个简单的公式对于3.3V和5V参考均适用:
下载:文件
复制代码
tmp36.value * (tmp36.reference_voltage * 1000 / 65535) tmp36.value * (tmp36.reference_voltage * 1000 / 65535)

一旦TMP36输出了模拟电压值,就可以将其转换为温度就像上一页显示的那样:
下载:文件
复制代码
millivolts = tmp36.value * (tmp36.reference_voltage * 1000 / 65535)
(millivolts - 500) / 10 millivolts = tmp36.value * (tmp36.reference_voltage * 1000 / 65535)
(millivolts - 500) / 10

让我们为我们执行此函数并返回以摄氏度为单位的温度:
下载:文件
复制代码
def tmp36_temperature_C(analogin):
millivolts = analogin.value * (analogin.reference_voltage * 1000 / 65535)
return (millivolts - 500) / 10
tmp36_temperature_C(tmp36) def tmp36_temperature_C(analogin):
millivolts = analogin.value * (analogin.reference_voltage * 1000 / 65535)
return (millivolts - 500) / 10
tmp36_temperature_C(tmp36)


您也可以将其变成一个完整的程序,该程序也每秒读取和打印温度。将其另存为板上的 main.py 并检查串行输出:
下载:文件
复制代码
import board
import analogio
import time
TMP36_PIN = board.A0 # Analog input connected to TMP36 output.
# Function to simplify the math of reading the temperature.
def tmp36_temperature_C(analogin):
millivolts = analogin.value * (analogin.reference_voltage * 1000 / 65535)
return (millivolts - 500) / 10
# Create TMP36 analog input.
tmp36 = analogio.AnalogIn(TMP36_PIN)
# Loop forever.
while True:
# Read the temperature in Celsius.
temp_C = tmp36_temperature_C(tmp36)
# Convert to Fahrenheit.
temp_F = (temp_C * 9/5) + 32
# Print out the value and delay a second before looping again.
print(“Temperature: {}C {}F”.format(temp_C, temp_F))
time.sleep(1.0) import board
import analogio
import time
TMP36_PIN = board.A0 # Analog input connected to TMP36 output.
# Function to simplify the math of reading the temperature.
def tmp36_temperature_C(analogin):
millivolts = analogin.value * (analogin.reference_voltage * 1000 / 65535)
return (millivolts - 500) / 10
# Create TMP36 analog input.
tmp36 = analogio.AnalogIn(TMP36_PIN)
# Loop forever.
while True:
# Read the temperature in Celsius.
temp_C = tmp36_temperature_C(tmp36)
# Convert to Fahrenheit.
temp_F = (temp_C * 9/5) + 32
# Print out the value and delay a second before looping again.
print(“Temperature: {}C {}F”.format(temp_C, temp_F))
time.sleep(1.0)
这是将TMP36与CircuitPython一起使用的全部内容!
示例项目
远程温度传感器
视频使用生物反馈(体温)的编辑器
如何为用于遥控车辆(机器人潜艇)的LM35传感器防水
一个“智能杯垫”可让您知道何时可以安全饮用咖啡/茶。其中一些项目使用热敏电阻(根据温度改变电阻的电阻温度),但很容易适应TMP36等固态传感器。
责任编辑:wv
-
温度传感器
+关注
关注
48文章
3254浏览量
163376
发布评论请先 登录


评论