 基于YOLOv8的自定义医学图像分割

YOLOv8是一种令人惊叹的分割模型;它易于训练、测试和部署。在本教程中,我们将学习如何在自定义数据集上使用YOLOv8。但在此之前,我想告诉你为什么在存在其他优秀的分割模型时应该使用YOLOv8呢?
我正在从事与医学图像分割相关的项目,当我的合作者突然告诉我,我们只有来自175名患者的600张图像和标注。在医学成像领域,这是一个常见的问题,因为临床医生是最忙碌的人,他们有许多职责。然而,他向我保证,一旦模型训练好(并进行微调),我们将获得来自其他300多名患者的图像和标注,作为额外的测试集以评估我们的模型。
我开始将这50名患者分为训练、测试和验证数据集,使用8010的比例。对于模型,我首先尝试了UNet及其变体(ResUNet、Attention UNet、Res-Attention UNet)。这些模型在训练、测试和验证数据集上表现出色,但在额外的测试集上表现糟糕。然后我想,“让我们试试YOLOv8;如果有效,那将是很好的,如果不行,那将是一次有趣的学习经历。”几个小时后,它奏效了,令我惊讶的是,在额外的测试集上远远超出了我的预期。我不能透露具体数值,因为论文仍在审查中,但我愿意分享如何将其调整为自定义数据集,以便你可以节省大量工作时间。让我们开始制定攻略。
攻略
以下是我们将学习的主题:
1. YOLOv8简介
2. 安装库
3. 数据集准备
4. 训练准备
5. 训练模型
6. 结果
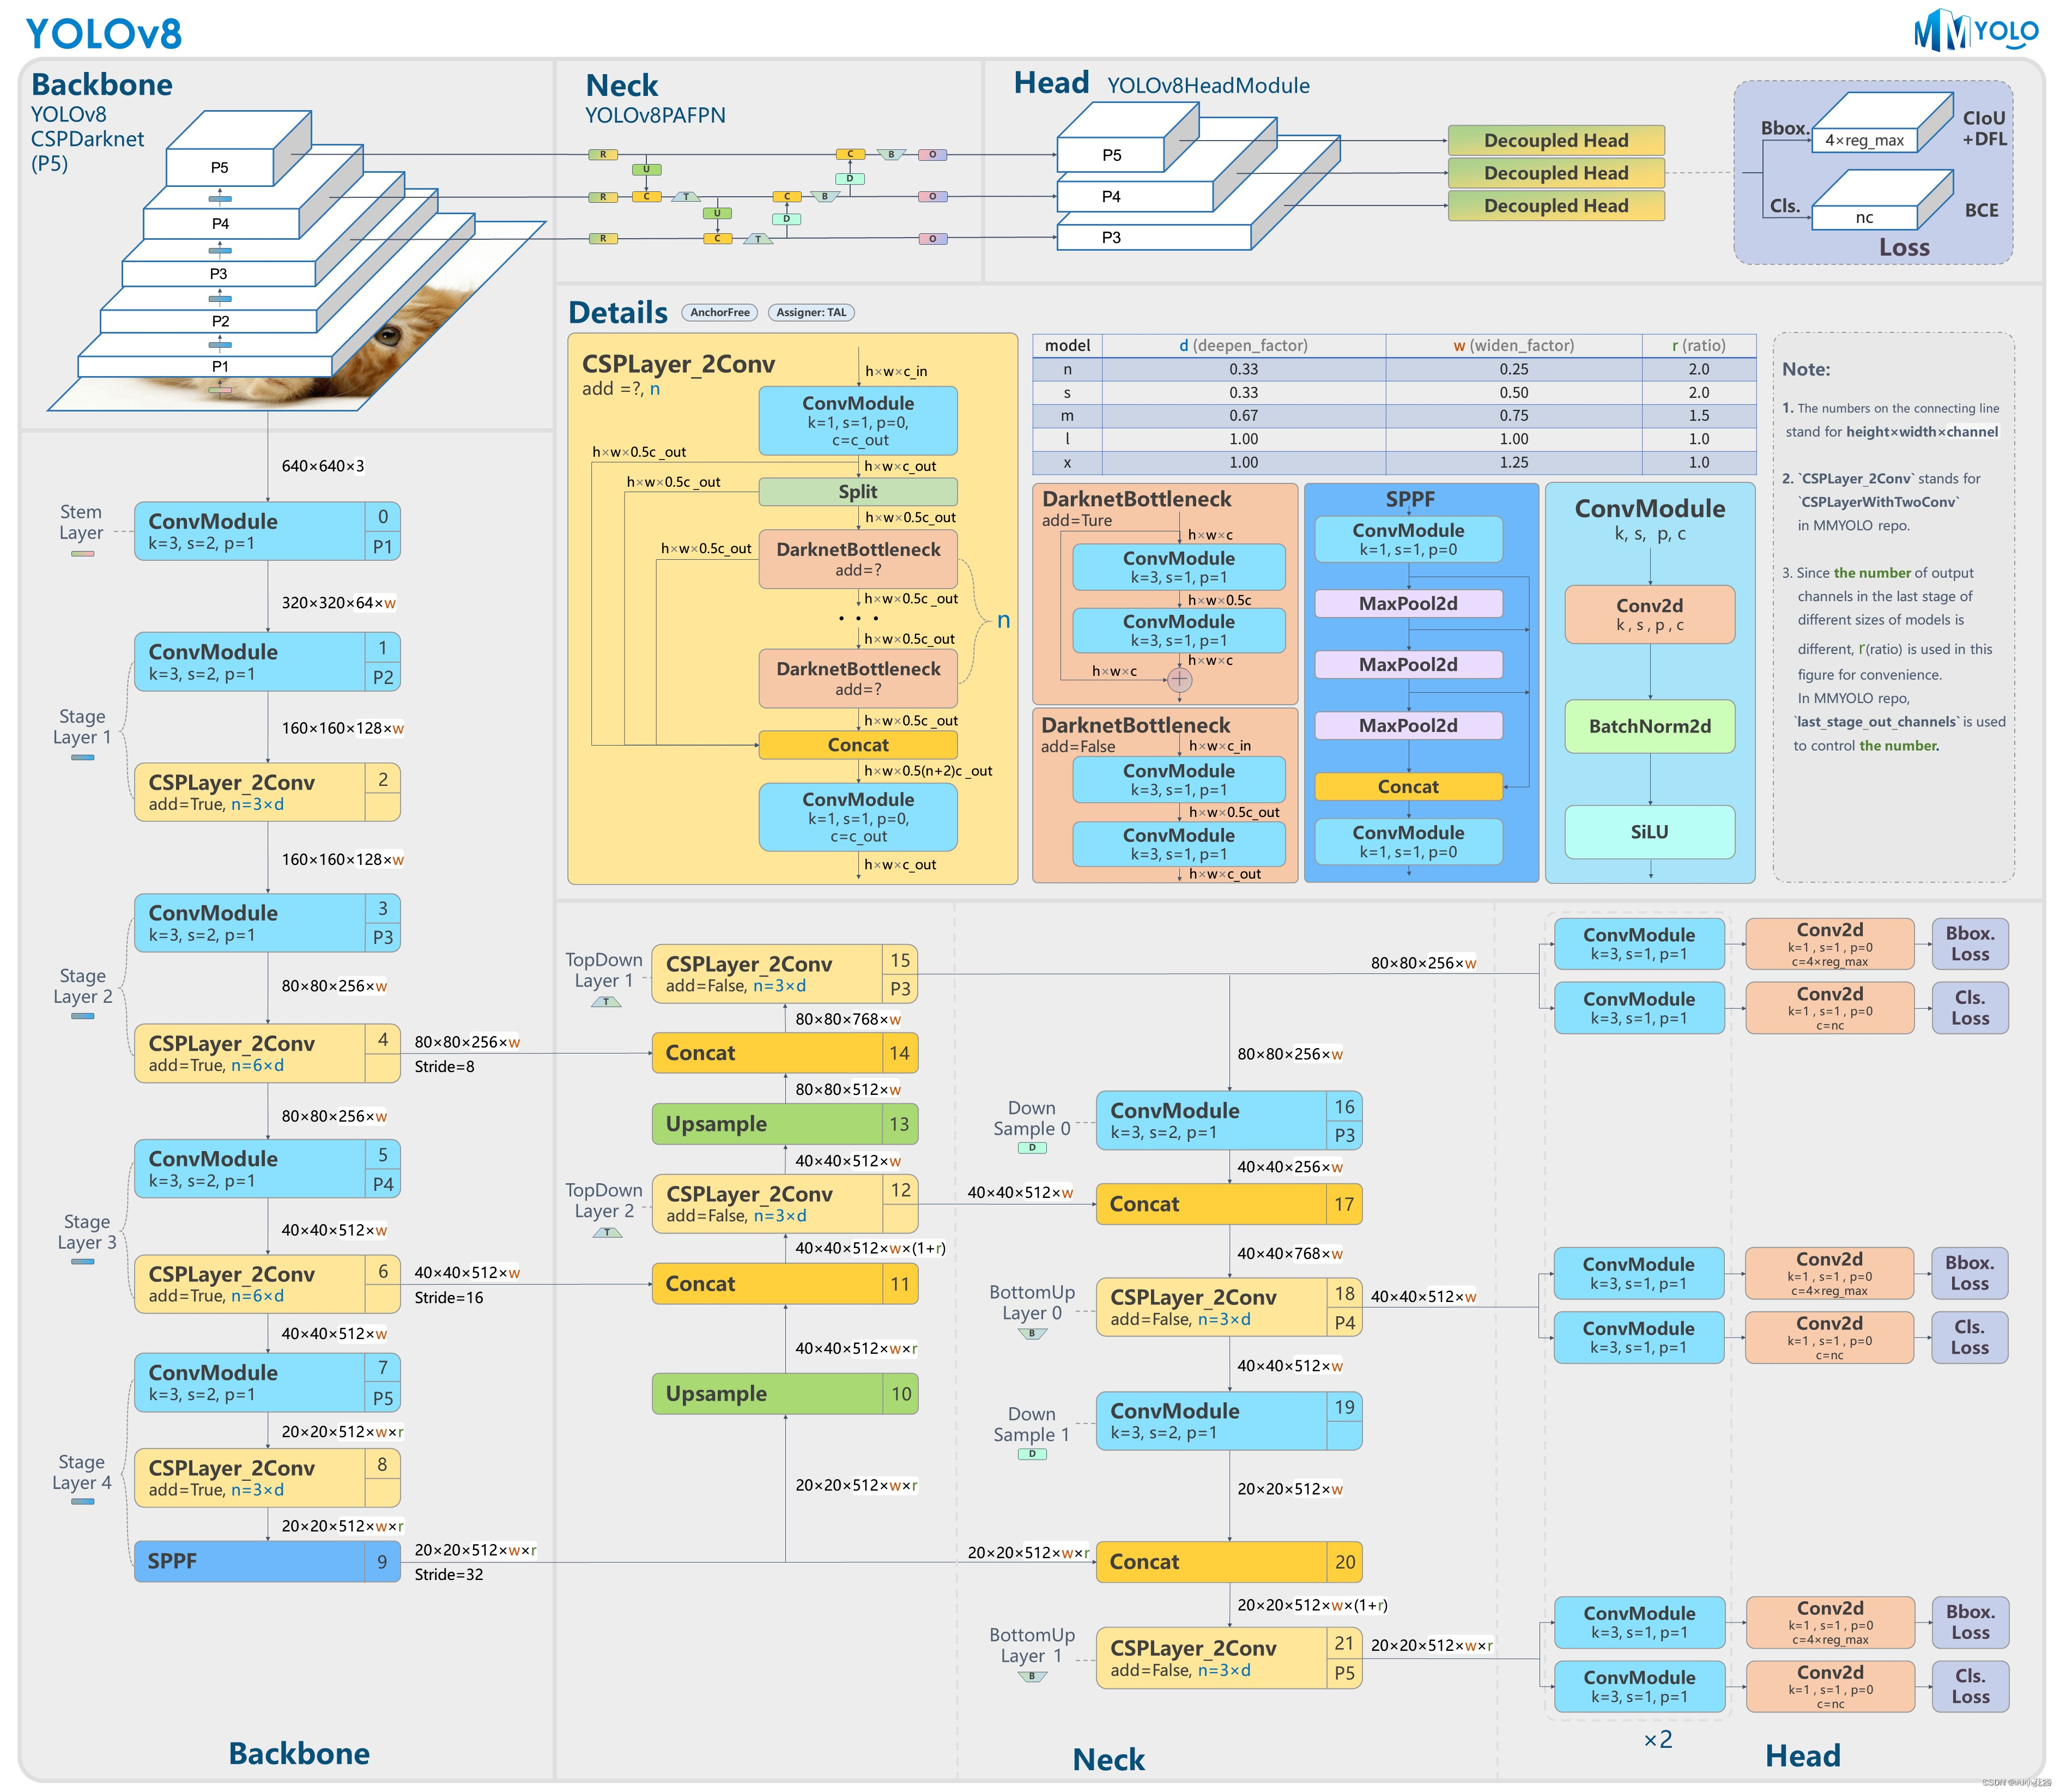
YOLOv8简介
YOLOv8是YOLO系列的最新版本,用于实时目标检测,由Ultralytics开发。它通过引入空间注意力和特征融合等修改来提高准确性和速度。该架构将修改过的CSPDarknet53骨干网络与用于处理的先进头部相结合。这些先进之处使YOLOv8成为各种计算机视觉任务的最新选择。
安装库
以下是安装库的选项。
# Install the ultralytics package using conda
conda install -c conda-forge ultralytics


or


# Install the ultralytics package from PyPI
pip install ultralytics
数据集准备
数据集需要进行两个步骤的处理:
步骤1:请按照以下结构组织您的数据集(图像和掩膜):理想情况下,训练、测试和验证(val)的比例为8010。数据集文件夹的安排如下:
dataset
|
|---train
|   |-- images
|   |-- labels
|
|---Val
|   |-- images
|   |-- labels
|
|---test
|   |-- images
|   |-- labels
步骤2:第二步是将 .png(或任何类型)掩膜(标签)转换为所有3个标签文件夹中的 .txt 文件。以下是将标签(.png、.jpg)转换为 .txt 文件的Python代码。(您也可以在此操作)
将每个标签图像转换为 .txt 文件
import numpy as np
from PIL import Image


import numpy as np
from PIL import Image
from pathlib import Path


def create_label(image_path, label_path):
    # Load the image from the given path and convert it to a NumPy array
    mask = np.asarray(Image.open(image_path))


    # Find the coordinates of non-zero (i.e., not black) pixels in the mask's first channel (assumed to be red)
    rows, cols = np.nonzero(mask[:, :, 0])


    # If no non-zero pixels are found in the mask, return early as there's nothing to label
    if len(rows) == 0:
        return  # Optionally, handle the case of no non-zero pixels as needed


    # Calculate the normalized coordinates by dividing by the respective dimensions of the image
    # This is done to ensure that the coordinates are relative (between 0 and 1) rather than absolute
    normalized_coords = [(col / mask.shape[1], row / mask.shape[0]) for row, col in zip(rows, cols)]


    # Construct a string representing the label data
    # The format starts with '0' (which might represent a class id or similar) followed by pairs of normalized coordinates
    label_line = '0 ' + ' '.join([f'{cord[0]} {cord[1]}' for cord in normalized_coords])


    # Ensure that the directory for the label_path exists, create it if not
    Path(label_path).parent.mkdir(parents=True, exist_ok=True)


    # Open the label file in write mode and write the label_line to it
    with open(label_path, 'w') as f:
        f.write(label_line)


import os


for x in ['train', 'val', 'test']:
    images_dir_path = Path(f'datasets/{x}/labels')
    for img_path in images_dir_path.iterdir():
        if img_path.is_file() and img_path.suffix.lower() in ['.jpg', '.jpeg', '.png', '.bmp']:
            label_path = img_path.parent.parent / 'labels_' / f'{img_path.stem}.txt'
            label_line = create_label(img_path, label_path)
        else:
            print(f"Skipping non-image file: {img_path}")
请注意:在运行上述代码后,请不要忘记从标签文件夹中删除标签(掩膜)图像。
训练准备
为训练创建 'data.yaml' 文件。只需在Python中运行下面的代码,它将为YOLOv8创建 'data.yaml' 文件。
yaml_content = f'''
train: train/images
val: val/images
test: test/images


names: ['object']
# Hyperparameters ------------------------------------------------------------------------------------------------------
# lr0: 0.01  # initial learning rate (i.e. SGD=1E-2, Adam=1E-3)
# lrf: 0.01  # final learning rate (lr0 * lrf)
# momentum: 0.937  # SGD momentum/Adam beta1
# weight_decay: 0.0005  # optimizer weight decay 5e-4
# warmup_epochs: 3.0  # warmup epochs (fractions ok)
# warmup_momentum: 0.8  # warmup initial momentum
# warmup_bias_lr: 0.1  # warmup initial bias lr
# box: 7.5  # box loss gain
# cls: 0.5  # cls loss gain (scale with pixels)
# dfl: 1.5  # dfl loss gain
# pose: 12.0  # pose loss gain
# kobj: 1.0  # keypoint obj loss gain
# label_smoothing: 0.0  # label smoothing (fraction)
# nbs: 64  # nominal batch size
# hsv_h: 0.015  # image HSV-Hue augmentation (fraction)
# hsv_s: 0.7  # image HSV-Saturation augmentation (fraction)
# hsv_v: 0.4  # image HSV-Value augmentation (fraction)
degrees: 0.5  # image rotation (+/- deg)
translate: 0.1  # image translation (+/- fraction)
scale: 0.2  # image scale (+/- gain)
shear: 0.2  # image shear (+/- deg) from -0.5 to 0.5
perspective: 0.1  # image perspective (+/- fraction), range 0-0.001
flipud: 0.7  # image flip up-down (probability)
fliplr: 0.5  # image flip left-right (probability)
mosaic: 0.8  # image mosaic (probability)
mixup: 0.1  # image mixup (probability)
# copy_paste: 0.0  # segment copy-paste (probability)
    '''

with Path('data.yaml').open('w') as f:
    f.write(yaml_content)
训练模型
一旦数据准备好,其余的非常简单,只需运行以下代码。
import matplotlib.pyplot as plt
from ultralytics import YOLO


model = YOLO("yolov8n-seg.pt")


results = model.train(
        batch=8,
        device="cpu",
        data="data.yaml",
        epochs=100,
        imgsz=255)
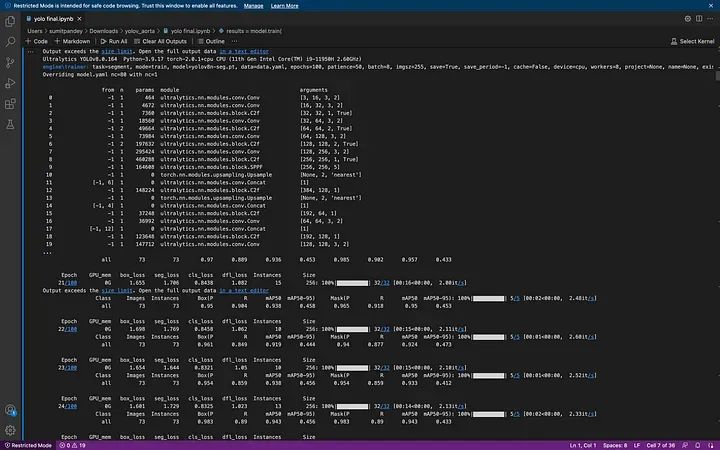
恭喜,你成功了。现在你会看到一个 'runs' 文件夹,你可以在其中找到所有的训练矩阵和图表。
结果
好,让我们在测试数据上检查结果:
model = YOLO("runs/segment/train13/weights/best.pt") # load the model


file = glob.glob('datasets/test/images/*') # let's get the images
现在让我们在图像上运行代码。
# lets run the model over every image
for i in range(len(file)):
    result = model(file[i], save=True, save_txt=True)
将每个 Pred.txt 文件转换为 mask.png
import numpy as np
import cv2


def convert_label_to_image(label_path, image_path):
    # Read the .txt label file
    with open(label_path, 'r') as f:
        label_line = f.readline()


    # Parse the label line to extract the normalized coordinates
    coords = label_line.strip().split()[1:]  # Remove the class label (assuming it's always 0)


    # Convert normalized coordinates to pixel coordinates
    width, height = 256, 256  # Set the dimensions of the output image
    coordinates = [(float(coords[i]) * width, float(coords[i+1]) * height) for i in range(0, len(coords), 2)]
    coordinates = np.array(coordinates, dtype=np.int32)


    # Create a blank image
    image = np.zeros((height, width, 3), dtype=np.uint8)


    # Draw the polygon using the coordinates
    cv2.fillPoly(image, [coordinates], (255, 255, 255))  # Fill the polygon with white color
    print(image.shape)
    # Save the image
    cv2.imwrite(image_path, image)
    print("Image saved successfully.")


# Example usage
label_path = 'runs/segment/predict4/val_labels/img_105.txt'
image_path = 'runs/segment/predict4/val_labels/img_105.jpg'
convert_label_to_image(label_path, image_path)


file = glob.glob('runs/segment/predict11/labels/*.txt')
for i in range(len(file)):
    label_path = file[i]
    image_path = file[i][:-3]+'jpg'
    convert_label_to_image(label_path, image_path)
审核编辑:汤梓红 -
模型
+关注
关注
1文章
3810浏览量
52253 -
数据集
+关注
关注
4文章
1240浏览量
26259 -
医学图像分割
+关注
关注
0文章
5浏览量
942
原文标题:基于YOLOv8的自定义医学图像分割
文章出处:【微信号:vision263com,微信公众号:新机器视觉】欢迎添加关注!文章转载请注明出处。
发布评论请先 登录
基于YOLOv8实现自定义姿态评估模型训练
【NPU实战】在迅为RK3588上玩转YOLOv8:目标检测与语义分割一站式部署指南

labview调用yolov8/11目标检测、分割、分类
如何修改yolov8分割程序中的kmodel?
TensorRT 8.6 C++开发环境配置与YOLOv8实例分割推理演示

YOLOv8版本升级支持小目标检测与高分辨率图像输入
教你如何用两行代码搞定YOLOv8各种模型推理
如何修改YOLOv8的源码
用自己的数据集训练YOLOv8实例分割模型
YOLOv8实现旋转对象检测
RV1126 yolov8训练部署教程
使用ROCm™优化并部署YOLOv8模型


评论