 在Arduino上使用1.8英寸TFT显示屏的入门指南

步骤1:引脚布局
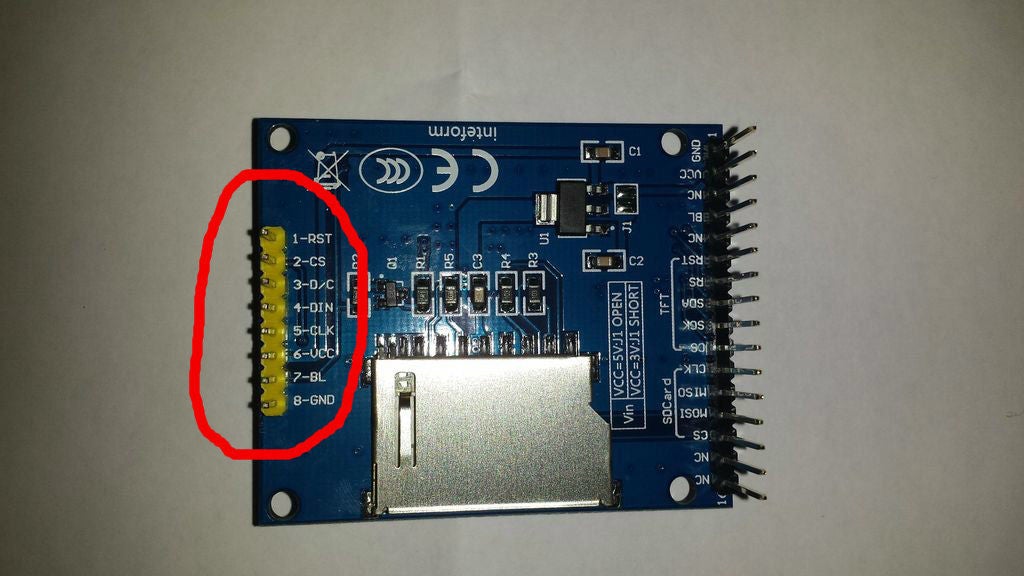
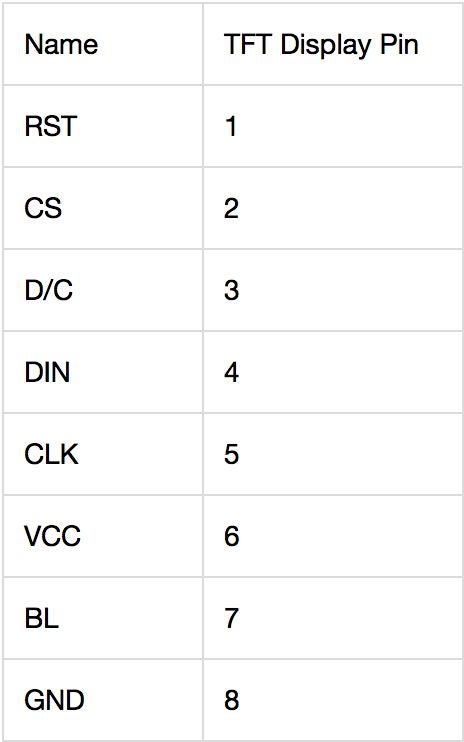
此处的第一张照片显示了显示板的背面。引脚有两个侧面-红色圆圈表示我们将要使用的侧面。它有8个引脚,您可以在第二张照片中看到每个引脚对应的含义。带有16针的另一侧用于SD卡,将在以后的Instructable中进行介绍。
引脚的简要概述(改编自Adafruits的详尽摘要):
RST -这是TFT复位引脚。接地以复位TFT!最好由库控制此引脚,以便清晰地重置显示器,但您也可以将其连接到Arduino Reset引脚,该引脚在大多数情况下都可以使用。
CS -这是TFT SPI芯片选择引脚
D/C -这是TFT SPI数据或命令选择器引脚
DIN -这是SPI主输出从输入引脚(MOSI),用于将数据从微控制器发送到SD卡和/或TFT
SCLK -此是SPI时钟输入引脚
Vcc -这是电源引脚,连接到5VDC-具有反极性保护,但请尝试正确连接!
BL -这是背光控制的输入。连接到5VDC以打开背光。
GND -这是电源和信号接地引脚
现在我们知道我们要处理的是什么是时候开始布线了!
步骤2:建立连接

这是我要做的步骤希望当我开始使用此板时能够更容易找到。收到屏幕并意识到我不知道如何将其连接起来后,我转向他们的产品的Adafruit指南。
起初,看似引脚的布局不同,但否则两个显示器可以互换,并且能够运行Adafruit Graphics库(有关下一步代码的更多信息)。但是,当我按照Adafruit指南连接董事会时,我的显示 种 起作用了。它确实显示了文本和绘图,但是图像中有很多噪点,并且图像在屏幕上呈条纹状。屏幕顶部还发出明亮的光,中断了图像质量。我以为是因为我在5V电压下运行屏幕,因此需要较低的功率。我尝试了3.3V,但显示效果却变差了。经过约10分钟的遗憾后,我决定购买edaBay,并希望自己能与Adafruit主板一起使用,我决定在Google上搜索我的问题,并发现了这篇有关类似问题的有用文章:(1.8in SPI 128x160 TFT Module Arduino)
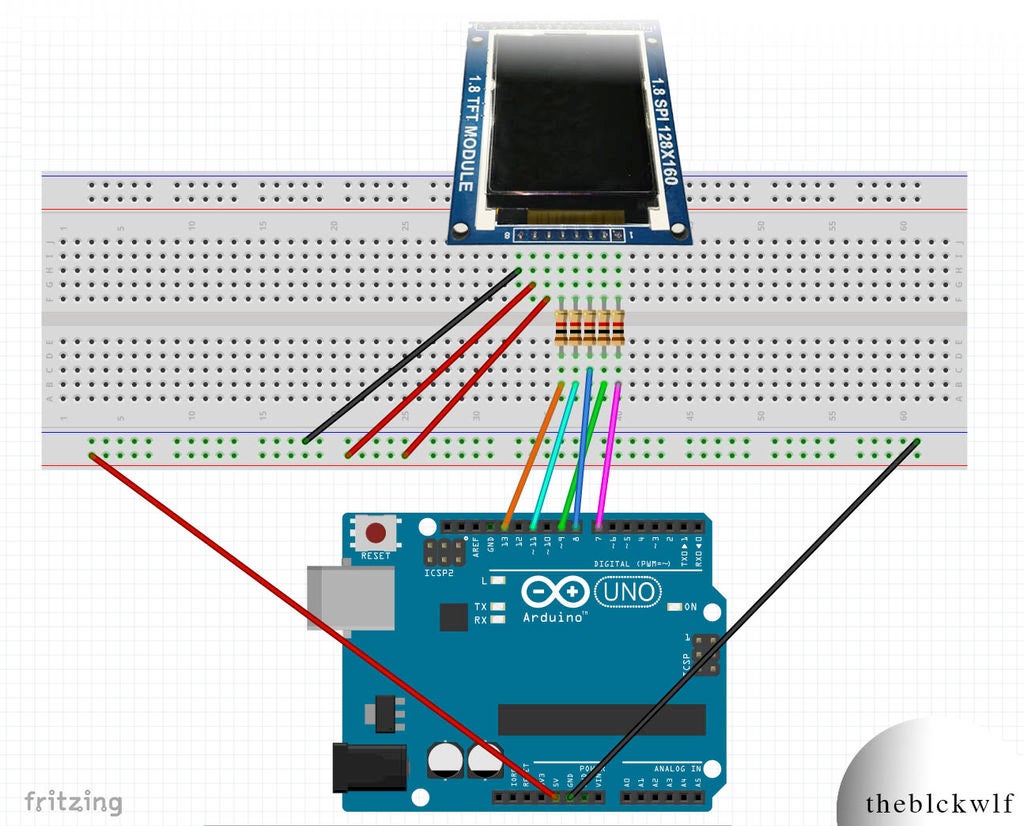
简而言之,在5个连接之间需要1k欧姆电阻。您可以在Fritzing图中看到电阻器的位置。第二张图片是显示器和Arduino引脚之间的连接表。我在下面列出了它们,并指出了连接是否需要电阻。
RST -Arduino Pin 7-1k电阻
CS -Arduino Pin 9-1k电阻器
DC -Arduino Pin 8-1k电阻器
DIN -Arduino Pin 11 -1k电阻
CLK -Arduino引脚13-1k电阻
Vcc -5V
BL -5V
GND -GND
步骤3:上传代码并运行
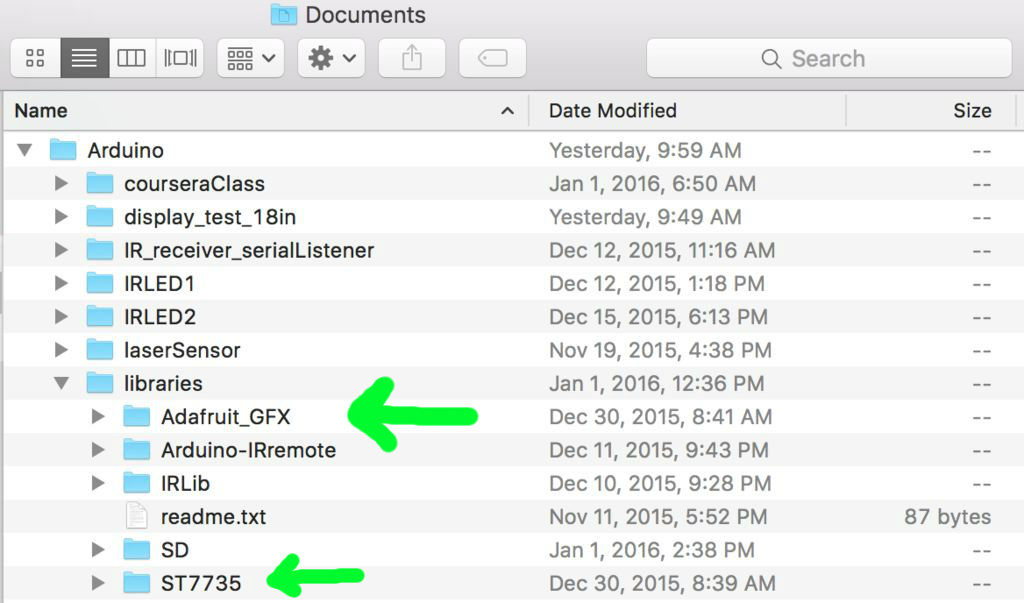
您将需要安装两个库才能操作显示器:
ST7735库
Adafruit GFX库
下载每个库并解压缩文件夹。将它们重命名为“ Adafruit_ST7735”和“ Adafruit_GFX”,并将每个文件夹放置在Arduino Libraries文件夹内。我已将库的屏幕快照附加在正确的文件夹中。安装完成后,就可以操作屏幕了! Adafruit ST7735库内部有一个名为graphicstest.ino的文件,您可以将其上传到Arduino,它将通过许多将对象绘制到屏幕上的函数来运行。但是,此文件将需要进行一些更改以使引脚适应您的布局。
或者,您可以将下面的代码复制/粘贴到Arduino IDE中并上传。这是Adafruit的graphictest.ino的修改版本,主要区别在于引脚的分配。我还玩了一下代码,看看有什么功能。如果您遇到任何代码问题,请告诉我。
/***************************************************
This is a library for the Adafruit 1.8“ SPI display. This library has
been modified from the original version to work with a non-Adafruit
1.8in display.
This library works with the Adafruit 1.8” TFT Breakout w/SD card
----》 http://www.adafruit.com/products/358
The 1.8“ TFT shield
----》 http://www.adafruit.com/products/358
The 1.44” TFT breakout
----》 http://www.adafruit.com/products/358
as well as Adafruit raw 1.8“ TFT display
----》 http://www.adafruit.com/products/358
Check out the links above for our tutorials and wiring diagrams
These displays use SPI to communicate, 4 or 5 pins are required to
interface (RST is optional)
Adafruit invests time and resources providing this open source code,
please support Adafruit and open-source hardware by purchasing
products from Adafruit!
Written by Limor Fried/Ladyada for Adafruit Industries.
MIT license, all text above must be included in any redistribution
****************************************************/
#include // Core graphics library
#include // Hardware-specific library
#include
// For the breakout, you can use any 2 or 3 pins
// These pins will also work for the 1.8” TFT shield
#define TFT_CS 9
#define TFT_RST 7 // you can also connect this to the Arduino reset
// in which case, set this #define pin to 0!
#define TFT_DC 8
// Option 1 (recommended): must use the hardware SPI pins
// (for UNO thats sclk = 13 and sid = 11) and pin 10 must be
// an output. This is much faster - also required if you want
// to use the microSD card (see the image drawing example)
Adafruit_ST7735 tft = Adafruit_ST7735(TFT_CS, TFT_DC, TFT_RST);
// Option 2: use any pins but a little slower!
#define TFT_SCLK 13 // set these to be whatever pins you like!
#define TFT_MOSI 11 // set these to be whatever pins you like!
//Adafruit_ST7735 tft = Adafruit_ST7735(TFT_CS, TFT_DC, TFT_MOSI, TFT_SCLK, TFT_RST);
float p = 3.1415926;
void setup(void) {
Serial.begin(9600);
Serial.print(“Hello! ST7735 TFT Test”);
// Use this initializer if you‘re using a 1.8“ TFT
tft.initR(INITR_BLACKTAB); // initialize a ST7735S chip, black tab
// Use this initializer (uncomment) if you’re using a 1.44” TFT
//tft.initR(INITR_144GREENTAB); // initialize a ST7735S chip, black tab
Serial.println(“Initialized”);
uint16_t time = millis();
tft.fillScreen(ST7735_BLACK);
time = millis() - time;
Serial.println(time, DEC);
delay(500);
// large block of text
tft.fillScreen(ST7735_BLACK);
testdrawtext(5, 45, “theblckwlf presents”, ST7735_WHITE);
delay(2000);
testdrawtext(15, 65, “the microscreen”, ST7735_WHITE);
testdrawtext(10, 75, “1.8in TFT display”, ST7735_WHITE);
delay(4000);
tft.fillScreen(ST7735_BLUE);
tft.setTextSize(2);
tft.fillScreen(ST7735_WHITE);
tft.setTextSize(1);
testdrawtext(5, 65, “start ”, ST7735_BLACK);
testdrawtext(5, 75, “diagnostic test.。.”, ST7735_BLACK);
delay(1000);
tft.fillScreen(ST7735_WHITE);
testdrawScreenData();
delay(3000);
tft.setTextSize(2);
drawTestGrid(10,10);
tft.setCursor(5, 40);
tft.println(“10x10 Grid”);
delay(2000);
tft.setCursor(15, 40);
drawTestGrid(5,5);
tft.println(“5x5 Grid”);
delay(2000);
tft.fillScreen(ST7735_WHITE);
tft.setTextSize(1);
tft.drawPixel(tft.width()/2, tft.height()/2, ST7735_BLACK);
tft.setCursor(15, (tft.height()/2)-15);
tft.print(“Center ”);
tft.print(tft.width()/2);
tft.print(“, ”);
tft.println(tft.height()/2);
tft.drawCircle(tft.width()/2, tft.height()/2, 5, ST7735_BLACK);
delay(2000);
// tft print function!
tftPrintTest();
delay(4000);
// a single pixel
tft.drawPixel(tft.width()/2, tft.height()/2, ST7735_GREEN);
delay(500);
// line draw test
testlines(ST7735_YELLOW);
delay(500);
// optimized lines
testfastlines(ST7735_RED, ST7735_BLUE);
delay(500);
testdrawrects(ST7735_GREEN);
delay(500);
testfillrects(ST7735_YELLOW, ST7735_MAGENTA);
delay(500);
tft.fillScreen(ST7735_BLACK);
testfillcircles(5, ST7735_BLUE);
testdrawcircles(5, ST7735_WHITE);
delay(500);
for (int i=0; i《5; i++){
testroundrects();
}
delay(500);
testtriangles();
delay(500);
mediabuttons();
delay(500);
Serial.println(“done”);
delay(1000);
}
void loop() {
tft.invertDisplay(true);
delay(500);
tft.invertDisplay(false);
delay(500);
}
void testlines(uint16_t color) {
tft.fillScreen(ST7735_BLACK);
for (int16_t x=0; x 《 tft.width(); x+=6) {
tft.drawLine(0, 0, x, tft.height()-1, color);
}
for (int16_t y=0; y 《 tft.height(); y+=6) {
tft.drawLine(0, 0, tft.width()-1, y, color);
}
tft.fillScreen(ST7735_BLACK);
for (int16_t x=0; x 《 tft.width(); x+=6) {
tft.drawLine(tft.width()-1, 0, x, tft.height()-1, color);
}
for (int16_t y=0; y 《 tft.height(); y+=6) {
tft.drawLine(tft.width()-1, 0, 0, y, color);
}
tft.fillScreen(ST7735_BLACK);
for (int16_t x=0; x 《 tft.width(); x+=6) {
tft.drawLine(0, tft.height()-1, x, 0, color);
}
for (int16_t y=0; y 《 tft.height(); y+=6) {
tft.drawLine(0, tft.height()-1, tft.width()-1, y, color);
}
tft.fillScreen(ST7735_BLACK);
for (int16_t x=0; x 《 tft.width(); x+=6) {
tft.drawLine(tft.width()-1, tft.height()-1, x, 0, color);
}
for (int16_t y=0; y 《 tft.height(); y+=6) {
tft.drawLine(tft.width()-1, tft.height()-1, 0, y, color);
}
}
void drawTestGrid(int hor, int vert){
tft.fillScreen(ST7735_WHITE);
//Draw vertical lines
for (int16_t x=0; x 《 tft.width(); x+=vert){
tft.drawFastVLine(x, 0, tft.height(), ST7735_RED);
}
for (int16_t y=0; y 《 tft.height(); y+=hor){
tft.drawFastHLine(0, y, tft.width(), ST7735_BLACK);
}
}
void testdrawtext(int wid, int hei, char *text, uint16_t color) {
tft.setCursor(wid, hei);
tft.setTextColor(color);
tft.setTextWrap(true);
tft.print(text);
}
void testfastlines(uint16_t color1, uint16_t color2) {
tft.fillScreen(ST7735_BLACK);
for (int16_t y=0; y 《 tft.height(); y+=5) {
tft.drawFastHLine(0, y, tft.width(), color1);
}
for (int16_t x=0; x 《 tft.width(); x+=5) {
tft.drawFastVLine(x, 0, tft.height(), color2);
}
}
void testdrawrects(uint16_t color) {
tft.fillScreen(ST7735_BLACK);
for (int16_t x=0; x 《 tft.width(); x+=6) {
tft.drawRect(tft.width()/2 -x/2, tft.height()/2 -x/2 , x, x, color);
}
}
void testfillrects(uint16_t color1, uint16_t color2) {
tft.fillScreen(ST7735_BLACK);
for (int16_t x=tft.width()-1; x 》 6; x-=6) {
tft.fillRect(tft.width()/2 -x/2, tft.height()/2 -x/2 , x, x, color1);
tft.drawRect(tft.width()/2 -x/2, tft.height()/2 -x/2 , x, x, color2);
}
}
void testfillcircles(uint8_t radius, uint16_t color) {
for (int16_t x=radius; x 《 tft.width(); x+=radius*2) {
for (int16_t y=radius; y 《 tft.height(); y+=radius*2) {
tft.fillCircle(x, y, radius, color);
}
}
}
void testdrawcircles(uint8_t radius, uint16_t color) {
for (int16_t x=0; x 《 tft.width()+radius; x+=radius*2) {
for (int16_t y=0; y 《 tft.height()+radius; y+=radius*2) {
tft.drawCircle(x, y, radius, color);
}
}
}
void testtriangles() {
tft.fillScreen(ST7735_BLACK);
int color = 0xF800;
int t;
int w = tft.width()/2;
int x = tft.height()-1;
int y = 0;
int z = tft.width();
for(t = 0 ; t 《= 15; t+=1) {
tft.drawTriangle(w, y, y, x, z, x, color);
x-=4;
y+=4;
z-=4;
color+=100;
}
}
void testroundrects() {
tft.fillScreen(ST7735_BLACK);
int color = 100;
int i;
int t;
for(t = 0 ; t 《= 4; t+=1) {
int x = 0;
int y = 0;
int w = tft.width()-2;
int h = tft.height()-2;
for(i = 0 ; i 《= 16; i+=1) {
tft.drawRoundRect(x, y, w, h, 5, color);
x+=2;
y+=3;
w-=4;
h-=6;
color+=1100;
}
color+=100;
}
}
void testdrawScreenData(){
tft.setCursor(0,20);
tft.println(“Screen Data:”);
tft.print(“Screen Width: ”);
tft.println(tft.width());
tft.print(“Screen Height: ”);
tft.println(tft.height());
}
void testdrawCountdown(){
tft.setTextWrap(true);
tft.fillScreen(ST7735_RED);
tft.setTextColor(ST7735_WHITE);
tft.setTextSize(6);
tft.setCursor(30, 50);
for (int i=10; i》0; i--){
tft.println(i);
delay(1000);
tft.setCursor(50, 50);
tft.fillScreen(ST7735_RED);
}
}
void circlePass(){
tft.fillScreen(ST7735_BLACK);
testfillcircles(5, ST7735_GREEN);
delay(1000);
testfillcircles(4, ST7735_RED);
delay(1000);
testfillcircles(2, ST7735_BLACK);
testfillcircles(3, ST7735_YELLOW);
delay(500);
}
void tftPrintTest() {
tft.setTextWrap(false);
tft.fillScreen(ST7735_BLACK);
tft.setCursor(0, 30);
tft.setTextColor(ST7735_RED);
tft.setTextSize(1);
tft.println(“Hello World!”);
tft.setTextColor(ST7735_YELLOW);
tft.setTextSize(2);
tft.println(“Hello World!”);
tft.setTextColor(ST7735_GREEN);
tft.setTextSize(3);
tft.println(“Hello World!”);
tft.setTextColor(ST7735_BLUE);
tft.setTextSize(4);
tft.print(1234.567);
delay(1500);
tft.setCursor(0, 0);
tft.fillScreen(ST7735_BLACK);
tft.setTextColor(ST7735_WHITE);
tft.setTextSize(0);
tft.println(“Hello World!”);
tft.setTextSize(1);
tft.setTextColor(ST7735_GREEN);
tft.print(p, 6);
tft.println(“ Want pi?”);
tft.println(“ ”);
tft.print(8675309, HEX); // print 8,675,309 out in HEX!
tft.println(“ Print HEX!”);
tft.println(“ ”);
tft.setTextColor(ST7735_WHITE);
tft.println(“Sketch has been”);
tft.println(“running for: ”);
tft.setTextColor(ST7735_MAGENTA);
tft.print(millis() / 1000);
tft.setTextColor(ST7735_WHITE);
tft.print(“ seconds.”);
}
void mediabuttons() {
// play
tft.fillScreen(ST7735_BLACK);
tft.fillRoundRect(25, 10, 78, 60, 8, ST7735_WHITE);
tft.fillTriangle(42, 20, 42, 60, 90, 40, ST7735_RED);
delay(500);
// pause
tft.fillRoundRect(25, 90, 78, 60, 8, ST7735_WHITE);
tft.fillRoundRect(39, 98, 20, 45, 5, ST7735_GREEN);
tft.fillRoundRect(69, 98, 20, 45, 5, ST7735_GREEN);
delay(500);
// play color
tft.fillTriangle(42, 20, 42, 60, 90, 40, ST7735_BLUE);
delay(50);
// pause color
tft.fillRoundRect(39, 98, 20, 45, 5, ST7735_RED);
tft.fillRoundRect(69, 98, 20, 45, 5, ST7735_RED);
// play color
tft.fillTriangle(42, 20, 42, 60, 90, 40, ST7735_GREEN);
}
就这些了。我用于此步骤的视频显示了如果您运行上面的代码,预期的显示效果。
责任编辑:wv
-
显示屏
+关注
关注
30文章
4712浏览量
79871 -
Arduino
+关注
关注
190文章
6527浏览量
197539
发布评论请先 登录
MAX1578/MAX1579:小型TFT显示屏的完整偏置与白光LED电源解决方案
天马微电子全新12英寸Micro-LED高亮车载显示屏成功点亮
探索MAX1579:小尺寸TFT显示屏的理想电源解决方案
LT1942:高度集成的TFT显示屏电源解决方案
浅谈液晶显示屏的七大特色技术
天马微电子推出TFT基135英寸Micro-LED拼接屏
基于RK3568开发板显示屏调试适配方法(1)-如何在Uboot界面切换显示屏

RA4L1驱动tft 无法显示不知道哪里问题


评论