 怎样用4X4键盘和ArduinoUno制作Arduino计算器

电路图和说明
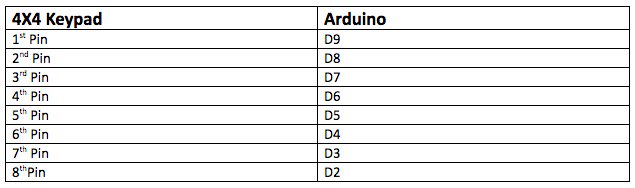
4X4键盘有8个引脚需要连接到从D2到D9的Arduino引脚,如下所示:
然后,将LCD连接到Arduino,如下所示:

除了数字按钮之外的按钮将执行以下任务:
‘A’用于添加
‘B’用于减法
‘C’用于清除
‘D’用于划分
‘*’用于乘法
完整的电路图如下所示。
Arduino计算器图。
代码细分和演练
我们来看看查看该项目所需的代码以及每个代码段的作用。
首先,您需要为键盘和I2C LCD显示添加库。使用的LCD显示器通过I2C通信与UNO配合使用,因此使用允许在Arduino上进行I2C通信的线程库。
然后,按照4X4键盘的引脚连接和键盘的说明进行操作按钮执行操作。
#include
#include
#include
const byte ROWS = 4;
const byte COLS = 4;
char keys[ROWS][COLS] = {
{‘1’, ‘2’, ‘3’, ‘+’},
{‘4’, ‘5’, ‘6’, ‘-’},
{‘7’, ‘8’, ‘9’, ‘C’},
{‘*’, ‘0’, ‘=’, ‘/’}
};
byte rowPins[ROWS] = {9, 8, 7, 6};
byte colPins[COLS] = {5, 4, 3, 2};
在设置功能中,显示屏将显示“MakerPro的Arduino计算器”。
lcd.begin();
lcd.setCursor(0, 0);
lcd.print(“Arduino Calculator”);
lcd.setCursor(0, 1);
lcd.print(“by MakerPro”);
delay(1000);
scrollDisplay();
clr();
在循环功能中,我们先来得到按下的键然后我们需要检查按下的键是否是数字键。如果是数字,则它将存储在firstNum字符串中。
char newKey = myKeypad.getKey();
if (newKey != NO_KEY && (newKey == ‘1’ || newKey == ‘2’ || newKey == ‘3’ || newKey == ‘4’ || newKey == ‘5’ || newKey == ‘6’ || newKey == ‘7’ || newKey == ‘8’ || newKey == ‘9’ || newKey == ‘0’)) {
if (firstNumState == true) {
firstNum = firstNum + newKey;
lcd.print(newKey);
}
else {
secondNum = secondNum + newKey;
lcd.print(newKey);
}
如果按下的键不是数字,请检查是否为‘+’,‘ - ’,‘/’,‘*’(在thekeypad上,这些键是‘A’,‘B’,‘D’,‘*’)。如果它来自这些键,我们将存储稍后将使用的值。它还会将firstNum设置为false,这意味着我们现在将得到第二个数字。
现在,其他数值将存储在secondNum字符串中。
if (newKey != NO_KEY && (newKey == ‘+’ || newKey == ‘-’ || newKey == ‘*’ || newKey == ‘/’)) {
if (firstNumState == true) {
operatr = newKey;
firstNumState = false;
lcd.setCursor(15, 0);
lcd.print(operatr);
lcd.setCursor(5, 1);
}
}
最后,我们设置它,所以如果按下的键不是来自操作键,它将检查它是否是‘=’。如果是这个键,那么它将对第一个和第二个数字执行存储操作并输出结果。
设置完代码后,计算器将能够执行方程式。
if (newKey != NO_KEY && newKey == ‘=’) {
if (operatr == ‘+’) {
result = firstNum.toFloat() + secondNum.toFloat();
}
if (operatr == ‘-’) {
result = firstNum.toFloat() - secondNum.toFloat();
}
if (operatr == ‘*’) {
result = firstNum.toFloat() * secondNum.toFloat();
}
if (operatr == ‘/’) {
result = firstNum.toFloat() / secondNum.toFloat();
}
lcd.clear();
lcd.setCursor(0, 0);
lcd.print(firstNum);
lcd.print(operatr);
lcd.print(secondNum);
lcd.setCursor(0, 1);
lcd.print(“=”);
lcd.print(result);
firstNumState = true;
}
And if the key will be ‘C’, then it will clear the display screen.
if (newKey != NO_KEY && newKey == ‘C’) {
clr();
}
完整计算器项目代码
#include
#include
#include
const byte ROWS = 4;
const byte COLS = 4;
char keys[ROWS][COLS] = {
{‘1’, ‘2’, ‘3’, ‘+’},
{‘4’, ‘5’, ‘6’, ‘-’},
{‘7’, ‘8’, ‘9’, ‘C’},
{‘*’, ‘0’, ‘=’, ‘/’}
};
byte rowPins[ROWS] = {9, 8, 7, 6};
byte colPins[COLS] = {5, 4, 3, 2};
// Created instances
Keypad myKeypad = Keypad(makeKeymap(keys), rowPins, colPins, ROWS, COLS);
LiquidCrystal_I2C lcd(0x27, 16, 2);
boolean firstNumState = true;
String firstNum = “”;
String secondNum = “”;
float result = 0.0;
char operatr = ‘ ’;
void setup() {
lcd.begin();
lcd.setCursor(0, 0);
lcd.print(“Arduino Calculator”);
lcd.setCursor(0, 1);
lcd.print(“by MakerPro”);
delay(1000);
scrollDisplay();
clr();
}
void loop() {
char newKey = myKeypad.getKey();
if (newKey != NO_KEY && (newKey == ‘1’ || newKey == ‘2’ || newKey == ‘3’ || newKey == ‘4’ || newKey == ‘5’ || newKey == ‘6’ || newKey == ‘7’ || newKey == ‘8’ || newKey == ‘9’ || newKey == ‘0’)) {
if (firstNumState == true) {
firstNum = firstNum + newKey;
lcd.print(newKey);
}
else {
secondNum = secondNum + newKey;
lcd.print(newKey);
}
}
if (newKey != NO_KEY && (newKey == ‘+’ || newKey == ‘-’ || newKey == ‘*’ || newKey == ‘/’)) {
if (firstNumState == true) {
operatr = newKey;
firstNumState = false;
lcd.setCursor(15, 0);
lcd.print(operatr);
lcd.setCursor(5, 1);
}
}
if (newKey != NO_KEY && newKey == ‘=’) {
if (operatr == ‘+’) {
result = firstNum.toFloat() + secondNum.toFloat();
}
if (operatr == ‘-’) {
result = firstNum.toFloat() - secondNum.toFloat();
}
if (operatr == ‘*’) {
result = firstNum.toFloat() * secondNum.toFloat();
}
if (operatr == ‘/’) {
result = firstNum.toFloat() / secondNum.toFloat();
}
lcd.clear();
lcd.setCursor(0, 0);
lcd.print(firstNum);
lcd.print(operatr);
lcd.print(secondNum);
lcd.setCursor(0, 1);
lcd.print(“=”);
lcd.print(result);
firstNumState = true;
}
if (newKey != NO_KEY && newKey == ‘C’) {
clr();
}
}
void scrollDisplay() {
// scroll 13 positions (string length) to the left
// to move it offscreen left:
for (int positionCounter = 0; positionCounter 《 3; positionCounter++) {
// scroll one position left:
lcd.scrollDisplayLeft();
// wait a bit:
delay(300);
}
delay(1000);
// scroll 29 positions (string length + display length) to the right
// to move it offscreen right:
for (int positionCounter = 0; positionCounter 《 3; positionCounter++) {
// scroll one position right:
lcd.scrollDisplayRight();
// wait a bit:
delay(300);
}
delay(2000);
}
void clr() {
lcd.clear();
lcd.setCursor(0, 0);
lcd.print(“1st: ”);
lcd.setCursor(12, 0);
lcd.print(“op ”);
lcd.setCursor(0, 1);
lcd.print(“2nd: ”);
lcd.setCursor(5, 0);
firstNum = “”;
secondNum = “”;
result = 0;
operatr = ‘ ’;
}
-
计算器
+关注
关注
16文章
441浏览量
39016 -
Arduino
+关注
关注
190文章
6527浏览量
197517
发布评论请先 登录
探索HMC596LP4/LP4E:0.2 - 3.0 GHz SMT CMOS 4x2开关矩阵的卓越性能
TMS570LS31x4/21x4微控制器:设计与应用深度解析
STPMC1可编程多相电能计算器IC:设计与应用详解
TMS570LS31x4/21x4微控制器:高安全标准下的强大之选
探索DS90CP04:1.5 Gbps 4x4 LVDS交叉点开关的卓越性能
解析SN65LVDS125A和SN65LVDT125A:4x4非阻塞交叉点开关的卓越性能
探索SN65LVDS125A和SN65LVDT125A:4x4非阻塞交叉点开关的卓越性能
探索SN65LVDS250和SN65LVDT250:高性能LVDS 4x4交叉点开关
深入解析SN65LVDS250与SN65LVDT250:高性能4x4 LVDS交叉点开关
探索SN65LVCP404:高性能千兆4x4交叉点开关的技术剖析
深入剖析DS10CP154A:1.5 Gbps 4x4 LVDS交叉点开关的卓越性能与应用
探索DS25CP104A/DS25CP114 3.125 Gbps 4x4 LVDS交叉点开关的奥秘
基于VL53L4CX的飞行时间传感器扩展板:X-NUCLEO-53L4A2技术解析
Qorvo全新设计计算器:晶振选型、能耗预算计算器和链路预算与覆盖范围计算器


评论