


 VMWare Linux系统磁盘扩容

VMWare Linux系统磁盘扩容
当我们在VMware Linux虚拟机安装软件的时候,发现磁盘不够了,可以考虑给磁盘扩容,而不是重建虚拟机。
1. 修改磁盘容量
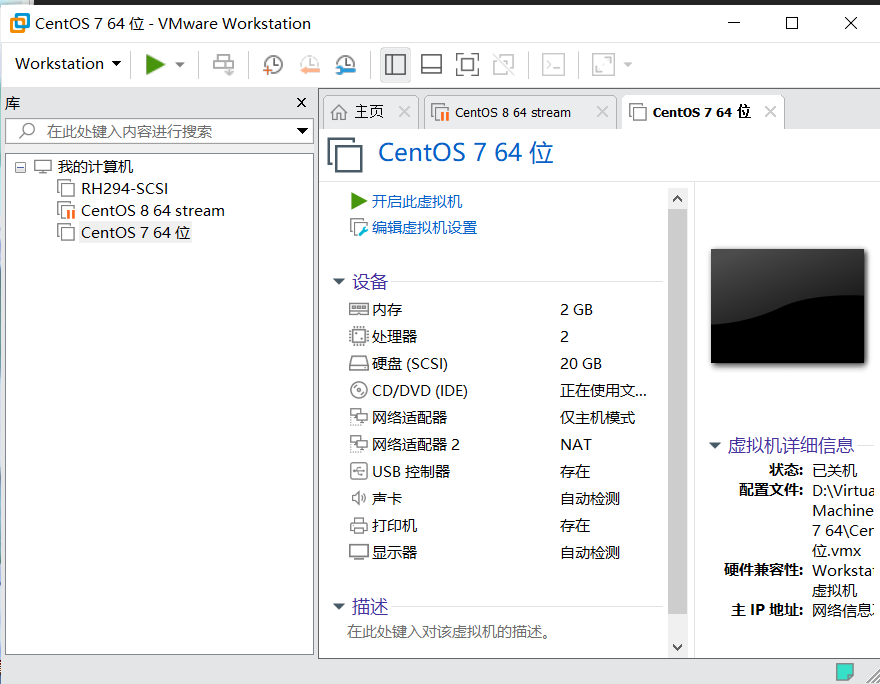
点击编辑虚拟设置
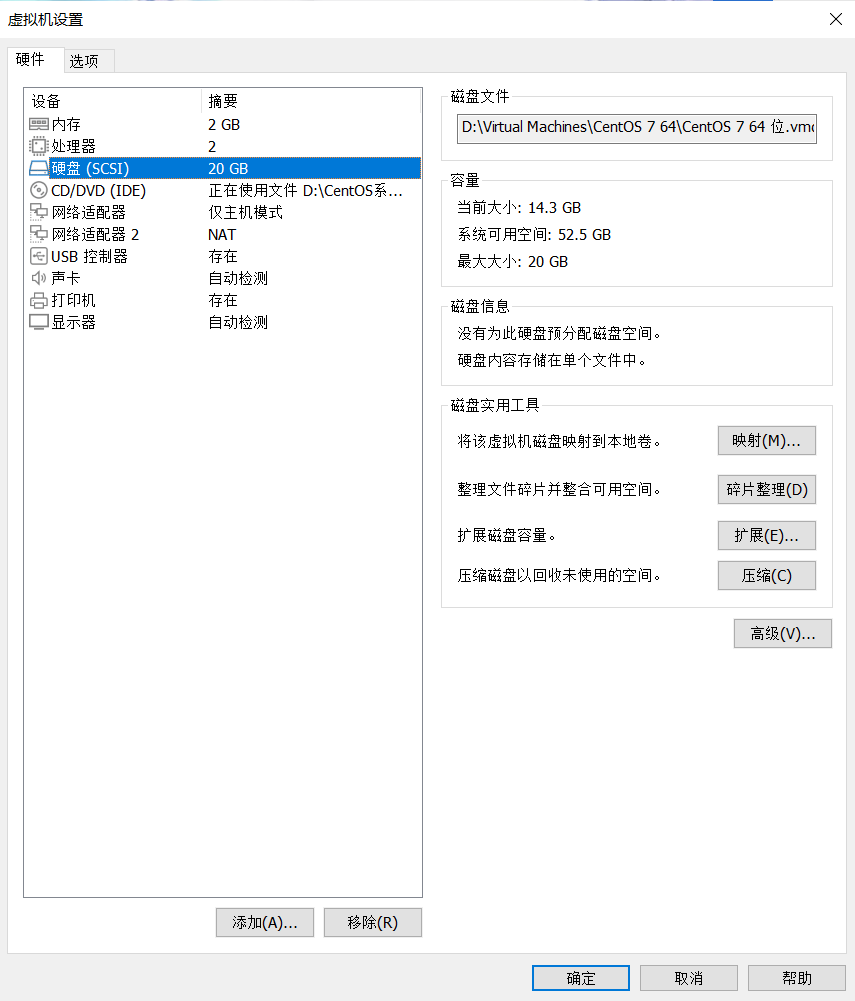
选择磁盘=》扩展
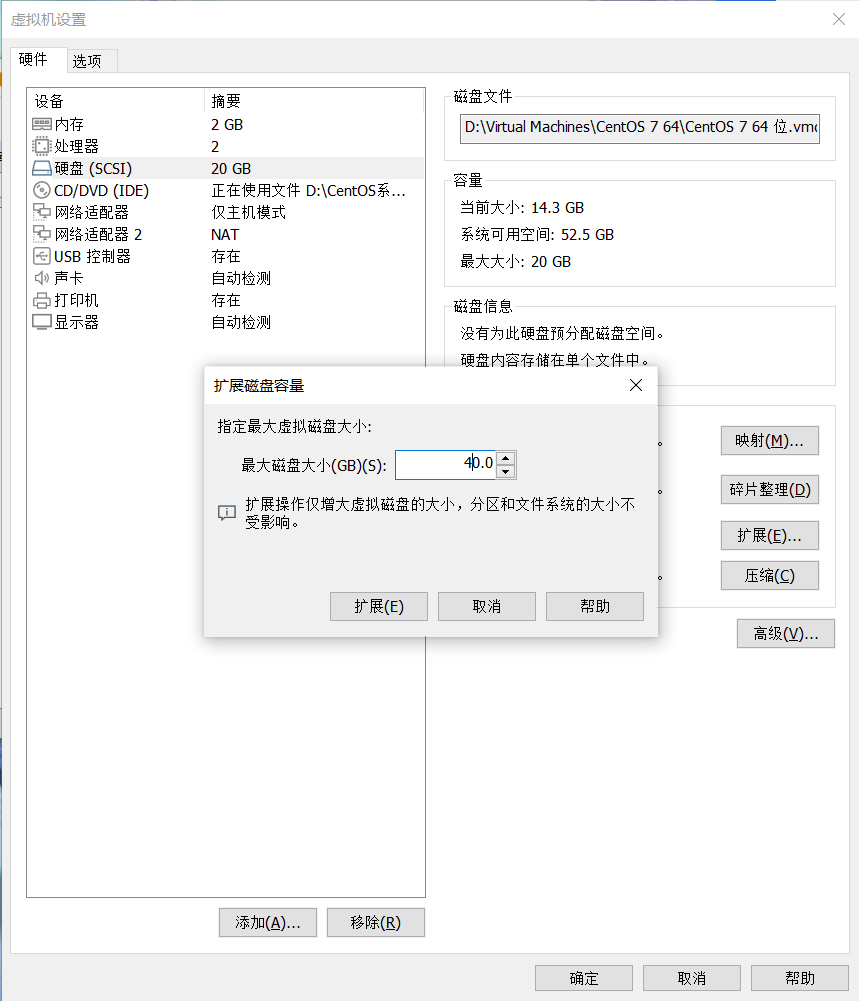
点击“扩展”
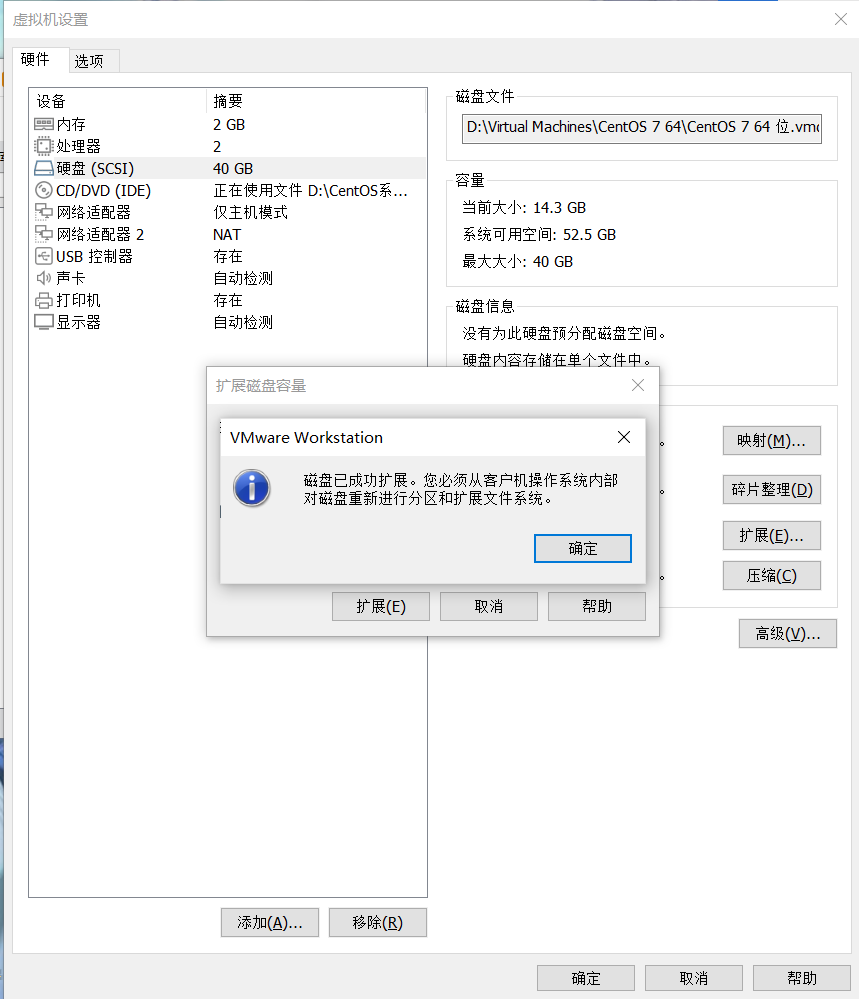
点击确定
2. 添加分区
重新启动系统后,执行以下操作
磁盘分区
[root@oracle ~]# fdisk /dev/sda
Welcome to fdisk (util-linux 2.23.2).

Changes will remain in memory only, until you decide to write them.
Be careful before using the write command.


Command (m for help): m
Command action
   a   toggle a bootable flag
   b   edit bsd disklabel
   c   toggle the dos compatibility flag
   d   delete a partition
   g   create a new empty GPT partition table
   G   create an IRIX (SGI) partition table
   l   list known partition types
   m   print this menu
   n   add a new partition
   o   create a new empty DOS partition table
   p   print the partition table
   q   quit without saving changes
   s   create a new empty Sun disklabel
   t   change a partition's system id
   u   change display/entry units
   v   verify the partition table
   w   write table to disk and exit
   x   extra functionality (experts only)

Command (m for help): n
Partition type:
   p   primary (3 primary, 0 extended, 1 free)
   e   extended
Select (default e): p
Selected partition 4
First sector (41943040-83886079, default 41943040):
Using default value 41943040
Last sector, +sectors or +size{K,M,G} (41943040-83886079, default 83886079):
Using default value 83886079
Partition 4 of type Linux and of size 20 GiB is set

Command (m for help): w
The partition table has been altered!

Calling ioctl() to re-read partition table.

WARNING: Re-reading the partition table failed with error 16: Device or resource busy.
The kernel still uses the old table. The new table will be used at
the next reboot or after you run partprobe(8) or kpartx(8)
Syncing disks.
查看新的磁盘分区类型
[root@oracle ~]# fdisk -l

Disk /dev/sda: 42.9 GB, 42949672960 bytes, 83886080 sectors
Units = sectors of 1 * 512 = 512 bytes
Sector size (logical/physical): 512 bytes / 512 bytes
I/O size (minimum/optimal): 512 bytes / 512 bytes
Disk label type: dos
Disk identifier: 0x000a9a6f

   Device Boot      Start         End      Blocks   Id  System
/dev/sda1            2048        6143        2048   83  Linux
/dev/sda2   *        6144     2103295     1048576   83  Linux
/dev/sda3         2103296    41943039    19919872   8e  Linux LVM
/dev/sda4        41943040    83886079    20971520   83  Linux

Disk /dev/mapper/centos-root: 19.3 GB, 19323158528 bytes, 37740544 sectors
Units = sectors of 1 * 512 = 512 bytes
Sector size (logical/physical): 512 bytes / 512 bytes
I/O size (minimum/optimal): 512 bytes / 512 bytes


Disk /dev/mapper/centos-swap: 1073 MB, 1073741824 bytes, 2097152 sectors
Units = sectors of 1 * 512 = 512 bytes
Sector size (logical/physical): 512 bytes / 512 bytes
I/O size (minimum/optimal): 512 bytes / 512 bytes
修改磁盘分区类型
通过fdisk -l 查看到/dev/sdb3的分区Id为8e,所以,/dev/vdb4的id也修改与其一致。
[root@oracle ~]# fdisk /dev/sda
Welcome to fdisk (util-linux 2.23.2).

Changes will remain in memory only, until you decide to write them.
Be careful before using the write command.

Command (m for help): t
Partition number (1-4, default 4):
Hex code (type L to list all codes): L

 0  Empty           24  NEC DOS         81  Minix / old Lin bf  Solaris
 1  FAT12           27  Hidden NTFS Win 82  Linux swap / So c1  DRDOS/sec (FAT-
 2  XENIX root      39  Plan 9          83  Linux           c4  DRDOS/sec (FAT-
 3  XENIX usr       3c  PartitionMagic  84  OS/2 hidden C:  c6  DRDOS/sec (FAT-
 4  FAT16 <32M      40  Venix 80286     85  Linux extended  c7  Syrinx
 5  Extended        41  PPC PReP Boot   86  NTFS volume set da  Non-FS data
 6  FAT16           42  SFS             87  NTFS volume set db  CP/M / CTOS / .
 7  HPFS/NTFS/exFAT 4d  QNX4.x          88  Linux plaintext de  Dell Utility
 8  AIX             4e  QNX4.x 2nd part 8e  Linux LVM       df  BootIt
 9  AIX bootable    4f  QNX4.x 3rd part 93  Amoeba          e1  DOS access
 a  OS/2 Boot Manag 50  OnTrack DM      94  Amoeba BBT      e3  DOS R/O
 b  W95 FAT32       51  OnTrack DM6 Aux 9f  BSD/OS          e4  SpeedStor
 c  W95 FAT32 (LBA) 52  CP/M            a0  IBM Thinkpad hi eb  BeOS fs
 e  W95 FAT16 (LBA) 53  OnTrack DM6 Aux a5  FreeBSD         ee  GPT
 f  W95 Ext'd (LBA) 54  OnTrackDM6      a6  OpenBSD         ef  EFI (FAT-12/16/
10  OPUS            55  EZ-Drive        a7  NeXTSTEP        f0  Linux/PA-RISC b
11  Hidden FAT12    56  Golden Bow      a8  Darwin UFS      f1  SpeedStor
12  Compaq diagnost 5c  Priam Edisk     a9  NetBSD          f4  SpeedStor
14  Hidden FAT16 <3 61  SpeedStor       ab  Darwin boot     f2  DOS secondary
16  Hidden FAT16    63  GNU HURD or Sys af  HFS / HFS+      fb  VMware VMFS
17  Hidden HPFS/NTF 64  Novell Netware  b7  BSDI fs         fc  VMware VMKCORE
18  AST SmartSleep  65  Novell Netware  b8  BSDI swap       fd  Linux raid auto
1b  Hidden W95 FAT3 70  DiskSecure Mult bb  Boot Wizard hid fe  LANstep
1c  Hidden W95 FAT3 75  PC/IX           be  Solaris boot    ff  BBT
1e  Hidden W95 FAT1 80  Old Minix
Hex code (type L to list all codes): 8e
Changed type of partition 'Linux' to 'Linux LVM'

Command (m for help): w
The partition table has been altered!

Calling ioctl() to re-read partition table.

WARNING: Re-reading the partition table failed with error 16: Device or resource busy.
The kernel still uses the old table. The new table will be used at
the next reboot or after you run partprobe(8) or kpartx(8)
Syncing disks.
查看修改后分区类型
[root@oracle ~]# fdisk -l

Disk /dev/sda: 42.9 GB, 42949672960 bytes, 83886080 sectors
Units = sectors of 1 * 512 = 512 bytes
Sector size (logical/physical): 512 bytes / 512 bytes
I/O size (minimum/optimal): 512 bytes / 512 bytes
Disk label type: dos
Disk identifier: 0x000a9a6f

   Device Boot      Start         End      Blocks   Id  System
/dev/sda1            2048        6143        2048   83  Linux
/dev/sda2   *        6144     2103295     1048576   83  Linux
/dev/sda3         2103296    41943039    19919872   8e  Linux LVM
/dev/sda4        41943040    83886079    20971520   8e  Linux LVM

Disk /dev/mapper/centos-root: 19.3 GB, 19323158528 bytes, 37740544 sectors
Units = sectors of 1 * 512 = 512 bytes
Sector size (logical/physical): 512 bytes / 512 bytes
I/O size (minimum/optimal): 512 bytes / 512 bytes


Disk /dev/mapper/centos-swap: 1073 MB, 1073741824 bytes, 2097152 sectors
Units = sectors of 1 * 512 = 512 bytes
Sector size (logical/physical): 512 bytes / 512 bytes
I/O size (minimum/optimal): 512 bytes / 512 bytes
磁盘扩容
重启系统后,开始扩充分区
查看磁盘分区卷组
[root@oracle ~]# lvs
  LV   VG     Attr       LSize   Pool Origin Data%  Meta%  Move Log Cpy%Sync Convert
  root centos -wi-ao---- <18.00g
  swap centos -wi-ao----   1.00g
[root@oracle ~]# vgdisplay
  --- Volume group ---
  VG Name               centos
  System ID
  Format                lvm2
  Metadata Areas        1
  Metadata Sequence No  3
  VG Access             read/write
  VG Status             resizable
  MAX LV                0
  Cur LV                2
  Open LV               2
  Max PV                0
  Cur PV                1
  Act PV                1
  VG Size               <19.00 GiB
  PE Size               4.00 MiB
  Total PE              4863
  Alloc PE / Size       4863 / <19.00 GiB
  Free  PE / Size       0 / 0
  VG UUID               gp2KXC-VUTG-0C01-aAed-31UC-HkVO-qi3gus

[root@oracle ~]#
扩展逻辑卷
创建物理卷
[root@oracle ~]# pvcreate  /dev/sda4
  Physical volume "/dev/sda4" successfully created.
如果出现 “Device /dev/sda4 not found."
可以使用partprobe命令使系统获知新的分区表的情况
[root@oracle ~]# partprobe
Warning: 无法以读写方式打开 /dev/sr0 (只读文件系统)。/dev/sr0 已按照只读方式打开。
[root@oracle ~]# pvcreate /dev/sda4
Physical volume "/dev/sda4" successfully created.
扩充卷组
[root@oracle ~]# vgextend centos /dev/sda4
  Volume group "centos" successfully extended

 [root@oracle ~]# vgdisplay
  --- Volume group ---
  VG Name               centos
  System ID
  Format                lvm2
  Metadata Areas        2
  Metadata Sequence No  4
  VG Access             read/write
  VG Status             resizable
  MAX LV                0
  Cur LV                2
  Open LV               2
  Max PV                0
  Cur PV                2
  Act PV                2
  VG Size               38.99 GiB
  PE Size               4.00 MiB
  Total PE              9982
  Alloc PE / Size       4863 / <19.00 GiB
  Free  PE / Size       5119 / <20.00 GiB
  VG UUID               gp2KXC-VUTG-0C01-aAed-31UC-HkVO-qi3gus
扩充逻辑卷
[root@oracle ~]# lvextend -l +100%FREE /dev/centos/root /dev/sda4
  Size of logical volume centos/root changed from <18.00 GiB (4607 extents) to <36.50 GiB (9343 extents).
  Logical volume centos/root successfully resized.
修改文件系统大小
查看文件系统类型
[root@oracle ~]# df -Th
Filesystem              Type      Size  Used Avail Use% Mounted on
/dev/mapper/centos-root xfs        37G   14G   24G  37% /
devtmpfs                devtmpfs  898M     0  898M   0% /dev
tmpfs                   tmpfs     910M     0  910M   0% /dev/shm
tmpfs                   tmpfs     910M  9.6M  901M   2% /run
tmpfs                   tmpfs     910M     0  910M   0% /sys/fs/cgroup
/dev/sda2               xfs      1014M  148M  867M  15% /boot
tmpfs                   tmpfs     182M     0  182M   0% /run/user/0
修改文件系统大小
[root@oracle ~]# xfs_growfs /dev/mapper/centos-root
meta-data=/dev/mapper/centos-root isize=512    agcount=4, agsize=1179392 blks
         =                       sectsz=512   attr=2, projid32bit=1
         =                       crc=1        finobt=0 spinodes=0
data     =                       bsize=4096   blocks=4717568, imaxpct=25
         =                       sunit=0      swidth=0 blks
naming   =version 2              bsize=4096   ascii-ci=0 ftype=1
log      =internal               bsize=4096   blocks=2560, version=2
         =                       sectsz=512   sunit=0 blks, lazy-count=1
realtime =none                   extsz=4096   blocks=0, rtextents=0
data blocks changed from 4717568 to 9567232
注:如果文件系统是ext4,使用resize2fs修改文件系统大小。
扩容完毕!
本文来自博客园,作者:何以卿卿
链接:https://www.cnblogs.com/shiqiang-lee/p/16885421.html
声明:本文内容及配图由入驻作者撰写或者入驻合作网站授权转载。文章观点仅代表作者本人,不代表电子发烧友网立场。文章及其配图仅供工程师学习之用,如有内容侵权或者其他违规问题,请联系本站处理。
举报投诉
-
Linux系统
+关注
关注
4文章
618浏览量
30242 -
磁盘
+关注
关注
1文章
403浏览量
26625 -
VMware
+关注
关注
1文章
301浏览量
23233
原文标题:Linux系统磁盘扩容
文章出处:【微信号:magedu-Linux,微信公众号:马哥Linux运维】欢迎添加关注!文章转载请注明出处。
发布评论请先 登录
相关推荐
热点推荐
安装VMWARE+LINUX开发平台
“下一步”选择操作系统为“linux"和版本为“Ubuntu";点“下一步”输入虚拟机名称和选择安装路径;点“下一步”选择“使用桥接网络”;“下一步”磁盘大小填15GB以上,勾选
发表于 11-29 14:06
【OK210试用体验】之VMware下Ubuntu磁盘空间扩容
虚拟机是关闭状态,然后虚拟机—>设置—>添加 根据自己需要添加所需硬盘的大小,然后启动Ubuntu系统打开终端,通过输入df命令,可以查看磁盘的使用情况以及文件系统被挂载的位置df -h然后
发表于 10-10 00:21
【OK210试用体验】之疑惑VMware下Ubuntu扩展磁盘容量后无法启动
最近在编译和移植Qt过程产生了一些垃圾文件没及时清理,感觉Ubuntu磁盘空间不够用,于是准备扩容下磁盘。因为VMware11支持直接设置,所以这里就直接采用虚拟机上的设置来进行
发表于 10-14 18:22
【我们一起学Linux之准备篇】善用佳软Vmware安装Linux系统
Vmware安装Linux系统1. 安装VMware,此软件现在更新到了12.1.0.2487,我使用的是10的版本。 1)下载方法:大家可以百度
发表于 01-20 21:01
【昉·星光 2 高性能RISC-V单板计算机体验】三:从 nvme 磁盘启动 VisionFive2 并对磁盘分区扩容
从 nvme 磁盘启动 VisionFive2 并对磁盘分区扩容
在之前的经验贴《在 VisionFive2 上如何更快的向 nvme 硬盘安装操作系统》中介绍了一种通用的向 nvme
发表于 09-04 02:54
Linux中的可用磁盘空间如何检查?
跟踪磁盘利用率信息是系统管理员(和其他人)的日常待办事项列表之一。Linux 有一些内置的使用程序来帮助提供这些信息。df 命令意思是 “disk-free”,显示 Linux
你会用VMware虚拟机安装Linux系统?
由于要搭建Oracle RAC集群需要模拟环境,所以需要利用VMware虚拟机安装集群节点环境,本章节介绍如何利用VWware虚拟机安装centos系统(Linux)。
发表于 05-13 10:27
•3121次阅读
查看linux系统磁盘io情况的办法是什么
谈到 Linux 磁盘 I/O 的工作原理,我们了解到 Linux 存储系统 I/O 栈由文件系统层(file system layer)、
发表于 08-01 10:14
•2930次阅读
如何释放VMware虚拟磁盘未使用空间呢?
在Windows 11中通过VMware安装Ubuntu 22.04做一些Linux相关的学习,刚安装的时候VMware虚拟磁盘空间也就6~7GB,但是没用几天,




评论