 电子时钟制作(瑞萨RA)(6)----配置RTC时钟及显示时间

概述
本文将详细讲解如何借助e2studio来对瑞萨微控制器进行实时时钟(RTC)的设置和配置,以便实现日历功能和一秒钟产生的中断,从而通过串口输出实时数据。
实时时钟(RTC)模块是一种时间管理外设,主要用于记录和控制日期和时间。与常见的微控制器(MCU)中的定时器不同,RTC时钟提供了两种计时方式:日期模式和计时模式。RTC时钟的常用功能包括设置时间、设定闹钟、配置周期性中断以及启动或停止操作。 通过使用e2studio工具,我们可以轻松地对瑞萨微控制器进行RTC配置,从而实现高精度的时间和日期管理。在本文中,我们将重点讨论如何设置RTC时钟日历和产生一秒钟的中断,使得串口能够实时打印数据。
硬件准备
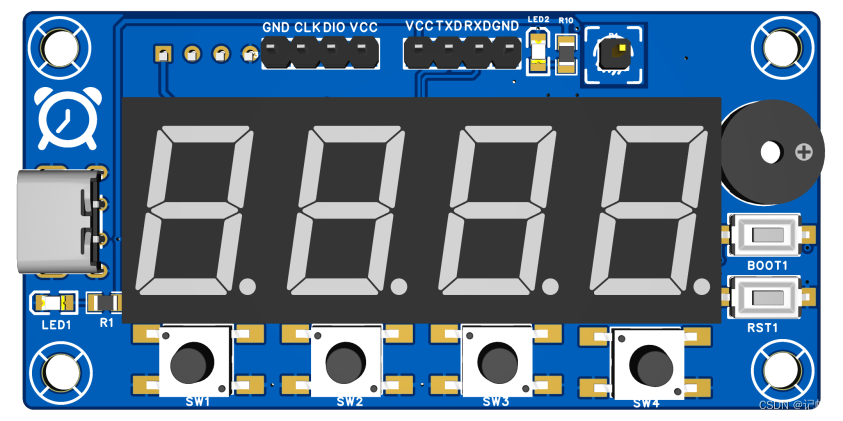
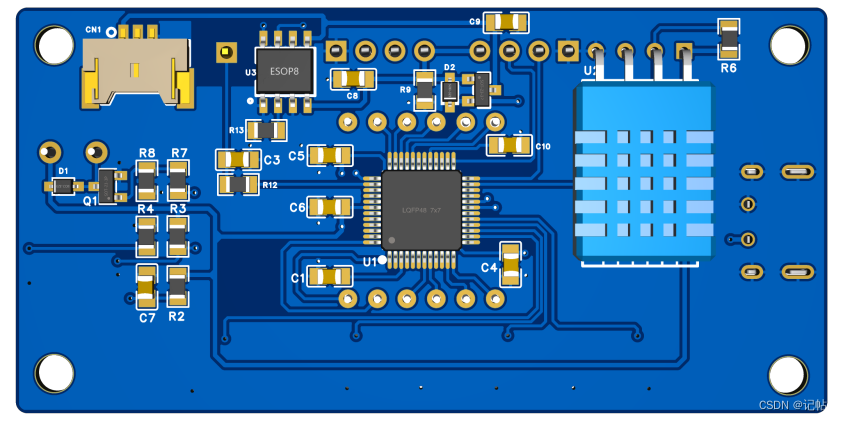
首先需要准备一个开发板,这里我准备的是芯片型号R7FA2E1A72DFL的开发板:
视频教程
https://www.bilibili.com/video/BV1Cz4y1n7rw/
RTC配置
点击Stacks->New Stack->Timers -> Realtime Clock(r_rtc)。

RTC属性配置
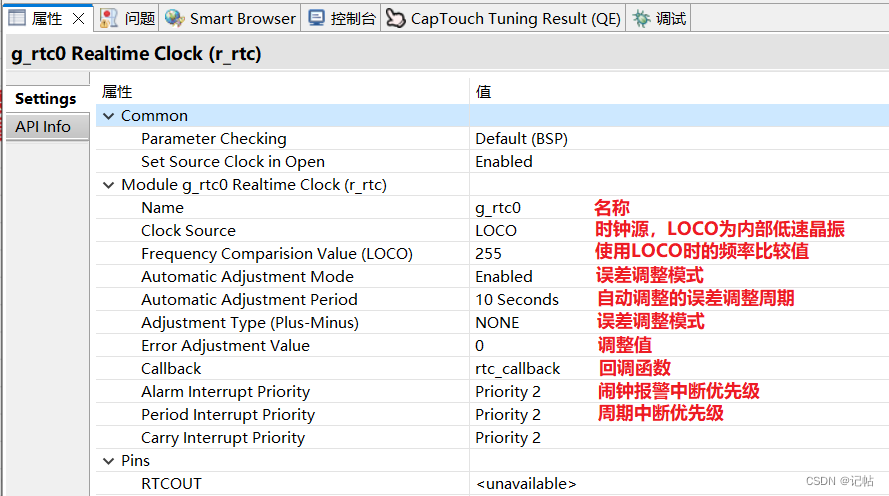
其中LOCO为内部低速时钟,需要准确定时还是需要外部低速晶振Sub-clock。
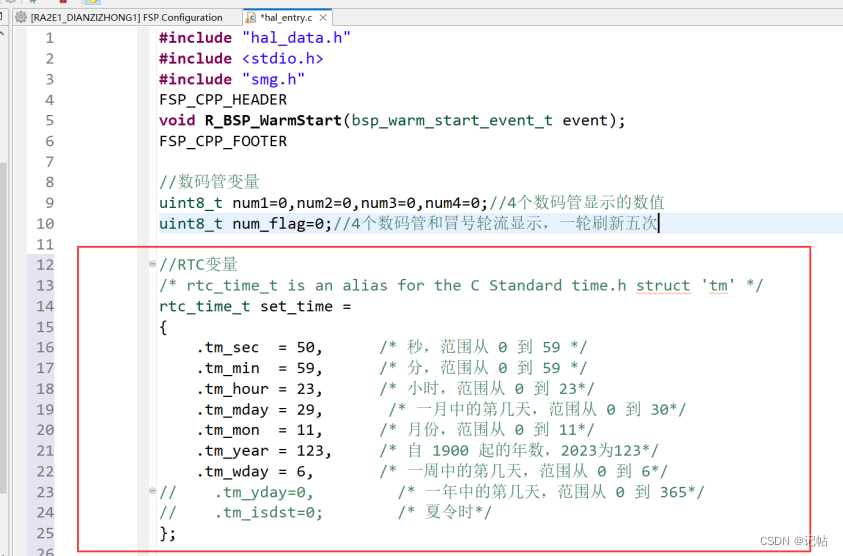
设定时间
在启动RTC后,需要为其设定当前时间。您可以使用R_RTC_CalendarTimeSet(&g_rtc0_ctrl, &set_time)函数来实现这一目标。具体的时间参数可以通过修改set_time变量来调整。

//RTC变量
/* rtc_time_t is an alias for the C Standard time.h struct 'tm' */
rtc_time_t set_time =
{
    .tm_sec  = 50,      /* 秒,范围从 0 到 59 */
    .tm_min  = 59,      /* 分,范围从 0 到 59 */
    .tm_hour = 23,      /* 小时,范围从 0 到 23*/
    .tm_mday = 29,       /* 一月中的第几天,范围从 0 到 30*/
    .tm_mon  = 11,      /* 月份,范围从 0 到 11*/
    .tm_year = 123,     /* 自 1900 起的年数,2023为123*/
    .tm_wday = 6,       /* 一周中的第几天,范围从 0 到 6*/
//    .tm_yday=0,         /* 一年中的第几天,范围从 0 到 365*/
//    .tm_isdst=0;        /* 夏令时*/
};
设定周期性中断
如果您想要使用RTC实现固定延迟中断,可以通过R_RTC_PeriodicIrqRateSet(rtc_ctrl_t *const p_ctrl, rtc_periodic_irq_select_t const rate)函数来实现。例如,要设置1秒的周期性中断,您可以使用如下代码:
R_RTC_PeriodicIrqRateSet(&g_rtc0_ctrl, RTC_PERIODIC_IRQ_SELECT_1_SECOND); 每次周期性中断产生时,系统将触发回调函数的事件RTC_EVENT_PERIODIC_IRQ。
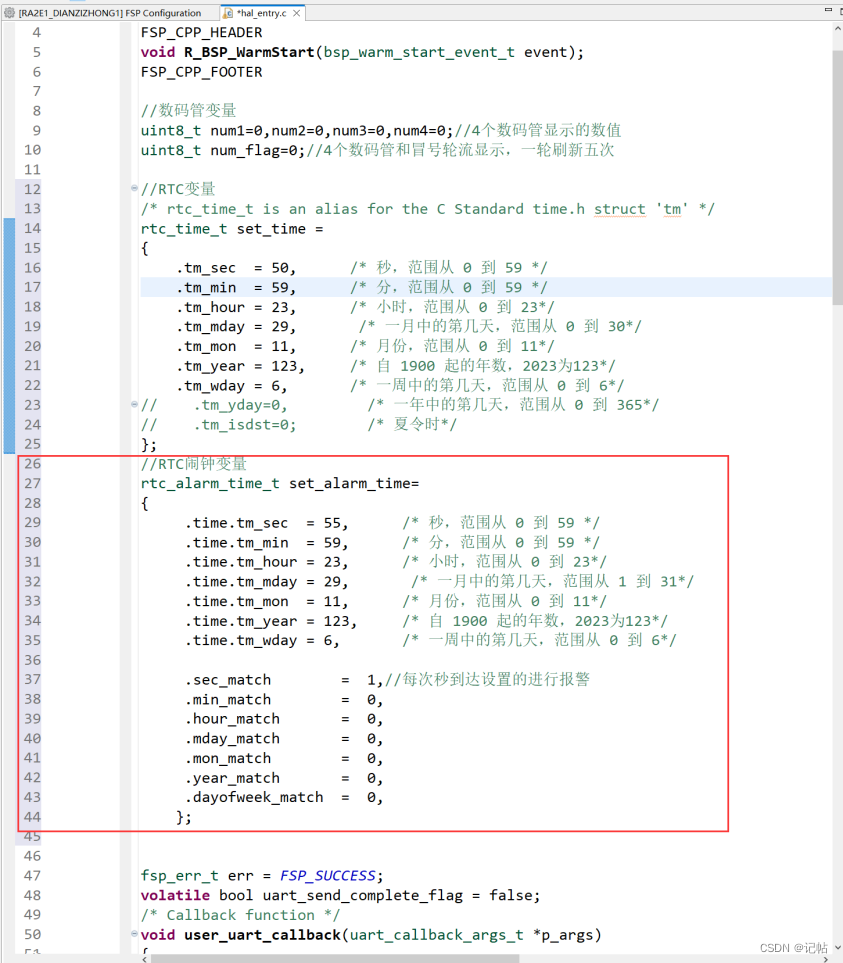
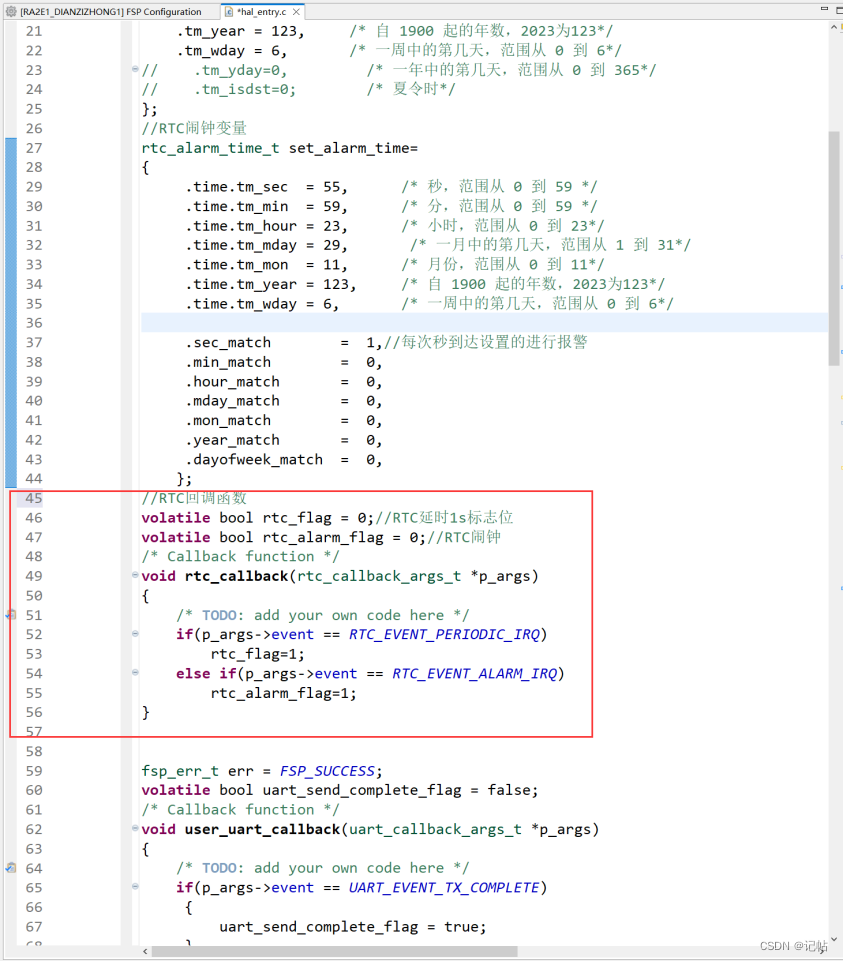
设定日历闹钟时间
在启动RTC后,您可以设置日历闹钟时间。通过使用R_RTC_CalendarAlarmSet(&g_rtc0_ctrl, &set_alarm_time)函数,可以设定闹钟时间。具体的时间参数可以通过修改set_alarm_time变量来调整。具体设置方法如下。
在这个示例中,我们仅设置了sec_match为1,因此每隔一分钟,当秒数达到5秒时,闹钟都会触发。如果要实现每天只响铃一次的功能,需要同时将min_match和hour_match设置为1。
//RTC闹钟变量
rtc_alarm_time_t set_alarm_time=
{
     .time.tm_sec  = 55,      /* 秒,范围从 0 到 59 */
     .time.tm_min  = 59,      /* 分,范围从 0 到 59 */
     .time.tm_hour = 23,      /* 小时,范围从 0 到 23*/
     .time.tm_mday = 29,       /* 一月中的第几天,范围从 1 到 31*/
     .time.tm_mon  = 11,      /* 月份,范围从 0 到 11*/
     .time.tm_year = 123,     /* 自 1900 起的年数,2023为123*/
     .time.tm_wday = 6,       /* 一周中的第几天,范围从 0 到 6*/

     .sec_match        =  1,//每次秒到达设置的进行报警
     .min_match        =  0,
     .hour_match       =  0,
     .mday_match       =  0,
     .mon_match        =  0,
     .year_match       =  0,
     .dayofweek_match  =  0,
    };
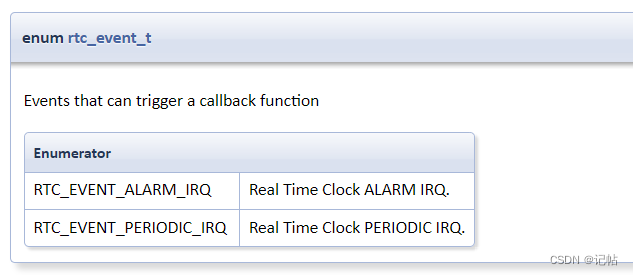
回调函数
可以触发进入回调函数的事件如下所示,RTC_EVENT_PERIODIC_IRQ为设置的实时性事件,例如1s一次,RTC_EVENT_ALARM_IRQ为闹钟事件。
//RTC回调函数
volatile bool rtc_flag = 0;//RTC延时1s标志位
volatile bool rtc_alarm_flag = 0;//RTC闹钟
/* Callback function */
void rtc_callback(rtc_callback_args_t *p_args)
{
    /* TODO: add your own code here */
    if(p_args- >event == RTC_EVENT_PERIODIC_IRQ)
        rtc_flag=1;
    else if(p_args- >event == RTC_EVENT_ALARM_IRQ)
        rtc_alarm_flag=1;
}
同时在主程序中开启RTC已经设置时间和闹钟。
/**********************RTC开启***************************************/
       /* Initialize the RTC module*/
       err = R_RTC_Open(&g_rtc0_ctrl, &g_rtc0_cfg);
       /* Handle any errors. This function should be defined by the user. */
       assert(FSP_SUCCESS == err);

       /* Set the RTC clock source. Can be skipped if "Set Source Clock in Open" property is enabled. */
       R_RTC_ClockSourceSet(&g_rtc0_ctrl);

       /* R_RTC_CalendarTimeSet must be called at least once to start the RTC */
       R_RTC_CalendarTimeSet(&g_rtc0_ctrl, &set_time);
       /* Set the periodic interrupt rate to 1 second */
       R_RTC_PeriodicIrqRateSet(&g_rtc0_ctrl, RTC_PERIODIC_IRQ_SELECT_1_SECOND);

       R_RTC_CalendarAlarmSet(&g_rtc0_ctrl, &set_alarm_time);
       uint8_t rtc_second= 0;      //秒
       uint8_t rtc_minute =0;      //分
       uint8_t rtc_hour =0;         //时
       uint8_t rtc_day =0;          //日
       uint8_t rtc_month =0;      //月
       uint16_t rtc_year =0;        //年
       uint8_t rtc_week =0;        //周
       rtc_time_t get_time;

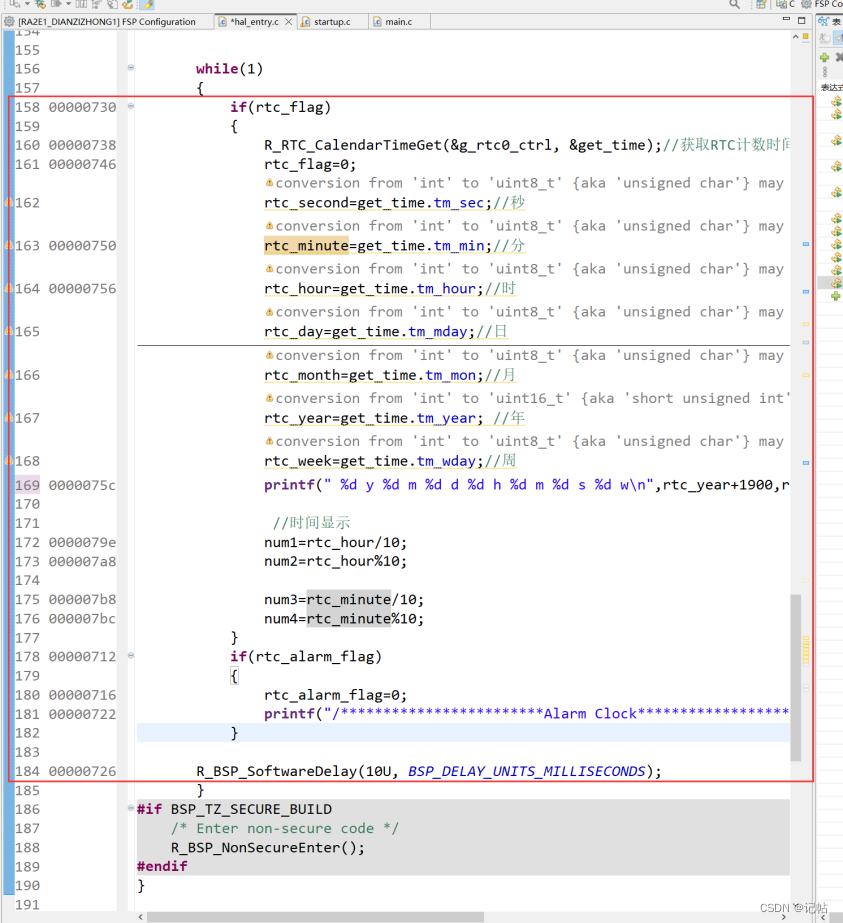
同时在主函数的while循环中添加打印和中断处理,以及当前时间显示。
if(rtc_flag)
{
R_RTC_CalendarTimeGet(&g_rtc0_ctrl, &get_time);//获取RTC计数时间
rtc_flag=0;
rtc_second=get_time.tm_sec;//秒
rtc_minute=get_time.tm_min;//分
rtc_hour=get_time.tm_hour;//时
rtc_day=get_time.tm_mday;//日
rtc_month=get_time.tm_mon;//月
rtc_year=get_time.tm_year; //年
rtc_week=get_time.tm_wday;//周
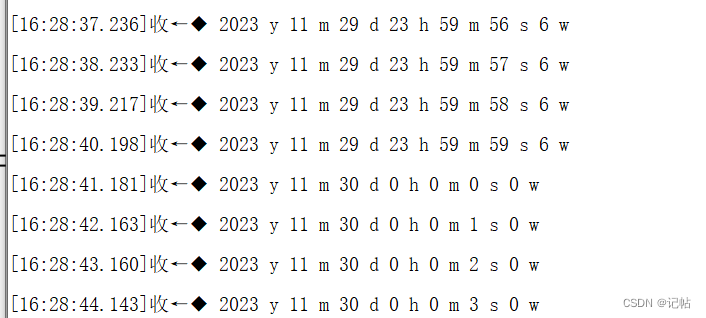
printf(" %d y %d m %d d %d h %d m %d s %d wn",rtc_year+1900,rtc_month,rtc_day,rtc_hour,rtc_minute,rtc_second,rtc_week);
//时间显示
num1=rtc_hour/10;
num2=rtc_hour%10;
num3=rtc_minute/10;
num4=rtc_minute%10;
}
if(rtc_alarm_flag)
{
rtc_alarm_flag=0;
printf("/************************Alarm Clock********************************/n");
}
R_BSP_SoftwareDelay(10U, BSP_DELAY_UNITS_MILLISECONDS);
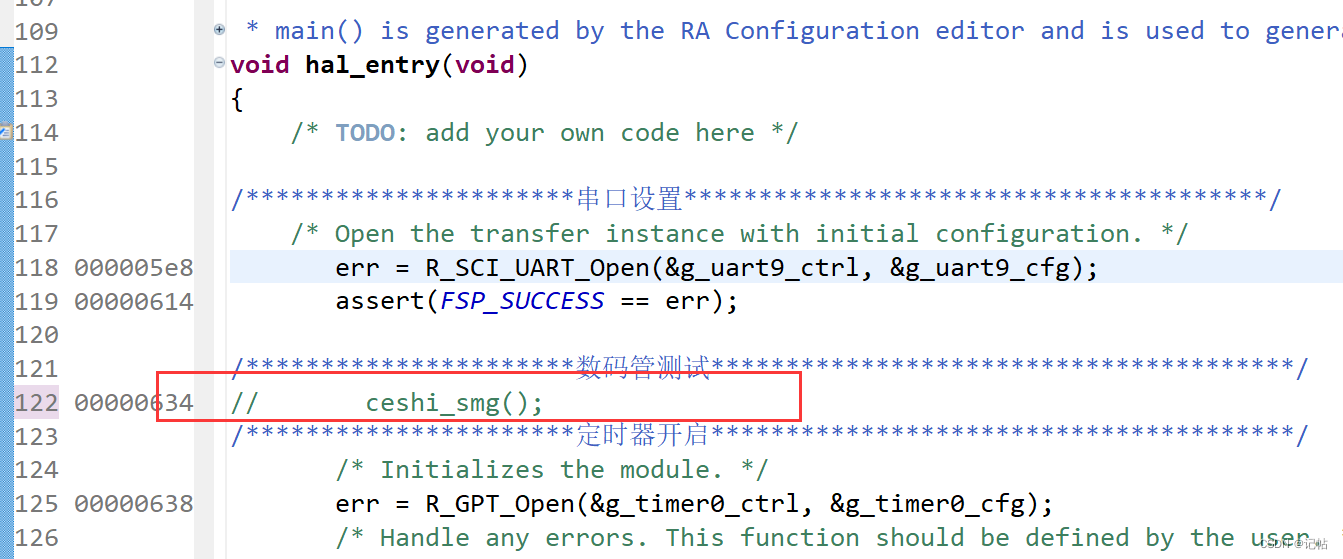
为了快速启动,关闭数码管测试。
演示效果
设置每过1s打印一次当前时间,设置过1分钟,在10秒时候闹铃。
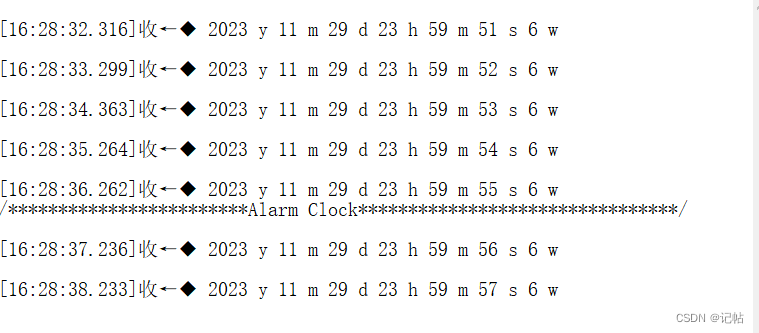
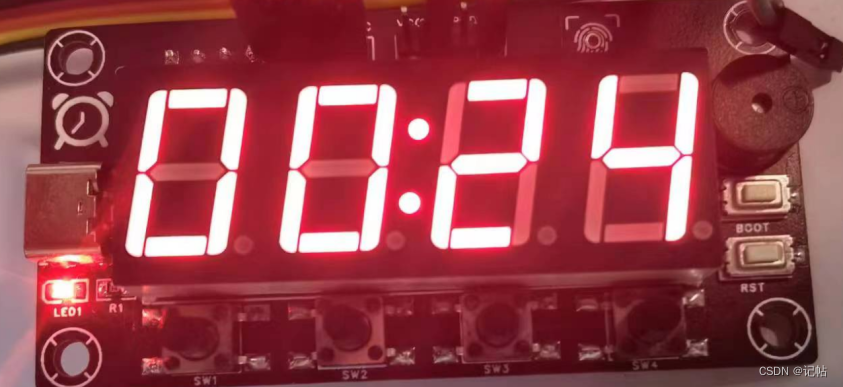
更换日期显示。
数码管显示日期
可以在主程序里面添加显示,让数码管显示日期。
num1=rtc_hour/10;
               num2=rtc_hour%10;

               num3=rtc_minute/10;
               num4=rtc_minute%10;
主程序
#include "hal_data.h"
#include < stdio.h >
#include "smg.h"
#include "timer_smg.h"

FSP_CPP_HEADER
void R_BSP_WarmStart(bsp_warm_start_event_t event);
FSP_CPP_FOOTER

//数码管变量
uint8_t num1=1,num2=4,num3=6,num4=8;//4个数码管显示的数值
uint8_t num_flag=0;//4个数码管和冒号轮流显示,一轮刷新五次


//RTC变量
/* rtc_time_t is an alias for the C Standard time.h struct 'tm' */
rtc_time_t set_time =
{
    .tm_sec  = 50,      /* 秒,范围从 0 到 59 */
    .tm_min  = 59,      /* 分,范围从 0 到 59 */
    .tm_hour = 23,      /* 小时,范围从 0 到 23*/
    .tm_mday = 29,       /* 一月中的第几天,范围从 0 到 30*/
    .tm_mon  = 11,      /* 月份,范围从 0 到 11*/
    .tm_year = 123,     /* 自 1900 起的年数,2023为123*/
    .tm_wday = 6,       /* 一周中的第几天,范围从 0 到 6*/
//    .tm_yday=0,         /* 一年中的第几天,范围从 0 到 365*/
//    .tm_isdst=0;        /* 夏令时*/
};


//RTC闹钟变量
rtc_alarm_time_t set_alarm_time=
{
     .time.tm_sec  = 58,      /* 秒,范围从 0 到 59 */
     .time.tm_min  = 59,      /* 分,范围从 0 到 59 */
     .time.tm_hour = 23,      /* 小时,范围从 0 到 23*/
     .time.tm_mday = 29,       /* 一月中的第几天,范围从 1 到 31*/
     .time.tm_mon  = 11,      /* 月份,范围从 0 到 11*/
     .time.tm_year = 123,     /* 自 1900 起的年数,2023为123*/
     .time.tm_wday = 6,       /* 一周中的第几天,范围从 0 到 6*/

     .sec_match        =  1,//每次秒到达设置的进行报警
     .min_match        =  0,
     .hour_match       =  0,
     .mday_match       =  0,
     .mon_match        =  0,
     .year_match       =  0,
     .dayofweek_match  =  0,
    };

//RTC回调函数
volatile bool rtc_flag = 0;//RTC延时1s标志位
volatile bool rtc_alarm_flag = 0;//RTC闹钟
/* Callback function */
void rtc_callback(rtc_callback_args_t *p_args)
{
    /* TODO: add your own code here */
    if(p_args- >event == RTC_EVENT_PERIODIC_IRQ)
        rtc_flag=1;
    else if(p_args- >event == RTC_EVENT_ALARM_IRQ)
        rtc_alarm_flag=1;
}


fsp_err_t err = FSP_SUCCESS;
volatile bool uart_send_complete_flag = false;
void user_uart_callback (uart_callback_args_t * p_args)
{
    if(p_args- >event == UART_EVENT_TX_COMPLETE)
    {
        uart_send_complete_flag = true;
    }
}

#ifdef __GNUC__                                 //串口重定向
    #define PUTCHAR_PROTOTYPE int __io_putchar(int ch)
#else
    #define PUTCHAR_PROTOTYPE int fputc(int ch, FILE *f)
#endif

PUTCHAR_PROTOTYPE
{
        err = R_SCI_UART_Write(&g_uart9_ctrl, (uint8_t *)&ch, 1);
        if(FSP_SUCCESS != err) __BKPT();
        while(uart_send_complete_flag == false){}
        uart_send_complete_flag = false;
        return ch;
}

int _write(int fd,char *pBuffer,int size)
{
    for(int i=0;i< size;i++)
    {
        __io_putchar(*pBuffer++);
    }
    return size;
}


/*******************************************************************************************************************//**
 * main() is generated by the RA Configuration editor and is used to generate threads if an RTOS is used.  This function
 * is called by main() when no RTOS is used.
 **********************************************************************************************************************/
void hal_entry(void)
{
    /* TODO: add your own code here */

    /* Open the transfer instance with initial configuration. */
       err = R_SCI_UART_Open(&g_uart9_ctrl, &g_uart9_cfg);
       assert(FSP_SUCCESS == err);


/**********************数码管测试***************************************/
//              ceshi_smg();
/**********************定时器开启***************************************/
    /* Initializes the module. */
    err = R_GPT_Open(&g_timer0_ctrl, &g_timer0_cfg);
    /* Handle any errors. This function should be defined by the user. */
    assert(FSP_SUCCESS == err);
    /* Start the timer. */
    (void) R_GPT_Start(&g_timer0_ctrl);


/**********************RTC开启***************************************/
    /* Initialize the RTC module*/
    err = R_RTC_Open(&g_rtc0_ctrl, &g_rtc0_cfg);
    /* Handle any errors. This function should be defined by the user. */
    assert(FSP_SUCCESS == err);

    /* Set the RTC clock source. Can be skipped if "Set Source Clock in Open" property is enabled. */
    R_RTC_ClockSourceSet(&g_rtc0_ctrl);

/* R_RTC_CalendarTimeSet must be called at least once to start the RTC */
    R_RTC_CalendarTimeSet(&g_rtc0_ctrl, &set_time);
    /* Set the periodic interrupt rate to 1 second */
    R_RTC_PeriodicIrqRateSet(&g_rtc0_ctrl, RTC_PERIODIC_IRQ_SELECT_1_SECOND);

           R_RTC_CalendarAlarmSet(&g_rtc0_ctrl, &set_alarm_time);
           uint8_t rtc_second= 0;      //秒
           uint8_t rtc_minute =0;      //分
           uint8_t rtc_hour =0;         //时
           uint8_t rtc_day =0;          //日
           uint8_t rtc_month =0;      //月
           uint16_t rtc_year =0;        //年
           uint8_t rtc_week =0;        //周
           rtc_time_t get_time;


       while(1)
       {
           if(rtc_flag)
           {
               R_RTC_CalendarTimeGet(&g_rtc0_ctrl, &get_time);//获取RTC计数时间
               rtc_flag=0;
               rtc_second=get_time.tm_sec;//秒
               rtc_minute=get_time.tm_min;//分
               rtc_hour=get_time.tm_hour;//时
               rtc_day=get_time.tm_mday;//日
               rtc_month=get_time.tm_mon;//月
               rtc_year=get_time.tm_year; //年
               rtc_week=get_time.tm_wday;//周
               printf(" %d y %d m %d d %d h %d m %d s %d wn",rtc_year+1900,rtc_month,rtc_day,rtc_hour,rtc_minute,rtc_second,rtc_week);

                //时间显示
               num1=rtc_hour/10;
               num2=rtc_hour%10;

               num3=rtc_minute/10;
               num4=rtc_minute%10;
           }
           if(rtc_alarm_flag)
           {
               rtc_alarm_flag=0;
               printf("/************************Alarm Clock********************************/n");
           }

           R_BSP_SoftwareDelay(10U, BSP_DELAY_UNITS_MILLISECONDS);
       }


#if BSP_TZ_SECURE_BUILD
    /* Enter non-secure code */
    R_BSP_NonSecureEnter();
#endif
}
审核编辑:汤梓红
-
微控制器
+关注
关注
49文章
8912浏览量
166067 -
瑞萨
+关注
关注
38文章
22543浏览量
91719 -
RTC
+关注
关注
2文章
673浏览量
72372 -
电子时钟
+关注
关注
11文章
212浏览量
26960
发布评论请先 登录
电子时钟制作(瑞萨RA)(7)----按键修改数码管时间

基于RASC的keil电子时钟制作(瑞萨RA)(2)----配置keil以及使用串口进行打印

基于RASC的keil电子时钟制作(瑞萨RA)(3)----使用J-Link烧写程序到瑞萨芯片
基于RASC的keil电子时钟制作(瑞萨RA)(7)----配置RTC时钟及显示时间
基于RA6M5开发板的低功耗电子时钟设计
瑞萨RA MCU众测宝典 | 串口之【RA-Eco-RA2L1】RTC日历及串口设置时间


评论