 怎样将Arduino数据直接存储到MySQL

步骤1:设置Arduino

刻录以下内容
void setup()
{
Serial.begin(9600);
}
void loop()
{
int i=0,j=0;
j=analogRead(A1);
Serial.print(i);
Serial.print(“,”);
Serial.println(i);
}
步骤2:设置启动MySQL

为MySQL安装Wamp服务器并将其配置为存储数据
运行wamp服务器
打开MySQL控制台
选择数据库
然后为您的数据创建表
create table data(sno int(4) primary key auto_increment,LDR int(4),TEMP int(4));
使用desc your_table_name显示表详细信息
desc data;
这就是数据库的全部内容,现在我们可以进行处理了……
第3步:设置处理IDE

下载并安装Processing IDE 2.2.1
将上述给定的ZIP压缩到MyDocuments/Processing/Libraries中
现在打开正在处理的IDE和检查库是否已正确安装(如上图所示)
然后将以下代码复制并进行处理,并自行命名
/*
ARDUINO TO MYSQL THROUGH PROCESSING
Read Serial messages from Arduino then write it in MySQL.
Author : J.V.JohnsonSelva September 2016
*/
import de.bezier.data.sql.*; //import the MySQL library
import processing.serial.*; //import the Serial library
MySQL msql; //Create MySQL Object
String[] a;
int end = 10; // the number 10 is ASCII for linefeed (end of serial.println), later we will look for this to break up individual messages
String serial; // declare a new string called ‘serial’ 。 A string is a sequence of characters (data type know as “char”)
Serial port; // The serial port, this is a new instance of the Serial class (an Object)
void setup() {
String user = “root”;
String pass = “”;
String database = “iot_database”;
msql = new MySQL( this, “localhost”, database, user, pass );
port = new Serial(this, Serial.list()[0], 9600); // initializing the object by assigning a port and baud rate (must match that of Arduino)
port.clear(); // function from serial library that throws out the first reading, in case we started reading in the middle of a string from Arduino
serial = port.readStringUntil(end); // function that reads the string from serial port until a println and then assigns string to our string variable (called ‘serial’)
serial = null; // initially, the string will be null (empty)
}
void draw()
{
while (port.available() 》 0)
{
//as long as there is data coming from serial port, read it and store it
serial = port.readStringUntil(end);
}
if (serial != null)
{
//if the string is not empty, print the following
//Note: the split function used below is not necessary if sending only a single variable. However, it is useful for parsing (separating) messages when
//reading from multiple inputs in Arduino. Below is example code for an Arduino sketch
a = split(serial, ‘,’); //a new array (called ‘a’) that stores values into separate cells (separated by commas specified in your Arduino program)
println(a[0]); //print LDR value
println(a[1]); //print LM35 value
function();
}
}
void function()
{
if ( msql.connect() )
{
msql.query( “insert into data(LDR,Temp)values(”+a[0]+“,”+a[1]+“)” );
}
else
{
// connection failed !
}
msql.close(); //Must close MySQL connection after Execution
}
第4步:执行程序。

通过单击“运行”按钮运行程序,请关闭弹出窗口。关闭窗口将停止执行,并在下面的查询中查看在MySQL中存储数据。..
select * from data;
查看数据插入器的数量可以使用下面的查询。
select count(*) from data;
责任编辑:wv
-
MySQL
+关注
关注
1文章
931浏览量
29760 -
Arduino
+关注
关注
190文章
6527浏览量
197486
发布评论请先 登录
从业务库到实时分析库,NineData 构建 MySQL到SelectDB 同步链路

NineData 新增支持 MySQL 到 openGauss PostgreSQL 数据复制链路

恒讯科技解析:如何安装MySQL并创建数据库

mysql数据恢复—mysql数据库表被truncate的数据恢复案例

企业级MySQL数据库管理指南
远程访问内网MySQL数据库?这个方案更简单

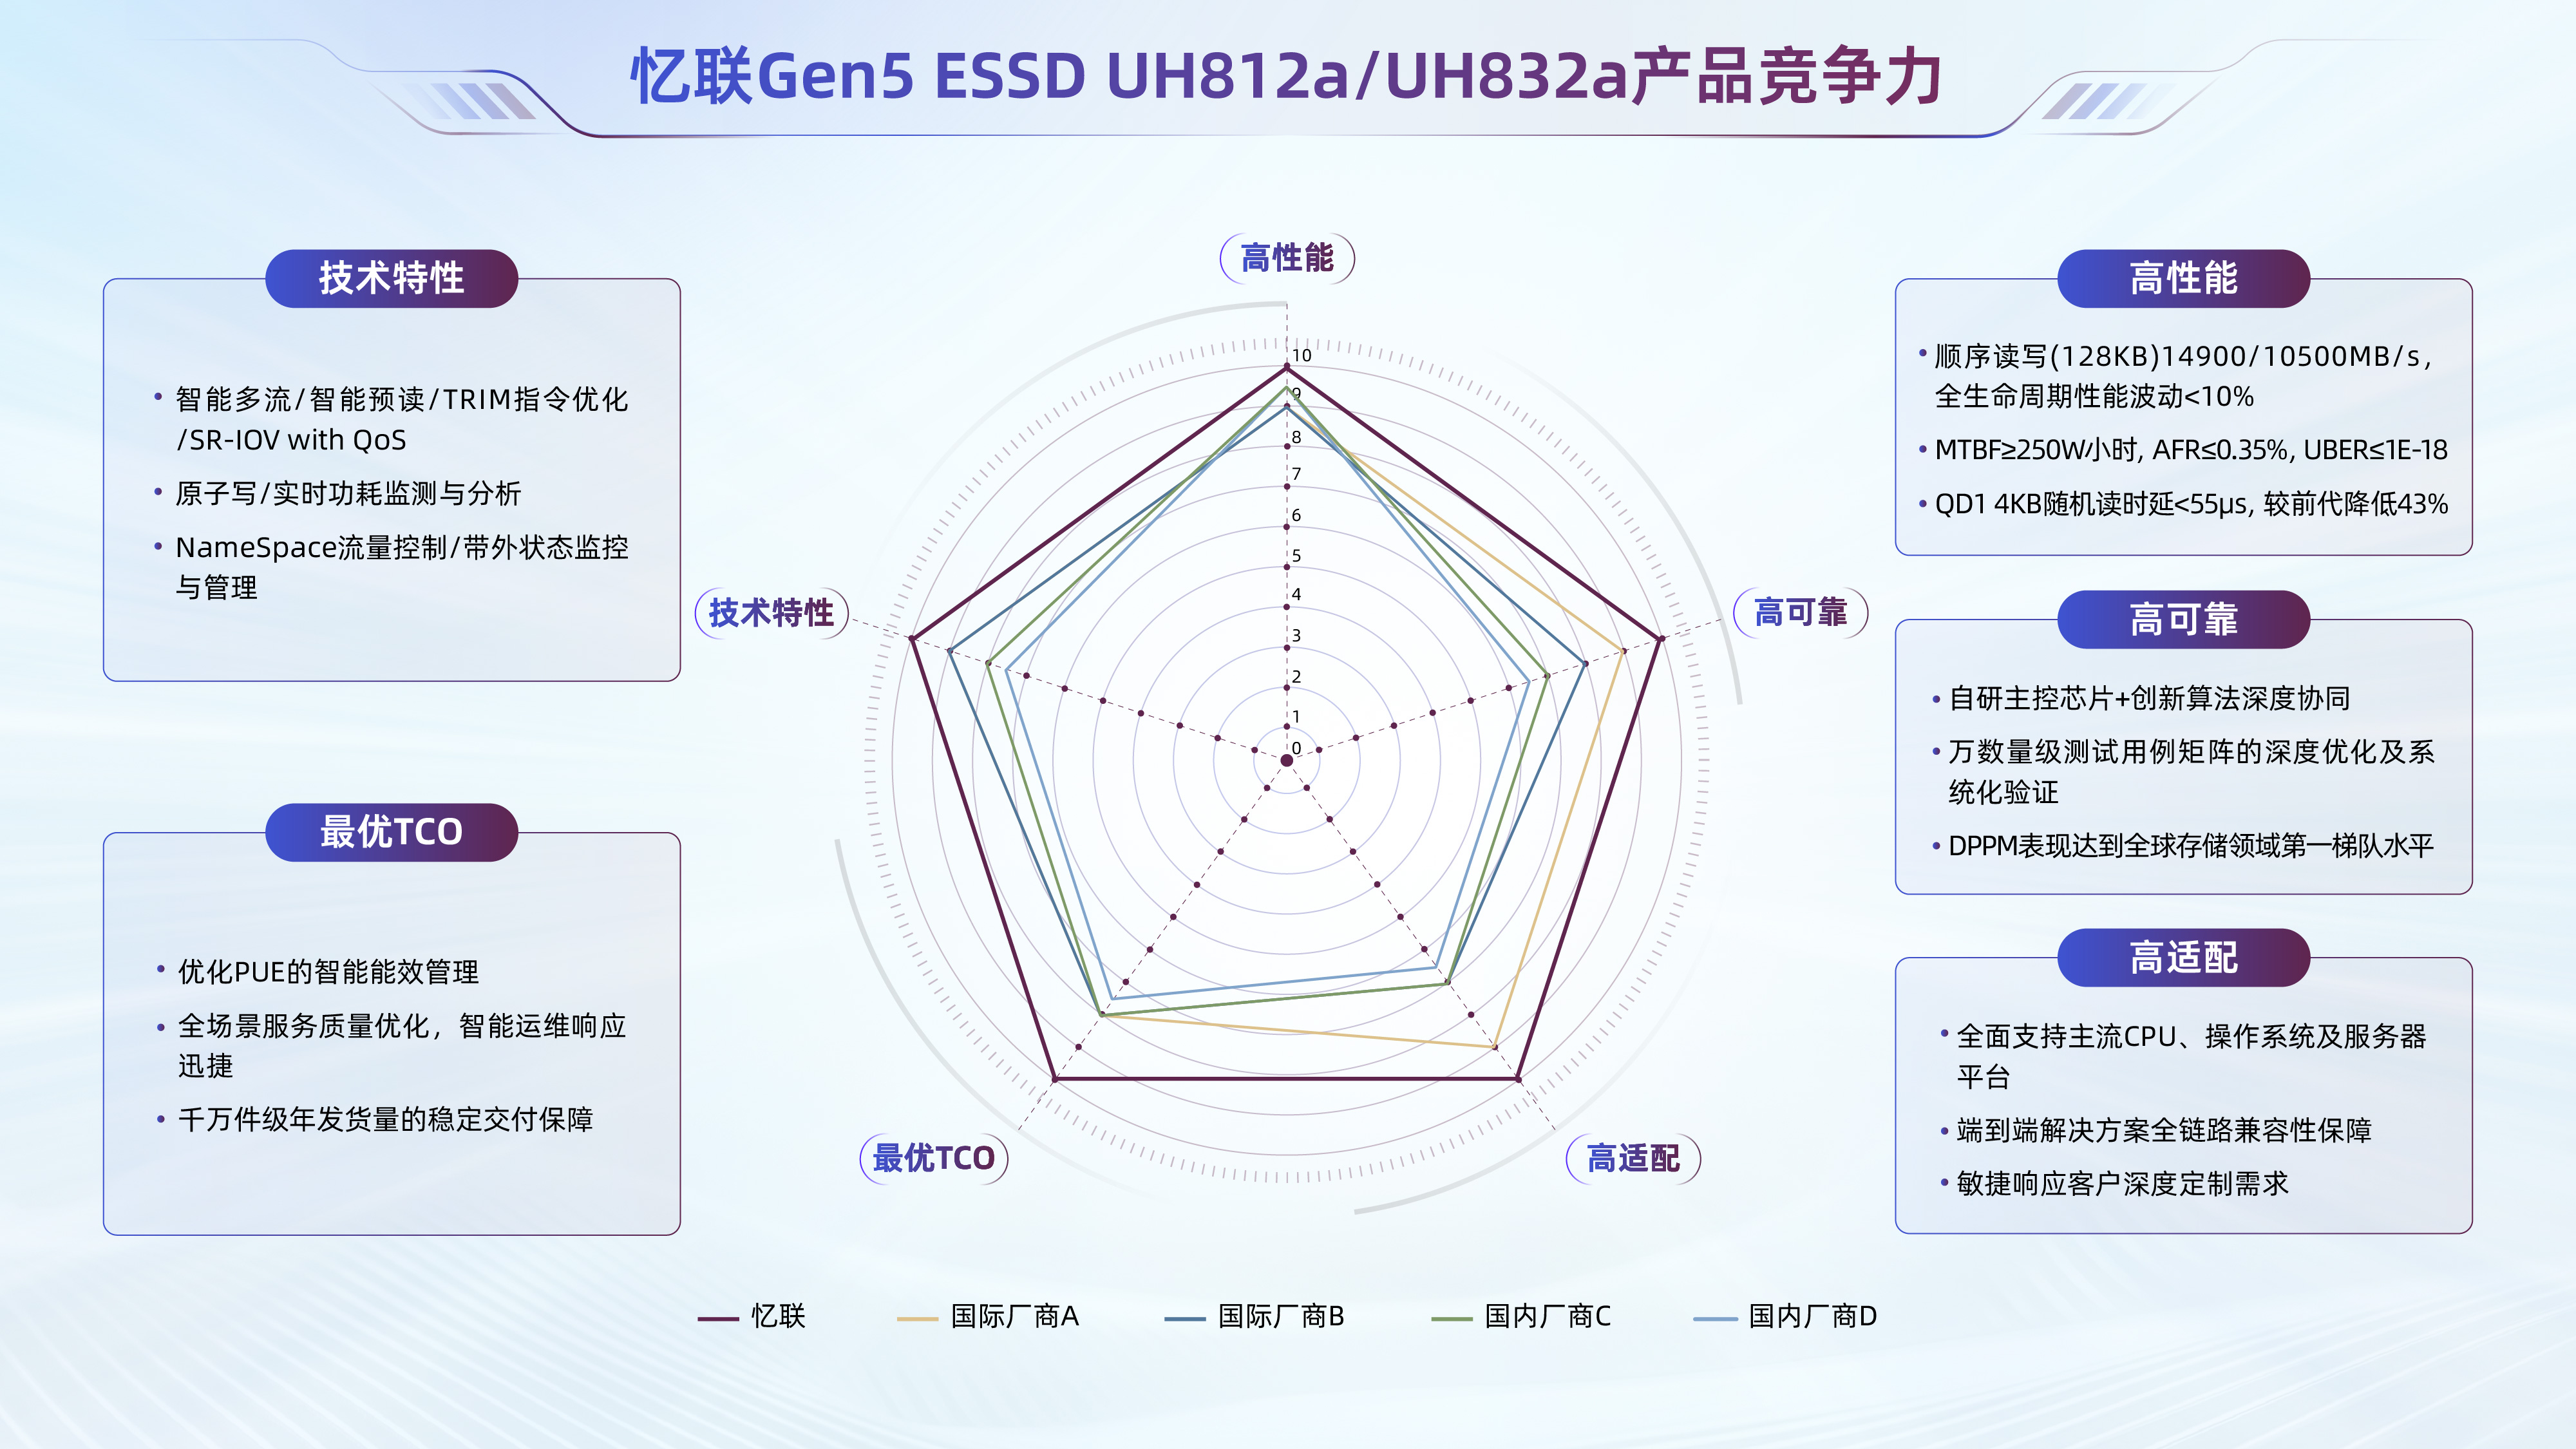
忆联 Docker+MySQL 流控方案:打造安全高效存储底座,释放 AI 极致性能
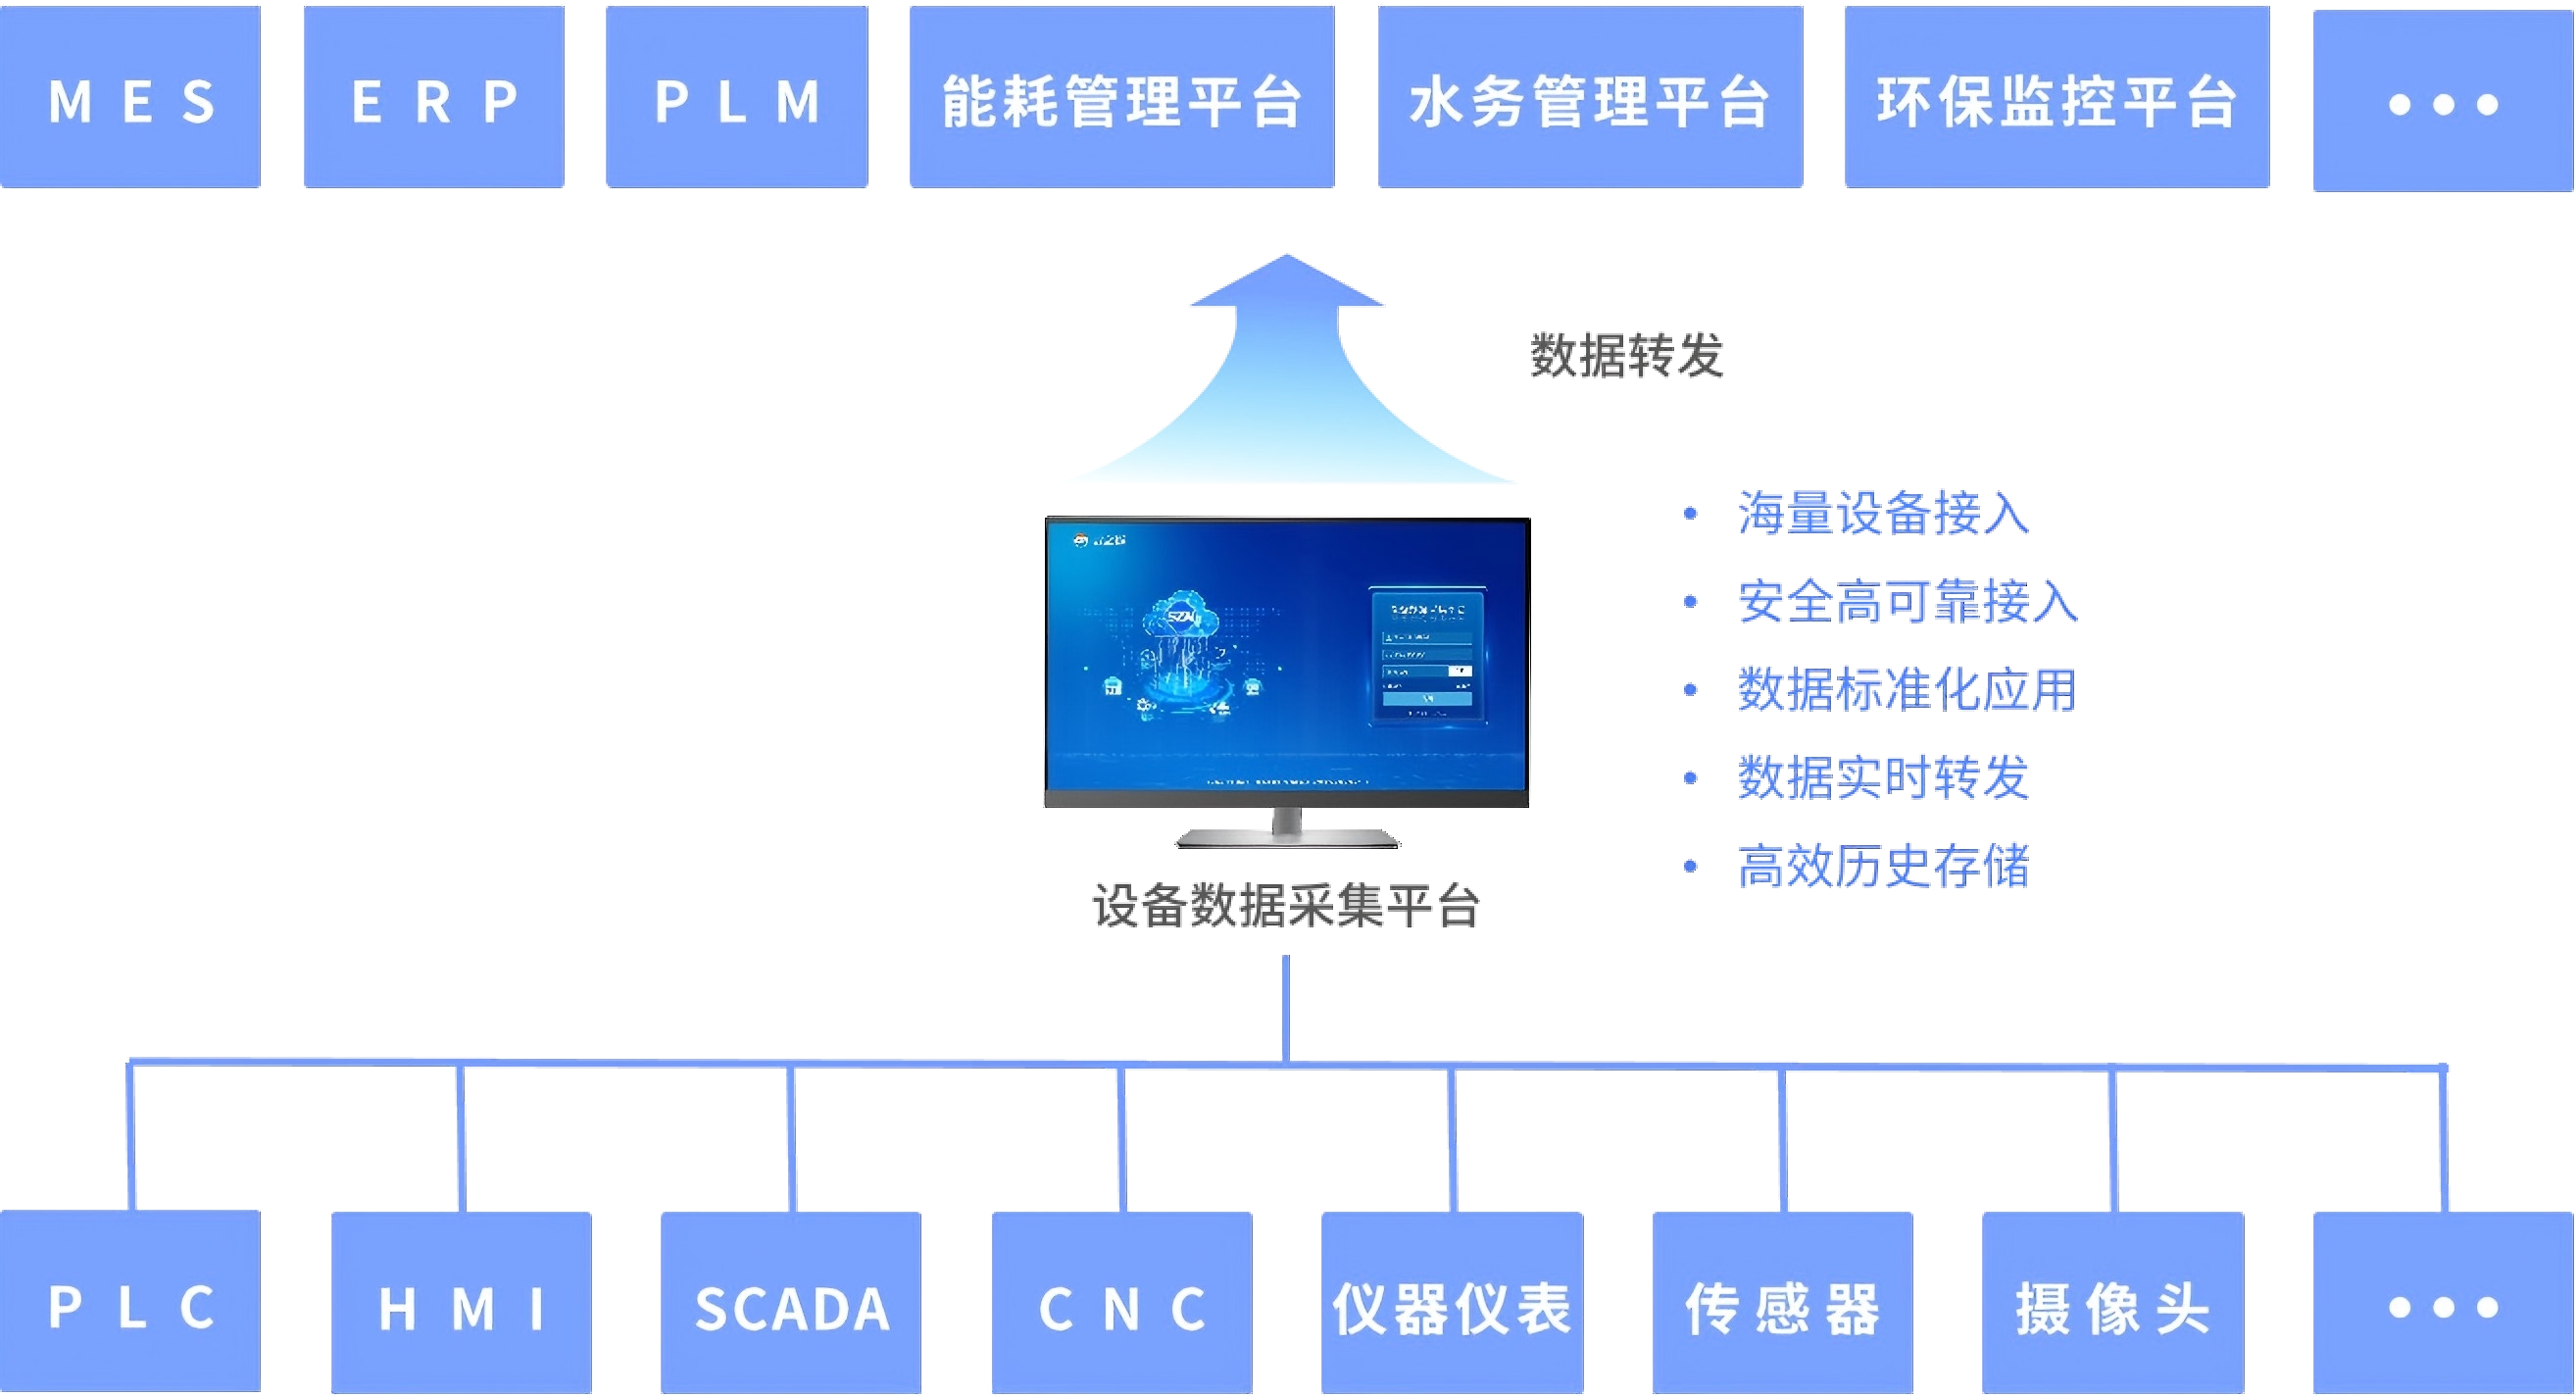
PLC数据中台对接到MySQL数据库并对接到生产看板


评论