 NanoBeacon™ BLE扫描器教程(第三部分)

Let’s recap what we covered in the previous articles within this series:
让我们回顾一下我们在本系列的前几篇文章中所涉及的内容:
- Requirements, installation, and setup steps for using the mobile app
- 使用移动应用程序的要求、安装和设置步骤
- Overview of the different sections within the app
- 应用程序内不同部分的概述
- Running a few test case scenarios with different advertising data types
- 用不同的广播数据类型运行一些测试案例场景
- A detailed look at device filters
- 详细了解设备过滤器
- Differences between the iOS and Android versions of the app
- 该应用程序的iOS和Android版本之间的差异
In this particular tutorial, we will focus on one of the most unique features of our app: App Notifications (even in the background) for detecting Triggered Advertising Sets.
在这个特别的教程中,我们将专注于我们应用程序的一个最独特的功能:应用通知(甚至在后台),用于检测触发的广播集。
So, how do these work? what exactly do we mean by “Triggered”? What are the limitations of app notifications in both versions of the app (Android and iOS)?
那么,这些是如何工作的?"Triggered "到底是什么意思?在两个版本的应用程序(安卓和iOS)中,应用程序通知的限制是什么?
Triggered Advertising Sets触发式广播集
Triggered advertising sets allow the user to configure the device to send advertising packets only when certain conditions occur.
触发式广播集允许用户配置设备,使其仅在某些条件发生时发送广播包。
This can be very useful in use cases where advertising packets are only needed when one or more conditions are met, for example, the battery level going below 10% or the temperate going over 40 degrees Celsius. In this case, sending advertising data all the time regardless of these conditions (which is what is referred to as “Continuous Advertising Mode” in the NanoBeacon Config Tool) would unnecessarily increase battery consumption, so it makes sense to only send them out based on certain conditions.
这对于只有在满足一个或多个条件时才需要广播数据包的用例非常有用,例如,电池电量低于10%或温度超过40摄氏度。在这种情况下,不管这些条件如何,一直发送广播数据(这就是NanoBeacon配置工具中所说的 "连续广播模式")会不必要地增加电池消耗,所以只根据某些条件发送广播是有意义的。
Here’s a look at the various options available for this mode within the NanoBeacon Config Tool:
下面我们来看看NanoBeacon配置工具中该模式的各种可用选项:
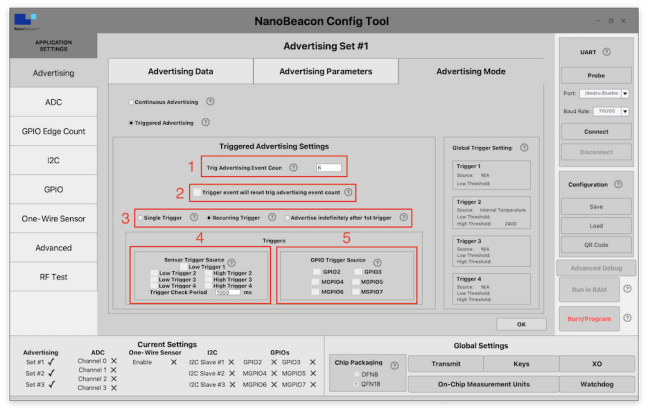
1、Triggered advertising event count: this defines the number of advertising events transmitted if a triggered condition is met.
1、触发的广播事件计数:这定义了在满足触发条件时传输的广播事件的数量。
2、Trigger event will reset triggered advertising event count: enabling this will reset the advertising event count set above in #1, meaning that if any of the trigger conditions are met, it will keep resetting the count and continue sending the advertising packets. Once none of the trigger conditions are met, the advertising event count will start decrementing. For example, suppose this option was enabled, and the trigger condition was a high threshold for internal temperature ≥ 25 deg C, and the temperature surpassed this threshold. In that case, it will continue sending advertising events until the temperature is below the threshold, and then it will only send the number of advertising events set in option #1.
2、触发事件将重置被触发的广播事件计数:启用这个功能将重置上面#1中设置的广播事件计数,这意味着如果满足任何一个触发条件,它将不断重置计数并继续发送广播数据包。一旦没有一个触发条件被满足,广播事件计数将开始递减。例如,假设该选项被启用,而触发条件是内部温度≥25摄氏度的高阈值,并且温度超过了这个阈值。在这种情况下,它将继续发送广播事件,直到温度低于阈值,然后它将只发送选项#1中设置的广播事件数量。
3、Single trigger, Recurring trigger, Advertise indefinitely after 1st trigger:
3、单次触发、重复触发、第1次触发后无限期广播:
- Single Trigger: choosing this type will set the behavior to only send the advertising events upon any of the trigger conditions being met just once. If the trigger conditions are met later (during the same power cycle), no advertising events will be transmitted.
- 单次触发:选择这种类型将设置行为,只在任何一次触发条件被满足时才发送广播事件。如果以后再满足触发条件(在同一电源周期内),将不发送广播事件。
- Recurring Trigger: choosing this type will send out advertising events every time a trigger condition is met.
- 循环触发:选择这种类型,每次触发条件被满足时都会发送广播事件。
- Advertise indefinitely after 1st trigger: as the name suggests, choosing this type will send out advertising events indefinitely after any of the trigger conditions are met.
- 第1次触发后无限期广播:顾名思义,选择这种类型将在满足任何触发条件后无限期地发送广播事件。
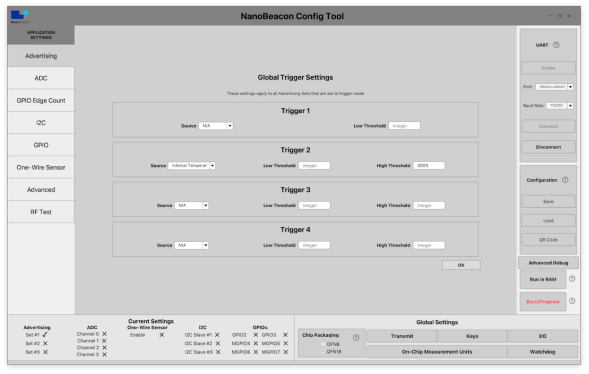
4、Sensor trigger source: this defines one or more sources for trigger conditions, which are set in the “Global Trigger Settings” section within the NanoBeacon Config Tool. Examples of trigger sources include VCC, Internal Temperature, ADC channels, 1-wire sensor readings, and I2C slave readings.4、传感器触发源:这定义了一个或多个触发条件的来源,在 NanoBeacon 配置工具中的 "全局触发设置 "部分设置。触发源的例子包括VCC、内部温度、ADC通道、单线传感器读数和I2C从属读数。
5、GPIO trigger source: this defines one or more sources for trigger conditions based on GPIO status. The GPIOs available are: GPIO2, GPIO3, MGPIO4, MGPIO5, MGPIO6, and MGPIO7.
5、GPIO触发源:这定义了一个或多个基于GPIO状态的触发条件源。可用的GPIO是:GPIO2, GPIO3, MGPIO4, MGPIO5, MGPIO6, 和 MGPIO7.
Keep in mind that the triggered event will occur if anyof the defined conditions are met.
请记住,如果满足任何定义的条件,触发的事件就会发生。
Triggered Advertising Sets on the Mobile App移动应用上的触发式广播集
Now that we better understand how triggered advertisements work and the different options available, we can now test them out to see what they look like and how they behave on both the Android and iOS versions of the mobile app.
现在我们更好地了解了触发式广播的工作原理和不同的选项,我们现在可以测试一下,看看它们在移动应用的安卓和iOS版本上是什么样子的,表现如何。
Referring back to the previous article, where we covered the differences between the iOS and Android versions of the app, the following is a significant difference related to notifications:
参考之前的文章,我们介绍了iOS和Android版本的应用程序之间的差异,以下是与通知有关的重大差异:
- Android supports background notifications for all types of Triggered advertisements.
- 安卓支持所有类型的Triggered广播的后台通知。
- iOS only supports background notifications for Triggered iBeacon advertisements.
- iOS只支持Triggered iBeacon广播的后台通知。
Due to this, we’ll use iBeacon as the primary test case in this tutorial.
由于这个原因,我们将使用iBeacon作为本教程的主要测试案例。
Test Case: Single Advertising Set: Triggered iBeacon
测试案例:单一广播集:触发的iBeacon
For this test case, we’ll go ahead and define one advertising set as iBeacon and configure it in Triggered mode.
在这个测试案例中,我们将继续将一个广播集定义为iBeacon,并将其配置为触发模式。
We’ll also define the following configuration parameters, all in the NanoBeacon Config Tool:
我们还将在NanoBeacon配置工具中定义以下配置参数:
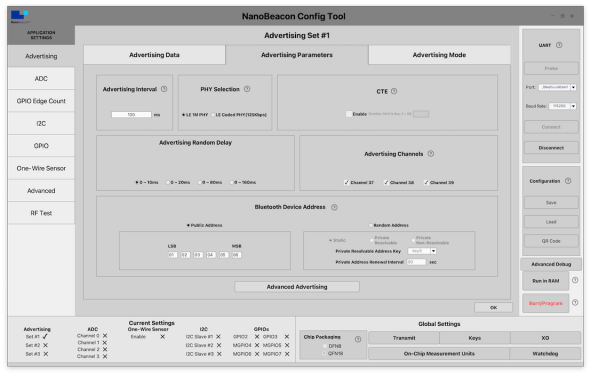
- Advertising Interval = 100 ms (to make it easier to discover the advertising sets, in practice, you may want to increase the interval to reduce power consumption).
- 广播间隔=100毫秒(为了使广播集更容易被发现,在实践中,你可能想增加间隔以减少功耗)。
- Global Triggers: set the source for Trigger #2 to be Internal Temperature and set the High Threshold to some temperature value that’s greater than the current environment you’re in to be able to manually invoke the trigger condition. I’ve set the value to 3000 (which translates to 30 deg C). Note that the value you enter here will be multiplied by the “On-Chip Measurement Unit” defined in the “On-Chip Measurement Units” section accessible from the main screen of the Config Tool.
- 全局触发器:将触发器#2的来源设置为内部温度,并将高阈值设置为某个温度值,该值要大于你当前所处的环境,以便能够手动调用触发条件。我把这个值设置为3000(换算成30摄氏度)。请注意,你在这里输入的值将乘以 "片上测量单位",该单位定义在 "片上测量单位 "部分,可从配置工具的主屏幕上访问。
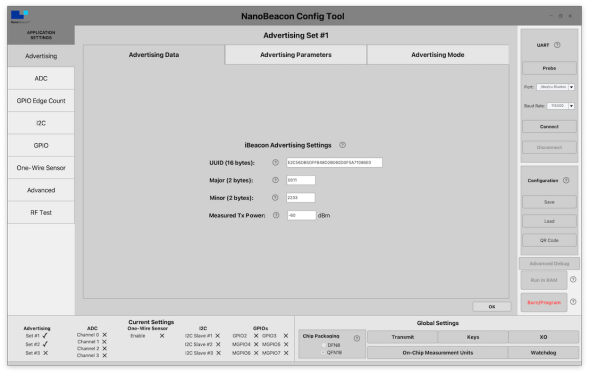
- Set the Advertising Data Format to iBeacon and set the UUID, Major, Minor, and Tx Power values as you’d like.
- 将广播数据格式设置为iBeacon,并根据你的需要设置UUID、Major、Minor和Tx Power值。
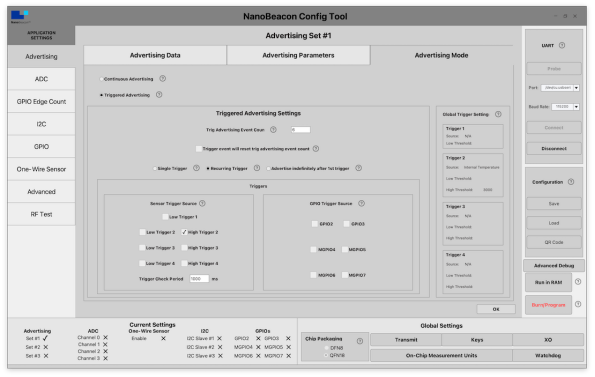
- Set the Advertising Mode to Triggered Advertising and enable “High Trigger 2” in the Sensor Trigger Source section.
- 将广播模式设置为触发式广播,并在传感器触发源部分启用 "高触发器2"。
Once that’s all set, make sure your IN100 development board and programmer board are attached and connected to the computer running the NanoBeacon Config Tool.
一旦设置完毕,确保你的IN100开发板和编程板连接到运行NanoBeacon配置工具的计算机上。
Now you can Probe the device, select it, and then Run in RAM to run your configuration on the IN100 tag.
现在你可以探测设备,选择它,然后在RAM中运行,在IN100标签上运行你的配置。
Here are some screenshots showing the settings described above:
下面是一些显示上述设置的屏幕截图:
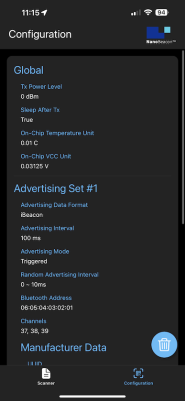
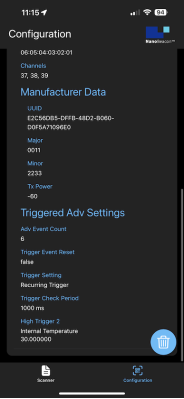
Now we’re ready to import this configuration into the mobile app. I’ll be using the iOS version for this test.
现在我们准备把这个配置导入到移动应用中。我将使用iOS版本进行这项测试。
Using the QR Code display functionality in the Config Tool and the QR Code import functionality in the mobile app, import the configuration:
使用配置工具中的QR码显示功能和移动应用程序中的QR码导入功能,导入配置:
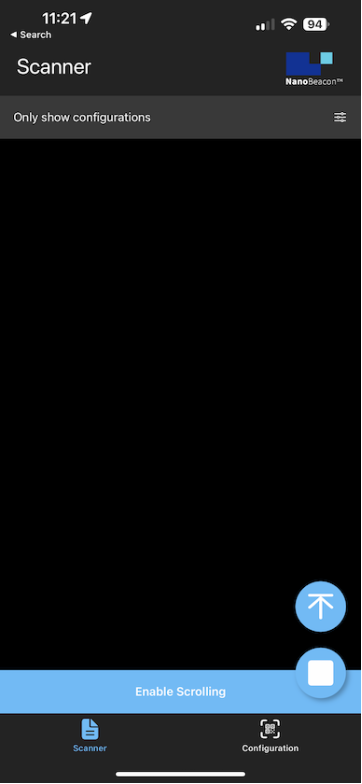
Now, navigate to the Scanner view within the mobile app and select “Only show project configuration matches” in the filter options. Give that the temperature is below the high threshold condition you set (30 degrees C in my case), you should not see any devices in the list:
现在,在移动应用程序中导航到扫描仪视图,在过滤器选项中选择 "只显示项目配置匹配"。鉴于温度低于你设置的高阈值条件(在我的例子中是30摄氏度),你应该在列表中看不到任何设备:
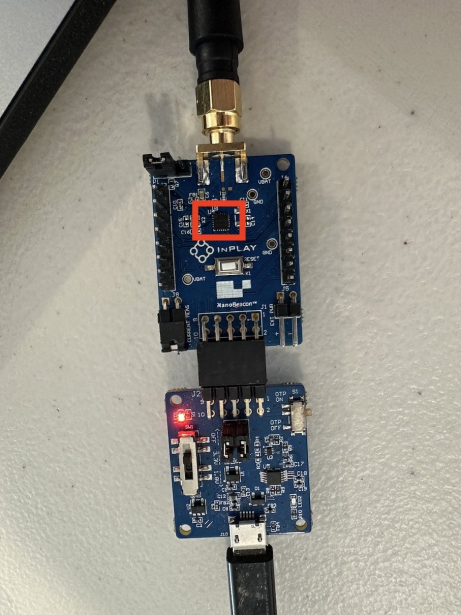
As a simple way to enable the trigger condition, you can place your finger (or momentarily point a heat gun) on the IN100 chipset on the development board
作为启用触发条件的一个简单方法,你可以将手指(或用热风枪瞬间指向)放在开发板上的IN100芯片组上
If you wait long enough for the temperature to hit the high threshold, the Scanner view in the mobile app should now show the iBeacon advertising set, along with a notification at the top of the screen:
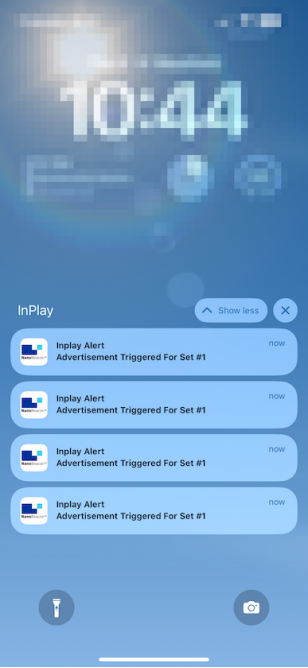
如果你等待足够长的时间让温度达到高阈值,移动应用程序中的扫描器视图现在应该显示iBeacon广播设置,同时在屏幕顶部有一个通知:

Even if you have the app running in the background and the phone locked, you should see the notifications come through for each Triggered advertising set being discovered:即使你的应用程序在后台运行,并且手机被锁定,你也应该看到每个被发现的触发式广播集的通知都会出现:
That’s all you need to do to get notifications for Triggered advertising sets from the mobile app!
这就是你需要做的,从移动应用中获得触发式广播集的通知!
Keep in mind that iBeacon is the only Advertising Data Format type that can trigger notifications on iOS devices. On Android, that limitation is not present.
请记住,iBeacon是唯一可以在iOS设备上触发通知的广播数据格式类型。在安卓上,这个限制是不存在的。
Conclusion & Summary 结论与总结In this tutorial, we covered how to discover Triggered Advertising Sets and showed how app notifications work in the mobile app.
在本教程中,我们介绍了如何发现触发式广播集,并展示了应用通知在移动应用中的作用。
In the next tutorial, we will go over another unique feature of our mobile app: Logs.
在下一个教程中,我们将介绍我们的移动应用程序的另一个独特功能:日志。
With logs, you’ll be able to view the history of discovered advertising sets and the advertising data contained in them as well as the ability to export those logs outside of the app to your computer or any other device for later analysis!
通过日志,你将能够查看已发现的广播集的历史和其中包含的广播数据,并能够将这些日志导出到你的电脑或任何其他设备,以便日后分析!
-
BLE
+关注
关注
13文章
810浏览量
66587 -
扫描器
+关注
关注
0文章
198浏览量
12799
发布评论请先 登录
深入了解TCA8424:低电压8x16键盘扫描器的技术剖析
远景达LV3000H工业固定式扫描器:工业自动化的高效数据采集利器
新大陆NLS FM430EX扫描器:多场景智能解码的实力之选
扫条形码分拣离不开扫码器!固定式扫描器的实用价值

PDA条码扫描器选购指南:仓储物流老板亲测5G手持终端推荐

雷卯针对香橙派Orange Pi 5 Pro开发板防雷防静电方案

NLS-Soldier100固定式工业条码扫描器读码器用于产线上扫码
如何更好选择二维码识别扫描器厂家?
固定式条码扫描器能在条码移动情况下扫描吗?

如何在树莓派 AI HAT+上进行YOLO目标检测?

提高篇——C语言核心技术(中文版)
TI大学计划-电源篇
如何用 Raspberry Pi 500 搭建家庭录音室?
自助售货机内嵌扫描器应该要如何选用?


评论