 电子发烧友App


 创作
创作 发文章
发文章 发帖
发帖  提问
提问  发资料
发资料 发视频
发视频资料介绍
描述
背景
这篇博文旨在作为我深入研究在 Raspberry Pi 上使用 Windows IoT 进行软件和硬件开发的一系列博文中的第一篇。
介绍
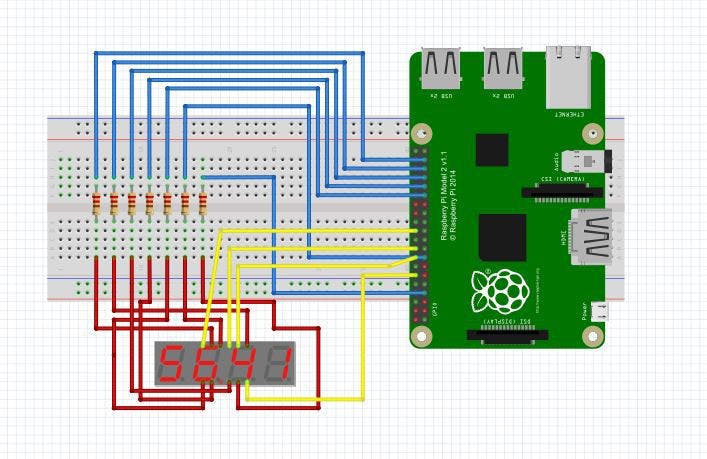
在 Raspberry Pi 上做任何其他事情之前,我决定开始的第一个任务是显示输出,这样我就可以看到我的应用程序完成的任何处理的结果。七段显示器是显示基本数字输出的一种简单方式,无论是温度、湿度还是计时器。
七段显示器可以有一个或多个数字,并带有共阳极或共阴极电路。共阳极显示器的每个段都有一个共享输入,每个段都有自己的输出,而共阴极显示器的每个段都有一个单独的输入和一个公共输出。
具有多于一个数字的显示器,每个数字将有一个阳极或一个阴极,但段输入/输出是共享的。由于一次只能显示一个数字,要显示多位数字,每个数字及其段必须非常快速地打开和关闭,给人眼的印象是所有需要的数字都在连续显示。
下面的解决方案是使用 4 位 7 段共阴极显示器编写的,但该库是有意编写的,以允许它通过 GPIO 输出用于任意位数的 7 段共阴极显示器。
先决条件
熔化图
七段显示图
编写此代码时使用的显示器是 5641AS,它有 12 个引脚,从左下角逆时针方向排列。数据表可以在谷歌上找到,但引脚布局如下:
- 乙
- 丁
- 小数点
- C
- G
- 数字 4
- 乙
- 数字 3
- 数字 2
- F
- 一种
- 数字 1
代码
GitHub [上面的链接] 上提供了完整的解决方案,但可以分为 3 个主要部分,初始化、构建输出和显示输出。
初始化
要设置显示器,我们需要知道哪些输出引脚将驱动段,哪些将驱动显示器。虽然段数是固定的(7 或 8,包括小数点),但显示屏上可用的位数可能会有所不同,具体取决于所使用的显示屏。在此示例中,我们有 4 位数字,因此我们需要提供 4 个额外的 pin 号码并对其进行初始化。
这些段是显式传递的,并且任何剩余的引脚都假定为每个显示器一个,通过 params 参数传递。每个显示链接输出引脚和段输出都设置为高电平,这意味着没有电压差,也没有电流流过。因此,所有显示都将关闭。
public Display(int segA, int segB, int segC, int segD, int segE, int segF, int segG, params int[] displayPins)
        {
            this.Displays = new GpioPin[displayPins.Length];

            for (int i = 0; i < displayPins.Length; i++)
            {
                GpioPin pin = GpioController.GetDefault().OpenPin(displayPins[i]);
                pin.Write(GpioPinValue.High);
                pin.SetDriveMode(GpioPinDriveMode.Output);
                this.Displays[i] = pin;
            }

            this.SetupOutputPin(ref this.PinSegA, segA);
            this.SetupOutputPin(ref this.PinSegB, segB);
            this.SetupOutputPin(ref this.PinSegC, segC);
            this.SetupOutputPin(ref this.PinSegD, segD);
            this.SetupOutputPin(ref this.PinSegE, segE);
            this.SetupOutputPin(ref this.PinSegF, segF);
            this.SetupOutputPin(ref this.PinSegG, segG);

            this.cts = new CancellationTokenSource();
            this.token = new CancellationToken();
        }

        private void SetupOutputPin(ref GpioPin pin, int pinNo)
        {
            pin = GpioController.GetDefault().OpenPin(pinNo);
            pin.Write(GpioPinValue.High);
            pin.SetDriveMode(GpioPinDriveMode.Output);
        }
构建输出
为了为消费者提供一种设置要显示的值的简便方法,我们将在库中完成这项工作。假设我们要显示 1234 整数,那么我们需要将单个数字拆分为一个由单个数字组成的数组,数组的长度小于或等于我们可以显示的位数,这取决于我们是否're 显示前导零。
在下面的代码中,我们首先运行一些检查以确保我们有一个有效的数字来显示,并且有足够的数字来显示它。然后我们通过 %10 [模数] 计算将它分解成单独的数字。
 public void DisplayNumber(int number, bool displayLeadingZero = true)
        {
            this.displayNo = number;
            this.displayLeadingZero = displayLeadingZero;

            if (this.displayNo < 0)
            {
                throw new ArgumentOutOfRangeException("Number cannot be negative");
            }

            int checkMax = 1;
            for(int i = 0; i < this.DisplayDigits.Length; i++)
            {
                checkMax = checkMax * 10;
            }

            if(number >= checkMax)
            {
                throw new ArgumentException("Cannot display numbers greater than " + (checkMax - 1).ToString());
            }

            if (this.displayNo == 0)
            {
                this.Blank();
                if(this.DisplayDigits.Length > 0)
                {
                    this.DisplayDigits[0] = 0;
                }
            }
            else
            {
                List<int> listOfInts = new List<int>();
                while (this.displayNo > 0)
                {
                    listOfInts.Add(this.displayNo % 10);
                    this.displayNo = this.displayNo / 10;
                }

                if (displayLeadingZero)
                {
                    while (listOfInts.Count < this.Displays.Length)
                    {
                        listOfInts.Add(0);
                    }
                }
                else
                {
                    while (listOfInts.Count < this.Displays.Length)
                    {
                        listOfInts.Add(10);
                    }
                }
                this.DisplayDigits = listOfInts.ToArray();
            }
显示输出
为了以足够快的速度在输出显示器上显示数字以欺骗眼睛认为所有显示器同时打开,我们必须创建一个永久循环,其唯一工作是依次打开和关闭每个显示器。这是通过“开始”方法完成的,该方法只是启动一个循环,并显示先前计算的数组中的数字。如果数组更新,显示会自动更新。
private void Start()
        {
            if (running)
            {
                return;
            }

            running = true;

            Task.Factory.StartNew(() =>
            {
                while (!this.cts.IsCancellationRequested)
                {
                    if (this.DisplayDigits == null)
                    {
                        this.Blank();
                    }

                    int[] arrDigs = this.DisplayDigits;

                    for (int i = 0; i < arrDigs.Length; i++)
                    {
                        this.SetDisplay(this.Displays[i], arrDigs[i]);
                    }
                }
            }, token);
        }
设置显示功能关闭所有显示[设置为高],然后根据数字将显示特定数字所需的段设置为高/低,然后将显示引脚设置为低,允许电流流动个位数。这轮流通过每个数字依次打开和关闭每个数字。这种情况发生的速度比眼睛能察觉的要快,给人的印象是所有数字都同时打开。
 private void SetDisplay(GpioPin displayPin, int value)
        {
            this.ClearDisplay();

            switch (value)
            {
                case 0:
                    this.SetHigh(new GpioPin[] { this.PinSegA, this.PinSegB, this.PinSegC, this.PinSegD, this.PinSegE, this.PinSegF });
                    this.SetLow(new GpioPin[] { this.PinSegG });
                    break;
                case 1:
                    this.SetHigh(new GpioPin[] { this.PinSegB, this.PinSegC });
                    this.SetLow(new GpioPin[] { this.PinSegA, this.PinSegD, this.PinSegE, this.PinSegF, this.PinSegG });
                    break;
                case 2:
                    this.SetHigh(new GpioPin[] { this.PinSegA, this.PinSegB, this.PinSegD, this.PinSegE, this.PinSegG });
                    this.SetLow(new GpioPin[] { this.PinSegC, this.PinSegF });
                    break;
                case 3:
                    this.SetHigh(new GpioPin[] { this.PinSegA, this.PinSegB, this.PinSegC, this.PinSegD, this.PinSegG });
                    this.SetLow(new GpioPin[] { this.PinSegE, this.PinSegF });
                    break;
                case 4:
                    this.SetHigh(new GpioPin[] { this.PinSegB, this.PinSegC, this.PinSegF, this.PinSegG });
                    this.SetLow(new GpioPin[] { this.PinSegA, this.PinSegD, this.PinSegE });
                    break;
                case 5:
                    this.SetHigh(new GpioPin[] { this.PinSegA, this.PinSegC, this.PinSegD, this.PinSegF, this.PinSegG });
                    this.SetLow(new GpioPin[] { this.PinSegB, this.PinSegE });
                    break;
                case 6:
                    this.SetHigh(new GpioPin[] { this.PinSegA, this.PinSegC, this.PinSegD, this.PinSegE, this.PinSegF, this.PinSegG });
                    this.SetLow(new GpioPin[] { this.PinSegB });
                    break;
                case 7:
                    this.SetHigh(new GpioPin[] { this.PinSegA, this.PinSegB, this.PinSegC });
                    this.SetLow(new GpioPin[] { this.PinSegD, this.PinSegE, this.PinSegF, this.PinSegG });
                    break;
                case 8:
                    this.SetHigh(new GpioPin[] { this.PinSegA, this.PinSegB, this.PinSegC, this.PinSegD, this.PinSegE, this.PinSegF, this.PinSegG });
                    break;
                case 9:
                    this.SetHigh(new GpioPin[] { this.PinSegA, this.PinSegB, this.PinSegC, this.PinSegD, this.PinSegF, this.PinSegG });
                    this.SetLow(new GpioPin[] { this.PinSegE });
                    break;
                case 10:  // Clear Display
                    this.SetLow(new GpioPin[] { this.PinSegA, this.PinSegB, this.PinSegC, this.PinSegD, this.PinSegE, this.PinSegF, this.PinSegG });
                    break;
                default:
                    this.SetLow(new GpioPin[] { this.PinSegA, this.PinSegB, this.PinSegC, this.PinSegD, this.PinSegE, this.PinSegF, this.PinSegG });
                    break;
            }

            this.SetLow(new GpioPin[] { displayPin });
        }
包括演示应用程序在内的完整代码清单可通过页面顶部的链接获得。
未来发展
目前,输出仅限于完整的正整数。未来的改进可能包括显示小数或负数,或一些字母数字字符(例如用于温度显示的 C 或 F)。
- 由Raspberry Pi驱动的机器猫玩具 0次下载
- 使用balena在Raspberry Pi 4创建私有LoRaWAN网络 0次下载
- 使用ATmega328的七段显示驱动程序 1次下载
- Raspberry Pi Pico:使用PIO驱动伺服 0次下载
- 乐化液晶驱动程序下载 7次下载
- 1602液晶显示驱动程序下载 1次下载
- STM32的ADC驱动程序 37次下载
- USB驱动程序
- DS1302的驱动程序和LCD1602驱动显示程序免费下载 0次下载
- 《爱上Raspberry Pi》中译版-电子书籍.pdf 0次下载
- 12864驱动程序 18次下载
- msp430显示驱动程序 2次下载
- raspberry_pi各版本差别 0次下载
- Windows 2000/XP下I/O设备驱动程序的设计 18次下载
- acer aspire 5570驱动程序下载 391次下载
- 怎么编写Framebuffer驱动程序 65次阅读
- Intel Xe驱动代码严重缺乏测试 218次阅读
- 使用Raspberry Pi Pico W和MicroPython开发物联网应用 939次阅读
- 用于测试项目的4个最佳树莓派Raspberry Pi模拟器 4868次阅读
- 基于树莓派产品 Raspberry Pi微控制器板的优缺点 2389次阅读
- 微雪电子ZeroW| Raspberry Pi ZeroW主板简介 2202次阅读
- 微雪电子Raspberry Pi 3 Model主板简介 2118次阅读
- 一文了解Raspberry Pi 4各项性能跑分 2.8w次阅读
- 浅谈电脑驱动程序的工作原理 详解电脑驱动程序意义 2.8w次阅读
- 可动态安装的Linux设备驱动程序 882次阅读
- 8255A驱动程序 2868次阅读
- 8155驱动程序 2784次阅读
- Xilinx设备的驱动程序 7711次阅读
- 视觉享受!用Raspberry Pi实现圣诞树灯光秀 7959次阅读
- PCI驱动程序开发实例 6506次阅读

 上传资料赚积分
下载排行
本周
- 1山景DSP芯片AP8248A2数据手册
- 1.06 MB | 532次下载 | 免费
- 2RK3399完整板原理图(支持平板,盒子VR)
- 3.28 MB | 339次下载 | 免费
- 3TC358743XBG评估板参考手册
- 1.36 MB | 330次下载 | 免费
- 4DFM软件使用教程
- 0.84 MB | 295次下载 | 免费
- 5元宇宙深度解析—未来的未来-风口还是泡沫
- 6.40 MB | 227次下载 | 免费
- 6迪文DGUS开发指南
- 31.67 MB | 194次下载 | 免费
- 7元宇宙底层硬件系列报告
- 13.42 MB | 182次下载 | 免费
- 8FP5207XR-G1中文应用手册
- 1.09 MB | 178次下载 | 免费
本月
- 1OrCAD10.5下载OrCAD10.5中文版软件
- 0.00 MB | 234315次下载 | 免费
- 2555集成电路应用800例(新编版)
- 0.00 MB | 33566次下载 | 免费
- 3接口电路图大全
- 未知 | 30323次下载 | 免费
- 4开关电源设计实例指南
- 未知 | 21549次下载 | 免费
- 5电气工程师手册免费下载(新编第二版pdf电子书)
- 0.00 MB | 15349次下载 | 免费
- 6数字电路基础pdf(下载)
- 未知 | 13750次下载 | 免费
- 7电子制作实例集锦 下载
- 未知 | 8113次下载 | 免费
- 8《LED驱动电路设计》 温德尔著
- 0.00 MB | 6656次下载 | 免费
总榜
- 1matlab软件下载入口
- 未知 | 935054次下载 | 免费
- 2protel99se软件下载(可英文版转中文版)
- 78.1 MB | 537798次下载 | 免费
- 3MATLAB 7.1 下载 (含软件介绍)
- 未知 | 420027次下载 | 免费
- 4OrCAD10.5下载OrCAD10.5中文版软件
- 0.00 MB | 234315次下载 | 免费
- 5Altium DXP2002下载入口
- 未知 | 233046次下载 | 免费
- 6电路仿真软件multisim 10.0免费下载
- 340992 | 191187次下载 | 免费
- 7十天学会AVR单片机与C语言视频教程 下载
- 158M | 183279次下载 | 免费
- 8proe5.0野火版下载(中文版免费下载)
- 未知 | 138040次下载 | 免费


 工商网监
工商网监
评论