资料介绍
描述
在 Arduino IoT Cloud 的帮助下创建植物通讯器!
正如英国诗人威廉华兹华斯曾经说过的:
“你的思想是花园,你的思想是种子,收获可以是花朵或杂草。”
让我们的植物保持活力可能是一项相当大的挑战,因为我们与植物之间缺乏清晰的沟通。让他们开心的一种方法是把我们的植物带在身边,但也许我们不想带着从冬季夹克口袋里伸出来的大仙人掌或蕨类植物四处走动。此外,大多数植物不喜欢寒冷。在花了几个月时间尝试与我们的吊兰进行通信之后,我们放弃了,而是将 IoT Bundle 组件与 Arduino IoT Cloud 一起使用来创建一个设备,该设备可以远程调查任何植物的健康状况。
简而言之
在这个实验中,我们将学习如何保护我们的植物并确保它们存活下来,以及如何使用 Arduino 魔法。通过监测湿度、温度和光照,我们可以确保我们的植物生长良好。
到该项目结束时,您的工厂将以可视化方式与您交流其需求,并通过 Arduino IoT CLoud 向您展示其目前的工作情况。
组件
注意:要实现此项目中演示的所有功能,您需要订阅 Arduino IoT Cloud。通过删除其中一个变量(光、温度或湿度),可以在没有 Arduino IoT Cloud 订阅的情况下执行该项目。
学习目标
想知道更多?
本教程是让您熟悉 Arduino RP2040 和物联网的一系列实验的一部分。所有实验都可以使用 IoT Bundle 中包含的组件来构建。
- I Love You 枕头与 Arduino 物联网捆绑包
- 带 Arduino IoT 捆绑包的拼图盒
- 拥有 Arduino IoT Bundle 的书呆子
- 巴甫洛夫的猫与 Arduino IoT 捆绑包
设置 Arduino 物联网云
如果您是 Arduino IoT Cloud 的新手,请查看我们的入门指南。
我们将从按照以下步骤设置 Arduino IoT Cloud 开始:
- 登录到您的 Arduino 创建帐户
- 创建一个东西
- 连接设备
- 添加变量
- 添加网络凭据
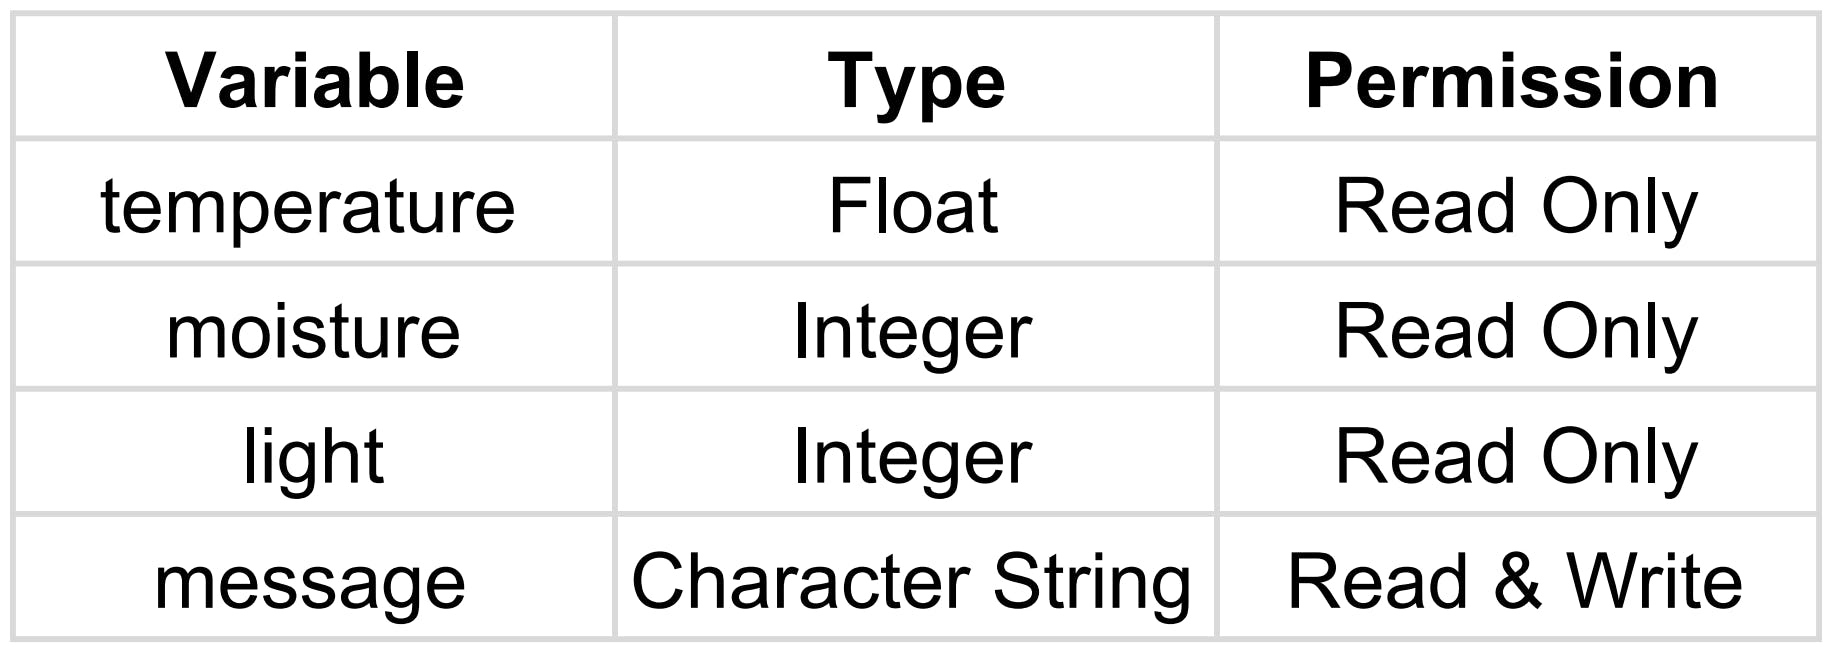
变量
我们将从添加四个变量开始:

设置硬件和草图
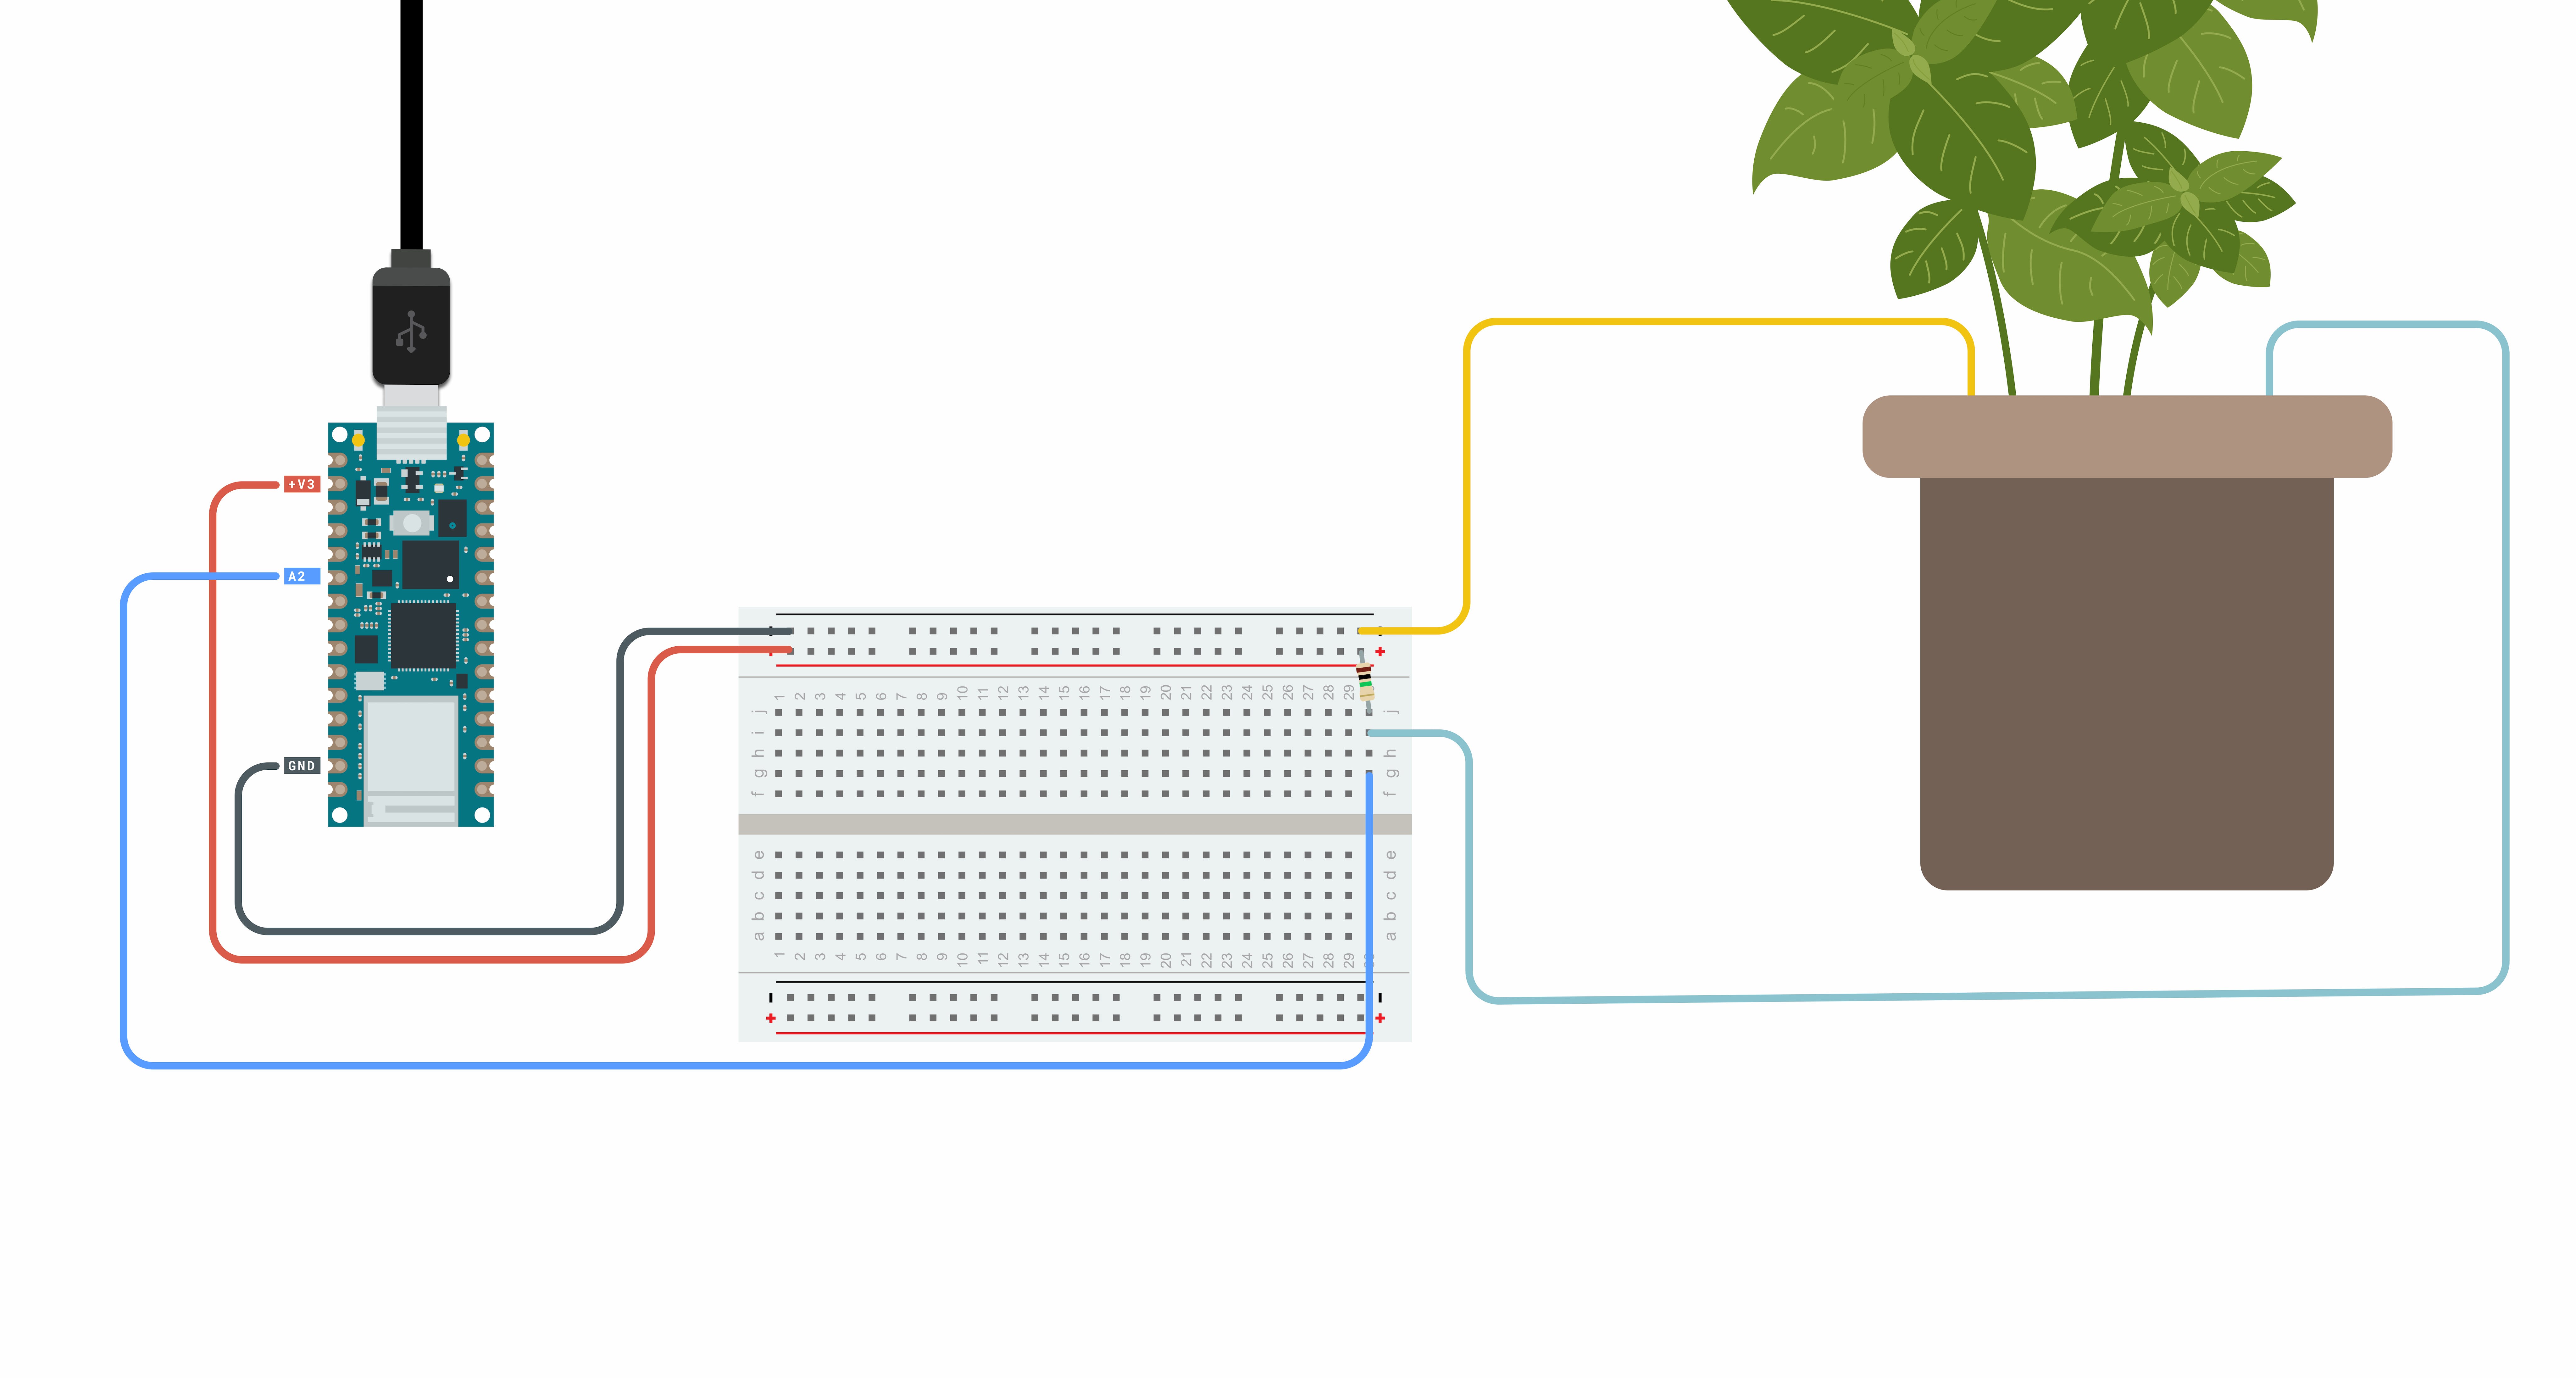
DIY土壤水分
放置在土盆中的两根导线构成一个可变电阻器,其阻值随土壤湿度而变化。这个可变电阻器以分压器配置连接,Arduino 收集与两条线之间的电阻成比例的电压。这意味着土壤越潮湿,Arduino 测量到的电压就越低,因为土壤中的电阻会随着水分的增加而降低。土壤越干燥,电阻越高。使用 1 兆欧电阻器和两根电线,我们可以创建我们的 DIY 土壤湿度传感器。

该值将用于设置阈值,以便 Arduino 知道您的植物何时需要水。将下面显示的代码添加到您的草图中并测试植物的水分含量。这些值显示在串行监视器中。
#include "thingProperties.h"
int moisturePin = A2;
/* Set this threeshold accordingly to the resistance you used */
/* The easiest way to calibrate this value is to test the sensor in both dry and wet earth */
int threshold = 800;
void setup() {
  /* Initialize serial and wait for port to open: */
  Serial.begin(9600);
  /* This delay gives the chance to wait for a Serial Monitor without blocking if none   is found */
  delay(1500);
  /* Defined in thingProperties.h */
  initProperties();
  /* Connect to Arduino IoT Cloud */
  ArduinoCloud.begin(ArduinoIoTPreferredConnection);
  /*
  The following function allows you to obtain more information
  related to the state of network and IoT Cloud connection and errors
  the higher number the more granular information you’ll get.
  The default is 0 (only errors).
  Maximum is 4
  */
  setDebugMessageLevel(2);
  ArduinoCloud.printDebugInfo();
}
void loop() {
  ArduinoCloud.update();
  moisture = get_average_moisture();
  Serial.print("moisture ");
  Serial.println(moisture);
  /* assign the message variable based on water levels */
  if (moisture > threshold) {
  message = "Warning your plant needs water!"; /* Insert here your emergency message */
  } else {
  message = "Your plant has enough water!";
  }
  Serial.println(message);
}
int get_average_moisture() {
  int tempValue = 0; /* variable to temporarily store moisture value */
  /* make an average of 10 values to be more accurate */
  for (int a = 0; a < 10; a++) {
  tempValue += analogRead(moisturePin);
  delay(100);
 }
  return tempValue / 10;
}
/*
Since Message is READ_WRITE variable, onMessageChange() is
executed every time a new value is received from IoT Cloud.
*/
void onMessageChange()  {
  /* Add your code here to act upon Message change */
}
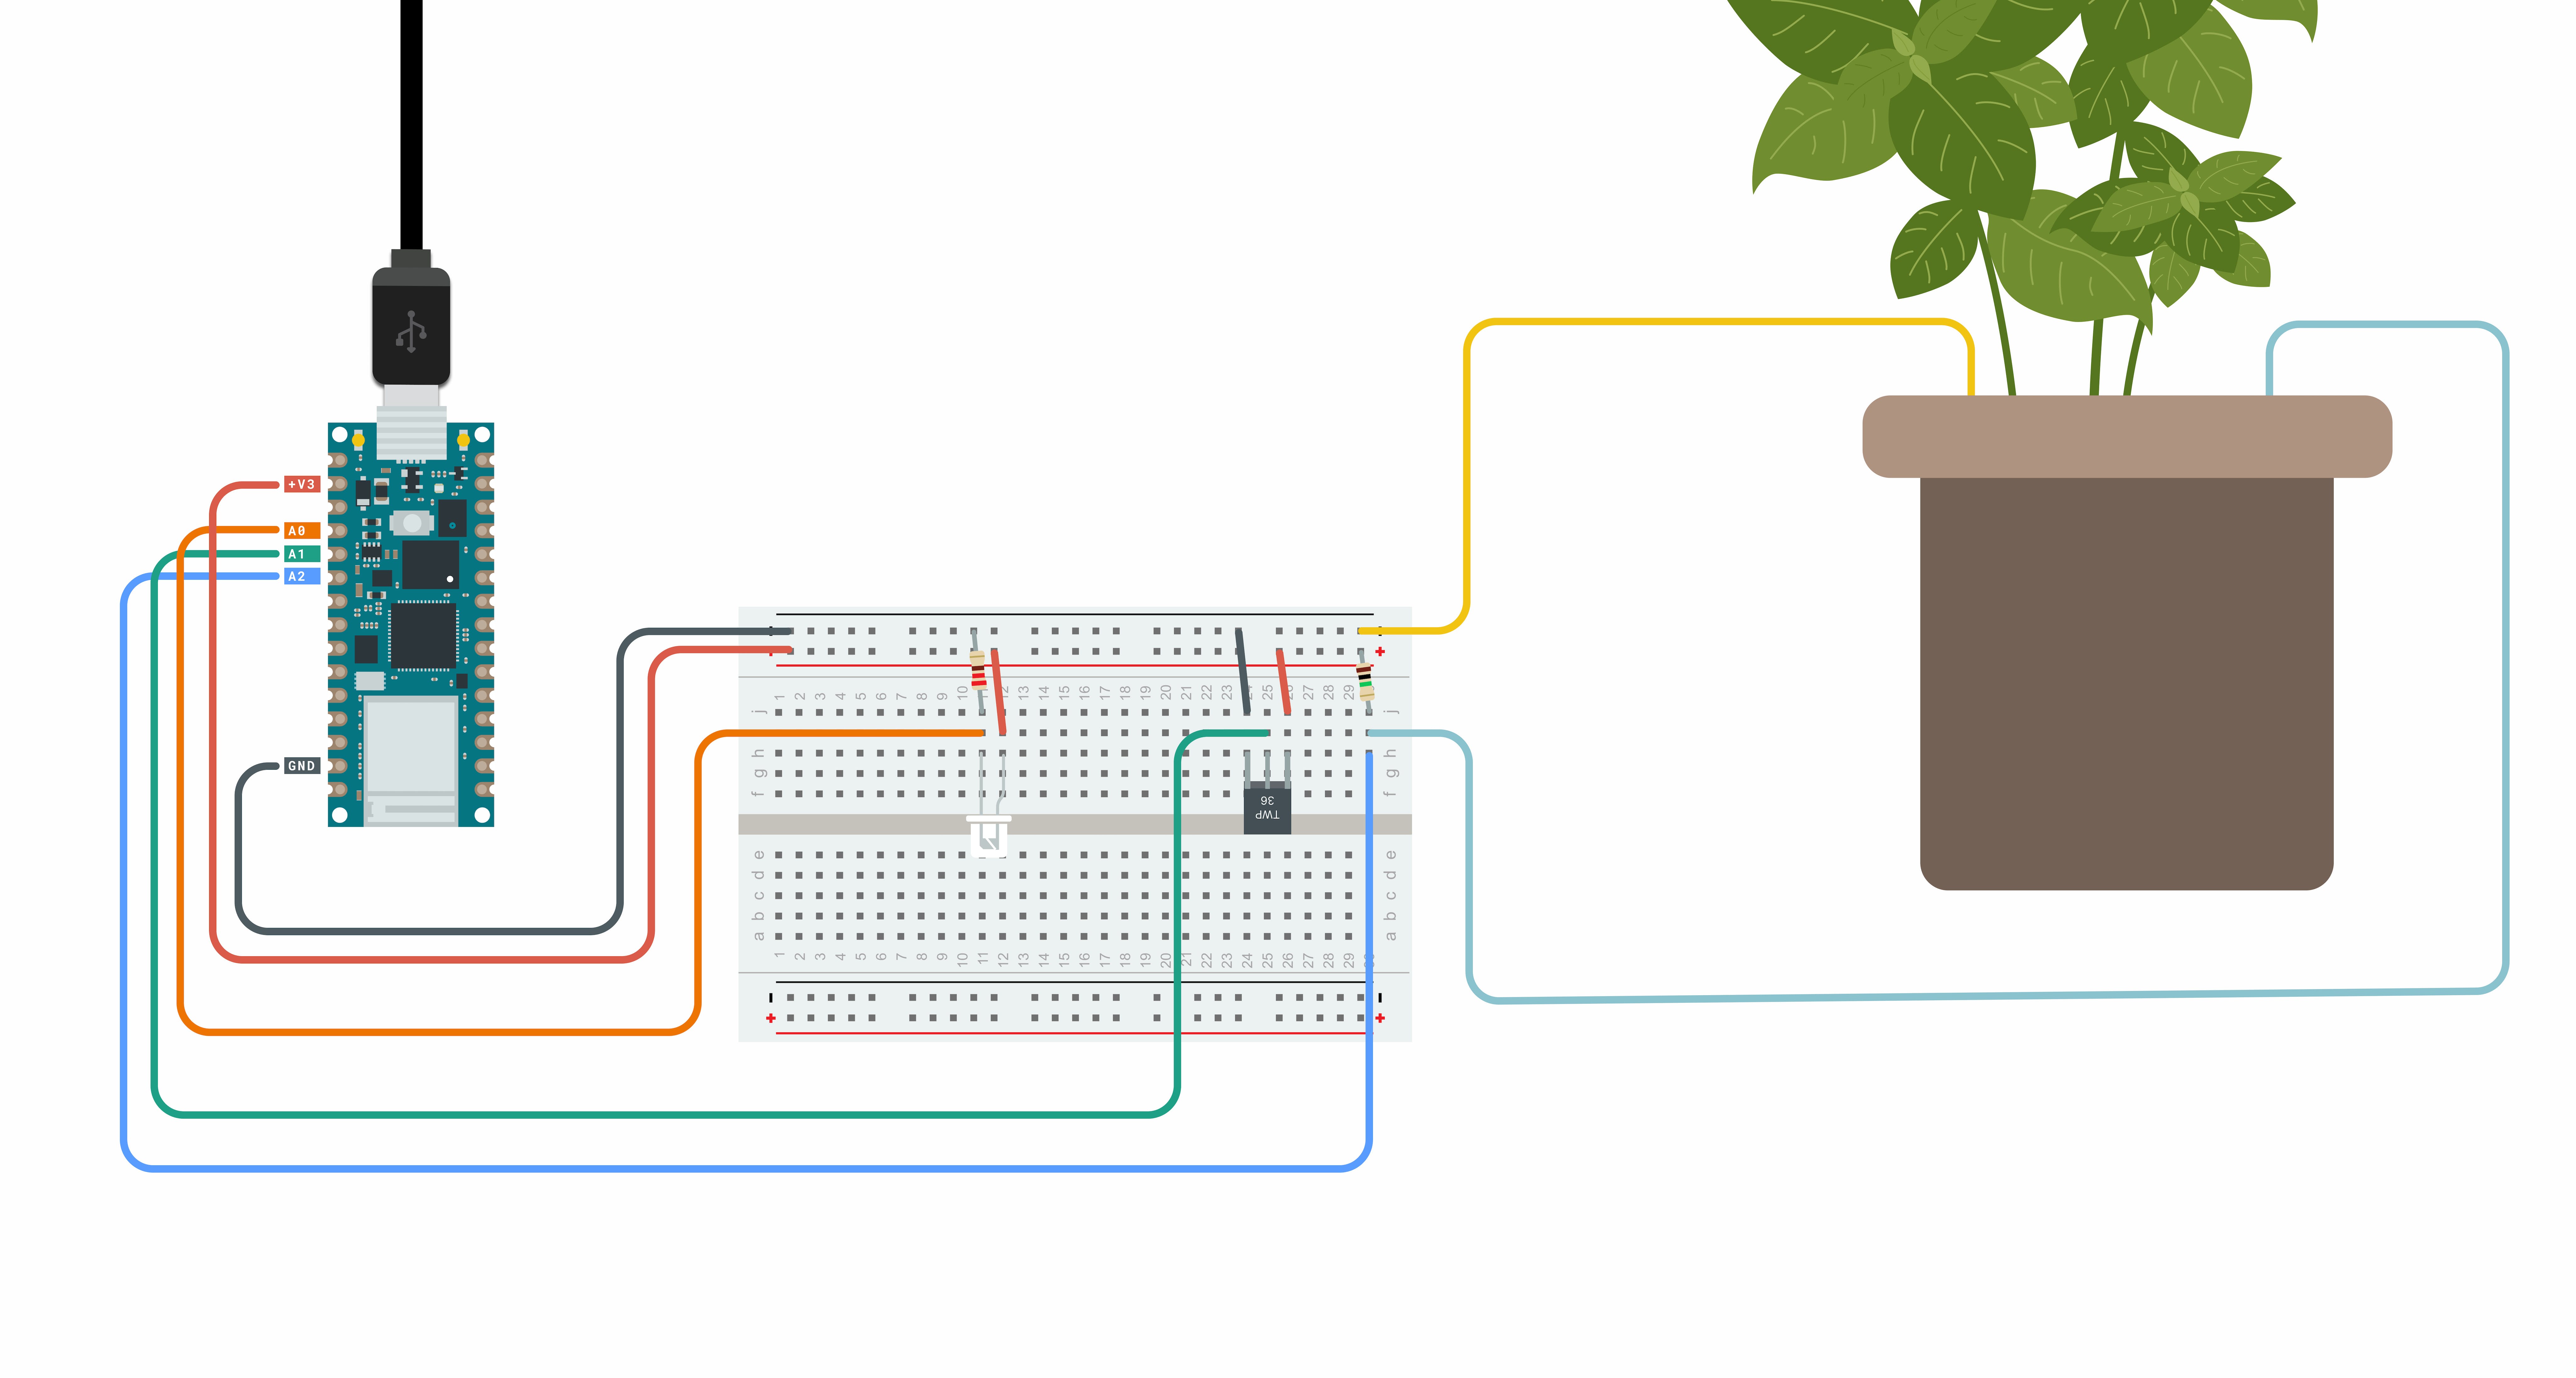
光和温度传感器
请参见下面的示意图以连接两个传感器。我们将使用这两个函数从传感器读取值:

#include "thingProperties.h"
int lightPin = A0; /*the analog pin the light sensor is connected to */
int tempPin = A1; /*the analog pin the TMP36's Vout (sense) pin is connected to */
int moisturePin = A2;
/* Set this threshold accordingly to the resistance you used */
/* The easiest way to calibrate this value is to test the sensor in both dry and wet earth */
int threshold = 800;
void setup() {
  /* Initialize serial and wait for port to open: */
  Serial.begin(9600);
  /* This delay gives the chance to wait for a Serial Monitor without blocking if none is found */
  delay(1500);
  /* Defined in thingProperties.h */
  initProperties();
  /* Connect to Arduino IoT Cloud */
  ArduinoCloud.begin(ArduinoIoTPreferredConnection);
  /*
     The following function allows you to obtain more information
     related to the state of network and IoT Cloud connection and errors
     the higher number the more granular information you’ll get.
     The default is 0 (only errors).
     Maximum is 4
  */
  setDebugMessageLevel(2);
  ArduinoCloud.printDebugInfo();
}
void loop() {
  ArduinoCloud.update();
  light = analogRead(lightPin); /* assign light variable to light sensor values */
  Serial.print("light ");
  Serial.println(light);
  temperature = get_temperature(); /* assign temperature variable to temperature in Celsius */
  Serial.print("temperature ");
  Serial.println(temperature);

  moisture = get_average_moisture();
  /* assign the message variable based on water levels */
  if (moisture > threshold) {
    message = "Warning your plant needs water!"; /* Insert here your emergency message */
  } else {
    message = "Your plant has enough water!";
  }
}
int get_average_moisture() {
  int tempValue = 0; /* variable to temporarly store moisture value */
  /* make an average of 10 values to be more accurate */
  for (int a = 0; a < 10; a++) {
    tempValue += analogRead(moisturePin);
    delay(100);
  }
  return tempValue / 10;
}
float get_temperature() {
  int reading = analogRead(tempPin);
  float voltage = reading * 3.3;
  voltage /= 1024.0;
  /* temperature in Celsius */
  float temperatureC = (voltage - 0.5) * 100 ; /*converting from 10 mv per degree wit 500 mV offset */
  /* Convert to Fahrenheit */
  float temperatureF = (temperatureC * 9.0 / 5.0) + 32.0;
  return temperatureC;
}
void onMessageChange()  {
  /* Add your code here to act upon Message change */
}
请注意,您可以通过在“get_temperature()”函数末尾返回 temperatureF 而不是 temperatureC 来使用华氏度单位。
仪表板
部署项目的最后一步是使用 Arduino IoT 仪表板添加控制面板。我们可以导航到Dashboards -> Build Dashboard -> ADD,然后我们可以添加四个小部件并将它们链接到变量,如下所示:
- 图形小部件 -> 温度变量
- 图形小部件 -> 湿度变量
- 仪表小部件 -> 光变量
- Messenger 小部件 -> 消息变量
现在,我们可以看到传感器数据的可视化表示。
祝贺您现在已经构建了自己的 DIY 植物通讯器,展示了您的植物如何使用 IoT Bundle 和 IoT Cloud 进行操作。
想知道更多?
本教程是让您熟悉 Arduino IoT Bundle 的一系列实验的一部分。所有实验都可以使用 IoT Bundle 中包含的组件来构建。
- Arduino自动化园艺植物
- 如何使用Arduino构建植物监视器
- Arduino IoT Cloud ESP32 Alexa Control智能家居
- IoT ONE Nixie Clock Arduino Cloud背光控制
- 使用Arduino创建烟雾探测器
- 基于Arduino Uno的植物浇水自动化设计 1次下载
- 带arduino的植物浇水报警系统
- 如何使用此分线器创建Arduino项目
- 使用Arduino创建智能灌溉控制器
- 使用Alexa和Arduino IoT Cloud完全控制您的电视
- 带有MKR WiFi 1010的植物通讯器
- Arduino智能植物孵化器
- Arduino通讯篇
- 基于Cloud Connected Zigbee IoT ThermostatSensing的参考设计
- Arduino板是什么如何使用IDE软件创建和上传Arduino程序到Arduino板
- 使用paramiko在eNSP的交换机中批量创建VLAN 1704次阅读
- Arduino IoT Cloud开始与ChatGPT联机运作 1642次阅读
- 如何创建基于DCO的音频合成器 1002次阅读
- 如何解决Spring Cloud下测试环境路由问题 1049次阅读
- 如何设置Arduino IoT将消息发送到云板显示器 2303次阅读
- 如何从网页控制arduino? 4186次阅读
- 如何利用Arduino创建一个电机滑动门 1786次阅读
- 如何使用Arduino创建停车门禁控制系统? 5302次阅读
- 欧司朗推出的新型LED技术帮助植物生长促进绿色生态 857次阅读
- 米尔科技 Beetle IoT 评估板概述 1361次阅读
- 远程控制通讯--基于Arduino + ESP8266控制LED灯 4w次阅读
- Arduino如何安装驱动_Arduino安装驱动步骤 5.9w次阅读
- arduino是什么以及arduino能干什么 4.5w次阅读
- 工程师DIY智能灌溉器解决植物浇水难题 2405次阅读
- 用于植物的土壤加热器 3964次阅读
下载排行
本周
- 1山景DSP芯片AP8248A2数据手册
- 1.06 MB | 532次下载 | 免费
- 2RK3399完整板原理图(支持平板,盒子VR)
- 3.28 MB | 339次下载 | 免费
- 3TC358743XBG评估板参考手册
- 1.36 MB | 330次下载 | 免费
- 4DFM软件使用教程
- 0.84 MB | 295次下载 | 免费
- 5元宇宙深度解析—未来的未来-风口还是泡沫
- 6.40 MB | 227次下载 | 免费
- 6迪文DGUS开发指南
- 31.67 MB | 194次下载 | 免费
- 7元宇宙底层硬件系列报告
- 13.42 MB | 182次下载 | 免费
- 8FP5207XR-G1中文应用手册
- 1.09 MB | 178次下载 | 免费
本月
- 1OrCAD10.5下载OrCAD10.5中文版软件
- 0.00 MB | 234315次下载 | 免费
- 2555集成电路应用800例(新编版)
- 0.00 MB | 33566次下载 | 免费
- 3接口电路图大全
- 未知 | 30323次下载 | 免费
- 4开关电源设计实例指南
- 未知 | 21549次下载 | 免费
- 5电气工程师手册免费下载(新编第二版pdf电子书)
- 0.00 MB | 15349次下载 | 免费
- 6数字电路基础pdf(下载)
- 未知 | 13750次下载 | 免费
- 7电子制作实例集锦 下载
- 未知 | 8113次下载 | 免费
- 8《LED驱动电路设计》 温德尔著
- 0.00 MB | 6656次下载 | 免费
总榜
- 1matlab软件下载入口
- 未知 | 935054次下载 | 免费
- 2protel99se软件下载(可英文版转中文版)
- 78.1 MB | 537798次下载 | 免费
- 3MATLAB 7.1 下载 (含软件介绍)
- 未知 | 420027次下载 | 免费
- 4OrCAD10.5下载OrCAD10.5中文版软件
- 0.00 MB | 234315次下载 | 免费
- 5Altium DXP2002下载入口
- 未知 | 233046次下载 | 免费
- 6电路仿真软件multisim 10.0免费下载
- 340992 | 191187次下载 | 免费
- 7十天学会AVR单片机与C语言视频教程 下载
- 158M | 183279次下载 | 免费
- 8proe5.0野火版下载(中文版免费下载)
- 未知 | 138040次下载 | 免费
 电子发烧友App


 创作
创作 发文章
发文章 发帖
发帖  提问
提问  发资料
发资料 发视频
发视频 上传资料赚积分


评论