 电子发烧友App


 创作
创作 发文章
发文章 发帖
发帖  提问
提问  发资料
发资料 发视频
发视频资料介绍
描述
概述
在许多电子项目中,需要根据时间或日期运行一个操作,并且时间和日期的计算不应该在系统关闭时停止。为此,使用了实时时钟 (RTC) 模块。在本教程中,您将学习如何将 RTC DS1 与 Arduino 结合使用来进行提醒。
你将学到什么:
什么是实时时钟?
实时时钟或 RTC 是一种跟踪当前时间的系统,可用于任何需要保持准确时间的设备。

您也可以在不使用 RTC 系统的情况下跟踪准确时间,但 RTC 具有一些重要的优势。以下是其中一些优点:
- 低功耗
- 从时间计算中释放系统时间(此功能很关键,因为在许多情况下 CPU 正在执行一些微妙的任务,例如接收传感器数据。如果您不使用 RTC,CPU 还必须跟踪时间,这可能会破坏处理器主任务。)
- 高准确率
RTC 通常有备用电源,因此它们可以在主电源关闭或不可用时继续计时。RTC 通常使用 32.768 kHz 晶体振荡器。但为什么是 32、768?32768 等于 215,因此可以轻松生成 1 秒。另外,晶体必须小,宽度适当,功耗低,使用32876 Hz即可满足。较高的频率是较大且易碎的晶体,而较低的频率比 32、768KHz 具有更多的功耗。
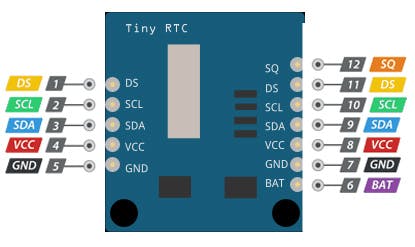
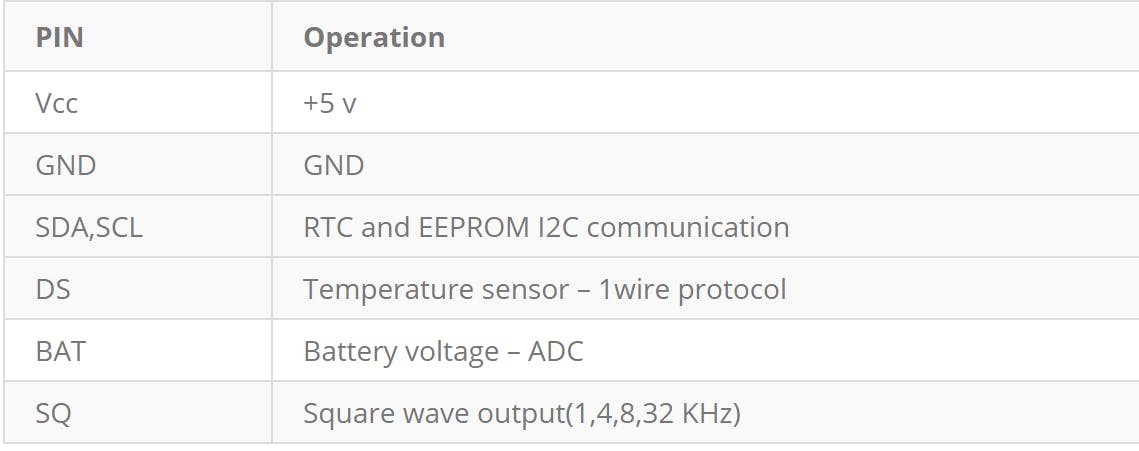
DS1307 模块特性和规格
DS1307 模块是最实惠和最常见的 RTC 模块之一。它可以准确地记录秒、分、时、日、月和年。
DS1307 的一些重要特性是:
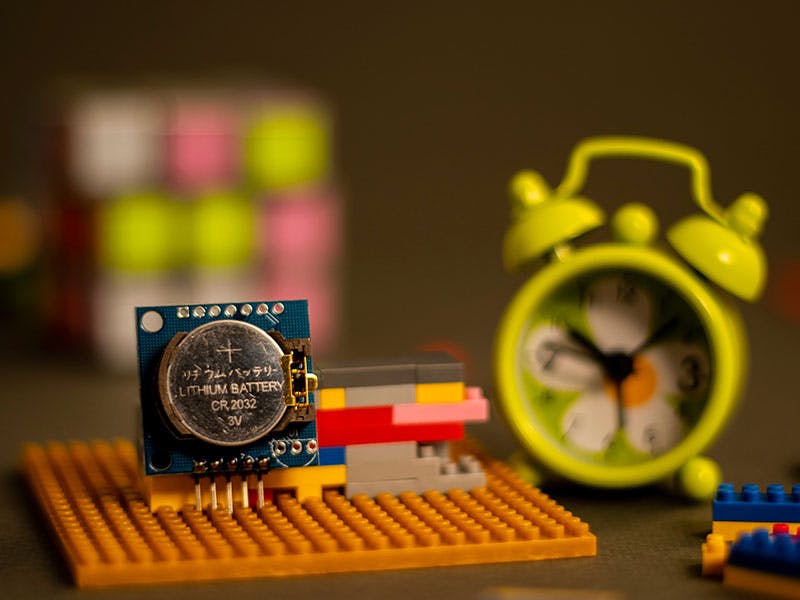
DS1307 模块能够安装 3 伏 CR2023 备用电池。该模块上还有一个嵌入式 EEPROM 24c32 存储器,可以保存 32kb 的数据。此外,您还可以通过在内置位置安装一个DS18B20传感器来测量环境温度。您还可以从 BAT 引脚读取备用电池电压。
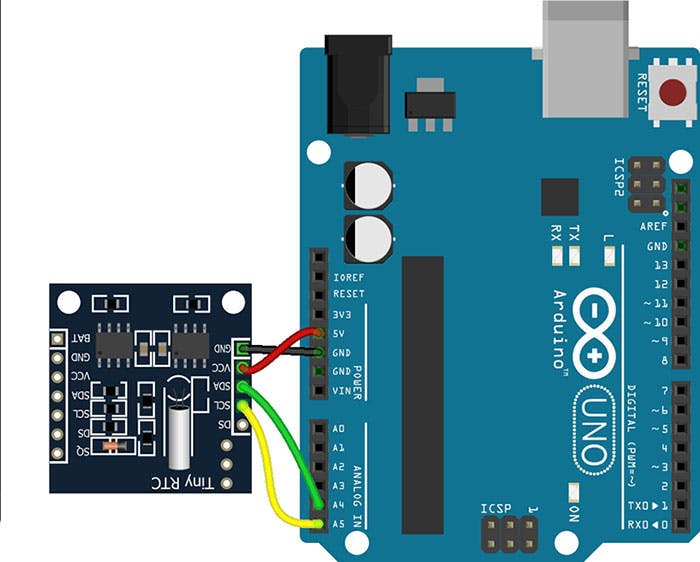
将 DS1307 与 Arduino 连接
电路
代码
您需要 RTClib 库才能将 DS1307 与 Arduino 一起使用。
现在将以下代码上传到您的板上,并在串行监视器窗口中查看结果。
// Date and time functions using a DS1307 RTC connected via I2C and Wire lib
#include
#include "RTClib.h"
RTC_DS1307 rtc;
char daysOfTheWeek[7][12] = {"Sunday", "Monday", "Tuesday", "Wednesday", "Thursday", "Friday", "Saturday"};
void setup () {
 while (!Serial); // for Leonardo/Micro/Zero
 Serial.begin(57600);
 if (! rtc.begin()) {
   Serial.println("Couldn't find RTC");
   while (1);
 }
 if (! rtc.isrunning()) {
   Serial.println("RTC is NOT running!");
   // following line sets the RTC to the date & time this sketch was compiled
   rtc.adjust(DateTime(F(__DATE__), F(__TIME__)));
   // This line sets the RTC with an explicit date & time, for example to set
   // January 21, 2014 at 3am you would call:
   // rtc.adjust(DateTime(2014, 1, 21, 3, 0, 0));
 }
}
void loop () {
 DateTime now = rtc.now();
 Serial.print(now.year(), DEC);
 Serial.print('/');
 Serial.print(now.month(), DEC);
 Serial.print('/');
 Serial.print(now.day(), DEC);
 Serial.print(" (");
 Serial.print(daysOfTheWeek[now.dayOfTheWeek()]);
 Serial.print(") ");
 Serial.print(now.hour(), DEC);
 Serial.print(':');
 Serial.print(now.minute(), DEC);
 Serial.print(':');
 Serial.print(now.second(), DEC);
 Serial.println();
 Serial.print(" since midnight 1/1/1970 = ");
 Serial.print(now.unixtime());
 Serial.print("s = ");
 Serial.print(now.unixtime() / 86400L);
 Serial.println("d");
 // calculate a date which is 7 days and 30 seconds into the future
 DateTime future (now + TimeSpan(7, 12, 30, 6));
 Serial.print(" now + 7d + 30s: ");
 Serial.print(future.year(), DEC);
 Serial.print('/');
 Serial.print(future.month(), DEC);
 Serial.print('/');
 Serial.print(future.day(), DEC);
 Serial.print(' ');
 Serial.print(future.hour(), DEC);
 Serial.print(':');
 Serial.print(future.minute(), DEC);
 Serial.print(':');
 Serial.print(future.second(), DEC);
 Serial.println();
 Serial.println();
 delay(3000);
}
您可以通过两种方式设置日期和时间。首先是使用以下代码在您的 PC 上设置它们:
rtc.adjust(DateTime(F(__DATE__), F(__TIME__)));
第二种方法是使用以下代码手动设置日期和时间:
rtc.adjust(DateTime(YEAR, MONTH, DAY, HOUR , MINUTE, SECOND));
注意您只需在项目中设置一次日期和时间,之后,您应该从代码中删除相关行。否则,每次打开系统时都会设置日期和时间,这可能会导致一些错误。
注意在您的 Arduino 上上传代码需要几秒钟,与实时相比,这可能会导致您的时间延迟几秒钟。所以我们建议您在上传代码之前将您的时间提前几秒。
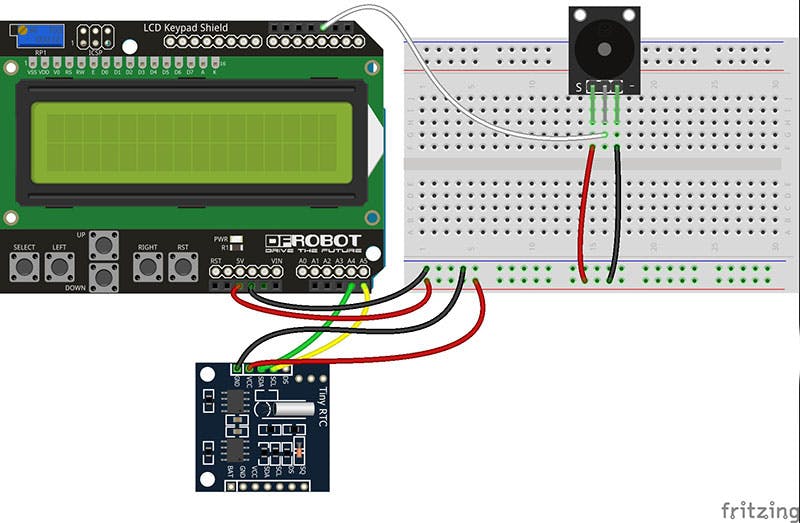
奖励项目:做一个智能提醒
您可以使用 DS1307 模块制作一个简单而有用的提醒。
其他所需材料
电路
代码
将以下代码上传到您的 Arduino 板上,您的智能提醒已准备就绪!
/*
Arduino Reminder
modified on 13 March 2019
by Saeed Hosseini @ Electropeak
https://electropeak.com/learn/
*/
#include #include #include "RTClib.h"
#define NOTE_C4  262
#define NOTE_D4  294
#define NOTE_E4  330
#define NOTE_F4  349
#define NOTE_G4  392
#define NOTE_A4  440
#define NOTE_B4  494
#define NOTE_C5  523
#define NOTE_D5  587
#define NOTE_E5  659
#define NOTE_F5  698
#define NOTE_G5  784
#define NOTE_A5  880
#define NOTE_B5  988
//LCD Pin to Arduino
const int pin_RS = 8;
const int pin_EN = 9;
const int pin_d4 = 4;
const int pin_d5 = 5;
const int pin_d6 = 6;
const int pin_d7 = 7;
const int pin_BL = 10;
//BUZZER Pin to Arduino
const int buzzer = 2;
LiquidCrystal lcd( pin_RS,  pin_EN,  pin_d4,  pin_d5,  pin_d6,  pin_d7);
RTC_DS1307 rtc;
byte smiley[8] = {
 B00000,
 B10001,
 B00000,
 B00000,
 B10001,
 B01110,
 B00000,
};
String menuItems[] = {"1-Medicin", "2-Wake up", "3-Go out"};
int songspeed = 1.5;
int flag = 0;
int menuPage = 0;
int maxMenuPages = round(((sizeof(menuItems) / sizeof(String)) / 2) + .5);
int cursorPosition = 0;
int btn;
int h = 0, m = 0;
int duration[] = {         //duration of each note (in ms) Quarter Note is set to 250 ms
 125, 125, 250, 125, 125,
 125, 125, 250, 125, 125,
 125, 125, 250, 125, 125,
 125, 125, 375, 125,
 125, 125, 250, 125, 125,
 125, 125, 250, 125, 125,
 125, 125, 250, 125, 125,
 125, 125, 375, 125,
 125, 125, 250, 125, 125,
 125, 125, 250, 125, 125,
 125, 125, 250, 125, 125,
 125, 125, 125, 250, 125,
 125, 125, 250, 125, 125,
 250, 125, 250, 125,
 125, 125, 250, 125, 125,
 125, 125, 375, 375,
 250, 125,
 //Rpeat of First Part
 125, 125, 250, 125, 125,
 125, 125, 250, 125, 125,
 125, 125, 375, 125,
 125, 125, 250, 125, 125,
 125, 125, 250, 125, 125,
 125, 125, 250, 125, 125,
 125, 125, 375, 125,
 125, 125, 250, 125, 125,
 125, 125, 250, 125, 125,
 125, 125, 250, 125, 125,
 125, 125, 125, 250, 125,
 125, 125, 250, 125, 125,
 250, 125, 250, 125,
 125, 125, 250, 125, 125,
 125, 125, 375, 375,
 //End of Repeat
 250, 125, 375, 250, 125, 375,
 125, 125, 125, 125, 125, 125, 125, 125, 375,
 250, 125, 375, 250, 125, 375,
 125, 125, 125, 125, 125, 500,
 250, 125, 375, 250, 125, 375,
 125, 125, 125, 125, 125, 125, 125, 125, 375,
 250, 125, 375, 250, 125, 375,
 125, 125, 125, 125, 125, 500
};
int notes[] = {       //Note of the song, 0 is a rest/pulse
 NOTE_E4, NOTE_G4, NOTE_A4, NOTE_A4, 0,
 NOTE_A4, NOTE_B4, NOTE_C5, NOTE_C5, 0,
 NOTE_C5, NOTE_D5, NOTE_B4, NOTE_B4, 0,
 NOTE_A4, NOTE_G4, NOTE_A4, 0,
 NOTE_E4, NOTE_G4, NOTE_A4, NOTE_A4, 0,
 NOTE_A4, NOTE_B4, NOTE_C5, NOTE_C5, 0,
 NOTE_C5, NOTE_D5, NOTE_B4, NOTE_B4, 0,
 NOTE_A4, NOTE_G4, NOTE_A4, 0,
 NOTE_E4, NOTE_G4, NOTE_A4, NOTE_A4, 0,
 NOTE_A4, NOTE_C5, NOTE_D5, NOTE_D5, 0,
 NOTE_D5, NOTE_E5, NOTE_F5, NOTE_F5, 0,
 NOTE_E5, NOTE_D5, NOTE_E5, NOTE_A4, 0,
 NOTE_A4, NOTE_B4, NOTE_C5, NOTE_C5, 0,
 NOTE_D5, NOTE_E5, NOTE_A4, 0,
 NOTE_A4, NOTE_C5, NOTE_B4, NOTE_B4, 0,
 NOTE_C5, NOTE_A4, NOTE_B4, 0,
 NOTE_A4, NOTE_A4,
 //Repeat of first part
 NOTE_A4, NOTE_B4, NOTE_C5, NOTE_C5, 0,
 NOTE_C5, NOTE_D5, NOTE_B4, NOTE_B4, 0,
 NOTE_A4, NOTE_G4, NOTE_A4, 0,
 NOTE_E4, NOTE_G4, NOTE_A4, NOTE_A4, 0,
 NOTE_A4, NOTE_B4, NOTE_C5, NOTE_C5, 0,
 NOTE_C5, NOTE_D5, NOTE_B4, NOTE_B4, 0,
 NOTE_A4, NOTE_G4, NOTE_A4, 0,
 NOTE_E4, NOTE_G4, NOTE_A4, NOTE_A4, 0,
 NOTE_A4, NOTE_C5, NOTE_D5, NOTE_D5, 0,
 NOTE_D5, NOTE_E5, NOTE_F5, NOTE_F5, 0,
 NOTE_E5, NOTE_D5, NOTE_E5, NOTE_A4, 0,
 NOTE_A4, NOTE_B4, NOTE_C5, NOTE_C5, 0,
 NOTE_D5, NOTE_E5, NOTE_A4, 0,
 NOTE_A4, NOTE_C5, NOTE_B4, NOTE_B4, 0,
 NOTE_C5, NOTE_A4, NOTE_B4, 0,
 //End of Repeat
 NOTE_E5, 0, 0, NOTE_F5, 0, 0,
 NOTE_E5, NOTE_E5, 0, NOTE_G5, 0, NOTE_E5, NOTE_D5, 0, 0,
 NOTE_D5, 0, 0, NOTE_C5, 0, 0,
 NOTE_B4, NOTE_C5, 0, NOTE_B4, 0, NOTE_A4,
 NOTE_E5, 0, 0, NOTE_F5, 0, 0,
 NOTE_E5, NOTE_E5, 0, NOTE_G5, 0, NOTE_E5, NOTE_D5, 0, 0,
 NOTE_D5, 0, 0, NOTE_C5, 0, 0,
 NOTE_B4, NOTE_C5, 0, NOTE_B4, 0, NOTE_A4
};
void show_time()
{
 lcd.clear();
 DateTime now = rtc.now();
 lcd.setCursor(0, 0);
 lcd.print("* Electropeak *");
 lcd.setCursor(5, 0);
 lcd.print(now.hour(), DEC);
 lcd.print(":");
 lcd.print(now.minute(), DEC);
 if (now.hour() == h && now.minute() == m)
 {
   lcd.clear();
   lcd.setCursor(0 , 0);
   switch (flag)
   {
     case 1:
       lcd.print("** ءedicine Time **");
       break;
     case 2:
       lcd.print("You'r late!!");
       lcd.setCursor(0, 1);
       lcd.print("Come onnnnnnn");
       break;
     case 3:
       lcd.print("Befor you go:");
       lcd.setCursor(0, 1);
       lcd.print("Wallet,Keys,...");
       break;
   }
   for (int i = 0; i < 203; i++) {       //203 is the total number of music notes in the song
     int wait = duration[i] * songspeed;
     tone(buzzer, notes[i], wait);        //tone(pin,frequency,duration)
     delay(wait);
   }
 }
 delay(2000);
}
void welcome_menu(int show_delay)
{
 lcd.setCursor(0, 0);
 lcd.print("Arduino reminder");
 lcd.createChar(1, smiley);
 lcd.setCursor(7, 1);
 lcd.write(1);
 delay(show_delay);
 lcd.clear();
}
int detect_button() {
 int readkey = 0;
 int result = 0;
 int activeButton = 0;
 while (activeButton == 0) {
   readkey = analogRead(0);
   if (readkey < 790) {
     delay(100);
     readkey = analogRead(0);
     if (readkey < 60) {
       result = 1; // right
     } else if (readkey < 200) {
       result = 2; // up
     } else if (readkey < 400) {
       result = 3; // down
     } else if (readkey < 600) {
       result = 4; // down
     } else if (readkey < 800) { result = 5; // select } return result; } } activeButton = 1; } int choose_menu() { lcd.clear(); lcd.print("Remmeber what?"); while (btn != 5) { btn = detect_button(); if (btn == 1) { if (menuPage > maxMenuPages) menuPage = 0;
     lcd.clear();
     lcd.print("Remmeber what?");
     lcd.setCursor(0, 1);
     lcd.print(menuItems[menuPage]);
     menuPage = menuPage + 1;
   }
 }
 return menuPage;
}
void set_alarm() {
 int sit = 0;
 lcd.clear();
 lcd.setCursor(1, 0);
 lcd.print("**Set Alarm**");
 lcd.setCursor(5, 1);
 lcd.print("00:00");
 while (sit != 1)
 {
   sit = detect_button();
   if (sit == 2)
   {
     lcd.clear();
     lcd.setCursor(1, 0);
     lcd.print("**Set Alarm**");
     h++;
     if (h > 23)
     {
       h = 0;
     }
     lcd.setCursor(5, 1);
     lcd.print(h);
     lcd.print(":00");
   }
   else if (sit == 3)
   {
     lcd.clear();
     lcd.setCursor(1, 0);
     lcd.print("**Set Alarm**");
     h--;
     if (h < 0) { h = 23; } lcd.setCursor(5, 1); lcd.print(h); lcd.print(":00"); } } while (sit != 5) { sit = detect_button(); if (sit == 2) { lcd.clear(); lcd.setCursor(1, 0); lcd.print("**Set Alarm**"); m++; if (m > 59)
     {
       m = 0;
     }
     lcd.setCursor(5, 1);
     lcd.print(h);
     lcd.print(":");
     lcd.print(m);
   }
   else if (sit == 3)
   {
     lcd.clear();
     lcd.setCursor(1, 0);
     lcd.print("**Set Alarm**");
     m--;
     if (m < 0)
     {
       m = 59;
     }
     lcd.setCursor(5, 1);
     lcd.print(h);
     lcd.print(":");
     lcd.print(m);
   }
 }
 lcd.clear();
 lcd.setCursor(0, 0);
 lcd.print("Alarm set");
 lcd.setCursor(0, 1);
 lcd.print("I'll be on time");
 delay(1500);
}
void setup() {
 lcd.begin(16, 2);
 rtc.begin();
 pinMode(buzzer, OUTPUT);
 welcome_menu(1000);
 flag = choose_menu();
 set_alarm();
}
void loop()
{
 show_time();
}
如果您需要有关 LCD Keypad Shield 的更多信息,请阅读Using 1602 LCD Keypad Shield w/ Arduino [+Practical Projects]。
打开设备后,LCD 上会显示一个菜单。选择您的提醒模式(您可以通过右键在选项之间移动并通过按选择键选择您想要的模式。)然后设置您的闹钟时间(通过向上和向下键设置小时,然后通过向右转到分钟并设置它.) 现在开始您的日常工作,不用担心!
下一步是什么?
- 使用RTC DS1307在TM1637 LED显示屏上的Arduino显示时间
- 如何将LoRa模块与Arduino连接
- 如何将DS18B20数字温度传感器与Arduino结合使用
- 如何将Arduino MKR和Portenta安装到机柜中
- 如何将红外接收器或TSOP与Arduino结合使用
- 如何将arduino串口链接到python
- 如何将Grove语音识别器模块与Arduino板连接
- 如何将Arduino Uno安装在面包板上来制作DIY Arduino Uno
- Arduino DS1307 RTC时钟
- 如何将Arduino板与不同的传感器连接
- 如何将GPS模块与Arduino连接
- 基于DS1模拟到数字转换的参考设计
- 如何将Arduino板连接到的计算机上的30个项目 16次下载
- 1.5/45 Mb/s (DS1/DS3) Line Int
- DS1904,pdf,datasheet (RTC iBut
- 解析爱普生RTC芯片选型的五大关键 96次阅读
- DS3112发送时钟的时钟速率和频率容差 638次阅读
- 如何使用DS300/DS1 CCFL控制器实现3881:3882的调光比 849次阅读
- DS3112发送时钟的时钟速率和频率容差 765次阅读
- 如何将DS1862连接至集成APC环路的激光驱动器 1306次阅读
- DS1390/DS1391 RTC与带SPI的摩托罗拉DSP接口 1442次阅读
- DS2172 BERT接口连接所有达拉斯成帧器和收发器 771次阅读
- 如何将ubuntu安装到树莓派上 2876次阅读
- 如何使用MAX7219和DS1307制作7段数字时钟 3564次阅读
- 如何利用Arduino UNO设计无RTC模块简单时钟 4425次阅读
- 如何将DPDT开关作为多路开关进行4路接线 1804次阅读
- 基于Arduino Uno开发板的药物提醒系统 2613次阅读
- 微雪电子RTC 时钟模块 DS1302简介 3402次阅读
- dfrobotI2C DS1307 RTC实时时钟模块介绍 5135次阅读
- arduino测量土壤湿度自动浇水提醒 1.3w次阅读

 上传资料赚积分
下载排行
本周
- 1山景DSP芯片AP8248A2数据手册
- 1.06 MB | 532次下载 | 免费
- 2RK3399完整板原理图(支持平板,盒子VR)
- 3.28 MB | 339次下载 | 免费
- 3TC358743XBG评估板参考手册
- 1.36 MB | 330次下载 | 免费
- 4DFM软件使用教程
- 0.84 MB | 295次下载 | 免费
- 5元宇宙深度解析—未来的未来-风口还是泡沫
- 6.40 MB | 227次下载 | 免费
- 6迪文DGUS开发指南
- 31.67 MB | 194次下载 | 免费
- 7元宇宙底层硬件系列报告
- 13.42 MB | 182次下载 | 免费
- 8FP5207XR-G1中文应用手册
- 1.09 MB | 178次下载 | 免费
本月
- 1OrCAD10.5下载OrCAD10.5中文版软件
- 0.00 MB | 234315次下载 | 免费
- 2555集成电路应用800例(新编版)
- 0.00 MB | 33566次下载 | 免费
- 3接口电路图大全
- 未知 | 30323次下载 | 免费
- 4开关电源设计实例指南
- 未知 | 21549次下载 | 免费
- 5电气工程师手册免费下载(新编第二版pdf电子书)
- 0.00 MB | 15349次下载 | 免费
- 6数字电路基础pdf(下载)
- 未知 | 13750次下载 | 免费
- 7电子制作实例集锦 下载
- 未知 | 8113次下载 | 免费
- 8《LED驱动电路设计》 温德尔著
- 0.00 MB | 6656次下载 | 免费
总榜
- 1matlab软件下载入口
- 未知 | 935054次下载 | 免费
- 2protel99se软件下载(可英文版转中文版)
- 78.1 MB | 537798次下载 | 免费
- 3MATLAB 7.1 下载 (含软件介绍)
- 未知 | 420027次下载 | 免费
- 4OrCAD10.5下载OrCAD10.5中文版软件
- 0.00 MB | 234315次下载 | 免费
- 5Altium DXP2002下载入口
- 未知 | 233046次下载 | 免费
- 6电路仿真软件multisim 10.0免费下载
- 340992 | 191187次下载 | 免费
- 7十天学会AVR单片机与C语言视频教程 下载
- 158M | 183279次下载 | 免费
- 8proe5.0野火版下载(中文版免费下载)
- 未知 | 138040次下载 | 免费


 工商网监
工商网监
评论