 从零开始手把手教你写一个基于nRF54L15的BLE工程

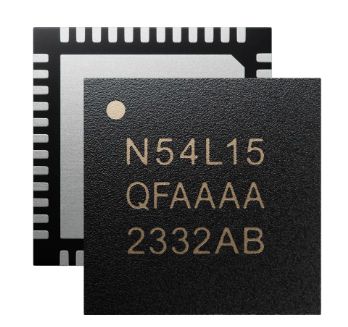
最近收到了Nordic最新的旗舰级BLE芯片 nRF54L15的开发板,大概研究了一下,今天教大家怎么在上面把BLE跑起来。
前言:开发板概览
1、打开包装之后里面是用防静电袋包装的开发板和NFC天线,nRF54L15DK的代号是PCA10156,但是nRF54L15的开发板对比nRF52832的开发板来看,nRF54L15的开发板没有再采用Arduion接口将IO引出。开发板上用到的元器件也少了很多,看下来只用到五颗主芯片。

开发板的JLINK芯片用的是Nordic的nRF5340,JLINK的USB口换成了Typc-C口。
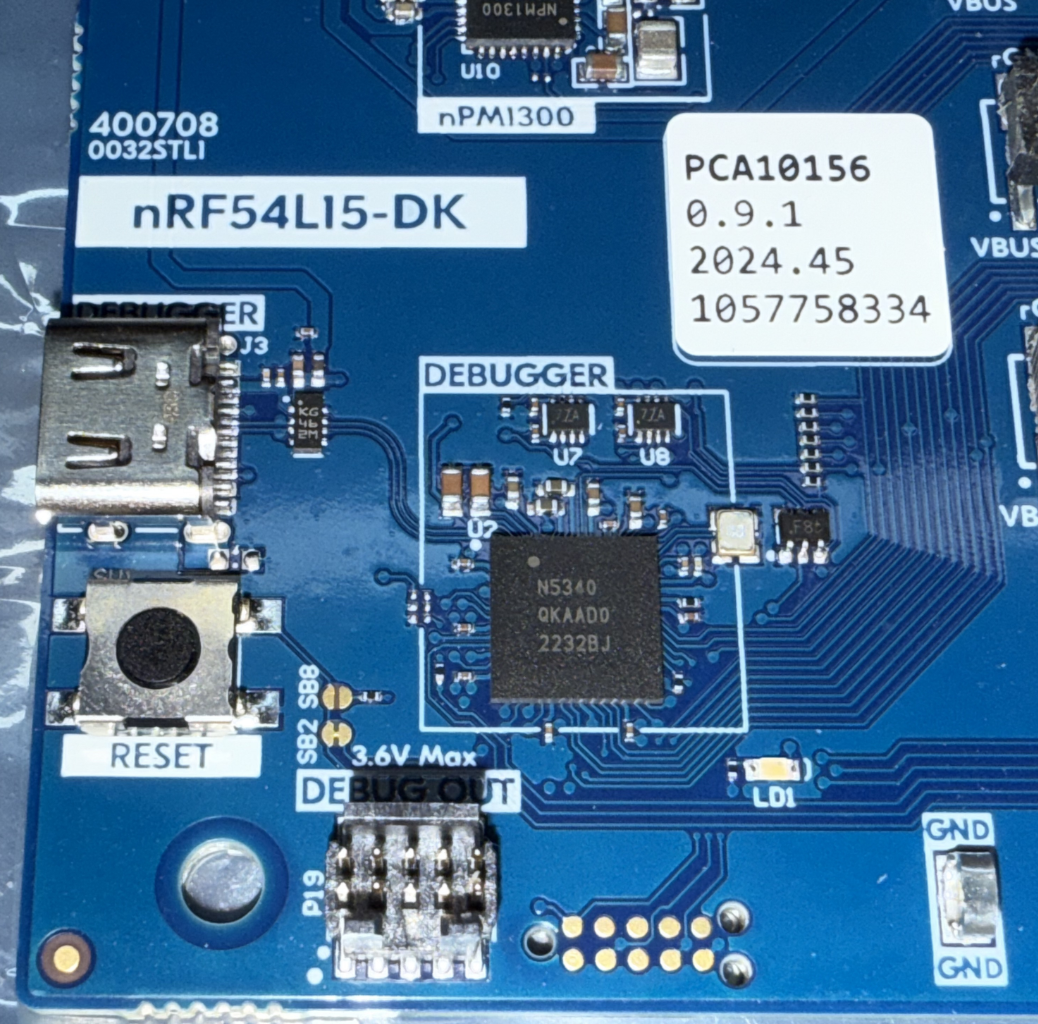

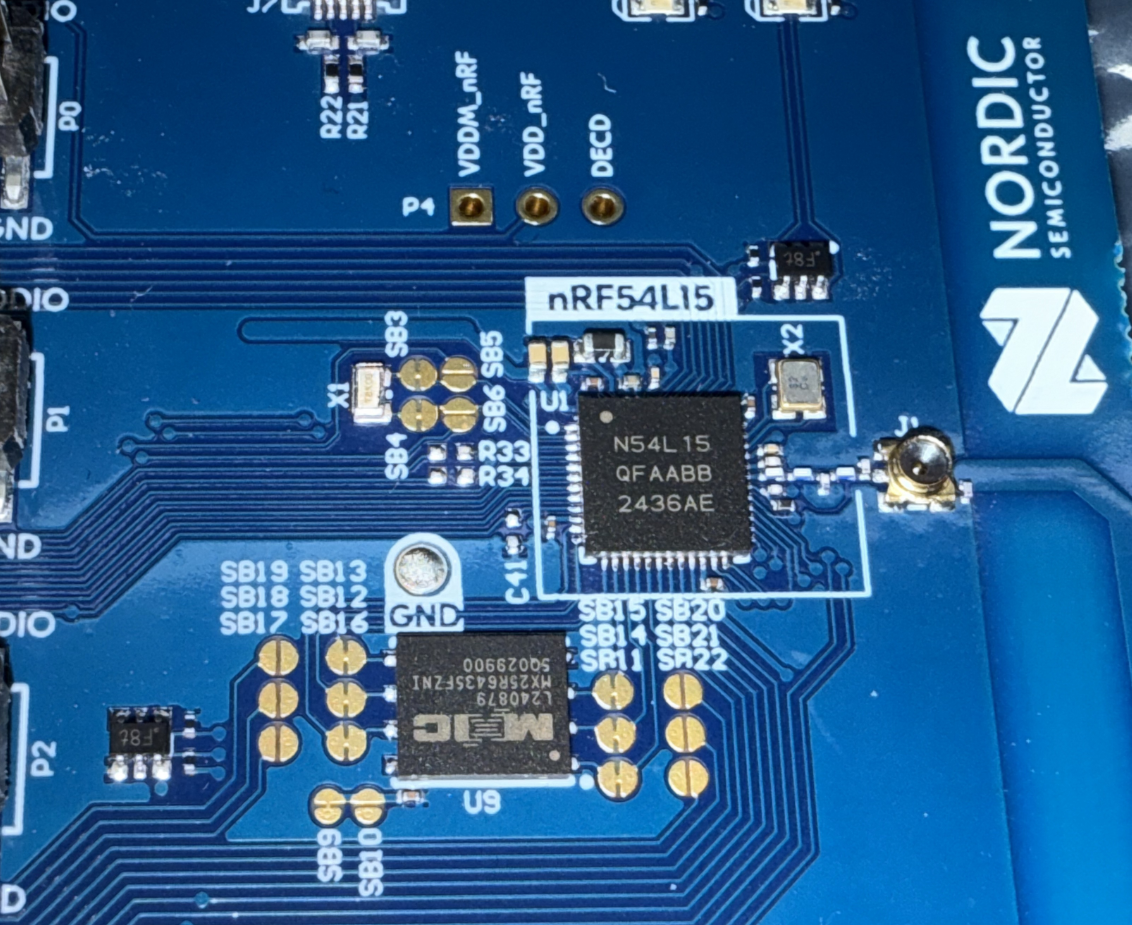
最后来看一下nRF54L15部分,这里外挂了一个MXIC 64Mbit的flash,nRF54L15最小系统的元器件也少了很多。
在网上可以找到nRF54L15的资料:
介绍:https://www.nordicsemi.com/Products/nRF54L15
规格书:https://docs-be.nordicsemi.com/bundle/ps_nrf54L15/attach/pdf/nRF54L15_nRF54L10_nRF54L05_Datasheet_v0.7.pdf
硬件设计:https://www.nordicsemi.com/-/media/Software-and-other-downloads/Reference-Layouts/nRF54L15/nRF54L15-QFAA-Reference-Layout-0_7.zip
2、环境搭建
根据我原厂的朋友的说法,新的nRF54L15需要用到NRF Connect SDK去开发,
这里环境搭建可以参考官方的文档:Installing the nRF Connect SDK (nordicsemi.com)
最新的文档已经推荐使用nrfutil来下载SDK了,但是我个人还是更喜欢用west的方式
这里可以参考中国区原厂FAE的博客:开发你的第一个nRF Connect SDK(NCS)/Zephyr应用程序 - iini - 博客园 (cnblogs.com)
按照博客中的方法安装好Choco和相关的工具之后,直接执行下面两条命令即可:
west init -m https://github.com/nrfconnect/sdk-nrf --mr v2.9.0
west update
nRF54系列的SDK要使用NCS 2.7.0及以上的版本,下载SDK的时候需要注意。
NRF CONNECT SDK现在的编译环境也换成了VS Code + Nordic插件的方式,这里的编译环境搭建也可以参考上面中国区原厂FAE的博客。

一、在nRF54L15D上运行你的第一个程序
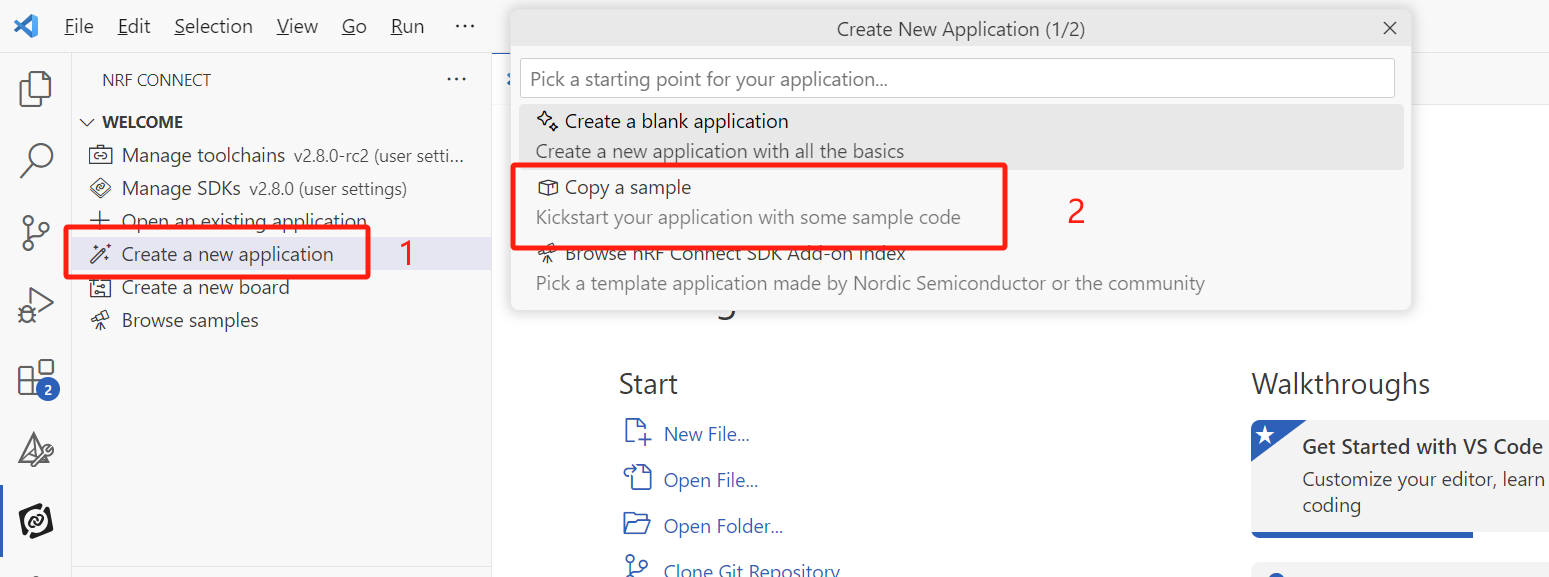
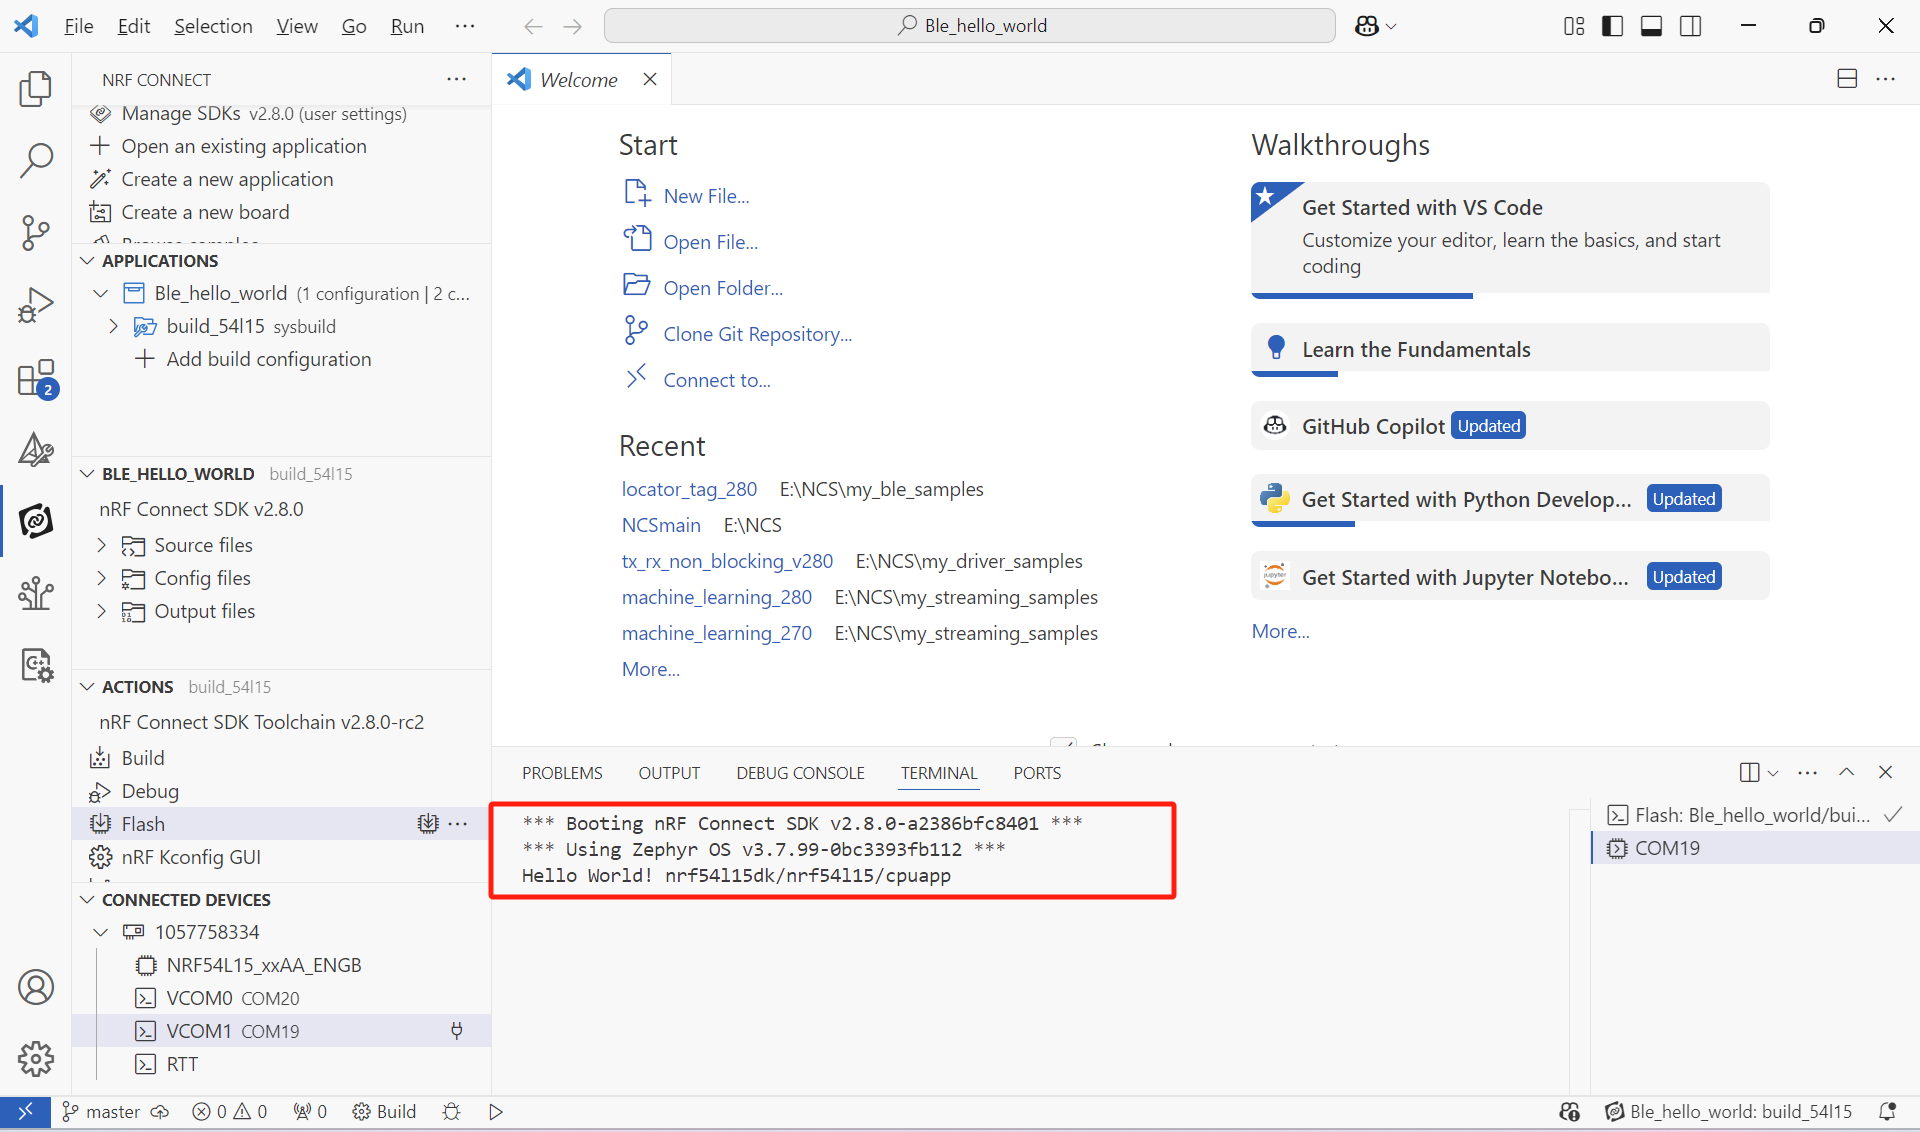
1、搭建好环境之后,首先我们从SDK中Copy一个Hello World的工程
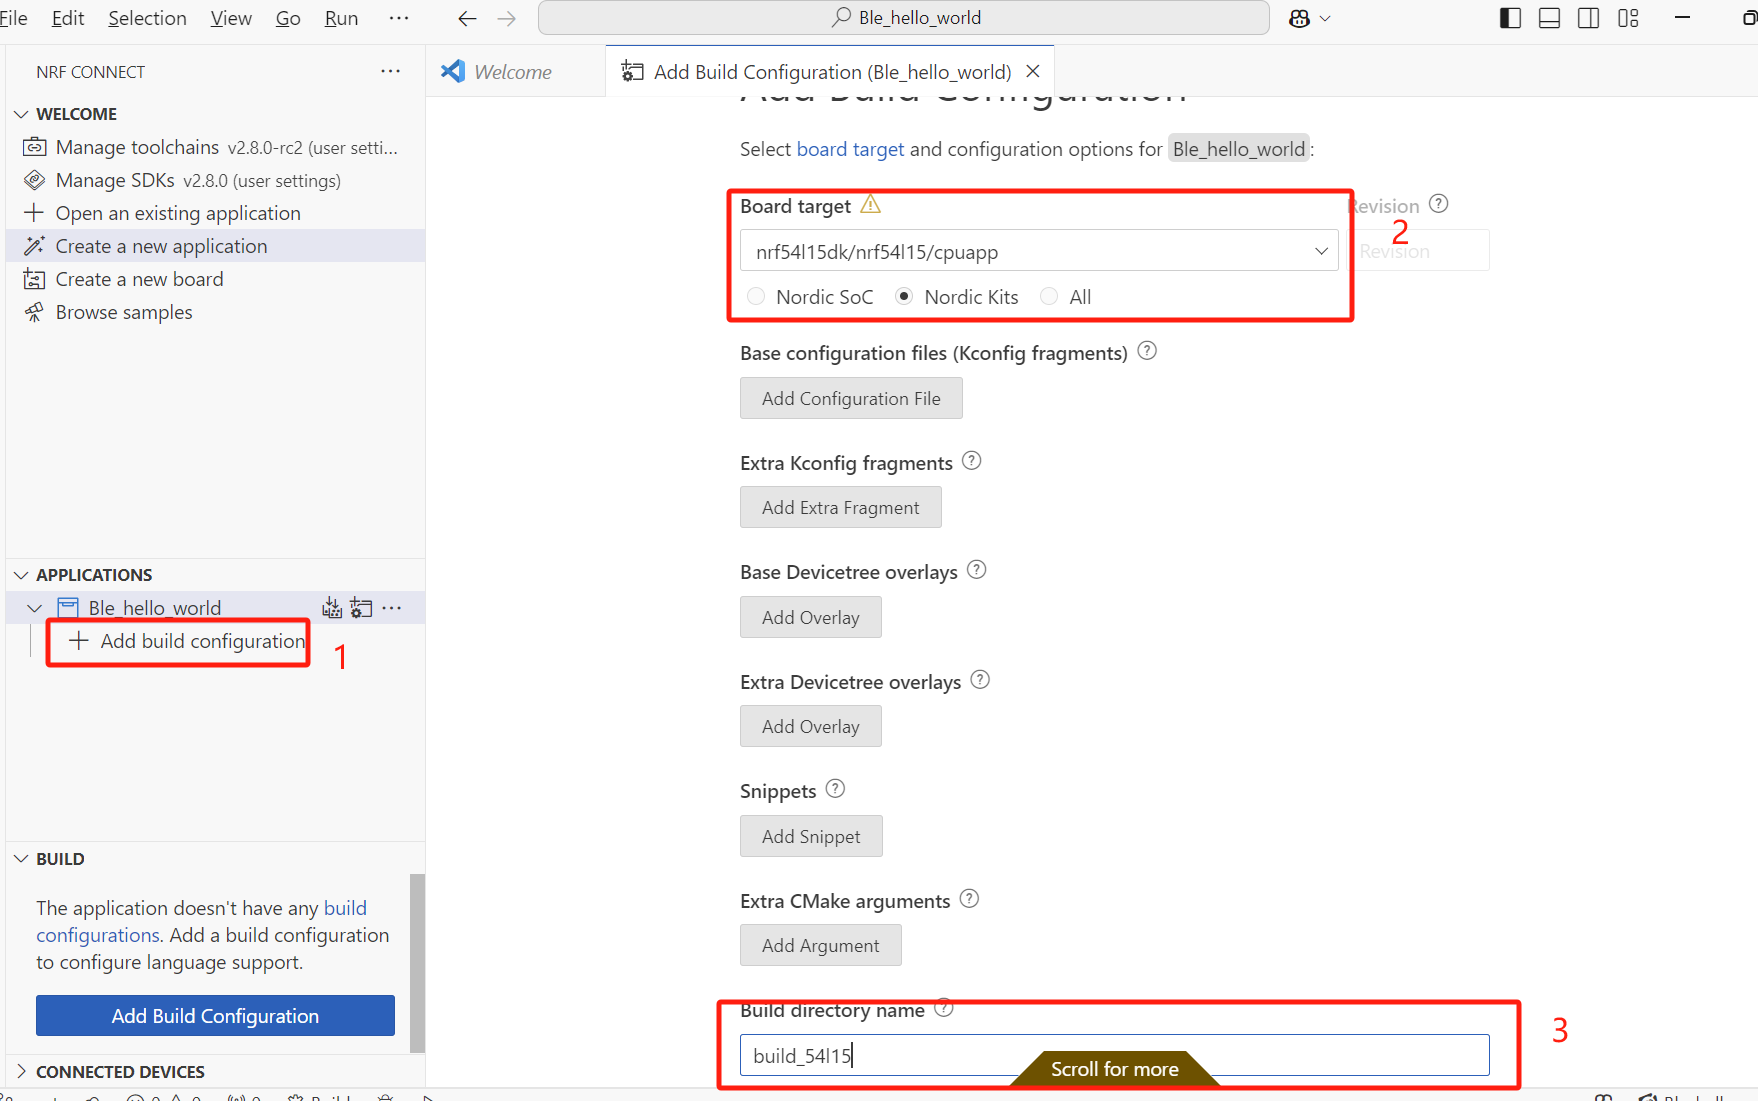
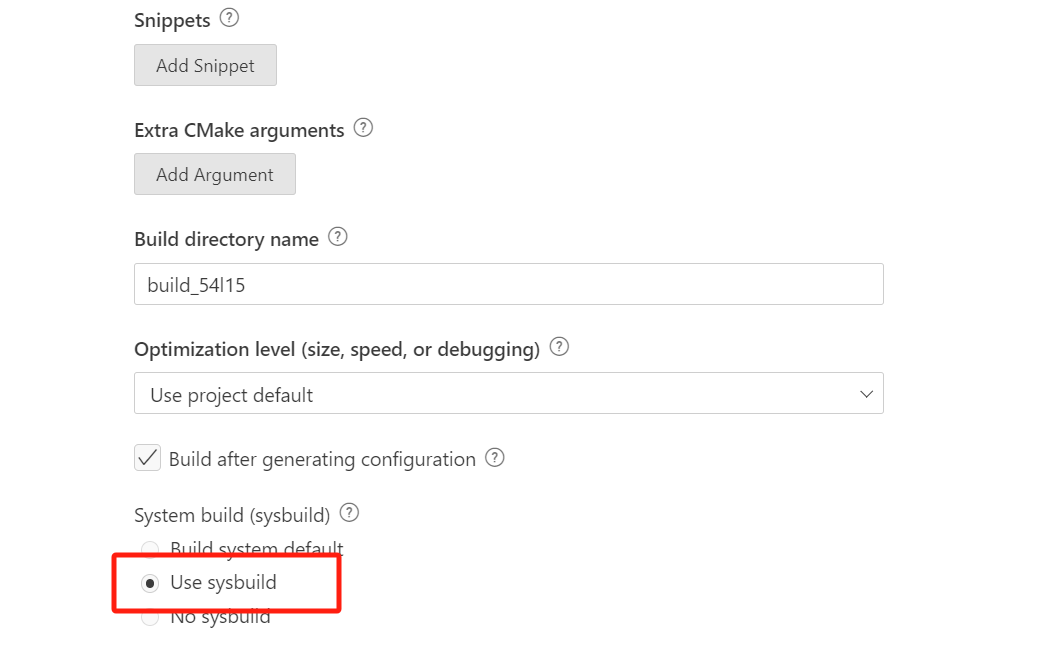
2、编译在NRF54L15DK上运行,这里需要注意NCS2.7.x及以上的版本在编译的时候需要选择SysBuild
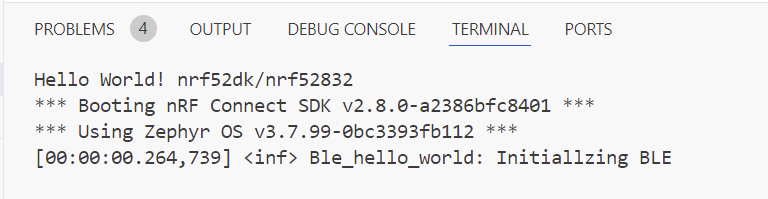
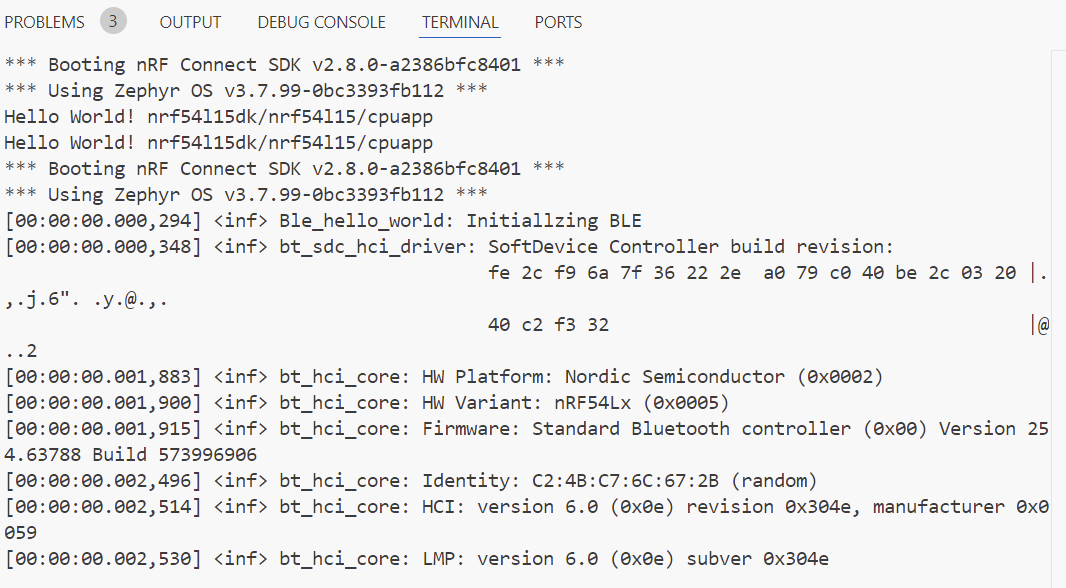
3、程序编译之后下载到nRF54L15DK中,打开串口我们可以看到串口打印如下:
分别是NCS和Zephyr的版本,以及Hello World!和Boards的型号
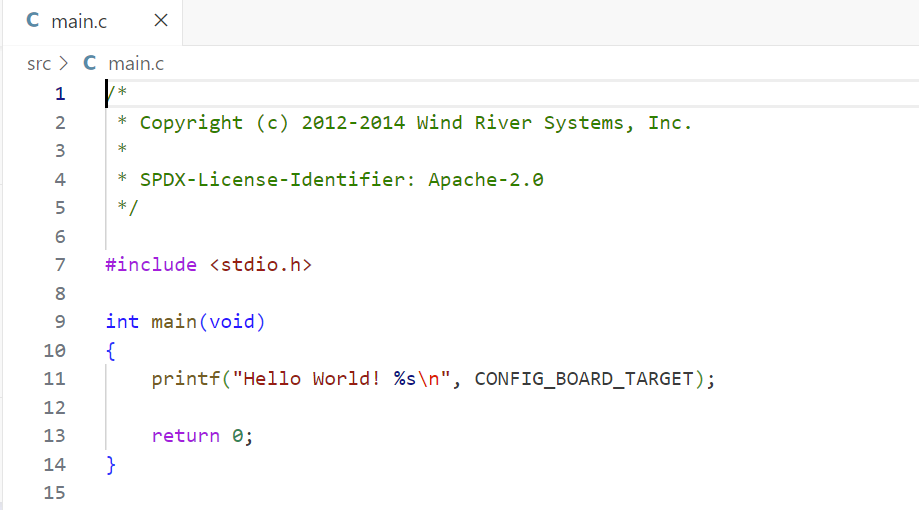
4、我们打开这个工程的main.c,可以看到这个工程非常简单,就是调用了printf来打印Hello World!和CONFIG_BOARD_TARGET这个宏
二、添加LOG模块
上面的Hello World使用了printf来打印,在我们的程序里面可以调用LOG模块来打印调试日志,这样方便我们后续在产品量产的时候关闭LOG模块
1、这里我们先在hello_world/prj.conf中下面这些的宏,开启LOG
复制代码
#Config logger
CONFIG_LOG=y
CONFIG_USE_SEGGER_RTT=n
CONFIG_LOG_BACKEND_RTT=n
CONFIG_LOG_BACKEND_UART=y
CONFIG_LOG_DEFAULT_LEVEL=3
复制代码
2、在main.c中加入下面这些头文件,调用LOG的库,并注册LOG模组
复制代码
//Add Log Library file
#include
#include
//Register LOG Module
#define LOG_MODULE_NAME ble_hello_world
LOG_MODULE_REGISTER(LOG_MODULE_NAME);
复制代码
3、这里我们提前写一个bluetooth_init的函数,并在bluetooth_init中加入一些LOG信息
复制代码
int bluetooth_init(void)
{
int err_code;
LOG_INF("Initiallzing BLE");
err_code = 0;
return err_code;
}
复制代码
4、、在main函数中调用函数 bluetooth_init
复制代码
int main(void)
{
int err_code;
err_code = bluetooth_init();
if(err_code){
LOG_ERR("Bluetooth_init returnrd %d", err_code)
}
printf("Hello World! %sn", CONFIG_BOARD_TARGET);
}
复制代码
5、我们来编译并下载程序到nRF54L15DK中会看到程序进入了bluetooth_init 并在串口打印了LOG:
三、使能协议栈
1、接下来,我们需要加入BLE相关的头文件
//Add BLE Library file
#include
#include
#include
#include
2、prj.conf中加入这些宏,开启BLE相关的宏
复制代码
#Config BLE
CONFIG_BT=y
CONFIG_BT_PERIPHERAL=y
CONFIG_BT_DEVICE_NAME="BLE_Hello_World"
CONFIG_BT_DEVICE_APPEARANCE=0
CONFIG_BT_LL_SOFTDEVICE=y
CONFIG_BT_MAX_CONN=1
CONFIG_ASSERT=y
复制代码
3、在 bluetooth_init中调用bt_enable,这是一个库函数,这个函数的定义的bluetooth.h中,因为bt_enable只负责调度BLE协议栈的启动,而在执行其他函数之前需要确保协议栈完成了启动,所以我们要做一个简单判断
复制代码
int bluetooth_init(void)
{
int err_code;
err_code = bt_enable(bt_ready_callback);
if(err_code)
{
LOG_ERR("BLE Enable returned %d",err_code);
return err_code;
}
LOG_INF("Initiallzing BLE");
return err_code;
}
复制代码
3、我们去看一下这个函数的用法,这里看到bt_enable需要一个回调函数
复制代码
/**
* @brief Enable Bluetooth
*
* Enable Bluetooth. Must be the called before any calls that
* require communication with the local Bluetooth hardware.
*
* When @kconfig{CONFIG_BT_SETTINGS} is enabled, the application must load the
* Bluetooth settings after this API call successfully completes before
* Bluetooth APIs can be used. Loading the settings before calling this function
* is insufficient. Bluetooth settings can be loaded with settings_load() or
* settings_load_subtree() with argument "bt". The latter selectively loads only
* Bluetooth settings and is recommended if settings_load() has been called
* earlier.
*
* @param cb Callback to notify completion or NULL to perform the
* enabling synchronously. The callback is called from the system workqueue.
*
* @return Zero on success or (negative) error code otherwise.
*/
int bt_enable(bt_ready_cb_t cb);
复制代码
我们再去看bt_ready_cb_t这个参数的定义,从这个注释中可以得知这个回调的作用是通知BLE已使能
复制代码
/**
* @typedef bt_ready_cb_t
* @brief Callback for notifying that Bluetooth has been enabled.
*
* @param err zero on success or (negative) error code otherwise.
*/
typedef void (*bt_ready_cb_t)(int err);
复制代码
所以为了确保BLE协议栈已经完成了使能,我们需要自己写一个回调函数
复制代码
/*BLE Enable Callback function*/
void bt_ready_callback(int err_code)
{
if(err_code)
{
LOG_ERR("BLE Enable callback returned %d",err_code);
}
}
复制代码
4、这里我们在bluetooth_init中添加一个信号量,等待bt_ready_cb_t通知协议栈已使能,这里我们调用K_SEM_DEFINE初始化一个信号量,并将其计数设为 1、界限设为 1,然后在bluetooth_init中调用k_sem_take()获取这个信号量,因为我们将计数设置为了1,所以程序会一直在bt_enable()这里等待协议栈使能完成,当然可以将K_FOREVER设置为一个时间,超时之后程序会继续往下执行。
复制代码
static K_SEM_DEFINE(ble_init_ok, 1, 1);
int bluetooth_init(void)
{
int err_code;
LOG_INF("Initiallzing BLE");
err_code = bt_enable(bt_ready_callback);
if(err_code)
{
LOG_ERR("BLE Enable returned %d",err_code);
return err_code;
}
k_sem_take(&ble_init_ok, K_FOREVER);return err_code;
}
复制代码
因为这里我们要确保BLE协议栈使能完成,所以我们可以在bt_ready_callback()中释放这个信号量,这样我们可以通过信号量的同步得知BLE协议栈已经被使能。
复制代码
/*BLE Enable Callback function*/
void bt_ready_callback(int err_code)
{
if(err_code)
{
LOG_ERR("BLE Enable callback returned %d",err_code);
}
k_sem_give(&ble_init_ok);
}
复制代码
5、最后我们编译看一下有什么效果,这里可以看到BLE协议栈已经被使能,并打印了版本信息等LOG
四、开启广播
使能BLE协议栈之后,我们接下来要做的就是开启一个BLE广播
1、我们来设置广播包的内容,我们可以在广播包中加入UUID,这里我们可以写一个宏来定义UUID的号码
/** @brief UUID of the Hello World Service. **/
#define BT_UUID_HOWD_VAL
BT_UUID_128_ENCODE(0x6e400001, 0xb5a3, 0xf393, 0xe0a9, 0xe50e24dcca9e)
#define BT_UUID_HOWD_SERVICE BT_UUID_DECLARE_128(BT_UUID_HOWD_VAL)
2、我们写一个宏来设置广播名称,这个宏最终调用的是在prj.conf中CONFIG_BT_DEVICE_NAME的值,这里我的定义是CONFIG_BT_DEVICE_NAME="BLE_Hello_World"
/*Config BLE Device Name*/
#define DEVICE_NAME CONFIG_BT_DEVICE_NAME
#define DEVICE_NAME_LEN (sizeof(DEVICE_NAME) - 1)
3、最后我们把上面的UUID和名称放在广播包数据中,这里我把UUID放在了Scan response里面
复制代码
/*Config BLE Advertising Data*/
static const struct bt_data ad[] = {
BT_DATA_BYTES(BT_DATA_FLAGS, (BT_LE_AD_GENERAL | BT_LE_AD_NO_BREDR)),
BT_DATA(BT_DATA_NAME_COMPLETE, DEVICE_NAME, DEVICE_NAME_LEN),
};
/*Config BLE Scan repsponse Data*/
static const struct bt_data srd[] = {
BT_DATA_BYTES(BT_DATA_UUID128_ALL, BT_UUID_HOWD_VAL),
};
复制代码
4、完成广播数据定义之后,我们就可以在bluetooth_init()中调用bt_le_adv_start()来开启广播了。
复制代码
int bluetooth_init(void)
{
int err_code;
LOG_INF("Initiallzing BLE");
bt_conn_cb_register();
err_code = bt_enable(bt_ready_callback);
if(err_code)
{
LOG_ERR("BLE Enable returned %d",err_code);
return err_code;
}
k_sem_take(&ble_init_ok, K_FOREVER);
err_code = bt_le_adv_start(BT_LE_ADV_CONN, ad, ARRAY_SIZE(ad), srd,
ARRAY_SIZE(srd));
if (err_code) {
LOG_ERR("Advertising failed to start (err_code %d)", err_code);
return 0;
}
return err_code;
}
复制代码
这里我们可以去看一下bt_le_adv_start()这个函数的用法,这是一个库函数,可以在bluetooth.h中找到声明,可以看到这个函数一共有5个入参,分别是
1)const struct bt_le_adv_param *param,是包括广播周期、广播类型等参数
2)const struct bt_data *ad, size_t ad_len,分别是广播包数据和广播包的长度
3)const struct bt_data *sd, size_t sd_len,分别是扫描响应包数据和扫描响应包的长度
1/**
2* @brief Start advertising
3*
4* Set advertisement data, scan response data, advertisement parameters
5* and start advertising.
6*
7* When the advertisement parameter peer address has been set the advertising
8* will be directed to the peer. In this case advertisement data and scan
9* response data parameters are ignored. If the mode is high duty cycle
10* the timeout will be @ref BT_GAP_ADV_HIGH_DUTY_CYCLE_MAX_TIMEOUT.
11*
12* This function cannot be used with @ref BT_LE_ADV_OPT_EXT_ADV in the @p param.options.
13* For extended advertising, the bt_le_ext_adv_* functions must be used.
14*
15* @param param Advertising parameters.
16* @param ad Data to be used in advertisement packets.
17* @param ad_len Number of elements in ad
18* @param sd Data to be used in scan response packets.
19* @param sd_len Number of elements in sd
20*
21* @return Zero on success or (negative) error code otherwise.
22* @return -ENOMEM No free connection objects available for connectable
23* advertiser.
24* @return -ECONNREFUSED When connectable advertising is requested and there
25* is already maximum number of connections established
26* in the controller.
27* This error code is only guaranteed when using Zephyr
28* controller, for other controllers code returned in
29* this case may be -EIO.
30*/
31intbt_le_adv_start(conststructbt_le_adv_param *param,
32conststructbt_data *ad, size_t ad_len,
33 conststructbt_data *sd, size_t sd_len);
在上面的代码中,广播参数也调用了一个现成的宏,这个宏在bluetooth.h中可以找到,在这个宏里面可以看到参数主义是定义了广播类型为可连接广播,快速广播的最小周期和最大周期。此外广播包中还定义了一下flag等,感兴趣的读者可以自行去看下面这几个宏
BT_DATA_BYTES(BT_DATA_FLAGS, (BT_LE_AD_GENERAL | BT_LE_AD_NO_BREDR)
#define BT_LE_ADV_CONN BT_LE_ADV_PARAM(BT_LE_ADV_OPT_CONNECTABLE,
BT_GAP_ADV_FAST_INT_MIN_2,
BT_GAP_ADV_FAST_INT_MAX_2, NULL)
复制代码
#define BT_GAP_ADV_FAST_INT_MIN_2 0x00a0 /* 100 ms */
#define BT_GAP_ADV_FAST_INT_MAX_2 0x00f0 /* 150 ms */
/**
* @brief Advertise as connectable.
*
* Advertise as connectable. If not connectable then the type of
* advertising is determined by providing scan response data.
* The advertiser address is determined by the type of advertising
* and/or enabling privacy @kconfig{CONFIG_BT_PRIVACY}.
*/
BT_LE_ADV_OPT_CONNECTABLE = BIT(0),
复制代码
此外bluetooth.h中除了BT_LE_ADV_CONN BT_LE_ADV_PARAM之外,还有其他好多个广播参数,感兴趣的读者可以去看看其他的宏分别定义了一些什么。
5、最后我们编译工程来看一下有什么效果,我们可以使用nRF Connect app去查看一下广播数据

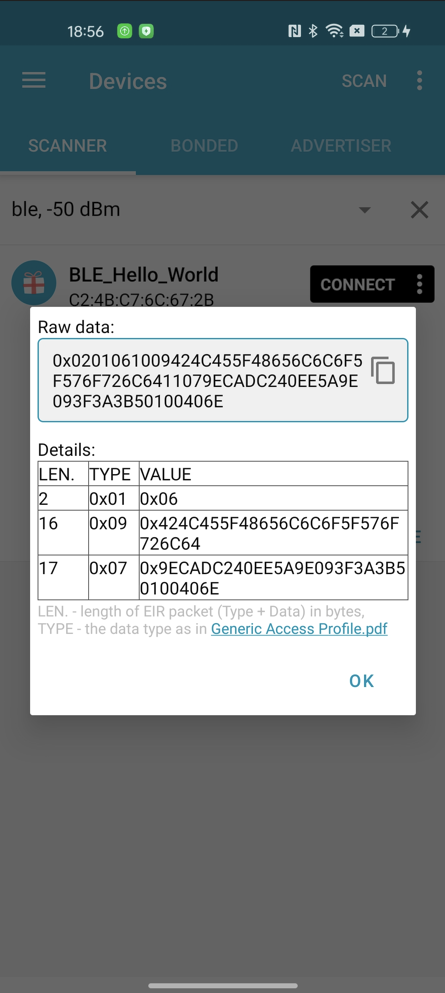
6、练习:如果你熟悉nRF5 SDK,你会发现在NCS上定义个广播参数和广播数据会比nRF5 SDK上要简单,不需要去写参数众多的指针变量,甚至可以直接用现成定义好的宏,许多参数甚至可以直接在prj.conf中定义即可,这大大减少了代码开发的工作量。这里感兴趣的读者可以去自行修改Appearance,这个参数可以通过下面这个宏来定义,修改这个宏的值然后在nRF Connect app的广播设备的图标会出现变化,SIG定义了一些标准具体的值,例如心率设备、HID设备等,具体去SIG这个网站查询:https://www.bluetooth.com/specifications/assigned-numbers
CONFIG_BT_DEVICE_APPEARANCE=0
五、BLE的连接回调
在nRF5 SDK中BLE初始化的时候会注册一个回调函数ble_evt_handler来处理BLE连接、断开连接、更新PHY、Timeout等时候的中断事件
复制代码
/*nRF5 SDK中的BLE中断事件*/
/**@brief Function for handling BLE events.
*
* @param[in] p_ble_evt Bluetooth stack event.
* @param[in] p_context Unused.
*/
static void ble_evt_handler(ble_evt_t const * p_ble_evt, void * p_context)
{
uint32_t err_code;
switch (p_ble_evt->header.evt_id)
{
case BLE_GAP_EVT_CONNECTED:
NRF_LOG_INFO("Connected");
err_code = bsp_indication_set(BSP_INDICATE_CONNECTED);
APP_ERROR_CHECK(err_code);
m_conn_handle = p_ble_evt->evt.gap_evt.conn_handle;
err_code = nrf_ble_qwr_conn_handle_assign(&m_qwr, m_conn_handle);
APP_ERROR_CHECK(err_code);
break;
case BLE_GAP_EVT_DISCONNECTED:
NRF_LOG_INFO("Disconnected");
// LED indication will be changed when advertising starts.
m_conn_handle = BLE_CONN_HANDLE_INVALID;
break;
case BLE_GAP_EVT_PHY_UPDATE_REQUEST:
{
NRF_LOG_DEBUG("PHY update request.");
ble_gap_phys_t const phys =
{
.rx_phys = BLE_GAP_PHY_AUTO,
.tx_phys = BLE_GAP_PHY_AUTO,
};
err_code = sd_ble_gap_phy_update(p_ble_evt->evt.gap_evt.conn_handle, &phys);
APP_ERROR_CHECK(err_code);
} break;
case BLE_GAP_EVT_SEC_PARAMS_REQUEST:
// Pairing not supported
err_code = sd_ble_gap_sec_params_reply(m_conn_handle, BLE_GAP_SEC_STATUS_PAIRING_NOT_SUPP, NULL, NULL);
APP_ERROR_CHECK(err_code);
break;
case BLE_GATTS_EVT_SYS_ATTR_MISSING:
// No system attributes have been stored.
err_code = sd_ble_gatts_sys_attr_set(m_conn_handle, NULL, 0, 0);
APP_ERROR_CHECK(err_code);
break;
case BLE_GATTC_EVT_TIMEOUT:
// Disconnect on GATT Client timeout event.
err_code = sd_ble_gap_disconnect(p_ble_evt->evt.gattc_evt.conn_handle,
BLE_HCI_REMOTE_USER_TERMINATED_CONNECTION);
APP_ERROR_CHECK(err_code);
break;
case BLE_GATTS_EVT_TIMEOUT:
// Disconnect on GATT Server timeout event.
err_code = sd_ble_gap_disconnect(p_ble_evt->evt.gatts_evt.conn_handle,
BLE_HCI_REMOTE_USER_TERMINATED_CONNECTION);
APP_ERROR_CHECK(err_code);
break;
default:
// No implementation needed.
break;
}
}
复制代码
在NCS中,我们也可以这样来做,这个章节我们将演示如何在连接和断开连接的时候,打印LOG和点亮熄灭DK的LED1。
1、首先我们在bluetooth_init()加入一个回调注册函数bt_conn_cb_register(),这个函数在conn.h,我们来看一下这个函数的声明,可以看到这个函数的主要作用就是注册一个callback用来在连接状态下监控相关事件。
复制代码
/** @brief Register connection callbacks.
*
* Register callbacks to monitor the state of connections.
*
* @param cb Callback struct. Must point to memory that remains valid.
*
* @retval 0 Success.
* @retval -EEXIST if @p cb was already registered.
*/
int bt_conn_cb_register(struct bt_conn_cb *cb);
复制代码
从注释中我们可以看到这个函数需要输入 struct bt_conn_cb *cb 这个结构体作为入参,这个结构体的声明也在conn.h中,我们去看一下这个结构体的注释,可以看到这个结构体中给出的相关BLE回调函数是和nRF5 SDK中给出的case是相似的,感兴趣的读者可以自行查看注释来进一步做对比。
复制代码
/** @brief Connection callback structure.
*
* This structure is used for tracking the state of a connection.
* It is registered with the help of the bt_conn_cb_register() API.
* It's permissible to register multiple instances of this @ref bt_conn_cb
* type, in case different modules of an application are interested in
* tracking the connection state. If a callback is not of interest for
* an instance, it may be set to NULL and will as a consequence not be
* used for that instance.
*/
struct bt_conn_cb {
/** @brief A new connection has been established.
*
* This callback notifies the application of a new connection.
* In case the err parameter is non-zero it means that the
* connection establishment failed.
*
* @note If the connection was established from an advertising set then
* the advertising set cannot be restarted directly from this
* callback. Instead use the connected callback of the
* advertising set.
*
* @param conn New connection object.
* @param err HCI error. Zero for success, non-zero otherwise.
*
* @p err can mean either of the following:
* - @ref BT_HCI_ERR_UNKNOWN_CONN_ID Creating the connection started by
* @ref bt_conn_le_create was canceled either by the user through
* @ref bt_conn_disconnect or by the timeout in the host through
* @ref bt_conn_le_create_param timeout parameter, which defaults to
* @kconfig{CONFIG_BT_CREATE_CONN_TIMEOUT} seconds.
* - @p BT_HCI_ERR_ADV_TIMEOUT High duty cycle directed connectable
* advertiser started by @ref bt_le_adv_start failed to be connected
* within the timeout.
*/
void (*connected)(struct bt_conn *conn, uint8_t err);
/** @brief A connection has been disconnected.
*
* This callback notifies the application that a connection
* has been disconnected.
*
* When this callback is called the stack still has one reference to
* the connection object. If the application in this callback tries to
* start either a connectable advertiser or create a new connection
* this might fail because there are no free connection objects
* available.
* To avoid this issue it is recommended to either start connectable
* advertise or create a new connection using @ref k_work_submit or
* increase @kconfig{CONFIG_BT_MAX_CONN}.
*
* @param conn Connection object.
* @param reason BT_HCI_ERR_* reason for the disconnection.
*/
void (*disconnected)(struct bt_conn *conn, uint8_t reason);
/** @brief A connection object has been returned to the pool.
*
* This callback notifies the application that it might be able to
* allocate a connection object. No guarantee, first come, first serve.
*
* Use this to e.g. re-start connectable advertising or scanning.
*
* Treat this callback as an ISR, as it originates from
* @ref bt_conn_unref which is used by the BT stack. Making
* Bluetooth API calls in this context is error-prone and strongly
* discouraged.
*/
void (*recycled)(void);
/** @brief LE connection parameter update request.
*
* This callback notifies the application that a remote device
* is requesting to update the connection parameters. The
* application accepts the parameters by returning true, or
* rejects them by returning false. Before accepting, the
* application may also adjust the parameters to better suit
* its needs.
*
* It is recommended for an application to have just one of these
* callbacks for simplicity. However, if an application registers
* multiple it needs to manage the potentially different
* requirements for each callback. Each callback gets the
* parameters as returned by previous callbacks, i.e. they are not
* necessarily the same ones as the remote originally sent.
*
* If the application does not have this callback then the default
* is to accept the parameters.
*
* @param conn Connection object.
* @param param Proposed connection parameters.
*
* @return true to accept the parameters, or false to reject them.
*/
bool (*le_param_req)(struct bt_conn *conn,
struct bt_le_conn_param *param);
/** @brief The parameters for an LE connection have been updated.
*
* This callback notifies the application that the connection
* parameters for an LE connection have been updated.
*
* @param conn Connection object.
* @param interval Connection interval.
* @param latency Connection latency.
* @param timeout Connection supervision timeout.
*/
void (*le_param_updated)(struct bt_conn *conn, uint16_t interval,
uint16_t latency, uint16_t timeout);
#if defined(CONFIG_BT_SMP)
/** @brief Remote Identity Address has been resolved.
*
* This callback notifies the application that a remote
* Identity Address has been resolved
*
* @param conn Connection object.
* @param rpa Resolvable Private Address.
* @param identity Identity Address.
*/
void (*identity_resolved)(struct bt_conn *conn,
const bt_addr_le_t *rpa,
const bt_addr_le_t *identity);
#endif /* CONFIG_BT_SMP */
#if defined(CONFIG_BT_SMP) || defined(CONFIG_BT_CLASSIC)
/** @brief The security level of a connection has changed.
*
* This callback notifies the application that the security of a
* connection has changed.
*
* The security level of the connection can either have been increased
* or remain unchanged. An increased security level means that the
* pairing procedure has been performed or the bond information from
* a previous connection has been applied. If the security level
* remains unchanged this means that the encryption key has been
* refreshed for the connection.
*
* @param conn Connection object.
* @param level New security level of the connection.
* @param err Security error. Zero for success, non-zero otherwise.
*/
void (*security_changed)(struct bt_conn *conn, bt_security_t level,
enum bt_security_err err);
#endif /* defined(CONFIG_BT_SMP) || defined(CONFIG_BT_CLASSIC) */
#if defined(CONFIG_BT_REMOTE_INFO)
/** @brief Remote information procedures has completed.
*
* This callback notifies the application that the remote information
* has been retrieved from the remote peer.
*
* @param conn Connection object.
* @param remote_info Connection information of remote device.
*/
void (*remote_info_available)(struct bt_conn *conn,
struct bt_conn_remote_info *remote_info);
#endif /* defined(CONFIG_BT_REMOTE_INFO) */
#if defined(CONFIG_BT_USER_PHY_UPDATE)
/** @brief The PHY of the connection has changed.
*
* This callback notifies the application that the PHY of the
* connection has changed.
*
* @param conn Connection object.
* @param info Connection LE PHY information.
*/
void (*le_phy_updated)(struct bt_conn *conn,
struct bt_conn_le_phy_info *param);
#endif /* defined(CONFIG_BT_USER_PHY_UPDATE) */
#if defined(CONFIG_BT_USER_DATA_LEN_UPDATE)
/** @brief The data length parameters of the connection has changed.
*
* This callback notifies the application that the maximum Link Layer
* payload length or transmission time has changed.
*
* @param conn Connection object.
* @param info Connection data length information.
*/
void (*le_data_len_updated)(struct bt_conn *conn,
struct bt_conn_le_data_len_info *info);
#endif /* defined(CONFIG_BT_USER_DATA_LEN_UPDATE) */
#if defined(CONFIG_BT_DF_CONNECTION_CTE_RX)
/** @brief Callback for IQ samples report collected when sampling
* CTE received by data channel PDU.
*
* @param conn The connection object.
* @param iq_report Report data for collected IQ samples.
*/
void (*cte_report_cb)(struct bt_conn *conn,
const struct bt_df_conn_iq_samples_report *iq_report);
#endif /* CONFIG_BT_DF_CONNECTION_CTE_RX */
#if defined(CONFIG_BT_TRANSMIT_POWER_CONTROL)
/** @brief LE Read Remote Transmit Power Level procedure has completed or LE
* Transmit Power Reporting event.
*
* This callback notifies the application that either the remote transmit power level
* has been read from the peer or transmit power level has changed for the local or
* remote controller when transmit power reporting is enabled for the respective side
* using @ref bt_conn_le_set_tx_power_report_enable.
*
* @param conn Connection object.
* @param report Transmit power report.
*/
void (*tx_power_report)(struct bt_conn *conn,
const struct bt_conn_le_tx_power_report *report);
#endif /* CONFIG_BT_TRANSMIT_POWER_CONTROL */
#if defined(CONFIG_BT_PATH_LOSS_MONITORING)
/** @brief LE Path Loss Threshold event.
*
* This callback notifies the application that there has been a path loss threshold
* crossing or reporting the initial path loss threshold zone after using
* @ref bt_conn_le_set_path_loss_mon_enable.
*
* @param conn Connection object.
* @param report Path loss threshold report.
*/
void (*path_loss_threshold_report)(struct bt_conn *conn,
const struct bt_conn_le_path_loss_threshold_report *report);
#endif /* CONFIG_BT_PATH_LOSS_MONITORING */
#if defined(CONFIG_BT_SUBRATING)
/** @brief LE Subrate Changed event.
*
* This callback notifies the application that the subrating parameters
* of the connection may have changed.
* The connection subrating parameters will be unchanged
* if status is not BT_HCI_ERR_SUCCESS.
*
* @param conn Connection object.
* @param params New subrating parameters.
*/
void (*subrate_changed)(struct bt_conn *conn,
const struct bt_conn_le_subrate_changed *params);
#endif /* CONFIG_BT_SUBRATING */
#if defined(CONFIG_BT_CHANNEL_SOUNDING)
/** @brief LE CS Read Remote Supported Capabilities Complete event.
*
* This callback notifies the application that the remote channel
* sounding capabilities have been received from the peer.
*
* @param conn Connection object.
* @param remote_cs_capabilities Remote Channel Sounding Capabilities.
*/
void (*le_cs_remote_capabilities_available)(struct bt_conn *conn,
struct bt_conn_le_cs_capabilities *params);
/** @brief LE CS Read Remote FAE Table Complete event.
*
* This callback notifies the application that the remote mode-0
* FAE Table has been received from the peer.
*
* @param conn Connection object.
* @param params FAE Table.
*/
void (*le_cs_remote_fae_table_available)(struct bt_conn *conn,
struct bt_conn_le_cs_fae_table *params);
/** @brief LE CS Config created.
*
* This callback notifies the application that a Channel Sounding
* Configuration procedure has completed and a new CS config is created
*
* @param conn Connection object.
* @param config CS configuration.
*/
void (*le_cs_config_created)(struct bt_conn *conn, struct bt_conn_le_cs_config *config);
/** @brief LE CS Config removed.
*
* This callback notifies the application that a Channel Sounding
* Configuration procedure has completed and a CS config is removed
*
* @param conn Connection object.
* @param config_id ID of the CS configuration that was removed.
*/
void (*le_cs_config_removed)(struct bt_conn *conn, uint8_t config_id);
/** @brief Subevent Results from a CS procedure are available.
*
* This callback notifies the user that CS subevent results are
* available for the given connection object.
*
* @param conn Connection objects.
* @param result Subevent results
*/
void (*le_cs_subevent_data_available)(struct bt_conn *conn,
struct bt_conn_le_cs_subevent_result *result);
/** @brief LE CS Security Enabled.
*
* This callback notifies the application that a Channel Sounding
* Security Enable procedure has completed
*
* @param conn Connection object.
*/
void (*le_cs_security_enabled)(struct bt_conn *conn);
/** @brief LE CS Procedure Enabled.
*
* This callback notifies the application that a Channel Sounding
* Procedure Enable procedure has completed
*
* @param conn Connection object.
* @param params CS Procedure Enable parameters
*/
void (*le_cs_procedure_enabled)(
struct bt_conn *conn, struct bt_conn_le_cs_procedure_enable_complete *params);
#endif
/** @internal Internally used field for list handling */
sys_snode_t _node;
};
复制代码
2、这里我们还是来演示如何使用CONNECT和DISCONNECT这两个回调来在BLE断开和连接的时候处理相关任务。首先我们来写一个结构体ble_connection_callback ,这个结构体里面包括两个函数ble_on_connected和ble_on_connected
struct bt_conn_cb ble_connection_callback = {
.connected = ble_on_connected,
.disconnected = ble_on_disconnected,
};
这里我们需要调用bt_conn_get_dst这个函数来获取对端设备的MAC地址,并调用bt_addr_le_to_str将获取到的地址转成字符串用于打印。
复制代码
/** @brief Get destination (peer) address of a connection.
*
* @param conn Connection object.
*
* @return Destination address.
*/
const bt_addr_le_t *bt_conn_get_dst(const struct bt_conn *conn);
/** @brief Converts binary LE Bluetooth address to string.
*
* @param addr Address of buffer containing binary LE Bluetooth address.
* @param str Address of user buffer with enough room to store
* formatted string containing binary LE address.
* @param len Length of data to be copied to user string buffer. Refer to
* BT_ADDR_LE_STR_LEN about recommended value.
*
* @return Number of successfully formatted bytes from binary address.
*/
static inline int bt_addr_le_to_str(const bt_addr_le_t *addr, char *str,
size_t len)
复制代码
在连接和断开异常的时候我们还可以调用bt_hci_err_to_str来获取相关的错误代码。
复制代码
/** Converts a HCI error to string.
*
* The error codes are described in the Bluetooth Core specification,
* Vol 1, Part F, Section 2.
*
* The HCI documentation found in Vol 4, Part E,
* describes when the different error codes are used.
*
* See also the defined BT_HCI_ERR_* macros.
*
* @return The string representation of the HCI error code.
* If @kconfig{CONFIG_BT_HCI_ERR_TO_STR} is not enabled,
* this just returns the empty string
*/
#if defined(CONFIG_BT_HCI_ERR_TO_STR)
const char *bt_hci_err_to_str(uint8_t hci_err);
#else
static inline const char *bt_hci_err_to_str(uint8_t hci_err)
复制代码
最后调用dk_set_led_on和dk_set_led_off来点亮和熄灭nRF54L15 DK的LED1。
3、接下来我们来写ble_on_connected和ble_on_connected这两个回调函数
复制代码
static void ble_on_connected(struct bt_conn *conn, uint8_t err)
{
char addr[BT_ADDR_LE_STR_LEN];
/*Print err code when the connection is error*/
if (err) {
LOG_ERR("Connection failed, err 0x%02x %s", err, bt_hci_err_to_str(err));
return;
}
/*Print the MAC address of Central Deevice*/
bt_addr_le_to_str(bt_conn_get_dst(conn), addr, sizeof(addr));
LOG_INF("Connected %s", addr);
/*Count the coennection*/
current_conn = bt_conn_ref(conn);
dk_set_led_on(DK_LED1)
);
}
复制代码
复制代码
static void ble_on_disconnected(struct bt_conn *conn, uint8_t reason)
{
char addr[BT_ADDR_LE_STR_LEN];
/*Get the MAC address of central and print it when the connection is disconnected*/
bt_addr_le_to_str(bt_conn_get_dst(conn), addr, sizeof(addr));
LOG_INF("Disconnected: %s, reason 0x%02x %s", addr, reason, bt_hci_err_to_str(reason));
/*Decrement a connection's reference count and off LED1 of DK*/
if (current_conn) {
bt_conn_unref(current_conn);
current_conn = NULL;
dk_set_led_off(DK_LED1);
}
}
复制代码
这里我们引入了一个全局变量current_conn用于计数已连接的设备数量,所以需要做一个声明
static struct bt_conn *current_conn;
此外我们调用了LED1这个外设用来指示BLE的连接情况,所以我们还需要在main中初始化LED1这个外设,这里我们需要加入一些头文件并在prj.conf中使能相关的宏,最后在main中调用configure_gpio。
//Add LED and Button drivers Library file
#include
# Enable DK LED and Buttons library
CONFIG_DK_LIBRARY=y
CONFIG_GPIO=y
复制代码
static void configure_gpio(void)
{
int err_code;
err_code = dk_leds_init();
if (err_code) {
LOG_ERR("Cannot init LEDs (err: %d)", err_code);
}
}
复制代码
4、完成上述步骤之后,我们将ble_connection_callback这个函数注册到bluetooth_init中
复制代码
int bluetooth_init(struct bt_conn_cb *ble_cb)
{
int err_code;
LOG_INF("Initiallzing BLE");
if (ble_cb == NULL)
{
return -NRFX_ERROR_NULL;
}
bt_conn_cb_register(ble_cb);
err_code = bt_enable(bt_ready_callback);
if(err_code)
{
LOG_ERR("BLE Enable returned %d",err_code);
return err_code;
}
k_sem_take(&ble_init_ok, K_FOREVER);
err_code = bt_le_adv_start(BT_LE_ADV_CONN, ad, ARRAY_SIZE(ad), srd,
ARRAY_SIZE(srd));
if (err_code) {
LOG_ERR("Advertising failed to start (err_code %d)", err_code);
return 0;
}
return err_code;
}
复制代码
复制代码
int main(void)
{
int err_code;
configure_gpio();
err_code = bluetooth_init(&ble_connection_callback);
if(err_code)
{
LOG_ERR("Bluetooth_init returnrd %d", err_code);
}
printf("Hello World! %sn", CONFIG_BOARD_TARGET);
}
复制代码
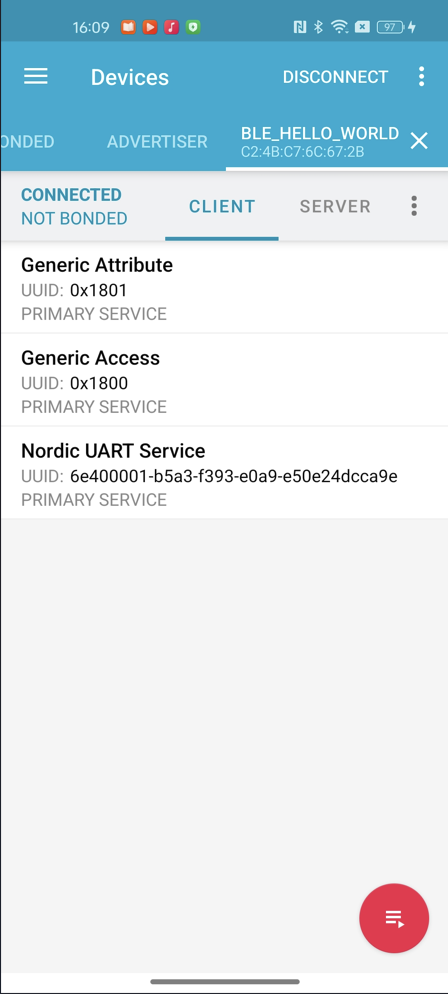
5、最后我们编译下载工程到nRF54L15的DK中,使用nRF Connect APP连接可以看到连接和断开之后分别打印了手机端的MAC地址

同时DK的LED1在连接之后常亮

六、添加一个Service
1、从上面的图片中可以看到,APP连接nRF54L15 DK之后只有一些通用的Service,这一步我们来演示如何添加一个自定义的Service,在nRF5 SDK中我们需要在service_init中初始化给相关的指针写入值,但在NCS中我们可以直接调用BT_GATT_SERVICE_DEFINE来实现
复制代码
/**
* @brief Statically define and register a service.
*
* Helper macro to statically define and register a service.
*
* @param _name Service name.
*/
#define BT_GATT_SERVICE_DEFINE(_name, ...)
const struct bt_gatt_attr attr_##_name[] = { __VA_ARGS__ };
const STRUCT_SECTION_ITERABLE(bt_gatt_service_static, _name) =
BT_GATT_SERVICE(attr_##_name)
#define _BT_GATT_ATTRS_ARRAY_DEFINE(n, _instances, _attrs_def)
static struct bt_gatt_attr attrs_##n[] = _attrs_def(_instances[n])
#define _BT_GATT_SERVICE_ARRAY_ITEM(_n, _) BT_GATT_SERVICE(attrs_##_n)
复制代码
2、这里我直接用了NUS服务的UUID,当然你可以自己定义一个UUID看一下有什么效果
复制代码
/** @brief UUID of the NUS Service. **/
#define BT_UUID_HOWD_VAL
BT_UUID_128_ENCODE(0x6e400001, 0xb5a3, 0xf393, 0xe0a9, 0xe50e24dcca9e)
#define BT_UUID_HOWD_SERVICE BT_UUID_DECLARE_128(BT_UUID_HOWD_VAL)
#define SERVICE_NAME nus_svc
BT_GATT_SERVICE_DEFINE(SERVICE_NAME,
BT_GATT_PRIMARY_SERVICE(BT_UUID_HOWD_SERVICE)
);
复制代码
3、最后编译一下工程下载的nRF54L15DK,并使用nRF Connect APP连接中可以看到多了一个NUS服务。
七、添加特征值并定义其属性
1、完成上述步骤之后,BLE多了一个Service,但是这个Service中没有Characteristic(特征值),这里我们还可以在BT_GATT_SERVICE_DEFINE中调用BT_GATT_CHARACTERISTIC,将特征值放在Service下面,这个结构就像APP上Service下面有特征值那样,非常直观。这里我们去看一下BT_GATT_CHARACTERISTIC,会发现它一共有6个入参
1)_uuid是特征值的UUID
2)_props是特征值的属性,比如:read,write,Notify,indicate等
3)_perm是属性的访问权限,比如:普通、加密、配对等
4)_read、_write是分别是读取和写入的回调函数
5)_user_data是留给用户自定义的一些数据,一般不用
复制代码
/**
* @brief Characteristic and Value Declaration Macro.
*
* Helper macro to declare a characteristic attribute along with its
* attribute value.
*
* @param _uuid Characteristic attribute uuid.
* @param _props Characteristic attribute properties,
* a bitmap of ``BT_GATT_CHRC_*`` macros.
* @param _perm Characteristic Attribute access permissions,
* a bitmap of @ref bt_gatt_perm values.
* @param _read Characteristic Attribute read callback
* (@ref bt_gatt_attr_read_func_t).
* @param _write Characteristic Attribute write callback
* (@ref bt_gatt_attr_write_func_t).
* @param _user_data Characteristic Attribute user data.
*/
#define BT_GATT_CHARACTERISTIC(_uuid, _props, _perm, _read, _write, _user_data)
BT_GATT_ATTRIBUTE(BT_UUID_GATT_CHRC, BT_GATT_PERM_READ,
bt_gatt_attr_read_chrc, NULL,
((struct bt_gatt_chrc[]) {
BT_GATT_CHRC_INIT(_uuid, 0U, _props),
})),
BT_GATT_ATTRIBUTE(_uuid, _perm, _read, _write, _user_data)
复制代码
2、这里因为我们这个特征值的属性是Read,所以我们需要在写一个回调,在里面将Button的键值通过GATT接口发送出去,这需要用到一个库函数bt_gatt_attr_read,这个函数的声明在gatt.h中,可以看到这个函数的作用是将本地数据通过Read属性上传
复制代码
/** @brief Generic Read Attribute value helper.
*
* Read attribute value from local database storing the result into buffer.
*
* @param conn Connection object.
* @param attr Attribute to read.
* @param buf Buffer to store the value.
* @param buf_len Buffer length.
* @param offset Start offset.
* @param value Attribute value.
* @param value_len Length of the attribute value.
*
* @return number of bytes read in case of success or negative values in
* case of error.
*/
ssize_t bt_gatt_attr_read(struct bt_conn *conn, const struct bt_gatt_attr *attr,
void *buf, uint16_t buf_len, uint16_t offset,
const void *value, uint16_t value_len);
复制代码
3、我们来尝试加一个Read属性的特征值,读取按键DK上按下的Button的键值,从BT_GATT_CHARACTERISTIC的注释中可以看到,要使用这个宏需要写一个回调函数,首先来声明以下这个回调函数,并将bt_gatt_attr_read的入参作为回调函数的入参
ssize_t read_button_characteristic_cb(struct bt_conn *conn, const struct bt_gatt_attr *attr,
void *buf, uint16_t len, uint16_t offset);
这个函数的实际功能是在Read这个特征值的时候,将键值上传给GATT,所以我们来定义一个全局变量来获取button的键值
static uint8_t button_value = 0;
然后将button_value通过bt_gatt_attr_read上传给GATT
复制代码
ssize_t read_button_characteristic_cb(struct bt_conn *conn, const struct bt_gatt_attr *attr,
void *buf, uint16_t len, uint16_t offset)
{
return bt_gatt_attr_read(conn, attr, buf, len, offset, &button_value, sizeof(button_value));
}
复制代码
4、将这个回调放入BT_GATT_CHARACTERISTIC中,并写入这个Read特征值的属性等相关配置。
这里的特征值的UUID我用了NUS服务TX的特征值;
BT_GATT_CHRC_READ表示特征值的属性是Read
BT_GATT_PERM_READ表示特征值的访问权限为普通读取
读取的回调使用我们写好的read_button_characteristic_cb这个函数
因为这个特征值只是Read属性,所以不需要Write的回调,也不需要用户自定义数据,所以最后两个入参填写为NULL
复制代码
#define BT_UUID_NUS_TX_VAL
BT_UUID_128_ENCODE(0x6e400003, 0xb5a3, 0xf393, 0xe0a9, 0xe50e24dcca9e)
#define BT_UUID_NUS_TX BT_UUID_DECLARE_128(BT_UUID_NUS_TX_VAL)
BT_GATT_SERVICE_DEFINE(SERVICE_NAME,
BT_GATT_PRIMARY_SERVICE(BT_UUID_NUS_SERVICE),
BT_GATT_CHARACTERISTIC(BT_UUID_NUS_TX,
BT_GATT_CHRC_READ,
BT_GATT_PERM_READ,
read_button_characteristic_cb, NULL, NULL),
);
复制代码
GATT的属性和权限除了上述两个参数之外,还有其他类型,感兴趣的读者具体可以去gatt.h中查看相关注释说明。
5、至此我们已经完成了BLE数据上传部分的代码编写,接下来我们来读取Button的键值,并将这个值给到全局变量button_value即可。这里我们写一个函数来传递button的键值
void set_button_value(uint8_t btn_value)
{
button_value = btn_value;
}
我们还需要通过GPIO外设来读取键值,和点亮LED一样,需要先将DK的Button初始化,这里要调用dk_buttons_init来完成,它是一个库函数,函数声明在dk_buttons_and_leds.h中。
复制代码
/** @brief Initialize the library to read the button state.
*
* @param button_handler Callback handler for button state changes.
*
* @retval 0 If the operation was successful.
* Otherwise, a (negative) error code is returned.
*/
int dk_buttons_init(button_handler_t button_handler);
/**
* @typedef button_handler_t
* @brief Callback that is executed when a button state change is detected.
*
* @param button_state Bitmask of button states.
* @param has_changed Bitmask that shows which buttons have changed.
*/
typedef void (*button_handler_t)(uint32_t button_state, uint32_t has_changed);
复制代码
从注释可以看到这个函数需要一个button的回调函数,用于处理button时候的中断。我们来写这个回调,在里面处理不同按键按下之后,定义不同的键值,并通过LOG打印键值,最后调用set_button_value将键值传递给全局变量button_value。
复制代码
void button_handler(uint32_t button_state, uint32_t has_changed)
{
int button_pressed = 0;
if (has_changed & button_state) {
if (DK_BTN1_MSK & has_changed) {
button_pressed = 1;
}
if (DK_BTN2_MSK & has_changed) {
button_pressed = 2;
}
if (DK_BTN3_MSK & has_changed) {
button_pressed = 3;
}
if (DK_BTN4_MSK & has_changed) {
button_pressed = 4;
}
LOG_INF("Button %d pressed", button_pressed);
set_button_value(button_pressed);
}
}
复制代码
最后在GPIO初始化里面调用dk_buttons_init并写入回调函数button_handler即可。
复制代码
static void configure_gpio(void)
{
int err_code;
err_code = dk_buttons_init(button_handler);
if (err_code) {
LOG_ERR("Cannot init buttons (err: %d)", err_code);
}
err_code = dk_leds_init();
if (err_code) {
LOG_ERR("Cannot init LEDs (err: %d)", err_code);
}
}
复制代码
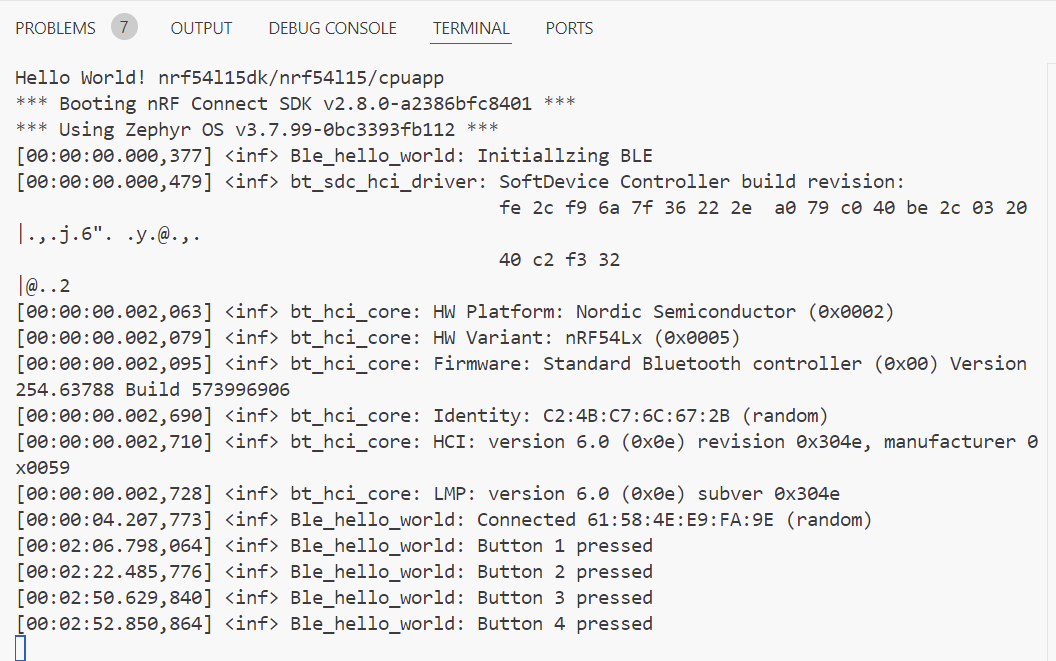
6、最后编译工程,并使用nRF Connect APP连接nRF54L15DK的广播,可以看到NUS Service下多了一个Read属性,当我们按下DK上的Button的时候,可以读取到对应的键值。
持续未完........
上一篇:nRF Connect SDK(NCS)/Zephyr固件升级详解 – 重点讲述MCUboot和蓝牙空中升级
审核编辑 黄宇
-
开发板
+关注
关注
25文章
6125浏览量
113366 -
BLE
+关注
关注
13文章
745浏览量
66011 -
Nordic
+关注
关注
9文章
238浏览量
48770
发布评论请先 登录
深入比较nRF52832和Nordic新的产品nRF54L15参数对比
深入比较nRF52832和Nordic新的产品nRF54L15参数对比
《电子发烧友电子设计周报》聚焦硬科技领域核心价值 第10期:2025.05.6--2025.05.9
NRF54L15的NORDIC芯片,adc的内部参考电压
手把手教你从零开始用labview编写智能车上位机程序.rar
手把手教你从零开始学习51单片机教程
nRF54L15 # 超低功耗无线 SoC


 工商网监
工商网监
评论