 基于ESP32和Wio Terminal的DeepSeeek移动终端项目

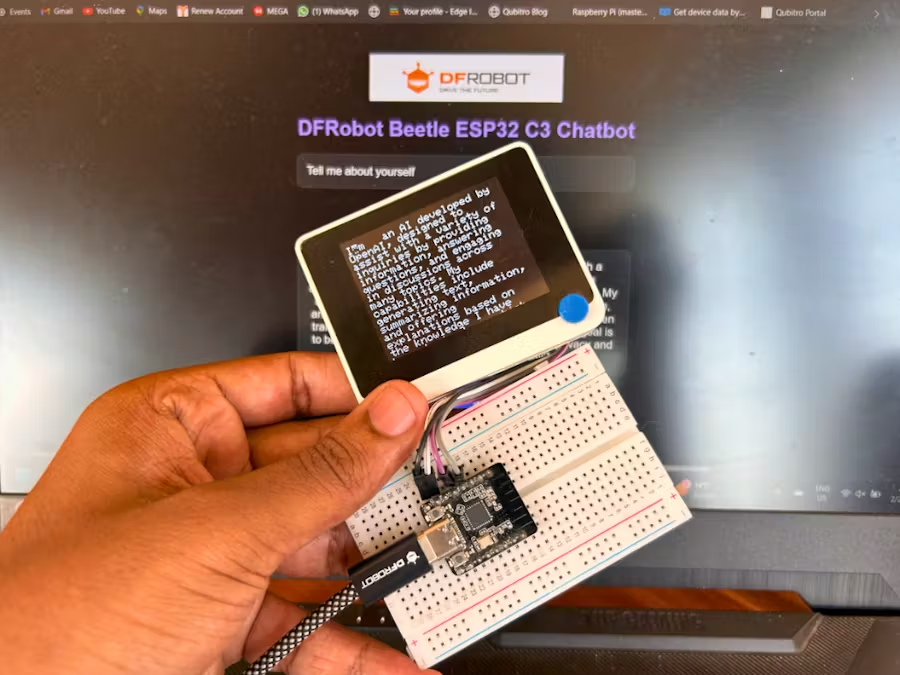
今天小标给大家带来的是印度Maker的DeepSeek移动终端项目,该项目使用ESP32开发板作为主控,结合Wio Terminal的屏幕进行DeepSeeek输出显示。
材料清单
Beetle ESP32 C6
面包板
跳线
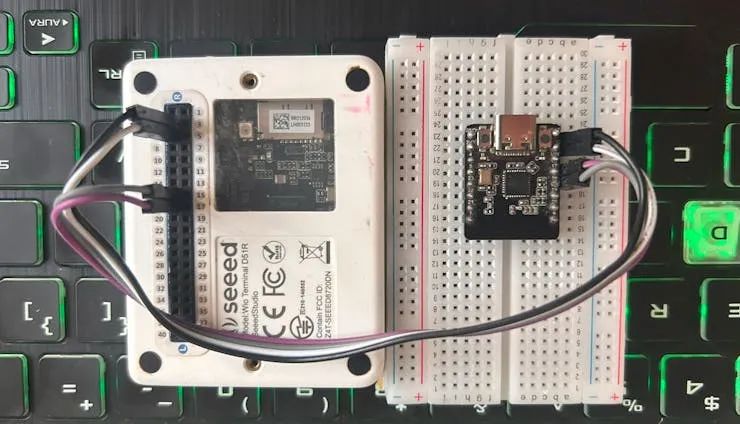
Wio 终端
DFRobot Beetle ESP32 C6
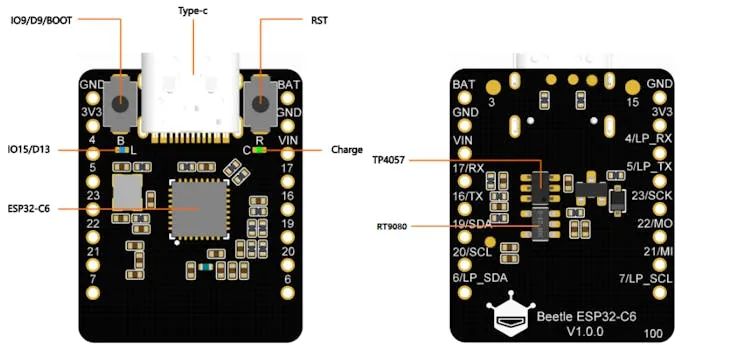
多种通信协议:支持 Wi-Fi 6、蓝牙 5、Zigbee 3.0 和 Thread 1.32。
超低功耗:具有深度睡眠模式,电流消耗仅为 14uA。
紧凑的尺寸:尺寸仅为 25*20.5 毫米,像硬币一样小。
Wio Terminal 是一个基于 ATSAMD51 微控制器的完整开源开发平台。

它具有 2.4 英寸 LCD 屏幕、板载传感器和无线连接选项,使其成为各种应用的绝佳选择。主要功能包括:
高性能:配备 120MHz ARM Cortex-M4F 处理器
显示屏:2.4 英寸 LCD 屏幕,分辨率为 320x240
连接性:通过附加模块支持 Wi-Fi、蓝牙和 LoRa。
多功能 I/O:包括 GPIO、数字、模拟、I2C、UART 和 SPI 接口。
内置传感器:具有陀螺仪、加速度计、麦克风和光传感器。
使用 Wio Terminal,可以轻松扩展 Beetle ESP32 聊天机器人项目的功能,提供实时反馈和交互式显示。
设置硬件
首先将 LED 连接到 Beetle ESP32。以下是引脚连接:
用电阻器将 LED1 连接到引脚 4。
这个简单的设置将使我们能够通过闪烁的 LED 来可视化聊天机器人的活动。
接下来,通过 UART 将 Wio 终端连接到 Beetle ESP32:
将 Wio Terminal 的 TX 引脚连接到 Beetle ESP32 C6 的 RX 引脚。
将 Wio Terminal 的 RX 引脚连接到 Beetle ESP32 C6 的 TX 引脚。
确保连接两个设备的接地 (GND)。
这个简单的设置将允许我们通过在 Wio 终端上显示 API 响应来可视化聊天机器人的活动。
连接Wi-Fi
要将 Beetle ESP32 连接到 Wi-Fi 网络,请使用以下代码片段:
#include


const char* ssid = "Your_SSID";
const char* password = "Your_PASSWORD";


void setup() {
  Serial.begin(115200);
  WiFi.begin(ssid, password);

  while (WiFi.status() != WL_CONNECTED) {
    delay(1000);
    Serial.print(".");
  }

  Serial.println("Connected to WiFi");
}
替换为本地实际 Wi-Fi 凭证 "Your_SSID""Your_PASSWORD"
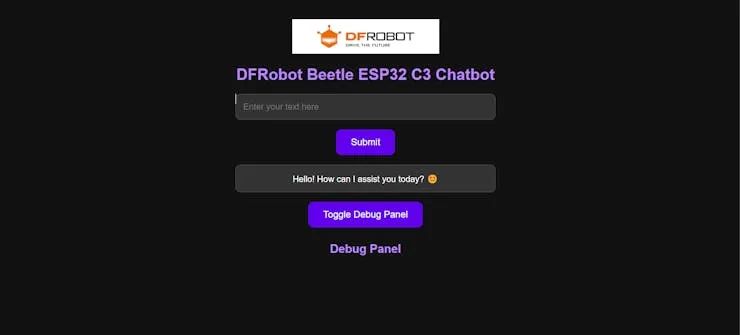
创建 Web 服务器
接下来,让我们在 Beetle ESP32 上设置一个 Web 服务器:
// HTML content to be served const char index_html[] PROGMEM = R"rawliteral(DFRobot Chatbot 
DFRobot Beetle ESP32 C3 Chatbot
Debug Panel
)rawliteral";
此代码设置了一个基本的 Web 服务器,该服务器用作 HTML 页面,用户可以在其中输入他们的问题。
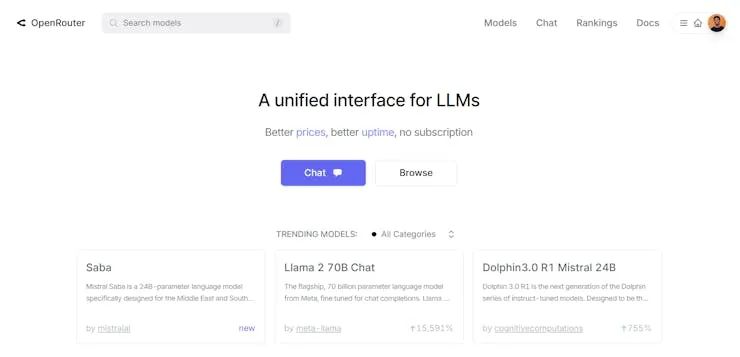
处理用户问题,首先导航到 Open router 并创建一个新的 API 密钥。
将以下代码添加到您的项目中:
HTTPClient http;
    http.begin("https://openrouter.ai/api/v1/chat/completions");
    http.addHeader("Content-Type", "application/json");
    http.addHeader("Authorization", String("Bearer ") + apiKey);


    StaticJsonDocument<512> jsonDoc;
    jsonDoc["model"] = "deepseek/deepseek-r1-distill-llama-70b";  // deepseek/deepseek-r1-distill-llama-70b //openai/gpt-4o-mini-2024-07-18
    JsonArray messages = jsonDoc.createNestedArray("messages");


    JsonObject systemMessage = messages.createNestedObject();
    systemMessage["role"] = "system";
    systemMessage["content"] = "Answer the user's question concisely and informatively.";


    JsonObject userMessage = messages.createNestedObject();
    userMessage["role"] = "user";
    userMessage["content"] = question;


    String requestBody;
    serializeJson(jsonDoc, requestBody);


    Serial.println("Sending HTTP POST request...");
    int httpResponseCode = http.POST(requestBody);
    Serial.print("HTTP Response code: ");
    Serial.println(httpResponseCode);


    String response = http.getString();
    Serial.print("HTTP Response: ");
    Serial.println(response);


    StaticJsonDocument<1024> responseDoc;
    DeserializationError error = deserializeJson(responseDoc, response);


    if (!error) {
      String assistantResponse = responseDoc["choices"][0]["message"]["content"].as();
      Serial.print("Assistant Response: ");
      Serial.println(assistantResponse); // Print the assistant response
      Serial1.println(assistantResponse);
      return response; // Return entire API response
    } else {
      return "Failed to parse JSON response.";
    }
  }
不要忘记替换为 OpenAI 的实际 API 密钥。"Your_API_Key"
最后,让我们在处理问题时通过闪烁 LED 来添加一些视觉反馈:
int led0 = 15;
int led1 = 4;


void setup() {
  pinMode(led0, OUTPUT);
  pinMode(led1, OUTPUT);
}


void loop() {
  digitalWrite(led0, HIGH);
  digitalWrite(led1, LOW);
  delay(100);
  digitalWrite(led0, LOW);
  digitalWrite(led1, HIGH);
  delay(100);
}
Beetle ESP32 C6 代码:
这是完整的草图,请将凭据更改为您的凭据。
#include#include #include #include int led0 = 15; int led1 = 4; // WiFi credentials const char* ssid = ""; const char* password = ""; const char* apiKey = ""; // Create WebServer object on port 80 WebServer server(80); // HTML content to be served const char index_html[] PROGMEM = R"rawliteral( DFRobot Chatbot DFRobot Beetle ESP32 C3 Chatbot
Debug Panel
)rawliteral"; // Function to process the user question and get the response String processQuestion(String question) { Serial.print("User Question: "); Serial.println(question); // Print the user question if (WiFi.status() == WL_CONNECTED) { HTTPClient http; http.begin("https://openrouter.ai/api/v1/chat/completions"); http.addHeader("Content-Type", "application/json"); http.addHeader("Authorization", String("Bearer ") + apiKey); StaticJsonDocument<512> jsonDoc; jsonDoc["model"] = "deepseek/deepseek-r1-distill-llama-70b"; // deepseek/deepseek-r1-distill-llama-70b //openai/gpt-4o-mini-2024-07-18 JsonArray messages = jsonDoc.createNestedArray("messages"); JsonObject systemMessage = messages.createNestedObject(); systemMessage["role"] = "system"; systemMessage["content"] = "Answer the user's question concisely and informatively."; JsonObject userMessage = messages.createNestedObject(); userMessage["role"] = "user"; userMessage["content"] = question; String requestBody; serializeJson(jsonDoc, requestBody); Serial.println("Sending HTTP POST request..."); int httpResponseCode = http.POST(requestBody); Serial.print("HTTP Response code: "); Serial.println(httpResponseCode); String response = http.getString(); Serial.print("HTTP Response: "); Serial.println(response); StaticJsonDocument<1024> responseDoc; DeserializationError error = deserializeJson(responseDoc, response); if (!error) { String assistantResponse = responseDoc["choices"][0]["message"]["content"].as(); Serial.print("Assistant Response: "); Serial.println(assistantResponse); // Print the assistant response Serial1.println(assistantResponse); return response; // Return entire API response } else { return "Failed to parse JSON response."; } } return "WiFi not connected!"; } void setup() { // Start Serial Monitor Serial.begin(115200); Serial1.begin(9600, SERIAL_8N1, /*rx =*/17, /*tx =*/16); pinMode(led0, OUTPUT); pinMode(led1, OUTPUT); // Connect to Wi-Fi WiFi.begin(ssid, password); Serial.print("Connecting to WiFi..."); while (WiFi.status() != WL_CONNECTED) { delay(1000); Serial.print("."); } Serial.println(" Connected to WiFi"); // Print ESP32 Local IP Address Serial.print("ESP32 IP Address: "); Serial.println(WiFi.localIP()); // Serve HTML content server.on("/", HTTP_GET, []() { server.send_P(200, "text/html", index_html); }); // Handle POST request from the web page server.on("/getQuestion", HTTP_POST, []() { if (server.hasArg("plain")) { String body = server.arg("plain");
Wio 终端代码 :
将以下代码上传到 Wio 终端,从 Beetle 获取数据并在屏幕上打印出来。
#include
#include// Include the graphics library (this includes the sprite functions)


// Create a SoftwareSerial object on pins 2 (RX) and 3 (TX)
SoftwareSerial mySerial(2, 3); // RX, TX


// Initialize the TFT screen
TFT_eSPI tft = TFT_eSPI();  // Create object "tft"


// Screen dimensions
#define SCREEN_WIDTH 320
#define SCREEN_HEIGHT 240


void setup() {
  Serial.begin(115200);
  mySerial.begin(9600);


  // Initialize the TFT screen
  tft.begin();
  tft.setRotation(3); // Set the screen orientation (1 for landscape mode)
  tft.fillScreen(TFT_BLACK); // Clear the screen with black color
  tft.setTextColor(TFT_WHITE); // Set text color to white
  tft.setTextSize(2); // Set text size


  // Print initial message to the screen
  tft.drawString("Waiting for data...", 10, 10);
}


void loop() {
  while (mySerial.available()) {
    String str = mySerial.readString(); // Read the incoming data as a string
    str.trim();
    Serial.println(str);


    // Clear the screen and display the new data with text wrapping
    tft.fillScreen(TFT_BLACK); // Clear the screen with black color
    printWrappedText(str, 10, 10, SCREEN_WIDTH - 20, 2);


    mySerial.println("initialization done.");
  }
}


// Function to print wrapped text on the screen
void printWrappedText(String str, int x, int y, int lineWidth, int textSize) {
  tft.setCursor(x, y);
  tft.setTextSize(textSize);


  int cursorX = x;
  int cursorY = y;
  int spaceWidth = tft.textWidth(" ");
  int maxLineWidth = lineWidth;


  String word;
  for (int i = 0; i < str.length(); i++) {
    if (str[i] == ' ' || str[i] == '
') {
      int wordWidth = tft.textWidth(word);


      if (cursorX + wordWidth > maxLineWidth) {
        cursorX = x;
        cursorY += tft.fontHeight();
      }


      tft.drawString(word, cursorX, cursorY);
      cursorX += wordWidth + spaceWidth;


      if (str[i] == '
') {
        cursorX = x;
        cursorY += tft.fontHeight();
      }


      word = "";
    } else {
      word += str[i];
    }
  }


  if (word.length() > 0) {
    int wordWidth = tft.textWidth(word);
    if (cursorX + wordWidth > maxLineWidth) {
      cursorX = x;
      cursorY += tft.fontHeight();
    }
    tft.drawString(word, cursorX, cursory);
  }
}
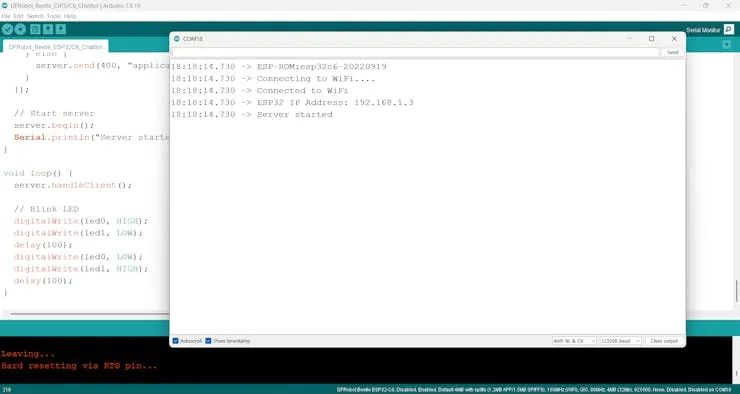
串行终端响应:
然后在 Web 浏览器中打开 IP 地址。
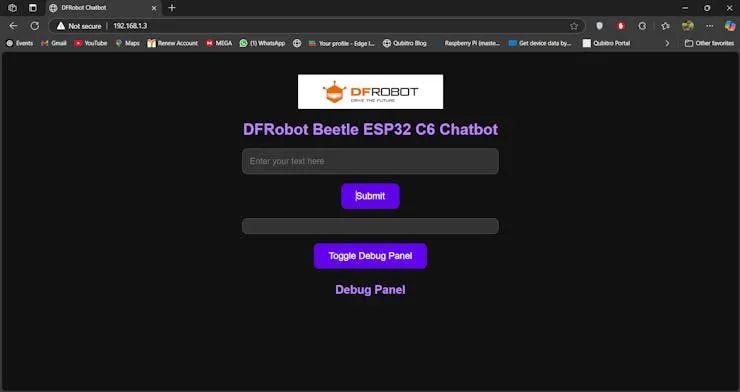
接下来,输入提示符。
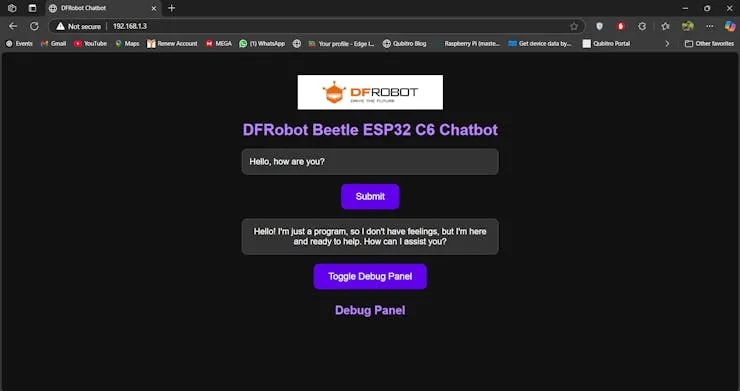
您可以在 Wio 终端屏幕中看到响应。

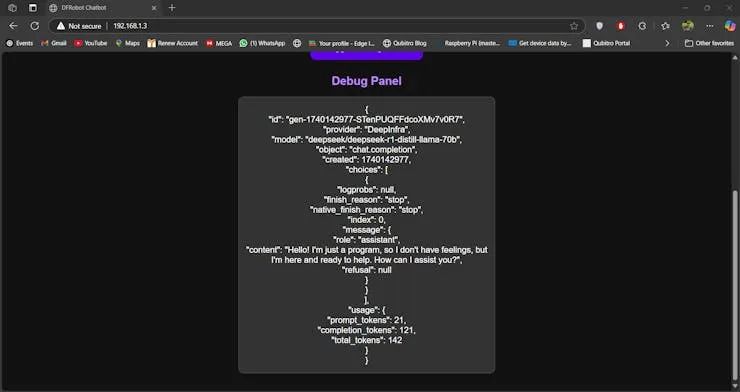
如果您想查看整个 API 响应,只需按网站上的 Debug log 按钮即可。这将显示完整的 API 响应以进行调试。
结论
通过此项目,您已经使用 Beetle ESP32 和 Wio Terminal 创建了一个基本的聊天机器人。可以通过添加更多功能(例如更多交互式网页、高级错误处理或集成其他 API)来进一步扩展此设置。DFRobot Beetle ESP32 C6 的紧凑尺寸和多功能功能,结合强大的 Wio 终端,使其成为各种物联网应用的绝佳选择。
-
移动终端
+关注
关注
1文章
224浏览量
25803 -
ESP32
+关注
关注
27文章
1239浏览量
22777 -
DeepSeek
+关注
关注
2文章
862浏览量
3500
原文标题:创客项目秀|基于ESP32和Wio Terminal的DeepSeeek终端
文章出处:【微信号:ChaiHuoMakerSpace,微信公众号:柴火创客空间】欢迎添加关注!文章转载请注明出处。
发布评论请先 登录
《电子发烧友电子设计周报》聚焦硬科技领域核心价值 第2期:2025.03.3--2025.03.7
esp32 例程 蓝牙_wifi&蓝牙MCU 该不该选ESP32

使用ESP32制作ESP RainMaker IoT项目
使用Wio Terminal和Tensorflow Lite创建智能气象站


评论