 详解Object Detection Demo的移植

以下文章来源于Android高效开发,作者2BAB
本文作者 /Android 谷歌开发者专家 El Zhang (2BAB)
继上一篇移植了 Mediapipe 的 LLM Inference 后,这篇文章我们将继续探索 Object Detection Demo 的移植。通过本文你将了解到:
移植 Mediapipe 的 Object Detection Android 官方 Demo 到 KMP,支持在 iOS 上运行。项目地址:https://github.com/2BAB/MediaPiper/tree/object-detection
Compose Multiplatform 与 iOS 原生控件的集成与交互 (Camera Preview),包括权限申请。
在 KMP 使用依赖注入 iOS 控件的小技巧 (基于 Koin)。
该 Demo 里两种 Object Detection 算法的简单背景知识。
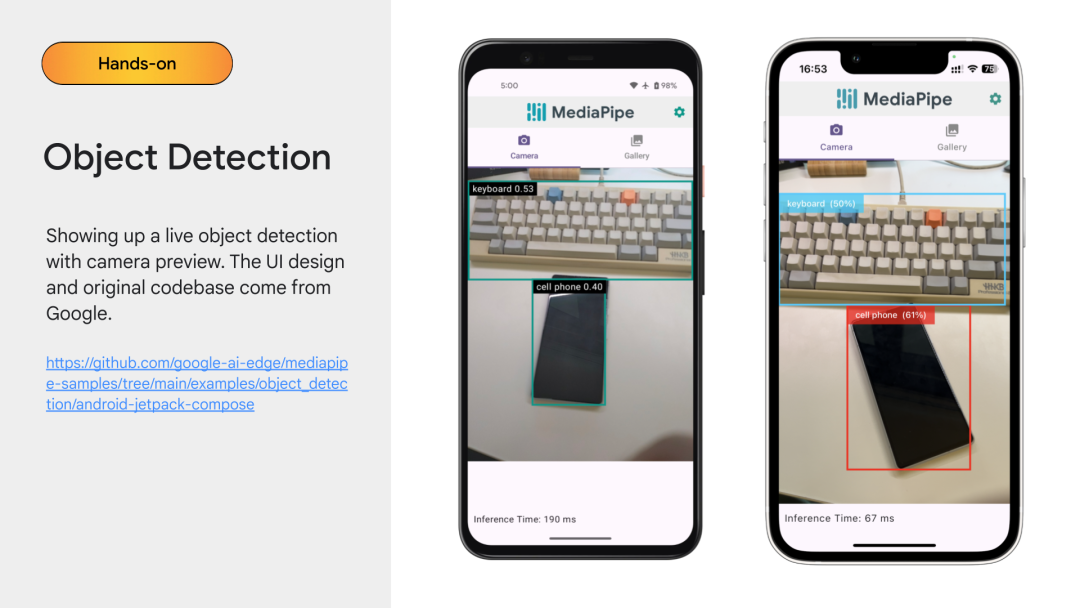
Object Detection Android Sample
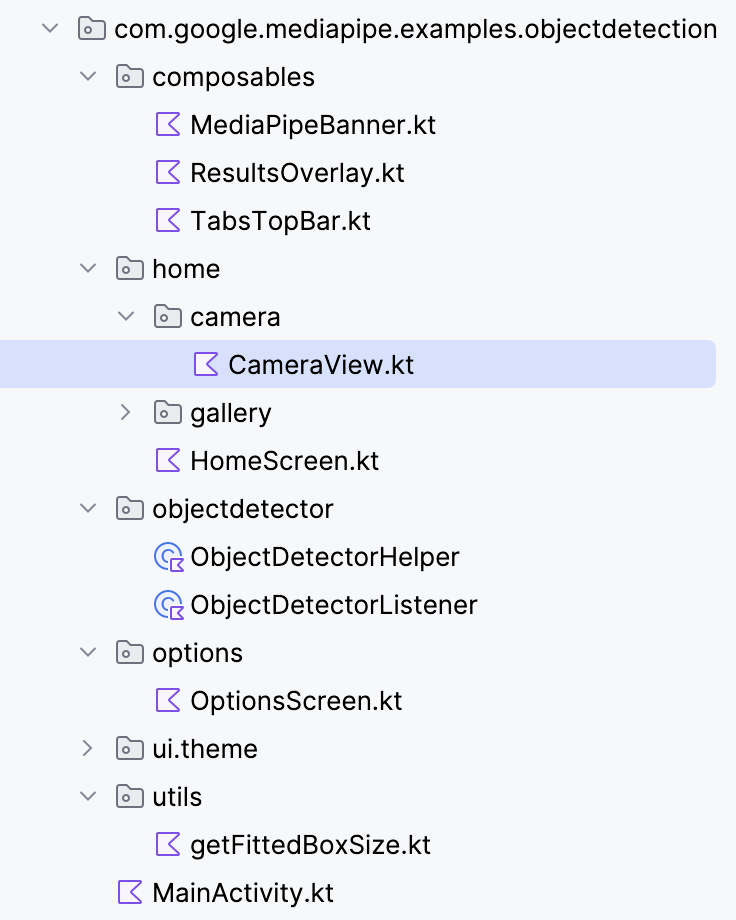
首先,我们先打开 Object Detection 的原版工程,发现其 Android 部分既有 android.view.View 版本的实现,也有 Jetpack Compose 的版本。因此我们延续上一篇的方式,基于 Jetpack Compose 的版本直接移植到 KMP 上。
接着,仔细体验该 App 会发现其复杂度更高。LLM Inference 中的 SDK 仅仅是提供文本的推理接口,可直接在 Kotlin 层封装对应平台的 SDK 方便抽象 (尽管因为一些 cinterop 支持原因我们最后用了备用方案),UI 上则完全复用。但 Object Detection 是基于图像的实时处理,演示里涉及摄像头实时检测、本地视频的检测、本地图片的检测三种。摄像头预览的需求一般都强依赖于平台实现,播放器在渲染层面也鲜有自绘 (即使用平台 Native 方案)。
小结,在开始设计时我们就得考虑把 Compose Multiplatform (CMP) 难以实现的部分留出 (例如上图中的 CameraView),抽象成独立的 expect Composable 函数留给两端各自实现。而为了方便学习需减少 Demo 的规模,我们也决定只实现 CameraView 的部分,把 Gallery (Video+Image) 的部分留给大家去尝试。实际上,只要掌握了 Camera Preview 的嵌入方法,其他两部分也可以参照实现,包括 Compose 和 UiKit 的交互、iOS 权限申请等。
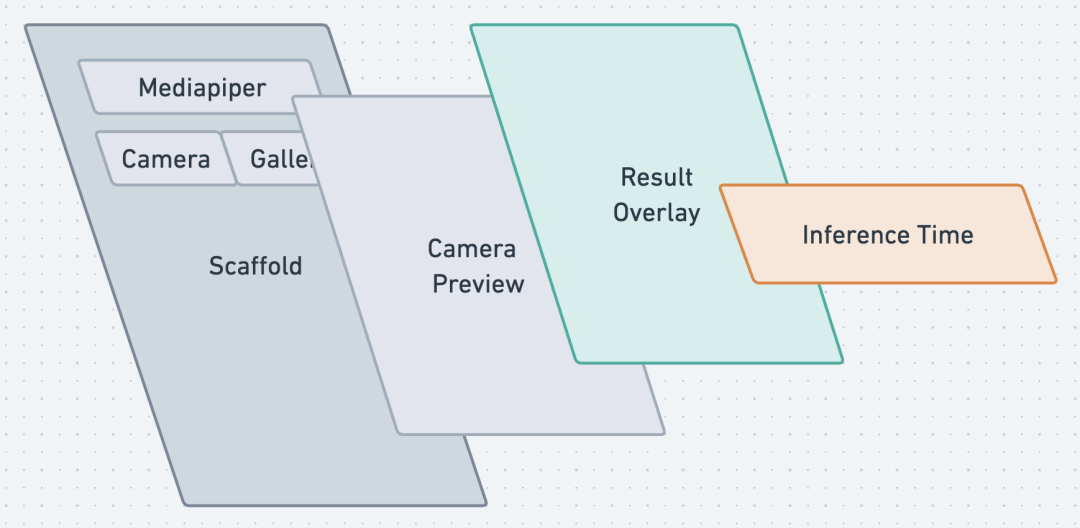
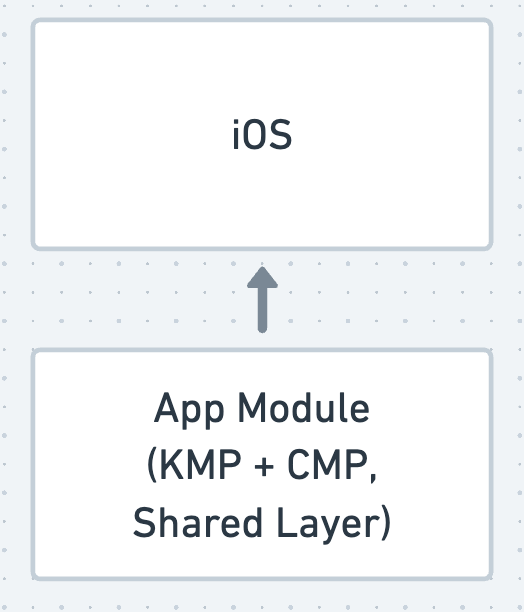
结合 iOS 版的 Demo 交叉比对,我们把 CameraView 有关的 UI 层整理成了四个部分,如上图所示。其中:
Camera Preview 层一定是交由两端各自实现。
ResultOverlay 即各种结果的方框绘制,可以考虑在 Common 层实现,但涉及到其与 Camera Preview 的图层匹配 (因 Camera Preview 的大小根据镜头的不同会有不同的比例选项)、坐标转换,较为复杂,本次 Demo 继续交由两端各自实现。
Scaffold 和 Inference Time Label 在 Common 层实现。
移植流程
移植主体的 UI 和数据结构
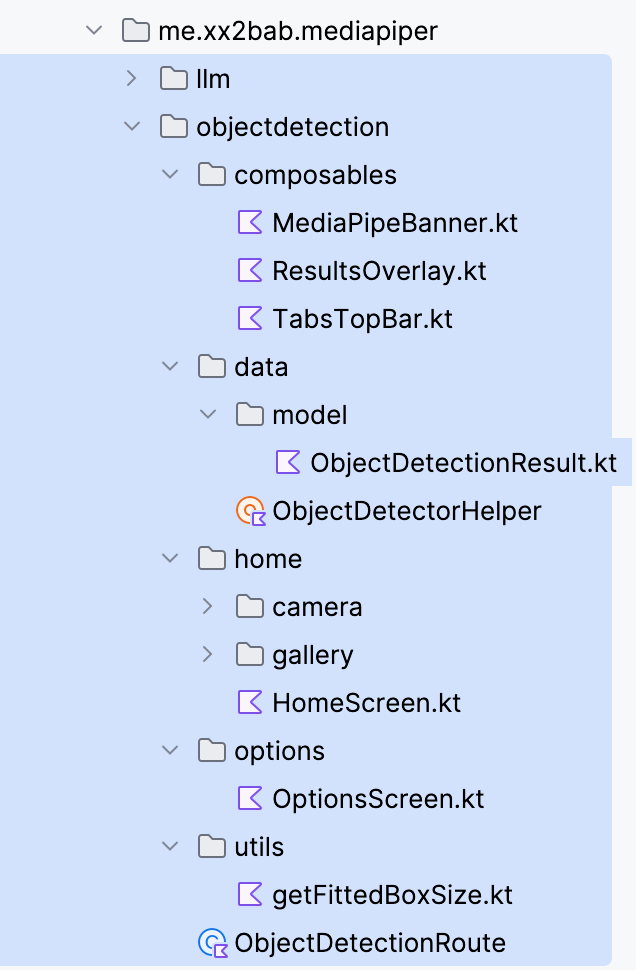
我们在上一节的基础上继续在 Mediapiper 工程中增加一个新文件夹 objectdetection。有了上一节的经验,我们发现其实很多 UI 的内容都不复杂——除了这节的重点,相机预览界面。因此,我们可以先行把除了camera和 gallery的文件都移动过来:
此处需要的修改分为两块:
数据和逻辑部分:
我们采集原来的 SDK 中的 ObjectDetectionResult 属性声明,创建了一个 Common 版本的 data class,也包括其用到的各种附属类型。如此一来,两边的 SDK 返回结果都可以通过简单转换直接替换成 Common 版本的,不管是要显示推理时间、统一采样埋点,甚至为以后把ResultOverlay 搬来 Common 做好了准备。
一些工具类和默认值枚举也被一并移至 Common 层,并且基本不需要修改,只要把推理结果的类置换成上述 Common 版本的。
UI 部分:
一些统一的修改和上一节完全相同,R引用改 Res,主题换成上一节统一的,一些简单的 Import 包修改。
而特别的部分在于该 Demo 没有使用 CMP 版本的 Navigation,所以在 Home 和 Option 页面切换只是在顶层做了一个简单的 if...else...。
至此已经可以运行一个不含相机功能的应用了,下图演示了这些 CMP 代码在 iOS 上运行时的两个页面。
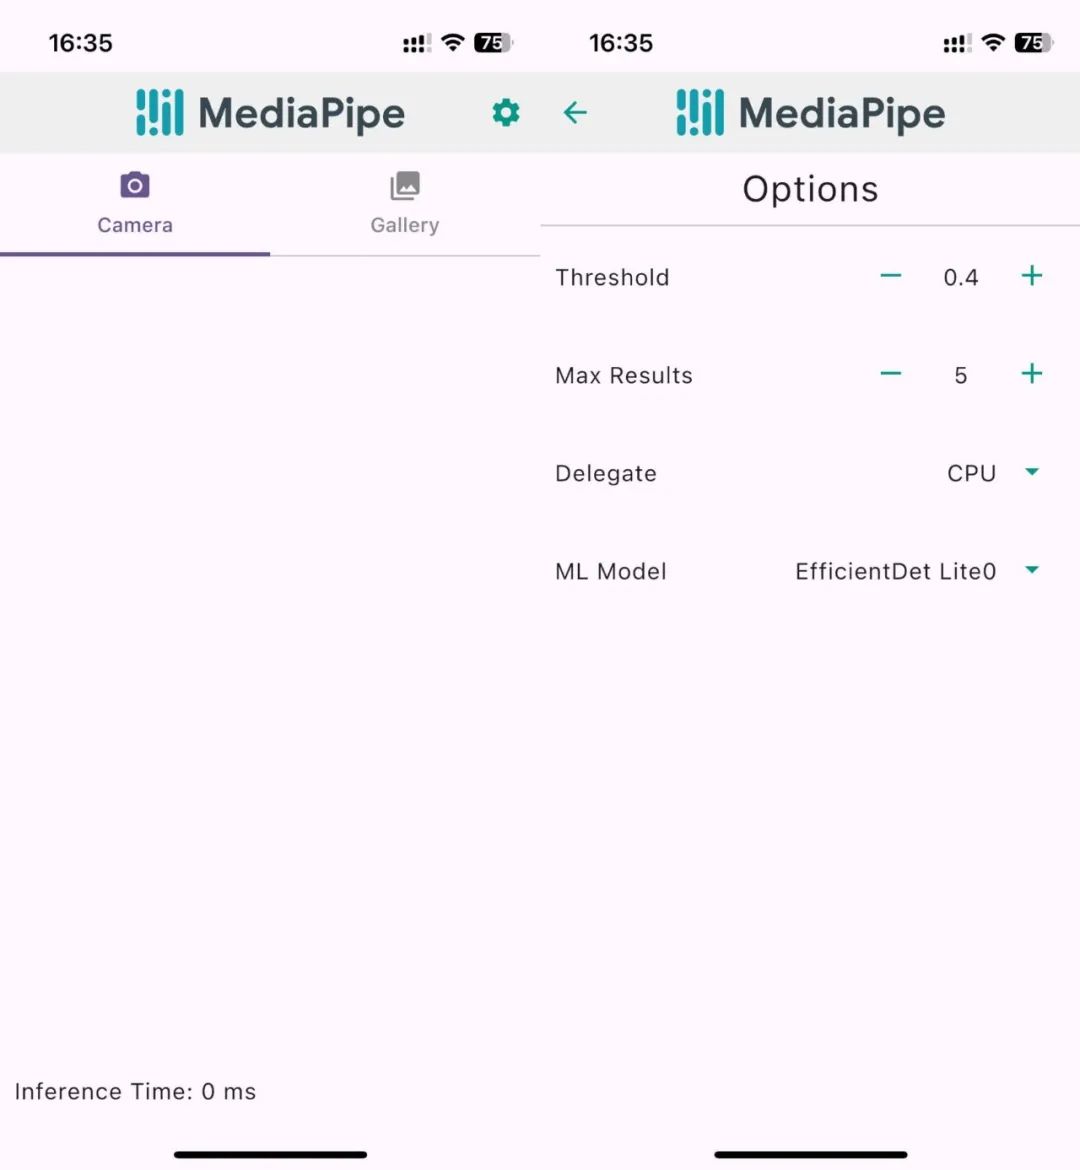
集成 CameraView 功能
如上文分析我们需要拆除 CameraView 的部分用 Native 实现,因此在 Common 的 CameraView里我们使用了两个 expect的 Composable 函数 CameraPermissionControl 和CameraPreview:
@Composable
fun CameraView(
   threshold: Float,
   maxResults: Int,
   delegate: Int,
   mlModel: Int,
   setInferenceTime: (newInferenceTime: Int) -> Unit,
) {
   CameraPermissionControl {
       CameraPreview(
           threshold,
           maxResults,
           delegate,
           mlModel,
           setInferenceTime,
           onDetectionResultUpdate = { detectionResults ->
              ...
           })
   }
}


@Composable
expect fun CameraPermissionControl(PermissionGrantedContent:  @Composable @UiComposable () -> Unit)
```kotlin
@Composable
expect fun CameraPreview(
   threshold: Float,
   maxResults: Int,
   delegate: Int,
   mlModel: Int,
   setInferenceTime: (newInferenceTime: Int) -> Unit,
   onDetectionResultUpdate: (result: ObjectDetectionResult) -> Unit
)
Android 侧的 CameraView 实现
Android 端的实现十分简单,直接将原有的 Jetpack Compose 代码拷贝过来:
// Android implementation
@OptIn(ExperimentalPermissionsApi::class)
@Composable
actual fun CameraPermissionControl(
  PermissionGrantedContent:  @Composable @UiComposable () -> Unit) {
   val storagePermissionState: PermissionState =
       rememberPermissionState(Manifest.permission.CAMERA)
   LaunchedEffect(key1 = Unit) {
       if (!storagePermissionState.hasPermission) {
           storagePermissionState.launchPermissionRequest()
       }
   }


   if (!storagePermissionState.hasPermission) {
       Text(text = "No Storage Permission!")
   } else {
       PermissionGrantedContent()
   }
}


@Composable
actual fun CameraPreview(...) {
   ... // Some properties' definition


   DisposableEffect(Unit) {
       onDispose {
           active = false;
           cameraProviderFuture.get().unbindAll()
       }
   }


   // Next we describe the UI of this camera view.
   BoxWithConstraints(..) {
       val cameraPreviewSize = getFittedBoxSize(
           containerSize = Size(
               width = this.maxWidth.value,
               height = this.maxHeight.value,
           ),
           boxSize = Size(
               width = frameWidth.toFloat(),
               height = frameHeight.toFloat()
           )
       )


       Box(
           Modifier
               .width(cameraPreviewSize.width.dp)
               .height(cameraPreviewSize.height.dp),
       ) {
           // We're using CameraX to use the phone's camera, and since it doesn't have a prebuilt
           // composable in Jetpack Compose, we use AndroidView to implement it
           AndroidView(
               factory = { ctx ->
                   val previewView = PreviewView(ctx)
                   val executor = ContextCompat.getMainExecutor(ctx)
                   cameraProviderFuture.addListener({
                       val cameraProvider = cameraProviderFuture.get()
                       val preview = Preview.Builder().build().also {
                           it.setSurfaceProvider(previewView.surfaceProvider)
                       }


                       val cameraSelector = CameraSelector.Builder()
                           .requireLensFacing(CameraSelector.LENS_FACING_BACK)
                           .build()


                       // We instantiate an image analyser to apply some transformations on the
                       // input frame before feeding it to the object detector
                       val imageAnalyzer =
                           ImageAnalysis.Builder()
                               .setTargetAspectRatio(AspectRatio.RATIO_4_3)
                               .setBackpressureStrategy(ImageAnalysis.STRATEGY_KEEP_ONLY_LATEST)
                               .setOutputImageFormat(ImageAnalysis.OUTPUT_IMAGE_FORMAT_RGBA_8888)
                               .build()


                       // Now we're ready to apply object detection. For a better performance, we
                       // execute the object detection process in a new thread.
                       val backgroundExecutor = Executors.newSingleThreadExecutor()


                       backgroundExecutor.execute {


                           // To apply object detection, we use our ObjectDetectorHelper class,
                           // which abstracts away the specifics of using MediaPipe  for object
                           // detection from the UI elements of the app
                           val objectDetectorHelper =
                               AndroidObjectDetector(
                                   context = ctx,
                                   threshold = threshold,
                                   currentDelegate = delegate,
                                   currentModel = mlModel,
                                   maxResults = maxResults,
                                   objectDetectorListener = ObjectDetectorListener(
                                       onErrorCallback = { _, _ -> },
                                       onResultsCallback = {
                                           // On receiving results, we now have the exact camera
                                           // frame dimensions, so we set them here
                                           frameHeight = it.inputImageHeight
                                           frameWidth = it.inputImageWidth


                                           // Then we check if the camera view is still active,
                                           // if so, we set the state of the results and
                                           // inference time.
                                           if (active) {
                                               results = it.results.first()
                                               setInferenceTime(it.inferenceTime.toInt())
                                           }
                                       }
                                   ),
                                   runningMode = RunningMode.LIVE_STREAM
                               )


                           // Now that we have our ObjectDetectorHelper instance, we set is as an
                           // analyzer and start detecting objects from the camera live stream
                           imageAnalyzer.setAnalyzer(
                               backgroundExecutor,
                               objectDetectorHelper::detectLivestreamFrame
                           )
                       }


                       // We close any currently open camera just in case, then open up
                       // our own to be display the live camera feed
                       cameraProvider.unbindAll()
                       cameraProvider.bindToLifecycle(
                           lifecycleOwner,
                           cameraSelector,
                           imageAnalyzer,
                           preview
                       )
                   }, executor)
                   // We return our preview view from the AndroidView factory to display it
                   previewView
               },
               modifier = Modifier.fillMaxSize(),
           )


           // Finally, we check for current results, if there's any, we display the results overlay
           results?.let {
               ResultsOverlay(
                   results = it,
                   frameWidth = frameWidth,
                   frameHeight = frameHeight
               )
           }
       }
   }
}
iOS 侧的 CameraView 实现
iOS 则稍微需要一些精力。对于相机权限控制,我们直接在这个 Composable 函数中调用 iOS 的 platform.AVFoundation相关 API,异步发起请求然后根据结果显示加载中、失败、或成功时直接显示相机预览。可以看到我们做的 iOS 实现已十分完善,考虑到了三个不同场景 :D
...
import platform.AVFoundation.AVAuthorizationStatusAuthorized
import platform.AVFoundation.AVAuthorizationStatusDenied
import platform.AVFoundation.AVAuthorizationStatusNotDetermined
import platform.AVFoundation.AVAuthorizationStatusRestricted
import platform.AVFoundation.AVCaptureDevice
import platform.AVFoundation.AVMediaTypeVideo
import platform.AVFoundation.authorizationStatusForMediaType
import platform.AVFoundation.requestAccessForMediaType
import kotlin.coroutines.resume
import kotlin.coroutines.suspendCoroutine


@Composable
actual fun CameraPermissionControl(PermissionGrantedContent:  @Composable @UiComposable () -> Unit) {
   var hasCameraPermission by remember { mutableStateOf(null) }


   LaunchedEffect(Unit) {
       hasCameraPermission = requestCameraAccess()
   }


   when (hasCameraPermission) {
       true -> {
           PermissionGrantedContent()
       }
       false -> {
           Text("Camera permission denied. Please grant access from settings.")
       }
       null -> {
           Text("Requesting camera permission...")
       }
   }
}


private suspend fun requestCameraAccess(): Boolean = suspendCoroutine { continuation ->
   val authorizationStatus = AVCaptureDevice.authorizationStatusForMediaType(AVMediaTypeVideo)


   when (authorizationStatus) {
       AVAuthorizationStatusNotDetermined -> {
           AVCaptureDevice.requestAccessForMediaType(AVMediaTypeVideo) { granted ->
               continuation.resume(granted)
           }
       }
       AVAuthorizationStatusRestricted, AVAuthorizationStatusDenied -> {
           continuation.resume(false)
       }
       AVAuthorizationStatusAuthorized -> {
           continuation.resume(true)
       }
       else -> {
           continuation.resume(false)
       }
   }
}
然后来到核心的相机预览功能。从 CMP 的文档中我们知道,使用 UIKitView 即可在 Composable 函数中嵌入一个 iOS 的 View。
// Example 1
UIKitView(
   factory = { MKMapView() },
   modifier = Modifier.size(300.dp),
)


// Example 2
@OptIn(ExperimentalForeignApi::class)
@Composable
fun UseUITextField(modifier: Modifier = Modifier) {
   var message by remember { mutableStateOf("Hello, World!") }
   UIKitView(
       factory = {
           val textField = object : UITextField(CGRectMake(0.0, 0.0, 0.0, 0.0)) {
               @ObjCAction
               fun editingChanged() {
                   message = text ?: ""
               }
           }
           textField.addTarget(
               target = textField,
               action = NSSelectorFromString(textField::editingChanged.name),
               forControlEvents = UIControlEventEditingChanged
           )
           textField
       },
       modifier = modifier.fillMaxWidth().height(30.dp),
       update = { textField ->
           textField.text = message
       }
   )
}
文档 https://www.jetbrains.com/help/kotlin-multiplatform-dev/compose-uikit-integration.html
仔细观察这两个示例会发现其使用的都是默认 UIKit 控件,而非工程自定义的;对应的引用则是 JetBrains 提前转换了相关的代码接口到 Kotlin,例如 platform.UIKit.UITextField 默认可以导入到 KMP 工程的 iOS target。但对于我们的工程情况不太相同,我们想要复用的是一个带有识别功能的自定义 CameraPreview 视图。
换个角度看,KMP 产出的 app.framework 是一个基础共享层,iOS 原生代码依赖于这个库。从依赖关系上,我们无法直接调用 iOS App 源码中的CamerePreview。解决方法也不难,一般分两种:
把相关代码打包成一个独立模块,产出 cameraview.freamework,让app 依赖它。
iOS App 在初始化 app.framework 时,传入一个 lambda 到app 用来初始化并返回一个UIView。
此处我们采用第二种方案,定义 IOSCameraPreviewCreator 作为两侧交互的协议。
// 定义
typealias IOSCameraPreviewCreator = (
   threshold: Float,
   maxResults: Int,
   delegate: Int,
   mlModel: Int,
   setInferenceTime: (newInferenceTime: Int) -> Unit,
   callback: IOSCameraPreviewCallback
) -> UIView


typealias IOSCameraPreviewCallback = (result: ObjectDetectionResult) -> Unit


// 在启动时从 iOS 端传入相关实现,并加入到 Koin 的 Definition
fun onStartup(iosCameraPreviewCreator: IOSCameraPreviewCreator) {
   Startup.run { koinApp ->
       koinApp.apply {
           modules(module {
               single { LLMOperatorFactory() }
               single { iosCameraPreviewCreator }
           })
       }
   }
}


// 回到 CameraPreview 的实现,我们只要执行注入,
// 并 invoke 这个函数获得 UIView 实例。
...
import androidx.compose.ui.viewinterop.UIKitView
import platform.UIKit.UIView


@Composable
actual fun CameraPreview(
   threshold: Float,
   maxResults: Int,
   delegate: Int,
   mlModel: Int,
   setInferenceTime: (newInferenceTime: Int) -> Unit,
   onDetectionResultUpdate: (result: ObjectDetectionResult) -> Unit,
) {
   val iOSCameraPreviewCreator = koinInject()
   // 和 Android 端集成原生 Camera View 的方式有几分相似
   UIKitView(
       factory = {
           val iosCameraPreview: UIView = iOSCameraPreviewCreator(
               threshold,
               maxResults,
               delegate,
               mlModel,
               setInferenceTime,
               onDetectionResultUpdate)
           iosCameraPreview
       },
       modifier = Modifier.fillMaxSize(),
       update = { _ -> }
   )
}
上述代码使用 Koin 管理依赖简化了流程。至此 CMP 的部分已经完成,我们顺延启动参数的注入去探究 iOS 的部分。
MainKt.onStartup(iosCameraPreviewCreator: { threshold, maxResults, delegate, mlModel, onInferenceTimeUpdate, resultCallback in
   return IOSCameraView.init(
       frame: CGRectMake(0, 0, 0, 0),
       modelName: Int(truncating: mlModel) == 0 ? "EfficientDet-Lite0" : "EfficientDet-Lite2",
       maxResults: Int(truncating: maxResults),
       scoreThreshold: Float(truncating: threshold),
       onInferenceTimeUpdate: onInferenceTimeUpdate,
       resultCallback: resultCallback
   )
})
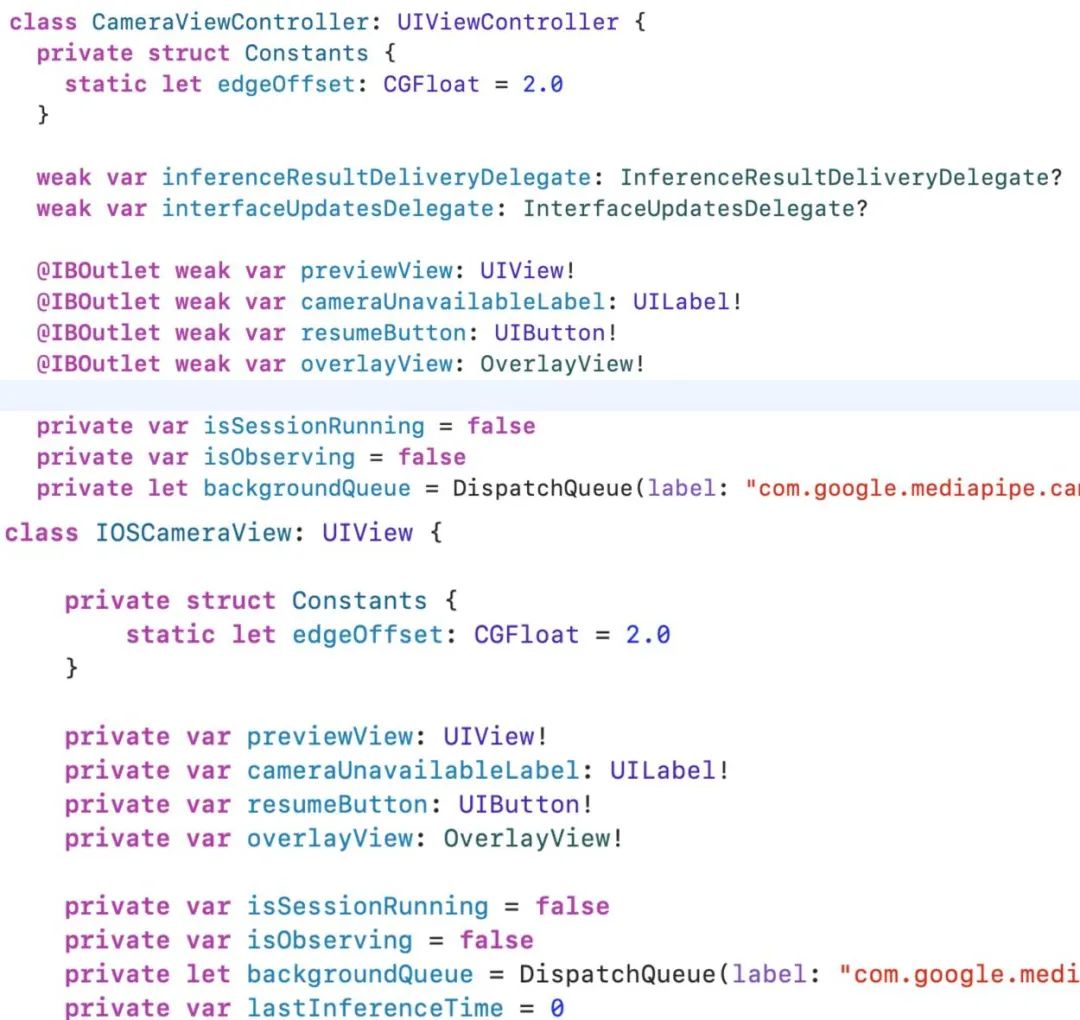
该IOSCameraView 实际上即原 iOS Demo 中的 CameraViewController,我们仅修改一些初始化和生命周期的内容,并简化掉了参数变化监听的部分以突出核心迁移内容:
生命周期处理:ViewController 使用 viewDidLoad 等生命周期方法,UIView 则用 didMoveToWindow 处理视图添加或移除时的逻辑。ViewController 通过生命周期管理初始化,而 UIView 提供自定义初始化方法来传递模型和检测参数。
子视图设置:ViewController 使用@IBOutlet 和 Interface Builder,而UIView 通过 setupView 方法直接创建并添加子视图,手动使用 AutoLayout 设置约束以及手动设置点击事件。
回调和委托:ViewController 使用委托,而 UIView 增加了回调闭包 onInferenceTimeUpdate 和resultCallback,初始化时传入这些参数并设置好类型转换,方便后面回调到 KMP 层。
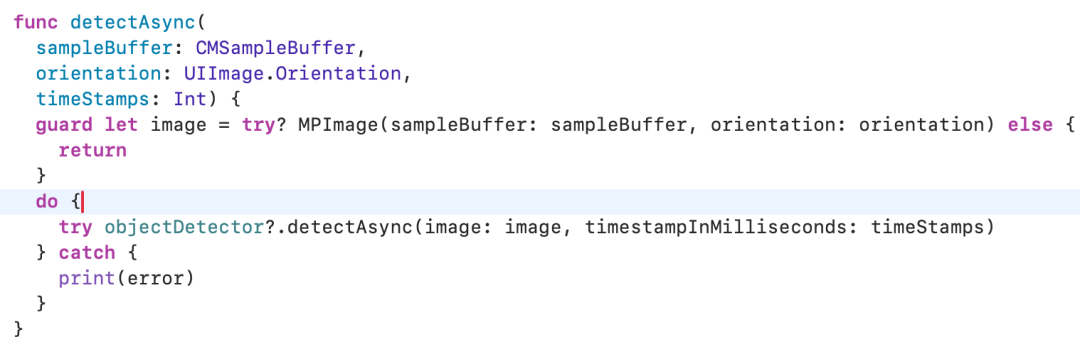
我们同时保留了OverlayView CameraFeedService ObjectDetectorService 和部分DefaultConstants,此处不对他们的代码进行修改。其中ObjectDetectorService 即是对 Object Detection SDK 的封装,如果观察它的 API 调用,会发现其和 iOS 的 Camera API 紧密耦合 (CMSampleBuffer 等),说明了其难以在 Common 抽象,呼应了文初对 Camera 相关服务的分析。
至此,我们就可以把 iOS 端的相机预览加 Object Detection 也跑起来。
简单测试
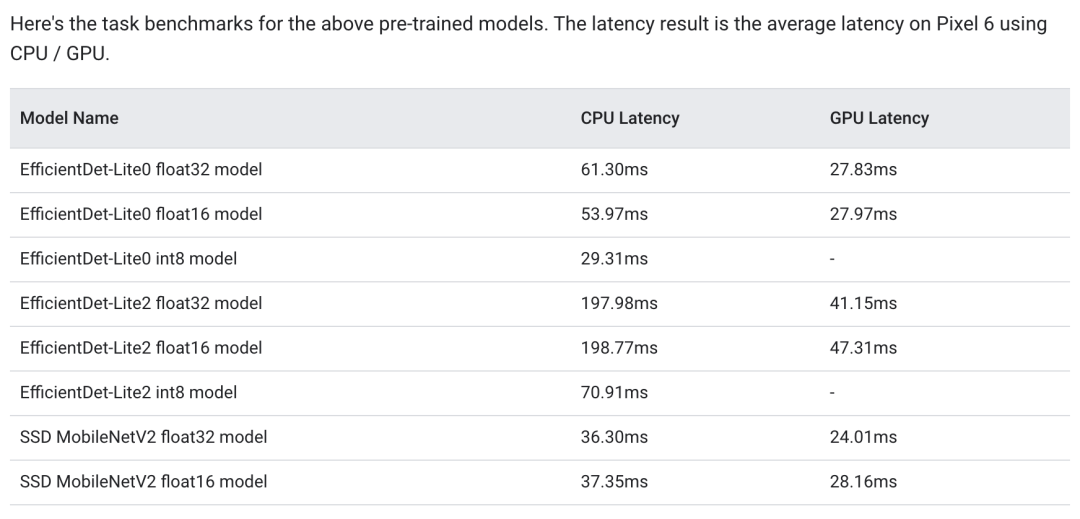
上方的动图展示了 EfficientDet-Lite0 加 CPU 模式在 iPhone 13mini 执行的效果。官方使用 Pixel 6 CPU/GPU 的测试中,转去 GPU 执行还能再小幅提高一些性能。不难看出,其实时性已足够满足生产环境的需求,同时在准确率方面表现尚可。
随 Demo 工程搭载的可选模型有两个:
EfficientDet-Lite0 模型使用 320x320 输入,平衡了延迟和准确性,适合轻量级应用。Demo 中默认搭载了其 float 32 版本的模型。
EfficientDet-Lite2 模型使用 448x448 输入,准确性更高,但速度较慢,适合对准确性要求更高的场景。Demo 中默认搭载了其 float 32 版本的模型。
这两种模型均使用包含 150 万个实例和 80 种物体标签的训练集进行训练。
总结
一些传统的 ML 模型在移动设备上的应用已经相对成熟,可以应对不少单一和专途的场景。而本文的两个模型亦只有 13~25MB,相比 LLM 的模型动辄 1GB 以上,这类模型完全没有落地的负担。
使用 Compose Multiplatform 内嵌 UiKit 的 View 可以解决很多高性能、需要原生 API 和硬件的情况。
为了尽可能还原 Demo 的效果同时减少迁移成本,ResultOverlay 在本次迁移中虽然已经放到 Common 层,且 iOS 侧也已设置结果回调到 KMP,但 iOS 上依旧使用了原生 View 实现。现实场景中,我们可进一步扩展思考:
倘若业务场景简单,例如也是方框识别且全屏展示 camera preview,则可以在 Compose 层简单复用ResultOverlay。
倘若业务场景复杂,例如视频聊天时的人脸识别加贴图选择和渲染,因业务部分的高复杂度使得复用同一个 StickerOverlay 的价值非常高,这个情况下 Camera Preview 无论大小如何,适配成本反倒都可以接受。另外对于 StickerOverlay 的位置计算,理论上也存在优化的空间,例如采样计算然后中间用插值动画移动。
一些依赖管理的复杂场景包括 UI 视图的注入,借助类似 Koin 依赖注入框架可大幅简化。
这次迁移的部分还有相册选择、照片与视频解析等等未实现,感兴趣的朋友可以自行添加测试,像读取权限申请、播放器 View 的嵌入和本文的迁移过程会非常类似。
-
Android
+关注
关注
12文章
4043浏览量
134902 -
摄像头
+关注
关注
61文章
5136浏览量
103680 -
移植
+关注
关注
1文章
417浏览量
29608 -
LLM
+关注
关注
1文章
352浏览量
1420
原文标题:【GDE 分享】移植 Mediapipe Demo 到 Kotlin Multiplatform (2)
文章出处:【微信号:Google_Developers,微信公众号:谷歌开发者】欢迎添加关注!文章转载请注明出处。
发布评论请先 登录
使用person-detection-action-recognition-0006模型运行智能课堂C++演示遇到报错怎么解决?
使用Yolo-v3-TF运行OpenVINO™对象检测Python演示时的结果不准确的原因?
【米尔百度大脑EdgeBoard边缘AI计算盒试用连载】III. 板载深度学习DEMO-detection测试-下(ZMJ)
STM32程序的移植详解步骤
如何执行object_detection_demo.py以使用摄像头作为对象检测Python演示的输入?
Java Object Serialization Spec
Object-Oriented Programming in
什么是CORBA (Common Object Reques

Object类中的所有方法


评论