 【聆思CSK6 LNN工具体验】自定义人脸检测模型

背景
在微信偶然发现聆思科技的CSK6开发板的评估活动,因为经常在各种硬件平台上测试模型,因此申请了测评。很荣幸能被选中。
官方提供了开源分类的模型转换,但平常使用分类模型较少因此尝试了目标检测模型的转换。
模型架构
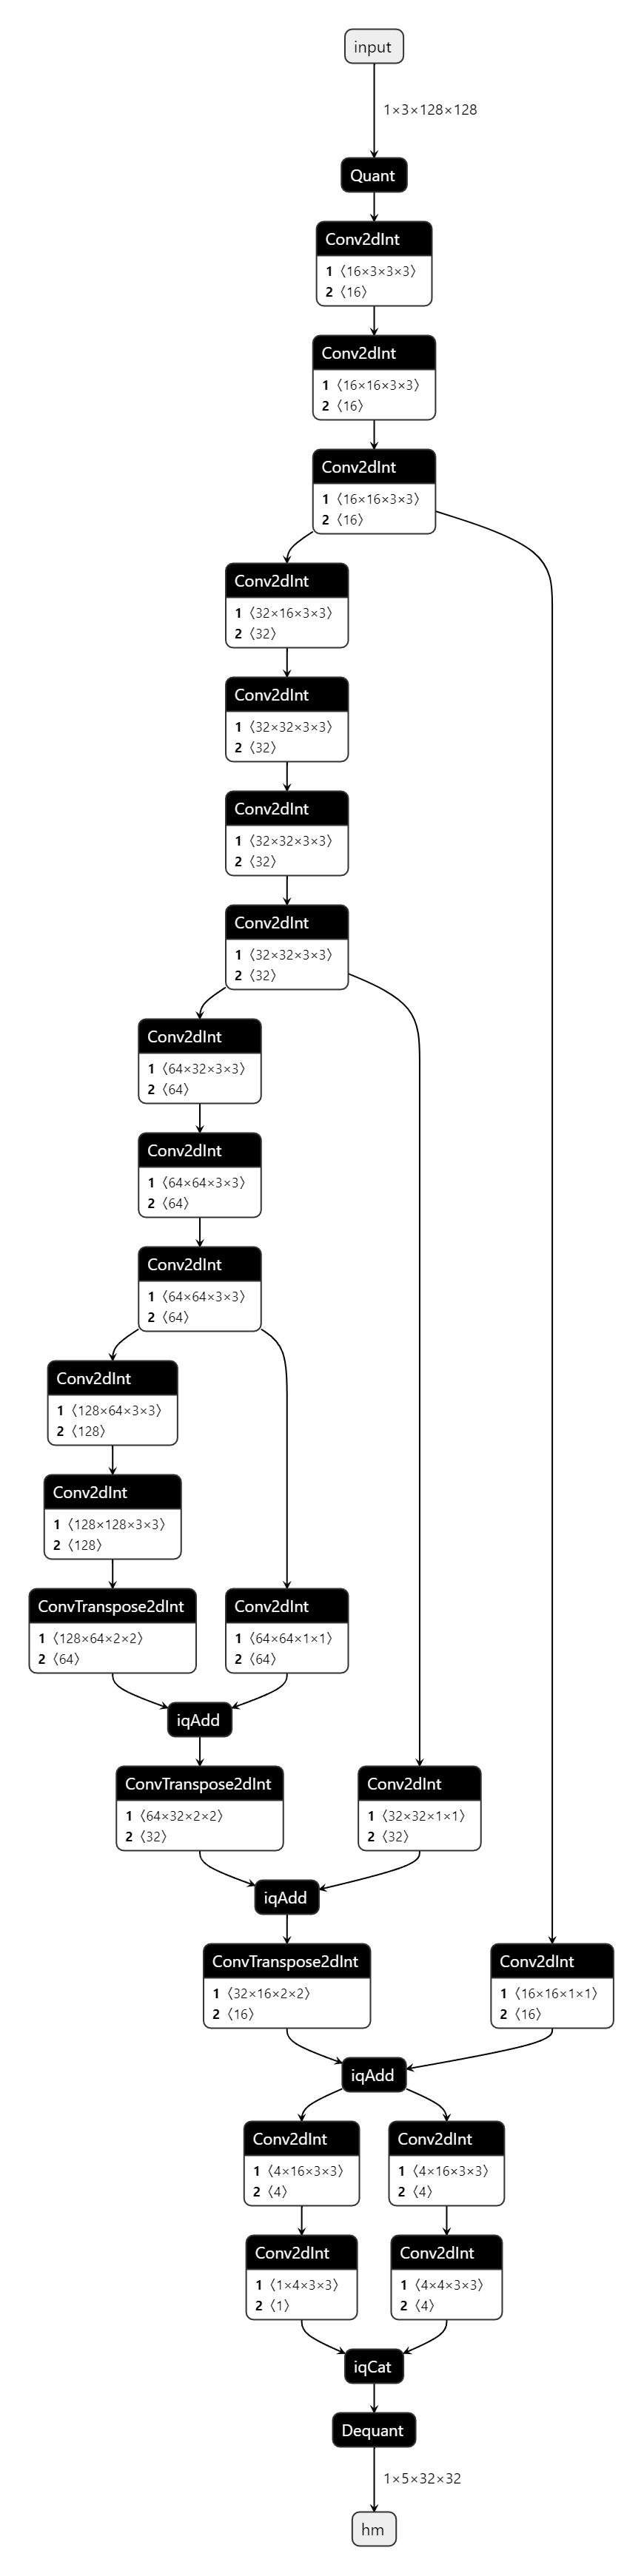
模型的思路采自centernet,基干是修改过的普通VGG块,FPN是简单的自顶向下结构,head输出了一个hm(中心点)和wh,但截至于写文章时,官方提供的烧录板子接口只能输出一个head,所以又将hm和wh cat在一起。网络结构如下
过程
环境搭建
linger与thinker 环境搭建
linger是用于量化训练的,thinker是用来转换模型的。我使用的是wsl中Ubuntu18环境。
linger配置
conda create -n linger-env python==3.7.0
conda activate linger-env
git clone https://github.com/LISTENAI/linger.git
cd linger && sh  install.sh
pip -U pip
cat requirements.txt |xargs -n 1 pip install
thinker配置
conda create -n thinker-env python==3.7.0
conda activate thinker-env
git clone https://github.com/LISTENAI/thinker.git
cd thinker
bash ./scripts/x86_linux.sh
pip -U pip
cat requirements.txt |xargs -n 1 pip install
两个环境分开搭建,搭建好后我们就可以进行训练了。
模型训练及转换
模型训练过程中需要先进行浮点训练,再进行定点训练,然后再转换成.bin格式。
linger不支持tensorboard,所以要把相关代码注释掉。其余的就是添加几行代码就ok了。
原始代码
model = create_model()
  model = model.to(cfg.device)
  optimizer = torch.optim.Adam(model.parameters(), cfg.lr, betas=(0.9, 0.999), eps=1e-08, weight_decay=1e-4)
修改后代码
import linger
  model = create_model()
  model = model.to(cfg.device)
  dummy_input = torch.randn(1, 3, 128, 128,requires_grad=True).cuda()
  linger.trace_layers(model, model, dummy_input, fuse_bn=True)
  type_modules = (nn.Conv2d,nn.BatchNorm2d,nn.ConvTranspose2d)
  normalize_modules =(nn.Conv2d,nn.BatchNorm2d,nn.ConvTranspose2d)
  linger.normalize_module(model, type_modules=type_modules, normalize_weight_value=16, normalize_bias_value=16,
                          normalize_output_value=16)
  optimizer = torch.optim.Adam(model.parameters(), cfg.lr, betas=(0.9, 0.999), eps=1e-08, weight_decay=1e-4)
再训练完浮点模型后需要加载保存的浮点模型进行定点训练,注意需要使用更小的学习率。
import linger
  model = create_model(arch=cfg.arch, num_classes=train_dataset.num_classes, inference_mode=True, onnx_flag=False)
  model = model.to(cfg.device)
  dummy_input = torch.randn(1, 3, 128, 128, requires_grad=True).cuda()
  type_modules = (nn.Conv2d,nn.BatchNorm2d,nn.ConvTranspose2d)
  normalize_modules = (nn.Conv2d,nn.BatchNorm2d,nn.ConvTranspose2d)
  linger.normalize_module(model, type_modules=type_modules, normalize_weight_value=16, normalize_bias_value=16,
                          normalize_output_value=16)
  model = linger.normalize_layers(model, normalize_modules=normalize_modules, normalize_weight_value=8,
                                normalize_bias_value=8, normalize_output_value=8)
  quant_modules = (nn.Conv2d,nn.BatchNorm2d,nn.ConvTranspose2d)
  model = linger.init(model, quant_modules=quant_modules)
  model.load_state_dict(torch.load(cfg.load_model)['state_dict'])
  optimizer = torch.optim.Adam(model.parameters(), cfg.lr, betas=(0.9, 0.999), eps=1e-08, weight_decay=1e-4)
定点模型训练完毕后,需要转换成onnx格式
import linger
  model = create_model()
  model = model.to(cfg.device)
  dummy_input = torch.randn(1, 3, 128, 128, requires_grad=True).cuda()
  linger.SetIQTensorCat(True)
    type_modules = (nn.Conv2d,nn.BatchNorm2d,nn.ConvTranspose2d)
  normalize_modules = (nn.Conv2d,nn.BatchNorm2d,nn.ConvTranspose2d)
  linger.normalize_module(model, type_modules=type_modules, normalize_weight_value=16, normalize_bias_value=16,
                          normalize_output_value=16)
  model = linger.normalize_layers(model, normalize_modules=normalize_modules, normalize_weight_value=8,
                                normalize_bias_value=8, normalize_output_value=8)
  quant_modules = (nn.Conv2d,nn.BatchNorm2d,nn.ConvTranspose2d)
  model = linger.init(model, quant_modules=quant_modules)

  model.load_state_dict(torch.load(cfg.load_model)['state_dict'])
  model.eval()
  dummy_input = torch.ones(1, 3, 128, 128).cuda()
  with torch.no_grad():
    torch.onnx.export(model, dummy_input, 'lnn.onnx',input_names=['input'], output_names=['hm'],
                      export_params=True,opset_version=12,operator_export_type=torch.onnx.OperatorExportTypes.ONNX_ATEN_FALLBACK)
模型转成onnx后需要在thinker环境中转成.bin格式
conda activate thinker-env
tpacker -g net.onnx -d True -o model.bin
如果最后一步报错,可能是因为不符合转换要求导致,按照官方要求来就行。
烧录模型到板子
首先需要安装lisa环境,这里我选择了wsl中的ubuntu22.04环境
先安装lisa zep 命令行工具,wasi-sdk,wasm-sdk,
编译程序
配置环境变量
export WASM_THINKER_SDK="/path_to_sdk/wasm-sdk"
export WASI_TOOLCHAIN_PATH="/path_to_sdk/wasi-sdk-17.0"
安装完成后,下载官方提供的demo
lisa zep create --from-git https://cloud.listenai.com/listenai/samples/camera_image_detect.git
修改wasm 应用
cd app_wasm/
vi main.c
将文件修改为如下
#include < stdio.h >

#include "thinker/thinker.h"

static tModelHandle model_hdl;
static tExecHandle hdl;

int
main(int argc, char **argv)
{
    printf("BOOT: WAMRn");

    tStatus ret;

    char version[30];
    tGetVersion(0, version, sizeof(version));
    printf("[WASM] tGetVersion: %sn", version);

    ret = tInitialize();
    printf("[WASM] tInitialize: %dn", ret);
    if (ret != T_SUCCESS) return 1;
    return 0;
}

int
set_model(void *ptr, uint32_t size)
{
    tStatus ret;

    uint32_t use_psram_size = 0;
    uint32_t use_share_size = 0;

    int num_memory = 0;
    tMemory memory_list[7];
    ret = tGetMemoryPlan(
        memory_list, &num_memory, (int8_t *)ptr, size, &use_psram_size, &use_share_size);
    printf("[WASM] tGetMemoryPlan: %dn", ret);
    if (ret != T_SUCCESS) return 1;

    printf("[WASM] * num_memory=%dn", num_memory);
    printf("[WASM] * use_psram_size=%dn", use_psram_size);
    printf("[WASM] * use_share_size=%dn", use_share_size);
    for (int i = 0; i < num_memory; i++) {
        printf("[WASM] * memory_list[%d].dev_type=%dn", i, memory_list[i].dev_type_);
        printf("[WASM] * memory_list[%d].mem_type=%dn", i, memory_list[i].mem_type_);
        printf("[WASM] * memory_list[%d].size=%dn", i, memory_list[i].size_);
        printf("[WASM] * memory_list[%d].addr=0x%08llxn", i, memory_list[i].dptr_);
    }

    ret = tModelInit(&model_hdl, (int8_t *)ptr, size, memory_list, num_memory);
    printf("[WASM] tModelInit: %d, model=0x%llxn", ret, model_hdl);
    if (ret != T_SUCCESS) return 1;

    ret = tCreateExecutor(model_hdl, &hdl, memory_list, num_memory);
    printf("[WASM] tCreateExecutor: %d, hdl=0x%llxn", ret, hdl);
    if (ret != T_SUCCESS) return 1;

    return 0;
}

int
set_input(void *ptr, uint32_t size)
{
    printf("[WASM] set_input(%p, %d)n", ptr, size);

    tStatus ret;

    int32_t in_c = 3;
    int32_t in_h = 128;
    int32_t in_w = 128;

    tData input;
    input.dtype_ = Int8;
    input.scale_ = 5;
    input.shape_.ndim_ = 4;
    input.shape_.dims_[0] = 1;
    input.shape_.dims_[1] = in_c;
    input.shape_.dims_[2] = in_h;
    input.shape_.dims_[3] = in_w;
    input.dptr_ = ptr;

    ret = tSetInput(hdl, 0, &input);
    printf("[WASM] tSetInput: %dn", ret);

    return ret;
}

int
get_output(void **ptr, uint32_t *size)
{
    printf("[WASM] get_outputn");

    tStatus ret;

    ret = tForward(hdl);
    printf("[WASM] tForward: %dn", ret);
    if (ret != T_SUCCESS) return 1;

    tData output;
    ret = tGetOutput(hdl, 0, &output);
    printf("[WASM] tGetOutput: %dn", ret);
    if (ret != T_SUCCESS) return 1;

    printf("[WASM] * output.dtype=%un", output.dtype_);
    printf("[WASM] * output.shape.ndim=%un", output.shape_.ndim_);
    printf("[WASM] * output.shape.ndim=%un", output.shape_.ndim_);
    printf("[WASM] * output.dptr=0x%pn", output.dptr_);

    int shape_size = (output.dtype_ & 0xF);
    for (int i = 0; i < output.shape_.ndim_; i++) {
        shape_size *= output.shape_.dims_[i];
    }

    printf("[WASM] * shape_size=%dn", shape_size);

    *ptr = output.dptr_;
    *size = shape_size;

    return ret;
}
主要是修改set_input中in_h和in_w为自己模型的输入输出,input.scale_的值修改为自己模型的值,这个如何查看开源通过onnx中的input quant中的scale_x, scale_x=pow(2,input.scale_)

修改主程序
cd ..
cd camera_image_detect
vi main.c
修改后的代码为
#include < zephyr/kernel.h >
#include < zephyr/device.h >
#include < zephyr/drivers/gpio.h >
#include < zephyr/drivers/video.h >
#include < zephyr/storage/flash_map.h >

#include < math.h >

#include < csk_malloc.h >

#include < lsf/services/thinker.h >

#include "lib_image.h"
#include "venus_ap.h"

#define THINKER_MODEL_ADDR (FLASH_BASE + FLASH_AREA_OFFSET(thinker_model))

double CIFAR100_TRAIN_MEAN[] = {0.5070751592371323, 0.48654887331495095, 0.4409178433670343};
double CIFAR100_TRAIN_STD[] = {0.2673342858792401, 0.2564384629170883, 0.27615047132568404};

void main(void)
{
    int ret;

    printk("Hello World! %sn", CONFIG_BOARD);

    /* 加载 Thinker 模型,注意传入模型的实际字节数 */
    lsf_thinker_set_model((void *)THINKER_MODEL_ADDR, 421520);

    const struct device *video = device_get_binding(DT_LABEL(DT_NODELABEL(dvp)));
    if (video == NULL) {
        printk("Video device not foundn");
        return;
    }

    struct video_format fmt;
    fmt.pixelformat = VIDEO_PIX_FMT_VYUY;
    fmt.width = 640;
    fmt.height = 480;
    fmt.pitch = fmt.width * 2;
    if (video_set_format(video, VIDEO_EP_OUT, &fmt)) {
        printk("Unable to set video formatn");
        return;
    }

    // 图像输入区域
    float box[4] = {0, 0, 0, 0};
    box[2] = fmt.width;
    box[3] = fmt.height;

    struct video_buffer *buffers[2];

    /* Size to allocate for each buffer */
    int bsize = fmt.width * fmt.height * 2;

    /* Alloc video buffers and enqueue for capture */
    for (int i = 0; i < ARRAY_SIZE(buffers); i++) {
        printk("#%d: Alloc video buffer: %dn", i, bsize);
        buffers[i] = video_buffer_alloc(bsize);
        if (buffers[i] == NULL) {
            csk_heap_info();
            printk("Unable to alloc video buffern");
            return;
        }

        video_enqueue(video, VIDEO_EP_OUT, buffers[i]);
    }

    ret = video_stream_start(video);
    if (ret != 0) {
        printk("Unable to start video streamn");
        return;
    }

    size_t result_size = 3 * 128 * 128;
    size_t pixel_count = fmt.width * fmt.height;
    uint8_t *result = csk_malloc(result_size); // 缩放后的图像
    assert(result != NULL);
    uint8_t *rgb_buffer = csk_malloc(pixel_count * 3); // 存 RGB 数组
    assert(rgb_buffer != NULL);

    double *input_data = csk_malloc(result_size * sizeof(double)); // 特征换算
    assert(input_data != NULL);
    uint8_t *final_input = csk_malloc(result_size); // 最终输入
    assert(final_input != NULL);

    size_t one_third_result = result_size / 3;

    int8_t *output;
    uint32_t output_size;

    // Start process
    struct video_buffer *vbuf;
    ret = video_dequeue(video, VIDEO_EP_OUT, &vbuf, K_MSEC(1000));
    if (ret != 0) {
        printk("Video buffer dequeued failed: %dn", ret);
        return;
    }

    uint8_t *buffer = vbuf- >buffer;

    printk("Processing...n");
    vyuy_to_rgb24(buffer, rgb_buffer, pixel_count);

    video_enqueue(video, VIDEO_EP_OUT, vbuf);

    printk("Resizing...n");
    ImagingResample(rgb_buffer, fmt.width, fmt.height, result, 128, 128, box);

    // 特征换算
    printk("Feature extraction...n");
    for (int i = 0; i < result_size; i++) {
        int index = i % 3;
        uint8_t value = result[i];
        input_data[i] = (double)(value / 255.0 - CIFAR100_TRAIN_MEAN[index]) /
                CIFAR100_TRAIN_STD[index];
    }

    // 输入数据
    printk("Input data to Thinker...n");
    for (int i = 0; i < result_size; i++) {
        // final_input[i] = (int8_t)floor(input_data[i] * 64 + 0.5);

        if (i < one_third_result) {
            final_input[i] = (int8_t)floor(input_data[i * 3] * 64 + 0.5);
        } else if (i < one_third_result * 2) {
            final_input[i] = (int8_t)floor(
                input_data[(i - one_third_result) * 3 + 1] * 64 + 0.5);
        } else {
            final_input[i] = (int8_t)floor(
                input_data[(i - one_third_result) * 3 + 2] * 64 + 0.5);
        }
    }

    // input data 给 Thinker
    lsf_thinker_set_input(final_input, result_size);

    // 获取 Output
    lsf_thinker_get_output((void **)&output, &output_size);

  int max_value = -129;
  int cur_index = 0;
  int xs = 0;
  int ys = 0;
  float score = 0;
  int w = 32;
  int h =32;
  for (int c = 0; c < 1; c++) {
    for (int h1 = 0; h1 < h; h1++) {
      for (int w1 = 0; w1 < w; w1++) {

        int value = output[cur_index];

        if (value > max_value) {
          max_value = value;
          xs = w1;
          ys = h1;
          score = value / pow(2.0, 3);
        }


          cur_index++;

      }
    }
  }


    int32_t idx_lx = w * h + ys * w + xs;
    int32_t idx_ty = w * h + idx_lx;
    int32_t idx_rx = w * h * 2 + idx_lx;
    int32_t idx_by = w * h * 3 + idx_lx;
    float a1 = xs - (float)(output[idx_lx]) / pow(2.0, 3);
    float b1 = ys - (float)(output[idx_ty]) / pow(2.0, 3);
    float c1 = xs + (float)(output[idx_rx]) / pow(2.0, 3);
    float d1 = ys + (float)(output[idx_by]) / pow(2.0, 3);


    float x1 = a1 * 4 * (640.0 /128.0);
    float y1 = b1 * 4* (480.0 /128.0);
    float x2 = c1 * 4* (640.0 /128.0);
    float y2 = d1 * 4* (480.0 /128.0);


    printk("facebox:x1:%f,y1:%f,x2:%f,y2:%f,score:%fn",x1,y1,x2,y2,score);

    for (int j = 0; j < 128; j++) {
        for (int i = 0; i < 128; i++) {
            uint8_t pixe_r = result[j * 128 * 3 + i * 3];
            uint8_t pixe_g = result[j * 128 * 3 + i * 3 + 1];
            uint8_t pixe_b = result[j * 128 * 3 + i * 3 + 2];
            printk("�33[0;38;2;%d;%d;%dm#", pixe_r, pixe_g, pixe_b);
        }
        printk("�33[00mn");
    }
}
需要修改的地方为
1.double CIFAR100_TRAIN_MEAN[]和double CIFAR100_TRAIN_STD[]改为自己模型使用的值
2.lsfthinkersetmodel((void )THINKERMODELADDR, 421520)
中的第二个参数为自己模型的大小
3.resultsize = 3 128 128;改为自己模型的输入大小
4.ImagingResample(rgbbuffer, fmt.width, fmt.height, result, 128, 128, box);中的倒数第二个和第三个参数改为自己模型的输入大小
5.修改自己的后处理:将讲一下我自己的后处理逻辑:我参照的是centernet的逻辑,只不过将hm和wh两个输出cat在一起,因此最后需要拆开来看;hm为13232的特征图,wh为43232的特征图。hm代表目标中心的score值,wh代表对应中心点的左上右下的距离,组合起来就是目标框的左上和右下角点。因此先计算hm特征图,为了节省时间以及单纯认为只检测一个人脸,遍历hm特征图后得到最大值就是目标中心点,然后获取该中心点位置的wh的4个值就是目标框。
烧录到板子
1.编译wasm应用
cd app_wasm
lisa zep exec python $WASM_THINKER_SDK/cmake/sdk.py build -p .
此时会在当前目录下build文件夹中生成:thinker_resnet18.aot
2.编译主程序
cd camera_image_detect
lisa zep build -b csk6011a_nano
此时会在当前目录下build文件夹中生成:zephyr/zephyr.bin
3.烧录到板子
lisa zep exec cskburn -s COMx -C 6 0x0 ./build/zephyr/zephyr.bin -b 748800

lisa zep exec cskburn -s COMx -C 6 0x100000 ./resource/cp.bin -b 748800

lisa zep exec cskburn -s COMx -C 6 0x200000 ./app_wasm/build/thinker_resnet18.aot -b 748800

lisa zep exec cskburn -s COMx -C 6 0x300000 ./resource/resnet18_model.bin -b 748800
其中 COMx 为 自己板子的串口,我的是COM3,需要修改对应的串口名字
./resource/resnet18_model.bin 是自己的模型,需要修改成对应的路径
4.串口查看结果
使用官方提供的串口工具
去查看模型结果
连接板子后,按动复位键,就会看到结果

-
printf函数
+关注
关注
0文章
31浏览量
6225 -
Ubuntu系统
+关注
关注
0文章
93浏览量
4522
发布评论请先 登录
无图形界面模式下自定义检查工具的应用
采用汇编指示符来使用自定义指令
智能硬件通过小聆AI自定义MCP应用开发操作讲解
聆思大模型智能FAE,看得懂技术,答得准问题
零基础在智能硬件上克隆原神可莉实现桌面陪伴(提供人设提示词、知识库、固件下载)
KiCad 中的自定义规则(KiCon 演讲)
HarmonyOS应用自定义键盘解决方案
手把手教你把coze扣子智能体接入CSK6大模型开发板实现听新闻自由
如何添加自定义单板
聆思CSK6大模型语音开发板接入DeepSeek资料汇总(包含深度求索/火山引擎/硅基流动华为昇腾满血版)
使用OpenVINO™ 2021.4在CPU和MYRIAD上进行自定义对象检测,为什么结果差异巨大?

think-cell:自定义think-cell(四)

think-cell;自定义think-cell(一)


 工商网监
工商网监
评论