 DS31256的分数级T1 (FT1)环回检测

本应用笔记介绍了利用DS31256的接收BERT (误码率测试)功能实现分数级T1 (FT1)上环回或下环回检测(V.54)的方法,并给出了示例代码。
概述
这篇应用笔记介绍了利用DS31256的接收BERT功能实现分数级T1 (FT1)上环回或下环回检测(V.54)的方法,详细说明请参考分数级T1.403附录B规范。所提供的算法和示例代码简化了DS31256最终用户的设计。
DS31256只有一个BERT引擎,但有16个V.54引擎(每端口一个)。因此,当测试端口多于一个时,软件带宽必须能够处理多路复用技术。
算法
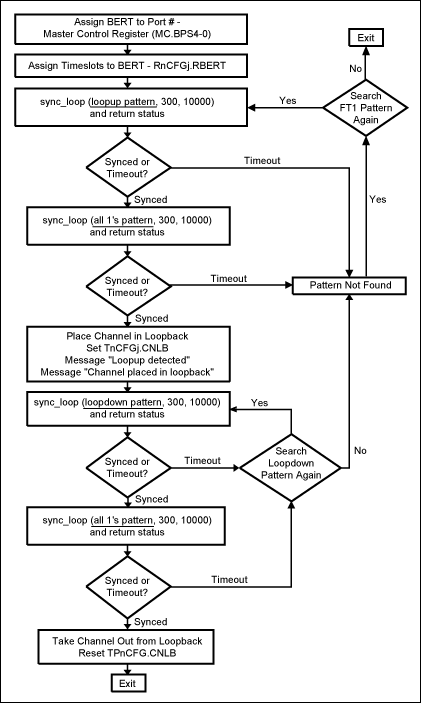
图1和图2所示流程图详细说明了上环回、下环回的操作流程。假设只有端口0查找FT1模板。基本算法设置BERT查询上环回模板。同步后,这个算法检测并确保BERT同步于可编程周期(例程中为0.6秒),然后查找一个全“1”模板。下环回例程中采用相同的同步、检验,随后是全“1”模板。
本例中选择0.6秒周期确保BERT同步,但这个时间周期必须根据sync_loop函数运行的快慢进行调整。

图1. FT1 (上环回与下环回)检测流程
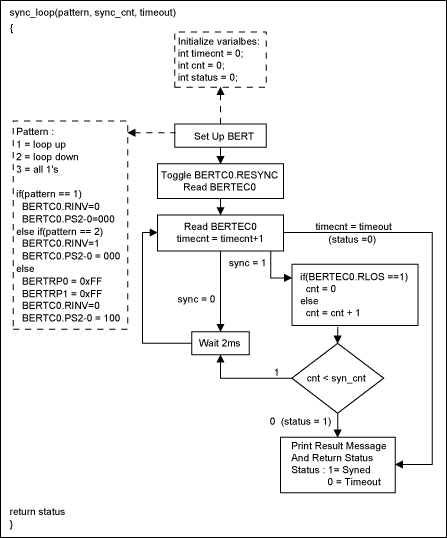
图2. FT1 (上环回与下环回)检测流程(续)
示例代码中函数调用定义
在进入特定程序前,必须了解一些假设条件,程序中需要下列函数。
- write_reg (addr, data)—将特定数值写入指定的DS31256寄存器:
addr = DS31256寄存器相对于芯片基地址的偏移量 data = 需要写入寄存器的数据 - read_reg (addr)—读取DS31256特定地址的寄存器并返回值:
addr = DS31256寄存器相对于芯片基地址的偏移量 - write_ind_reg (addr, data)—将特定数据写入指定的DS31256间接寻址寄存器,然后在返回前等待寄存器的“忙”位被清除:
addr = 要写入数据的间接寻址寄存器 data = 写入指定的间接寻址寄存器的数据 - read_ind_reg (addr, i)—读取指定地址的DS31256间接寻址寄存器并返回数值:
addr = DS31256寄存器相对于芯片基地址的偏移量 i = 索引 - 标准的C语言打印函数printf
函数示例代码
FT1测试函数
void FT1Test()
{
	int status = 0;

	FT1Setting(0, 0); 				-- Configure the device for BERT
status = sync_loop(1, 300, 5000); 		-- FT1 loop-up test
if(status == 1) 				-- Return status is synced
{
  	status = sync_loop(3, 300, 5000);	-- FT1 all ones test
  	if(status == 1)
  	{
   	loopbackSetup(1);			-- Place channelized in network loopback
	status = sync_loop(2, 300, 5000);	-- FT1 loop-down test

	if(status == 1)
   	     {
status = sync_loop(3, 300, 5000); 	-- FT1 all ones test
    		if(status == 1)
loopbackSetup(0);			-- Take out from channelized loopback
    		else
checkstatus(3);			-- Print out test status
   	}
	else
	{
checkstatus(2);			-- Print out test status
	}
  	}
else
{
checkstatus(3);			-- Print out test status
  	}
}
else
{
  	checkstatus(1);				-- Print out test status
}
}
1. 打印测试状态信息函数
void checkstatus(int type)
{
	switch(type)
 	{
 	case 1: printf("Loopup pattern not found");
  		break;
 	case 2: printf("Loopdown pattern not found");
  		break;
 	case 3: printf("All 1's pattern not found");
  		break;
 	}
}
2. 配置FT1函数
该例程假设端口0用于FT1检测。
void FT1Setting(int dev, int port)
{
int mc = 0;						-- Variables to be used
int ds0 = 0;
int rcfg = 0;

mc = read_reg (0x10);				-- Read Master Control(MC) 0x00 register
mc = mc & 0xf07f;	-- Mask out the read-back value from MC
write_reg (0x10, mc); 	-- Assign the BERT to port 0 (MC.BPS4-0)

write_reg(0x0304, 0x4000); 	-- Configure port 0 in receive port
for(ds0 = 0; ds0 < 128; ds0 = ds0 + 1) 		-- Configure register
{							--Assign timeslot R[0]CFG[ds0].RBERT bit
write_ind_reg(0x0300, 0x0100 + ds0);	-- Assign all 128 ds0’s to RBERT
	}
printf("FT1 configuration completed.");
}
3. 执行FT1测试函数
int sync_loop(int pattern, int sync_cnt, int timeout)
{
int timeCnt = 0; 					-- Variables will be used
int cnt = 0;
int status = 0;
int temp = 0;
int sync = 0;
int bertc0 = 0;
int bertec0 = 0;

BertSetup(pattern);					-- Set up the BERT

bertc0 = read_reg (0x500);				-- Toggle RESYNC
bertc0 = bertc0 | 0x0001;	-- Mask the read BERTC0 value
write_reg (0x500, bertc0);				-- Write a 1 into BERTC0.RESYNC
bertc0 = bertc0 & 0xfffe;				-- Mask out read-back value
write_reg (0x500, bertc0);				-- Write 0 into BERTC0.RESYNC

bertc0 = read_reg (0x500);				-- Read BERTC0
bertec0 = read_reg (0x518);				-- Read BERTEC0
sync = ((bertec0 & 0x0001) == 0x0001);
timeCnt = timeCnt + 1;

while(cnt
4. 在BERT寄存器中建立模板
void BertSetup(int pattern)
{
	switch (pattern)
	{
  	case 1:
write_reg (0x500, 0x0 & 0x003c);	-- Disable BERTC0.RINV
break;					-- Set 2E7-1 pattern
case 2:
write_reg (0x500, 0x0020 & 0x003c);--Enable BERTC0.RINV
break;					-- Set 2E7-1 pattern
  	default:
write_reg (0x508, 0xffff);		-- Set BERT Repetitive Pattern Set
write_reg (0x50C, 0xffff);		-- in BERTBRP0-1
write_reg (0x500, 0x0010 & 0x003c);-- Disable BERTC0.RINV
   		break;					-- Set to repetitive pattern
 	}
}
5. 建立环回模式函数
该例程假设将端口0置于环回模式。
void loopbackSetup(int val)
{
	int a = 0;
	int tmp = 0;

	tmp = val< < 11;
	write_reg(0x0304, tmp); 	-- Set port and channel 0
 	for (a = 0; a < 128; a++)	-- Set T[0]CFG[a].CNLB to place channel in
	{	-- loopback
write_ind_reg(0x0300, 0x0200 + a);
	}

	if(val ==1)
	{
write_reg(0x0200, 0x0008); 			-- Enable TP[0]CR.TFDA1 to allow data to
printf("Loopup detected");			-- be transmitted normally
printf("Channel placed in loopback");
	}
	else
	{
write_reg(0x0200, 0x0000); 			-- Disable TP[0]CR.TFDA1 bit
printf("Loopdown detected");
  	printf("Channel taken out from loopback");
	}
}
结论
本应用笔记介绍了如何使用DS31256的接收BERT功能,从例程和软件算法可以看出实施FT1上回环和下回环检测非常简单。
审核编辑:郭婷
声明:本文内容及配图由入驻作者撰写或者入驻合作网站授权转载。文章观点仅代表作者本人,不代表电子发烧友网立场。文章及其配图仅供工程师学习之用,如有内容侵权或者其他违规问题,请联系本站处理。
举报投诉
-
寄存器
+关注
关注
31文章
5618浏览量
130389 -
C语言
+关注
关注
183文章
7646浏览量
146113 -
代码
+关注
关注
30文章
4976浏览量
74358
发布评论请先 登录
相关推荐
热点推荐
DS31256,pdf,datasheet (256-Cha
The DS31256 Envoy is a 256-channel HDLC controller that can handle up to 60 T1 or 64 E1 data
发表于 04-21 23:49
•18次下载
Enabling Fractional-T1(FT1) Lo
the receive BERT function in the DS31256 to perform Fractional-T1(FT1)loop-up or loop-down detection (V.54).
Ov
发表于 04-18 11:23
•1365次阅读

Examples of DS31256 Applicatio
OverviewDS31256 has 256 independent directional HDLC channels, which support up to 64 T1 or E1 data streams. Si
发表于 04-18 11:25
•1000次阅读
DS31256 HDLC Controller Step-b
Abstract: This application note provides an example of how to configure a single T1 port on DS31256
发表于 04-18 11:29
•1522次阅读

DS31256 HDLC Controller Step-b
Abstract: This application note provides an example of how to configure a single T1 port on DS31256
发表于 04-18 11:30
•1030次阅读
DS31256 Loopback Modes
Abstract: This application note shows how to configure various loopback modes of the DS31256 HDLC
发表于 04-18 11:31
•1065次阅读
DS31256的初始化步骤
摘要:DS31256 Envoy HDLC控制器在发送数据包之前的初始化顺序。
概述按照设计,DS31256上电以后不会控制PCI总线。所有的物理端口(端口0至15)发送全1 (非HDLC空闲码)
发表于 04-20 09:02
•1315次阅读
DS31256 and T1/E1 Interface
2155, DS21Q55, DS21Q50 and DS26528 in T1/E1, 2MHz, 4MHz, 8MHz clock mo
发表于 04-20 09:26
•1849次阅读
DS31256 HDLC控制器的配置步骤—桥接模式
DS31256 HDLC控制器的配置步骤—桥接模式
本应用笔记提供了怎样配置桥接模式下DS31256 HDLC控制器T1端口的例子。文章提供了一个实际例程,以方便最终用户使用,帮助他
发表于 04-21 14:59
•1941次阅读

如何利用DS31256 HDLC控制器实现间隔时钟应用
DS31256有16个物理端口(16 Tx和16 Rx)或链路,可配置为信道化或非信道化。通道化端口可以处理一个、两个或四个 T1 或 E1 数据链路。这些端口或链路的时钟可以支持间隔时钟。本应用笔记介绍如何在256通道HDLC
DS31256 接口 - 电信
电子发烧友网为你提供Maxim(Maxim)DS31256相关产品参数、数据手册,更有DS31256的引脚图、接线图、封装手册、中文资料、英文资料,DS31256真值表,DS31256
发表于 01-14 19:46

DS31256闭合时钟应用
DS16有16个物理端口(16 Tx和31256 Rx)或链路,可配置为信道化或非信道化。通道化端口可以处理一个、两个或四个 T1 或 E1 数据链路。这些端口或链路的时钟可以支持间隔


评论