 如何使用Arduino控制大型线性执行器

本文将向你展示如何使用 Arduino 和两个按钮对大型线性执行器进行基本的手动控制。在第一组代码中,第一个按钮伸出执行器,第二个按钮缩回执行器。在第二组代码中,两个按钮将线性执行器移动到预设位置。
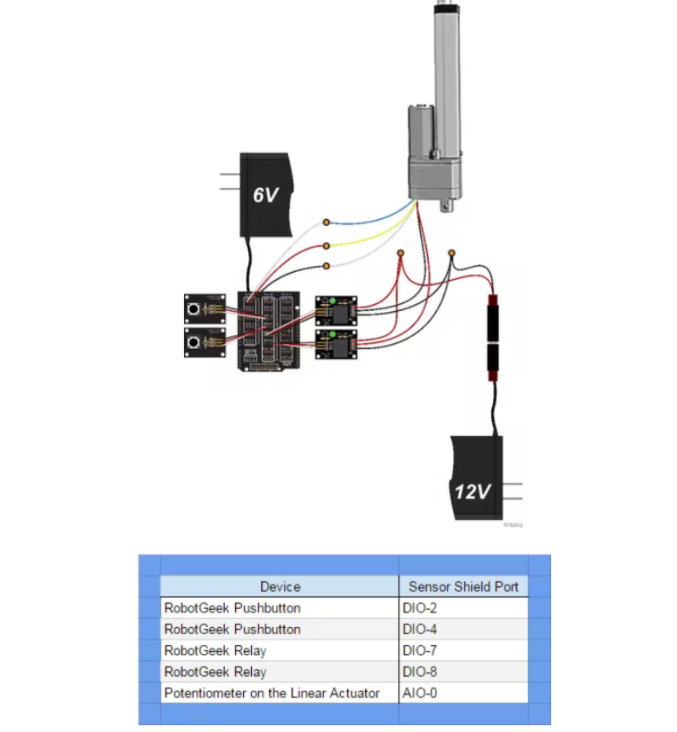
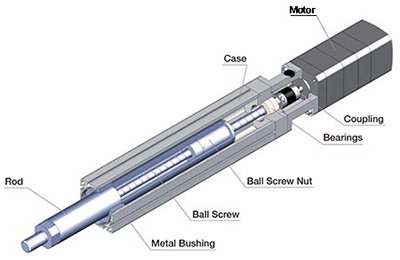
大型线性致动器传统上具有五根导线。两根线用于为电机供电,三根线连接到内部电位计以读取位置。这两个继电器用于切换电机的正负电源,以确定活塞的行进方向。代码的第一位不使用这个,第二个使用这个来达到目标位置。让我们开始吧。
第 1 步:接线
第 2 步:代码 1 - 手动控制
此部分代码显示了如何使用 Arduino 和两个按钮对大型线性执行器进行基本手动控制。第一个按钮伸出致动器,第二个按钮缩回致动器。
const int button1Pin = 2; // the number of the pushbutton1 pin
const int button2Pin = 4; // the number of the pushbutton2 pin
const int relay1Pin = 7; // the number of the Realy1 pin
const int relay2Pin = 8; // the number of the Relay2 pin
// variables will change:
int button1State = 0; // variable for reading the pushbutton status
int button2State = 0; // variable for reading the pushbutton status
const int sensorPin = 0; // select the input pin for the potentiometer
int sensorValue = 0; // variable to store the value coming from the sensor
void setup() {
//start serial connection
Serial.begin(9600);
// initialize the pushbutton pin as an input:
pinMode(button1Pin, INPUT);
pinMode(button2Pin, INPUT);
// initialize the relay pin as an output:
pinMode(relay1Pin, OUTPUT);
pinMode(relay2Pin, OUTPUT);
}
void loop(){
// read the value from the sensor:
sensorValue = analogRead(sensorPin);
//print out the value of the pushbutton
Serial.println(sensorValue);
// read the state of the pushbutton values:
button1State = digitalRead(button1Pin);
button2State = digitalRead(button2Pin);
// check if the pushbutton1 is pressed.
// if it is, the buttonState is HIGH:
// we also ensure tha the other button is not pushed to avoid conflict
if (button1State == HIGH && button2State == LOW) {
// turn relay1 on:
digitalWrite(relay1Pin, HIGH);
}
// When we let go of the button, turn off the relay
else if (digitalRead(relay1Pin) == HIGH) {
// turn relay1 off:
digitalWrite(relay1Pin, LOW);
}
// repeat the same procedure for the second pushbutton
if (button1State == LOW && button2State == HIGH) {
// turn relay2 on:
digitalWrite(relay2Pin, HIGH);
}
// When we let go of the button, turn off the relay
else if (digitalRead(relay2Pin) == HIGH) {
// turn relay2 off:
digitalWrite(relay2Pin, LOW);
}
}
第 3 步:代码 2 - 使用位置反馈预设位置
此部分代码显示了如何使用 Arduino 和两个按钮对大型线性执行器进行基本控制,每个按钮预设到一个位置。
const int button1Pin = 2; // the number of the pushbutton1 pin
const int button2Pin = 4; // the number of the pushbutton2 pin
const int relay1Pin = 7; // the number of the Realy1 pin
const int relay2Pin = 8; // the number of the Relay2 pin
const int sensorPin = 0; // select the input pin for the potentiometer
// variables will change:
int button1State = 0; // variable for reading the pushbutton status
int button2State = 0; // variable for reading the pushbutton status
int sensorValue = 0; // variable to store the value coming from the sensor
int goalPosition = 350;
int CurrentPosition = 0;
boolean Extending = false;
boolean Retracting = false;
void setup() {
//start serial connection
Serial.begin(9600);
// initialize the pushbutton pin as an input:
pinMode(button1Pin, INPUT);
pinMode(button2Pin, INPUT);
// initialize the relay pin as an output:
pinMode(relay1Pin, OUTPUT);
pinMode(relay2Pin, OUTPUT);
//preset the relays to LOW
digitalWrite(relay1Pin, LOW);
digitalWrite(relay2Pin, LOW);
}
void loop(){
// read the value from the sensor:
CurrentPosition = analogRead(sensorPin);
// print the results to the serial monitor:
Serial.print(“Current = ” );
Serial.print(CurrentPosition);
Serial.print(“\t Goal = ”);
Serial.println(goalPosition);
// read the state of the pushbutton values:
button1State = digitalRead(button1Pin);
button2State = digitalRead(button2Pin);
if (button1State == HIGH) {
// set new goal position
goalPosition = 300;
if (goalPosition 》 CurrentPosition) {
Retracting = false;
Extending = true;
digitalWrite(relay1Pin, HIGH);
digitalWrite(relay2Pin, LOW);
Serial.println(“Extending”);
}
else if (goalPosition 《 CurrentPosition) {
Retracting = true;
Extending = false;
digitalWrite(relay1Pin, LOW);
digitalWrite(relay2Pin, HIGH);
Serial.println(“Retracting”);
}
}
if (button2State == HIGH) {
// set new goal position
goalPosition = 500;
if (goalPosition 》 CurrentPosition) {
Retracting = false;
Extending = true;
digitalWrite(relay1Pin, HIGH);
digitalWrite(relay2Pin, LOW);
Serial.println(“Extending”);
}
else if (goalPosition 《 CurrentPosition) {
Retracting = true;
Extending = false;
digitalWrite(relay1Pin, LOW);
digitalWrite(relay2Pin, HIGH);
Serial.println(“Retracting”);
}
}
if (Extending = true && CurrentPosition 》 goalPosition) {
//we have reached our goal, shut the relay off
digitalWrite(relay1Pin, LOW);
boolean Extending = false;
Serial.println(“IDLE”);
}
if (Retracting = true && CurrentPosition 《 goalPosition){
//we have reached our goal, shut the relay off
digitalWrite(relay2Pin, LOW);
boolean Retracting = false;
Serial.println(“IDLE”);
}
}
以上就是该项目所需的全部功能代码,到这一步就可以验收了。
第4步:拓展
在可以控制大型线性执行器之后,你打算用它做什么?您可以制作一张可以变形的桌子,以变换坐姿或站姿。同时你还可以使用一些光传感器,制作一个跟踪太阳的太阳能电池板。
-
执行器
+关注
关注
5文章
435浏览量
20574 -
Arduino
+关注
关注
190文章
6527浏览量
197441
发布评论请先 登录
如何使用Arduino和光学系列线性致动器来实现同步控制
带触觉反馈的压电执行器(低电压/薄型)PiezoHapt™执行器的开发
安华高科技:大型家电控制电机和执行器的解决者!

执行器由什么组成_执行器的工作原理

气动执行器的组成_气动执行器选型
电动执行器和风门执行器之间的差别是什么
电动执行器控制精度低的解决方案
推动线性执行器设计的多项因素
BeagleBone Black Wireless、MotorCape和线性执行器


评论