 电子发烧友App


 创作
创作 发文章
发文章 发帖
发帖  提问
提问  发资料
发资料 发视频
发视频资料介绍
描述
此 Arduino 线性致动器教程展示了如何使用 Arduino 兼容板和各种输入传感器控制Firgelli 小型线性致动器,包括用于直接控制的滑块和旋转旋钮、用于增量移动的操纵杆以及具有预设位置的三个按钮(在代码中预设)每个位置都分配给一个按钮,因此当用户按下按钮时,小型线性执行器会移动到该位置)。
对于 Arduino 线性执行器项目,Firgelli 的小型线性执行器非常出色。这些线性执行器有一个内部控制器,允许它们像伺服一样操作。通过使用 Arduino 伺服库,我们可以简单地向执行器发送所需的位置,然后它移动到该位置。
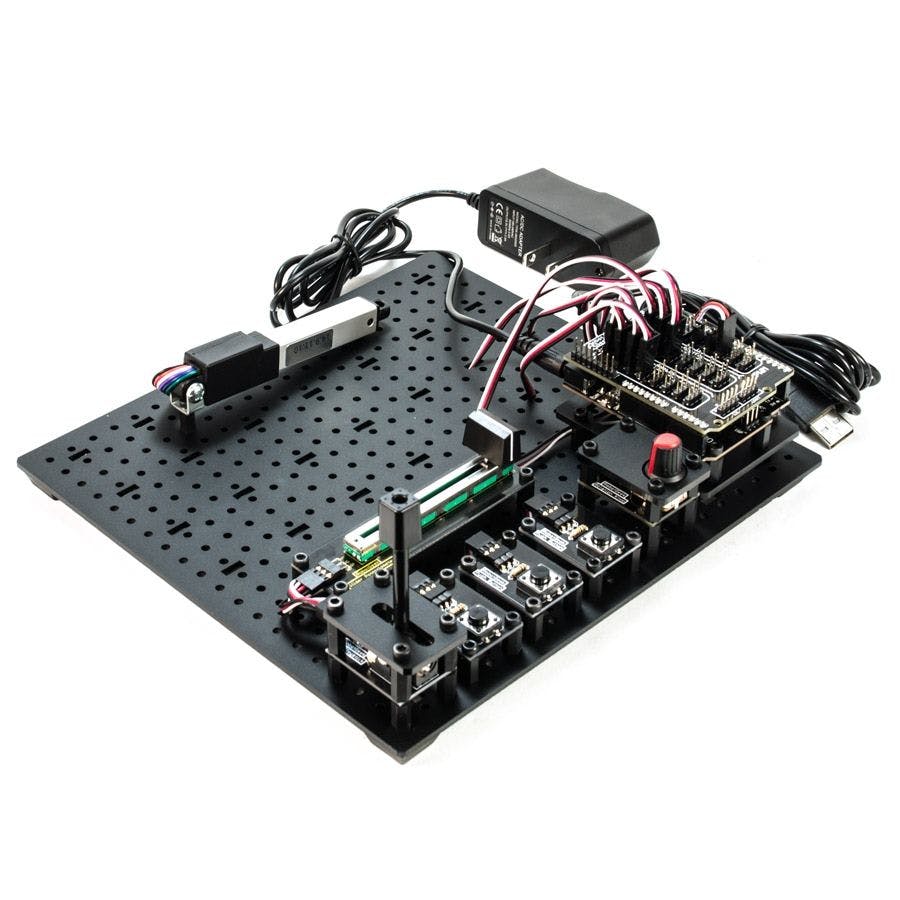
所有部件都可以在RobotGeek Arduino 线性执行器实验者套件中一起找到,或者单独获得。
第 1 步:接线
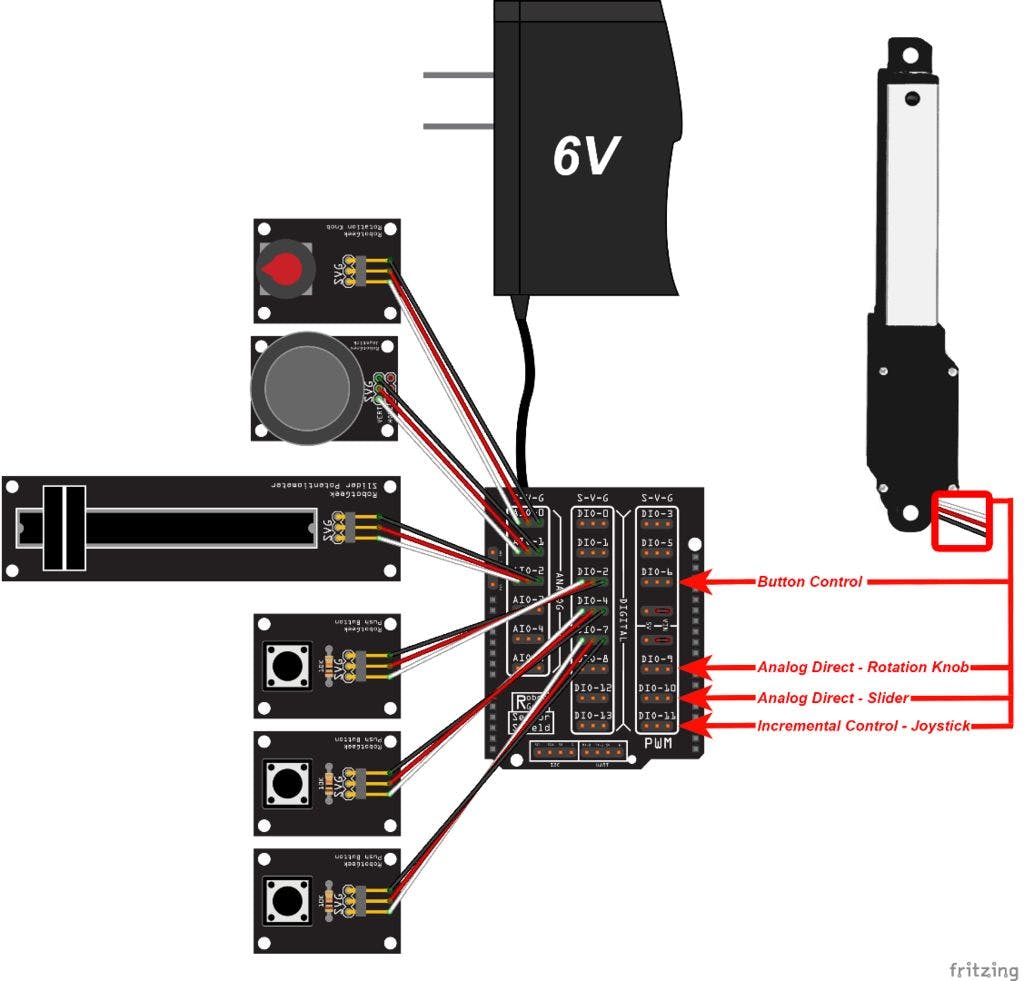
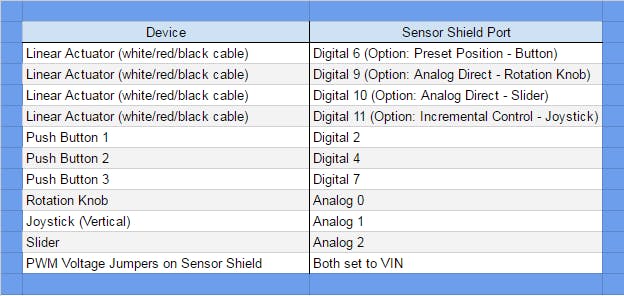
请注意,您必须将线性致动器物理插入不同的端口才能使用不同的控件移动它。如果您有多个线性执行器,您可以使用此代码同时控制多达 4 个。
第 2 步:将代码上传到您的 Arduino
您可以在RobotGeek 库和工具中的以下位置找到此演示代码:
RobotGeekSketches -> Demos -> LinearActuator -> linearActuatorExpDemo -> linearActuatorExpDemo.ino
这段代码将帮助我们完成接下来的三个部分。根据您正在学习的教程部分,您将被要求将线性致动器插入不同的引脚。
/***********************************************************************************
 *           RobotGeek Linear Actuator Experimenter's Kit Demo
 *        ________
 *       |        \---------\___________________________
 *     __|                  |                          ||--------------------|__
 *    (o |  FIRGELLI        |                        o ||____________________| o)
 *       |__________________/--------------------------||
 *
 *
 *  The following sketch will allow you to control a Firgelli Linear actuator using
 *  the RobotGeek Slider, RobotGeek Knob, RobotGeek Joystick, and RobotGeek Pushbuttons
 *
 *  http://www.robotgeek.com/robotgeek-experimenters-kit-linear-actuator
 *
 *
 *  Wiring
 *    Linear Actuator - Digital Pin 6, 9, 10, and/or 11
 *
 *    Knob            - Analog Pin 0
 *    Joystick        - Analog Pin 1
 *    Slider          - Analog Pin 2
 *
 *    Pushbutton      - Digital Pin 2
 *    Pushbutton      - Digital Pin 4
 *    Pushbutton      - Digital Pin 7
 *
 *    Jumpers for pins 3/5/6 and 9/10/11 should be set to 'VIN'
 *
 *
 *  Control Behavior:
 *    Moving the slider or knob will move the linear actuator keeping absolute position.
 *    Moving the joystick will move the linear actuator incrementally.
 *    Pressing one of the buttons will move the linear actuator to a predetermined position.
 *
 ***********************************************************************************/
//Includes
#include  //Servo Library can be used for Firgelli Mini Linear Actuators
//Linear Actuator Pins
const int LINEARPIN_BUTTON = 6;        //Linear Actuator on Digital Pin 6
const int LINEARPIN_KNOB = 9;          //Linear Actuator on Digital Pin 9
const int LINEARPIN_SLIDER = 10;       //Linear Actuator on Digital Pin 10
const int LINEARPIN_JOYSTICK = 11;     //Linear Actuator on Digital Pin 11
//Analog Input Pins
const int KNOB_PIN = 0;       //Knob on Analog Pin 0
const int JOYSTICK_PIN = 1;   //Joystick (vertical) on Analog Pin 1
const int SLIDER_PIN = 2;     //Slider on Analog Pin 2
//Digital Input Pins
const int BUTTON1_PIN = 2;     //Button 1 on Digital Pin 2
const int BUTTON2_PIN = 4;     //Button 2 on Digital Pin 4
const int BUTTON3_PIN = 7;     //Button 3 on Digital Pin 7
//Generic deadband limits - not all joystics will center at 512, so these limits remove 'drift' from joysticks that are off-center.
const int DEADBAND_LOW = 482;   //decrease this value if drift occurs, increase it to increase sensitivity around the center position
const int DEADBAND_HIGH = 542;  //increase this value if drift occurs, decrease it to increase sensitivity around the center position
//Max/min pulse values in microseconds for the linear actuators
const int LINEAR_MIN = 1050;
const int LINEAR_MAX = 2000;
// variables will change:
int button1State = 0;         // variable for reading the pushbutton status
int button2State = 0;         // variable for reading the pushbutton status
int button3State = 0;         // variable for reading the pushbutton status
Servo linearKnob, linearSlider, linearButton, linearJoystick;  // create servo objects to control the linear actuators
int knobValue, sliderValue, joystickValue;                     //variables to hold the last reading from the analog pins. The value will be between 0 and 1023
int valueMapped;                                               // the joystick values will be changed (or 'mapped') to new values to be sent to the linear actuator.
//variables for current positional value being sent to the linear actuator.
int linearValue_Knob = 1500;
int linearValue_Slider = 1500;
int linearValue_Button = 1500;
int linearValue_Joystick = 1500;
int speed = 2;
void setup()
{
  //initialize linear actuators as servo objects
  linearKnob.attach(LINEARPIN_KNOB);      // attaches/activates the linear actuator as a servo object
  linearSlider.attach(LINEARPIN_SLIDER);  // attaches/activates the linear actuator as a servo object
  linearButton.attach(LINEARPIN_BUTTON);  // attaches/activates the linear actuator as a servo object
  linearJoystick.attach(LINEARPIN_JOYSTICK);  // attaches/activates the linear actuator as a servo object
  //Analog pins do not need to be initialized

  //use the writeMicroseconds to set the linear actuators to their default positions
  linearKnob.writeMicroseconds(linearValue_Knob);
  linearSlider.writeMicroseconds(linearValue_Slider);
  linearButton.writeMicroseconds(linearValue_Button);
  linearJoystick.writeMicroseconds(linearValue_Joystick);
}
void loop()
{
//Preset Positions for Button Control
  // if the pushbutton is pressed set the linear value
  button1State = digitalRead(BUTTON1_PIN);
  if (button1State == HIGH) {
    // set the position value
    linearValue_Button = 1300;
  }
  button2State = digitalRead(BUTTON2_PIN);
  if (button2State == HIGH) {
    // set the position value
    linearValue_Button = 1500;
  }
  button3State = digitalRead(BUTTON3_PIN);
  if (button3State == HIGH) {
    // set the position value
    linearValue_Button = 1700;
  }
//Analog Direct Control
  //read the values from the analog sensors
  knobValue = analogRead(KNOB_PIN);
  sliderValue = analogRead(SLIDER_PIN);
  linearValue_Knob = map(knobValue, 0, 1023, LINEAR_MAX, LINEAR_MIN); //Map analog value from the sensor to the linear actuator
  linearValue_Slider = map(sliderValue, 0, 1023, LINEAR_MAX, LINEAR_MIN); //Map analog value from the sensor to the linear actuator
//Incremental Joystick Control
  joystickValue = analogRead(JOYSTICK_PIN); //read the values from the joystick
  //only update if the joystick is outside the deadzone (i.e. moved oustide the center position)
   if(joystickValue > DEADBAND_HIGH || joystickValue < DEADBAND_LOW)
   {
     valueMapped = map(joystickValue, 0, 1023, speed, -speed); //Map analog value from native joystick value (0 to 1023) to incremental change (speed to -speed).
     linearValue_Joystick = linearValue_Joystick + valueMapped; //add mapped joystick value to present Value

     linearValue_Joystick = constrain(linearValue_Joystick, LINEAR_MIN, LINEAR_MAX);  //
   }
//Use the writeMicroseconds to set the linear actuator to its new position
  linearKnob.writeMicroseconds(linearValue_Knob);
  linearSlider.writeMicroseconds(linearValue_Slider);
  linearButton.writeMicroseconds(linearValue_Button);
  linearJoystick.writeMicroseconds(linearValue_Joystick);
  delay(10);
}
第 3 步:模拟直接控制
对于本节:
要使用旋转旋钮,请将线性执行器插入Digital Pin 9
要使用滑块,请将线性执行器插入Digital Pin 10
那么这是怎么回事?我们正在将模拟传感器的绝对位置映射到执行器位置。这是有道理的,您将旋转旋钮或滑块移动到一个位置,并且线性执行器与该位置匹配。
想看废话吗?将操纵杆插入Analog Pin 0 ,将线性执行器插入Digital Pin 9 。操纵杆始终返回到中心位置,导致线性执行器匹配并返回到其中心值。如果您想使用操纵杆将线性致动器移动到中心以外的位置,那么这并不是那么有用,这将我们带到下一节。在继续之前,请确保将传感器恢复到原来的引脚。
如果您想要仅涵盖本教程这一部分的草图,可以在此处找到它。
第 4 步:增量控制
对于本节:
要使用操纵杆,请将线性执行器插入Digital Pin 11
那么这是怎么回事?这一次,我们不是直接映射到操纵杆的值,而是使用操纵杆来增加线性致动器的位置,这样我们就可以放开操纵杆,让线性致动器保持在上次放置的位置。
如果您想要仅涵盖本教程这一部分的草图,可以在此处找到它。
第 5 步:预设控件
对于本节:
要使用按钮,请将线性执行器插入Digital Pin 6
那么这是怎么回事?在这一部分中,我们使用按钮按下将线性执行器发送到预定义的位置。当您知道在输入定义的情况下您希望线性致动器处于什么位置时,这非常简单且非常有用。
如果您想要仅涵盖本教程这一部分的草图,可以在此处找到它。
第 6 步:下一步是什么?
现在您知道了三种控制直线推杆的方法。你能想到可以从中受益的项目吗?您有想要自动打开的盒子吗?您将如何使用线性致动器来做到这一点?人体的所有肌肉都是生物线性致动器。你能做一个模仿这个的机械臂吗?做一张可以倾斜的桌子怎么样?我们很想听听您的项目!去创造吧!
- BeagleBone Black Wireless、MotorCape和线性执行器 0次下载
- 从单个Arduino输出引脚控制多个继电器或其他执行器 0次下载
- 怎么样设计机器人的末端执行器 5次下载
- 电动执行器的功能及应用 17次下载
- 具有执行器饱和与随机非线性扰动的离散系统模型预测控制_石宇静 0次下载
- 控制仪表及计算机控制装置--执行器理论知识 0次下载
- 基于LPC2132的电动执行器双核控制系统的设计 49次下载
- 基于压电陶瓷微位移执行器的精密定位 0次下载
- 执行器的选择 25次下载
- 基于HART协议的智能执行器接口卡的开发 43次下载
- 基于神经网络的电动执行器状态诊断 9次下载
- 基于现场总线的智能执行器控制网络 21次下载
- 基于单片机的电动执行器控制系统的开发 40次下载
- 智能阀门定位器在气动执行器上的应用 27次下载
- JORDAN执行器资料 22次下载
- 机电执行器概述和演变 446次阅读
- 智能变频电动执行器的电流检测电路介绍 1794次阅读
- 多层压电执行器的应用 720次阅读
- 使用DAC精确控制线性执行器 1182次阅读
- 触觉反馈设计中常用的执行器 1752次阅读
- 如何使用Arduino控制大型线性执行器 1673次阅读
- 气动执行器的组成_气动执行器选型 3517次阅读
- 气动执行器的常见故障和解决方法 6602次阅读
- 执行器故障原因及检修 8461次阅读
- 执行器由什么组成_执行器的工作原理 9728次阅读
- 执行器是什么_执行器的主要作用 1.4w次阅读
- 电热执行器的作用 1.1w次阅读
- 电热执行器是什么_电热执行器工作原理 1.7w次阅读
- 汽车控制系统中的电子控制单元和传感器以及执行器 7893次阅读
- 精确控制流量的调节阀执行器一体化装置及其流量控制方法 1729次阅读

 上传资料赚积分
下载排行
本周
- 1山景DSP芯片AP8248A2数据手册
- 1.06 MB | 532次下载 | 免费
- 2RK3399完整板原理图(支持平板,盒子VR)
- 3.28 MB | 339次下载 | 免费
- 3TC358743XBG评估板参考手册
- 1.36 MB | 330次下载 | 免费
- 4DFM软件使用教程
- 0.84 MB | 295次下载 | 免费
- 5元宇宙深度解析—未来的未来-风口还是泡沫
- 6.40 MB | 227次下载 | 免费
- 6迪文DGUS开发指南
- 31.67 MB | 194次下载 | 免费
- 7元宇宙底层硬件系列报告
- 13.42 MB | 182次下载 | 免费
- 8FP5207XR-G1中文应用手册
- 1.09 MB | 178次下载 | 免费
本月
- 1OrCAD10.5下载OrCAD10.5中文版软件
- 0.00 MB | 234315次下载 | 免费
- 2555集成电路应用800例(新编版)
- 0.00 MB | 33566次下载 | 免费
- 3接口电路图大全
- 未知 | 30323次下载 | 免费
- 4开关电源设计实例指南
- 未知 | 21549次下载 | 免费
- 5电气工程师手册免费下载(新编第二版pdf电子书)
- 0.00 MB | 15349次下载 | 免费
- 6数字电路基础pdf(下载)
- 未知 | 13750次下载 | 免费
- 7电子制作实例集锦 下载
- 未知 | 8113次下载 | 免费
- 8《LED驱动电路设计》 温德尔著
- 0.00 MB | 6656次下载 | 免费
总榜
- 1matlab软件下载入口
- 未知 | 935054次下载 | 免费
- 2protel99se软件下载(可英文版转中文版)
- 78.1 MB | 537798次下载 | 免费
- 3MATLAB 7.1 下载 (含软件介绍)
- 未知 | 420027次下载 | 免费
- 4OrCAD10.5下载OrCAD10.5中文版软件
- 0.00 MB | 234315次下载 | 免费
- 5Altium DXP2002下载入口
- 未知 | 233046次下载 | 免费
- 6电路仿真软件multisim 10.0免费下载
- 340992 | 191187次下载 | 免费
- 7十天学会AVR单片机与C语言视频教程 下载
- 158M | 183279次下载 | 免费
- 8proe5.0野火版下载(中文版免费下载)
- 未知 | 138040次下载 | 免费


 工商网监
工商网监
评论