 如何使用ESP32创建一个气象站

在这个项目中,我们将使用ESP32创建一个气象站。基本原理是通过读取DHT22和BMP180传感器的数据,然后使用ESP32传输创建的网页上,在网页上显示气象数据。
电路图
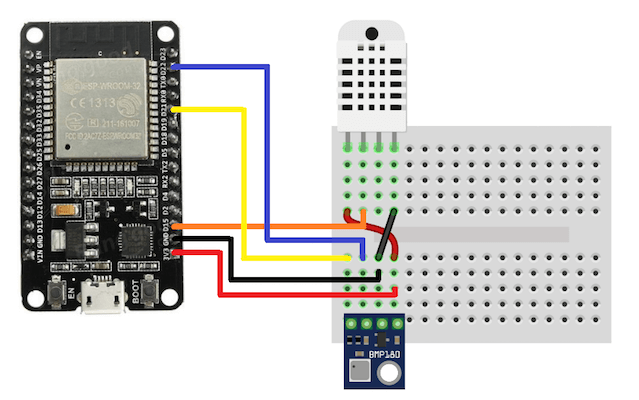
首先,将DHT22和ESP32连接起来。DHT22与ESP32的连接如下:
DHT22 引脚1 VCC —–>ESP32 / 3.3V;
DHT22 引脚2 DATA—–>ESP32 / D15;
DHT22引脚4 GND —–>ESP32 /GND.
然后将BMP180压力传感器连接到ESP32上。连接如下:
BMP180 Vin —–> ESP32 / 3.3V;
BMP180 GND —–> ESP32 /GND;
BMP180SCL —–> ESP32 / pin 22;(ESP32的22号引脚是SCL.)
BMP180SDA —–> ESP32 / pin 21;(ESP32的21号引脚是SDA.)
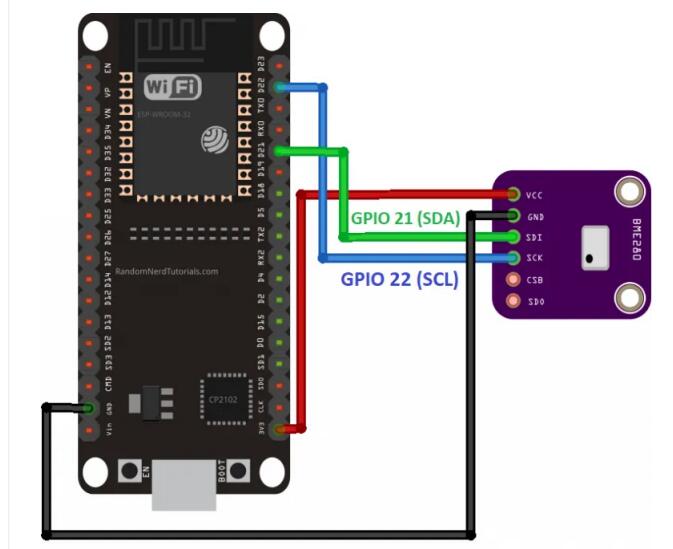
ESP32的22和21号引脚是I2C通信接口。详见下图ESP32的引脚图

气象站C代码
#include
#include
#include
#include
#define DHTPIN 15
#define DHTTYPE DHT22
DHT dht(DHTPIN, DHTTYPE);
Adafruit_BMP085 bmp;
char pressure_value[4];
const char* wifi_name = "Asus_2.4G"; //Your Wifi name
const char* wifi_pass = "basemu.com"; //Your Wifi password
WiFiServer server(80); //Port 80
void setup()
{
Serial.begin(115200);
dht.begin();
bmp.begin();
// Let's connect to wifi network
Serial.print("Connecting to ");
Serial.print(wifi_name);
WiFi.begin(wifi_name, wifi_pass); //Connecting to wifi network
while (WiFi.status() != WL_CONNECTED) //Waiting for the responce of wifi network
{
delay(500);
Serial.print(".");
}
Serial.println("");
Serial.println("Connection Successful");
Serial.print("IP address: ");
Serial.println(WiFi.localIP()); //Getting the IP address at which our webserver will be created
Serial.println("Type the above IP address into a browser search bar");
server.begin(); //Starting the server
}
void loop()
{
String pressure = String(bmp.readPressure());
// convert the reading to a char array
pressure.toCharArray(pressure_value, 4);
float hum = dht.readHumidity();
float temp = dht.readTemperature();
float fah = dht.readTemperature(true);
float heat_index = dht.computeHeatIndex(fah, hum);
float heat_indexC = dht.convertFtoC(heat_index);
WiFiClient client = server.available(); //Checking for incoming clients
if (client)
{
Serial.println("new client");
String currentLine = ""; //Storing the incoming data in the string
while (client.connected())
{
if (client.available()) //if there is some client data available
{
char c = client.read(); // read a byte
if (c == '\n') // check for newline character,
{
if (currentLine.length() == 0) //if line is blank it means its the end of the client HTTP request
{
client.print("
");
client.print("
);
client.print("
);
client.print(temp);
client.print("
Temperature in fah: ");
client.print(fah);
client.print("
Humidity is: ");
client.print(hum);
client.print("
Heat Index in C: ");
client.print(heat_indexC);
client.print("
Heat Index in fah: ");
client.print(heat_index);
client.print("
Pressure is: ");
client.print(pressure_value);
client.print("hpa");
client.print("
");
break; // break out of the while loop:
}
else
{ // if you got a newline, then clear currentLine:
currentLine = "";
}
}
else if (c != '\r')
{ // if you got anything else but a carriage return character,
currentLine += c; // add it to the end of the currentLine
}
}
}
}
}
气象站项目代码释义
首先,确保项目所需的所有库均 include 了,然后定义连接DHT22温度和湿度传感器的引脚,再创建实例:
#include
#include
#include
#include
#define DHTPIN 15
#define DHTTYPE DHT22 DHT dht(DHTPIN, DHTTYPE);
Adafruit_BMP085 bmp;
const char* wifi_name = "Asus_2.4G"; //Your Wifi name const char*
wifi_pass = "basemu.com"; //Your Wifi password
WiFiServer server(80); //Port 80
在setup函数中,会使用上面的Wi-Fi信数据将ESP32连接到的Wi-Fi网络。如果连接到网络成功,那么“connection successful”将显示在串口监视器上。否则,程序将继续尝试,直到连接到Wi-Fi网络。
Serial.print("Connecting to ");
Serial.print(wifi_name);
WiFi.begin(wifi_name, wifi_pass); //Connecting to wifi network
while (WiFi.status() != WL_CONNECTED) { //Waiting for the response of wifi network
delay(500);
Serial.print(".");
}
Serial.println("");
Serial.println("Connection Successful");
下面的命令会将IP地址显示在串口监视器上。
Serial.println(WiFi.localIP());
然后程序将启动服务器,以便程序能够接收和发送数据到浏览器上。
server.begin();
在loop函数中,程序能够从传感器读取数据并存储在变量中,这样就可以在网页上显示数据了。
String pressure = String(bmp.readPressure());
pressure.toCharArray(pressure_value, 4);
float hum = dht.readHumidity();
float temp = dht.readTemperature();
float fah = dht.readTemperature(true);
float heat_index = dht.computeHeatIndex(fah, hum);
float heat_indexC = dht.convertFtoC(heat_index);
然后检查客户端是否有发送HTTP请求,如果有客户端请求可用,那么程序将存储并显示结果在串行监视器上。在请求结束时,程序将发送HTML命令,在网页上显示传感器的数据。
WiFiClient client = server.available(); //Checking for incoming clients
if (client){
Serial.println("new client");
String currentLine = ""; //Storing the incoming data in the string
while (client.connected()){
if (client.available()) //if there is some client data available
{
char c = client.read(); // read a byte
if (c == '\n') // check for newline character,
{
if (currentLine.length() == 0) //if line is blank it means it’s the end of the client HTTP
request { client.print("");
client.print("
ESP32 Weather Station
");
client.print("Temperature in C: ");
client.print(temp);
client.print(" Temperature in fah: ");
client.print(fah);
client.print(" Humidity is: ");
client.print(hum);
气象站如何使用
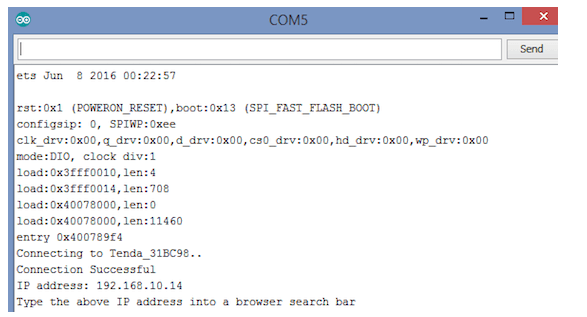
首先,将代码中的Wi-Fi名称和密码信息替换为你自己的。然后上传代码并打开串口监视器。串口监视器将显示如下图所示的IP地址。
在浏览器中输入这个IP地址。输入IP地址后,网页会显示如下图所示。
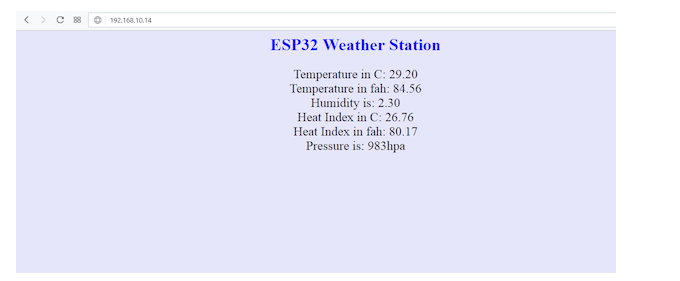
现在传感器数据就从气象站上传到网页上了。
-
气象站
+关注
关注
1文章
861浏览量
17099 -
DHT22
+关注
关注
2文章
51浏览量
7794 -
ESP32
+关注
关注
27文章
1223浏览量
22353
发布评论请先 登录
如何使用miniprog3设置气象站
基于机智云gokit4.0(G)和MDM9206的 小型智能气象站
怎样去设计一个基于ESP32的家庭气象站系统
DIY一个基于ESP8266的wifi气象站
使用ESP8266和ST7735 TFT显示屏设计气象站
带有esp8266和Python Flask的桌面气象站

基于ESP8266的自动气象站
基于ESP8266的自动气象站
WIoT2气象站之Nextion TFT with ESP8266/ESP32
使用Wio Terminal和Tensorflow Lite创建智能气象站


评论