0
  • 聊天消息
  • 系统消息
  • 评论与回复
登录后你可以
  • 下载海量资料
  • 学习在线课程
  • 观看技术视频
  • 写文章/发帖/加入社区
创作中心

完善资料让更多小伙伴认识你,还能领取20积分哦,立即完善>

3天内不再提示

fireflyCORE-3399主板JD4--Android工具简介

firefly 来源:firefly 作者:firefly 2019-12-17 16:55 次阅读
Android开发
ADB 使用
前言

adb,全称 Android Debug Bridge,是 Android 的命令行调试工具,可以完成多种功能,如跟踪系统日志,上传下载文件,安装应用等。

准备连接

支持两种ADB链接方式:USB网络连接。

USB方式

  • 在开发板上进入选项->开发人员选项,勾上 “USB 调试” 选项

  • AIO-3399JD4用双公头usb数据线连接设备USB3.0口和主机

  • host/device模式切换

    • 设置->USB->连接到PC

网络方式

  • 网络ADB

    • 查看3399的IP地址,PC端通过网络访问。例:

adbconnect+IPadbshell
Windows下的 ADB 安装

首先参照安装 RK USB 驱动一节安装好驱动。然后到 http://adbshell.com/download/download-adb-for-windows.html 下载 adb.zip,解压到C:\adb以方便调用。 打开命令行窗口,输入:

cdC:\adbadbshell

如果一切正常,就可以进入adbshell,在设备上面运行命令。

Ubuntu 下的 ADB 安装
  • 安装 adb 工具:

sudoapt-getinstallandroid-tools-adb
  • 加入设备标识:

mkdir-p~/.androidvi~/.android/adb_usb.ini# 添加以下一行0x2207
  • 加入 udev 规则:

sudovi/etc/udev/rules.d/51-android.rules# 添加以下一行:SUBSYSTEM=="usb",ATTR{idVendor}=="2207",MODE="0666"
  • 重新插拔 USB 线,或运行以下命令,让 udev 规则生效:

sudoudevadmcontrol--reload-rulessudoudevadmtrigger
  • 重新启动 adb 服务器

sudoadbkill-serveradbstart-server
常用 ADB 命令

连接管理

列出所有连接设备及其序列号

adbdevices

如果有多个连接设备,则需要使用序列号来区分:

exportANDROID_SERIAL=<设备序列号>adbshellls

多设备下连接指定设备

adb-s序列号shell

可以通过网络来连接 adb:

# 让设备端的 adbd 重启,并在 TCP 端口 5555 处监听adbtcpip5555# 此时可以断开 USB 连接# 远程连接设备,设备的 IP 地址是 192.168.1.100adbconnect192.168.1.100:5555# 断开连接adbdisconnect192.168.1.100:5555
调试

获取系统日志 adb logcat

  • 用法

adblogcat[选项][应用标签]
  • 示例

# 查看全部日志adblogcat# 仅查看部分日志adblogcat-sWifiStateMachineStateMachine

运行命令 adb shell

获取详细运行信息 adb bugreport

adbbugreport用于错误报告,里面包含大量有用的信息。

  • 示例

adbbugreport# 保存到本地,方便用编辑器查看adbbugreport>bugreport.txt

root 权限

如果 TARGET_BUILD_VARIANT 使用的是 userdebug 模式,要获得 root 权限,需要先运行:

adbroot

让 adb 的设备端切换到 root 权限模式,这样 adb remount 等需要 root 权限的命令才会成功。

应用管理

安装应用 adb install

  • 用法:

adbinstall[选项]应用包.apk

选项包括:

-l forward-lock -r 重新安装应用,保留原先数据 -s 安装到 SD 卡上,而不是内部存储
  • 示例:

# 安装 facebook.apkadbinstallfacebook.apk# 升级 twitter.apkadbinstall-rtwitter.apk

如果安装成功,工具会返回成功提示 “Success”;失败的话,一般是以下几种情况:

  • INSTALL_FAILED_ALREADY_EXISTS: 此时需要用 -r 参数来重新安装。

  • INSTALL_FAILED_SIGNATURE_ERROR: 应用的签名不一致,可能是发布版和调试版签名不同所致。如果确认 APK 文件签名正常,可以用 adb uninstall 命令先卸载旧的应用,然后再安装。

  • INSTALL_FAILED_INSUFFICIENT_STORAGE: 存储空间不足,需要检查设备存储情况。

卸载应用 adb uninstall

  • 用法:

adbuninstall应用包名称
  • 示例:

adbuninstallcom.android.chrome

应用包名称可以用以下命令列出:

adbshellpmlistpackages-f

运行结果是:

package:/system/app/Bluetooth.apk=com.android.bluetooth

前面是 apk 文件,后面则是对应的包名称。

命令行帮助信息 adb help

AndroidDebugBridgeversion1.0.31-a-directsadbtolistenonallinterfacesforaconnection-d-directscommandtotheonlyconnectedUSBdevicereturnsanerrorifmorethanoneUSBdeviceispresent.-e-directscommandtotheonlyrunningemulator.returnsanerrorifmorethanoneemulatorisrunning.-s-directscommandtothedeviceoremulatorwiththegivenserialnumberorqualifier.OverridesANDROID_SERIALenvironmentvariable.-p-simpleproductnamelike'sooner',orarelative/absolutepathtoaproductoutdirectorylike'out/target/product/sooner'.If-pisnotspecified,theANDROID_PRODUCT_OUTenvironmentvariableisused,whichmustbeanabsolutepath.-H-Nameofadbserverhost(default:localhost)-P-Portofadbserver(default:5037)devices[-l]-listallconnecteddevices('-l'willalsolistdevicequalifiers)connect[:]-connecttoadeviceviaTCP/IPPort5555isusedbydefaultifnoportnumberisspecified.disconnect[[:]]-disconnectfromaTCP/IPdevice.Port5555isusedbydefaultifnoportnumberisspecified.UsingthiscommandwithnoadditionalargumentswilldisconnectfromallconnectedTCP/IPdevices.devicecommands:adbpush[-p]-copyfile/dirtodevice('-p'todisplaythetransferprogress)adbpull[-p][-a][]-copyfile/dirfromdevice('-p'todisplaythetransferprogress)('-a'meanscopytimestampandmode)adbsync[]-copyhost->deviceonlyifchanged(-lmeanslistbutdon't copy)(see'adb help all')adbshell-runremoteshellinteractivelyadbshell-runremoteshellcommandadbemu-runemulatorconsolecommandadblogcat[]-Viewdevicelogadbforward--list-listallforwardsocketconnections.theformatisalistoflineswiththefollowingformat:" "" ""\n"adbforward-forwardsocketconnectionsforwardspecsareoneof:tcp:localabstract:localreserved:localfilesystem:dev:jdwp:(remoteonly)adbforward--no-rebind-sameas'adb forward'butfailsifisalreadyforwardedadbforward--remove-removeaspecificforwardsocketconnectionadbforward--remove-all-removeallforwardsocketconnectionsadbjdwp-listPIDsofprocesseshostingaJDWPtransportadbinstall[-l][-r][-d][-s][--algo--key--iv]-pushthispackagefiletothedeviceandinstallit('-l'meansforward-locktheapp)('-r'meansreinstalltheapp,keepingitsdata)('-d'meansallowversioncodedowngrade)('-s'meansinstallonSDcardinsteadofinternalstorage)('--algo','--key',and'--iv'meanthefileisencryptedalready)adbuninstall[-k]-removethisapppackagefromthedevice('-k'meanskeepthedataandcachedirectories)adbbugreport-returnallinformationfromthedevicethatshouldbeincludedinabugreport.adbbackup[-f][-apk|-noapk][-obb|-noobb][-shared|-noshared][-all][-system|-nosystem][]-writeanarchiveofthedevice's data to.Ifno-foptionissuppliedthenthedataiswrittento"backup.ab"inthecurrentdirectory.(-apk|-noapkenable/disablebackupofthe.apksthemselvesinthearchive;thedefaultisnoapk.)(-obb|-noobbenable/disablebackupofanyinstalledapkexpansion(aka.obb)filesassociatedwitheachapplication;thedefaultisnoobb.)(-shared|-nosharedenable/disablebackupofthedevice'ssharedstorage/SDcardcontents;thedefaultisnoshared.)(-allmeanstobackupallinstalledapplications)(-system|-nosystemtoggleswhether-allautomaticallyincludessystemapplications;thedefaultistoincludesystemapps)(isthelistofapplicationstobebackedup.Ifthe-allor-sharedflagsarepassed,thenthepackagelistisoptional.Applicationsexplicitlygivenonthecommandlinewillbeincludedevenif-nosystemwouldordinarilycausethemtobeomitted.)adbrestore-restoredevicecontentsfromthebackuparchiveadbhelp-showthishelpmessageadbversion-showversionnumscripting:adbwait-for-device-blockuntildeviceisonlineadbstart-server-ensurethatthereisaserverrunningadbkill-server-killtheserverifitisrunningadbget-state-prints:offline|bootloader|deviceadbget-serialno-prints:adbget-devpath-prints:adbstatus-window-continuouslyprintdevicestatusforaspecifieddeviceadbremount-remountsthe/systempartitiononthedeviceread-writeadbreboot[bootloader|recovery]-rebootsthedevice,optionallyintothebootloaderorrecoveryprogramadbreboot-bootloader-rebootsthedeviceintothebootloaderadbroot-restartstheadbddaemonwithrootpermissionsadbusb-restartstheadbddaemonlisteningonUSBadbtcpip-restartstheadbddaemonlisteningonTCPonthespecifiedportnetworking:adbppp[parameters]-RunPPPoverUSB.Note:youshouldnotautomaticallystartaPPPconnection.referstothettyforPPPstream.Eg.dev:/dev/omap_csmi_tty1[parameters]-Eg.defaultroutedebugdumplocalnottyusepeerdnsadbsyncnotes:adbsync[]canbeinterpretedinseveralways:-Ifisnotspecified,both/systemand/datapartitionswillbeupdated.-Ifitis"system"or"data",onlythecorrespondingpartitionisupdated.environmentalvariables:ADB_TRACE-Printdebuginformation.Acommaseparatedlistofthefollowingvalues1orall,adb,sockets,packets,rwx,usb,sync,sysdeps,transport,jdwpANDROID_SERIAL-Theserialnumbertoconnectto.-stakespriorityoverthisifgiven.ANDROID_LOG_TAGS-Whenusedwiththelogcatoption,onlythesedebugtagsareprinted.
编译 Android 固件
准备工作

编译 Android 对机器的配置要求较高:

  • 64 位 CPU

  • 16GB 物理内存+交换内存

  • 150GB 空闲的磁盘空间用于构建,源码树另外占用大约 25GB

官方推荐 Ubuntu 14.04 操作系统,经测试,Ubuntu 12.04 也可以编译运行成功,只需要满足 http://source.android.com/source/building.html 里的软硬件配置即可。编译环境的初始化可参考 http://source.android.com/source/initializing.html 。

  • 安装 OpenJDK 8:

sudoapt-getinstallopenjdk-8-jdk

提示:安装 openjdk-8-jdk,会更改 JDK 的默认链接,这时可用:

$ sudo update-alternatives --config java $ sudo update-alternatives --config javac

来切换 JDK 版本。SDK 在找不到操作系统默认 JDK 的时候会使用内部设定的 JDK 路径,因此,为了让同一台机器可以编译 Android 5.1 及之前的版本,去掉链接更方便:

$ sudo /var/lib/dpkg/info/openjdk-8-jdk:amd64.prerm remove
  • Ubuntu 12.04 软件包安装:

sudoapt-getinstallgitgnupgflexbisongperfbuild-essential\zipcurllibc6-devlibncurses5-dev:i386x11proto-core-dev\libx11-dev:i386libreadline6-dev:i386libgl1-mesa-glx:i386\g++-multilibmingw32tofrodosgcc-multilibia32-libs\python-markdownlibxml2-utilsxsltproczlib1g-dev:i386\lzoplibssl1.0.0libssl-dev
  • Ubuntu 14.04 软件包安装:

sudoapt-getinstallgit-coregnupgflexbisongperflibsdl1.2-dev\libesd0-devlibwxgtk2.8-devsquashfs-toolsbuild-essentialzipcurl\libncurses5-devzlib1g-devpngcrushschedtoollibxml2libxml2-utils\xsltproclzoplibc6-devschedtoolg++-multiliblib32z1-devlib32ncurses5-dev\lib32readline-gplv2-devgcc-multiliblibswitch-perl\libssl1.0.0libssl-dev
下载 Android SDK

Android SDK 源码包比较大,可以通过如下方式获取Android7.1源码包:[下载链接]

下载完成后先验证一下 MD5 码:

$ md5sum /path/to/Firefly-RK3399_Android7.1.2_git_20180126.7z 699cff05bfa39a341e7aae3857cea4a7 Firefly-RK3399_Android7.1.2_git_20180126.7z

确认无误后,就可以解压:

mkdir-p~/proj/firefly-rk3399cd~/proj/firefly-rk33997zx/path/to/Firefly-RK3399_Android7.1.2_git_20180126.7z-r-o./gitreset--hard

注意:解压后务必要先更新下远程仓库。 以下为从 gitlab 处更新的方法:
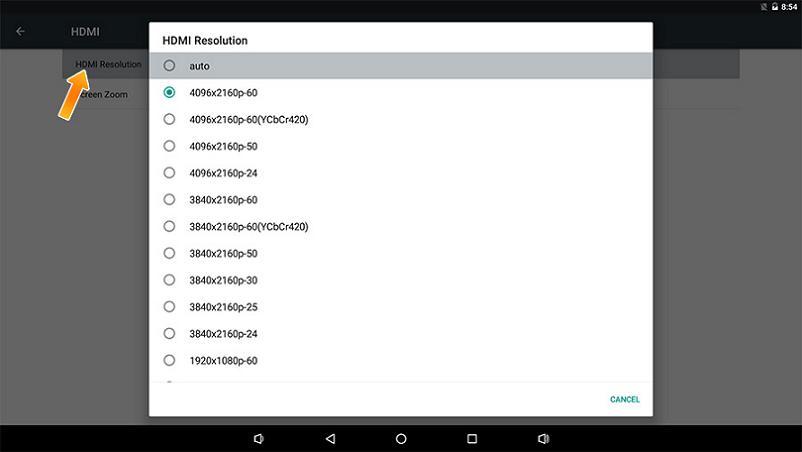
# 进入SDK根目录cd~/proj/firefly-rk3399# 如果没有拉取远程仓库,需要先拉取对应bundle仓库gitclonehttps://gitlab.com/TeeFirefly/rk3399-nougat-bundle.git.bundle# 更新SDK,并且后续更新不需要再次拉取远程仓库,直接执行以下命令即可.bundle/update# 按照提示已经更新内容到 FETCH_HEAD,同步FETCH_HEAD到firefly-rk3399分支gitrebaseFETCH_HEAD
AIO-3399JD4产品编译方法

HDMI显示编译

./FFTools/make.sh-drk3399-firefly-aiojd4-j8-lrk3399_firefly_aiojd4_box-userdebug./FFTools/mkupdate/mkupdate.sh-lrk3399_firefly_aiojd4_box-userdebug

HDMI+lvds编译

./FFTools/make.sh-drk3399-firefly-aiojd4-lvds-HSX101H40C-j8-lrk3399_firefly_aiojd4_lvds_box-userdebug./FFTools/mkupdate/mkupdate.sh-lrk3399_firefly_aiojd4_lvds_box-userdebug

手动编译AIO-3399JD4

编译前执行如下命令配置环境变量:

export JAVA_HOME=/usr/lib/jvm/java-8-openjdk-amd64 export PATH=$JAVA_HOME/bin:$PATH export CLASSPATH=.:$JAVA_HOME/lib:$JAVA_HOME/lib/tools.jar
  • 编译kernel:

cd~/proj/firefly-rk3399/kernel/makeARCH=arm64firefly_defconfigmake-j8ARCH=arm64rk3399-firefly-aiojd4.img
  • 编译uboot:

cd~/proj/firefly-rk3399/u-boot/makerk3399_box_defconfigmakeARCHV=aarch64-j8
  • 编译android:

cd~/proj/firefly-rk3399/sourcebuild/envsetup.shlunchrk3399_firefly_aiojd4_box-userdebugmake-j8./mkimage.sh
打包成统一固件 update.img

编译完可以用Firefly官方的脚本打包成统一固件,执行如下命令:

./FFTools/mkupdate/mkupdate.shupdate

打包完成后将在rockdev/Image-rk3399_firefly_aiojd4_box/下生成统一固件:update.img

在 Windows 下打包统一固件 update.img 也很简单,将编译生成的文件拷贝到 AndroidTool 的 rockdev\Image 目录中,然后运行 rockdev 目录下的 mkupdate.bat 批处理文件即可创建 update.img 并存放到 rockdev\Image 目录里。

烧写分区映像

编译的时候执行 ./mkimage.sh 会重新打包 boot.img 和 system.img, 并将其它相关的映像文件拷贝到目录 rockdev/Image-rk3399_firefly_xxx/ 中。以下列出一般固件用到的映像文件:

  • boot.img :Android 的初始文件映像,负责初始化并加载 system 分区。

  • kernel.img :内核映像。

  • misc.img :misc 分区映像,负责启动模式切换和急救模式的参数传递。

  • parameter.txt :emmc的分区信息

  • recovery.img :急救模式映像。

  • resource.img :资源映像,内含开机图片和内核的设备树信息。

  • system.img :Android 的 system 分区映像,ext4 文件系统格式。

  • trust.img :休眠唤醒相关的文件

  • rk3399_loader_v1.08.106.bin :Loader文件

  • uboot.img :uboot文件

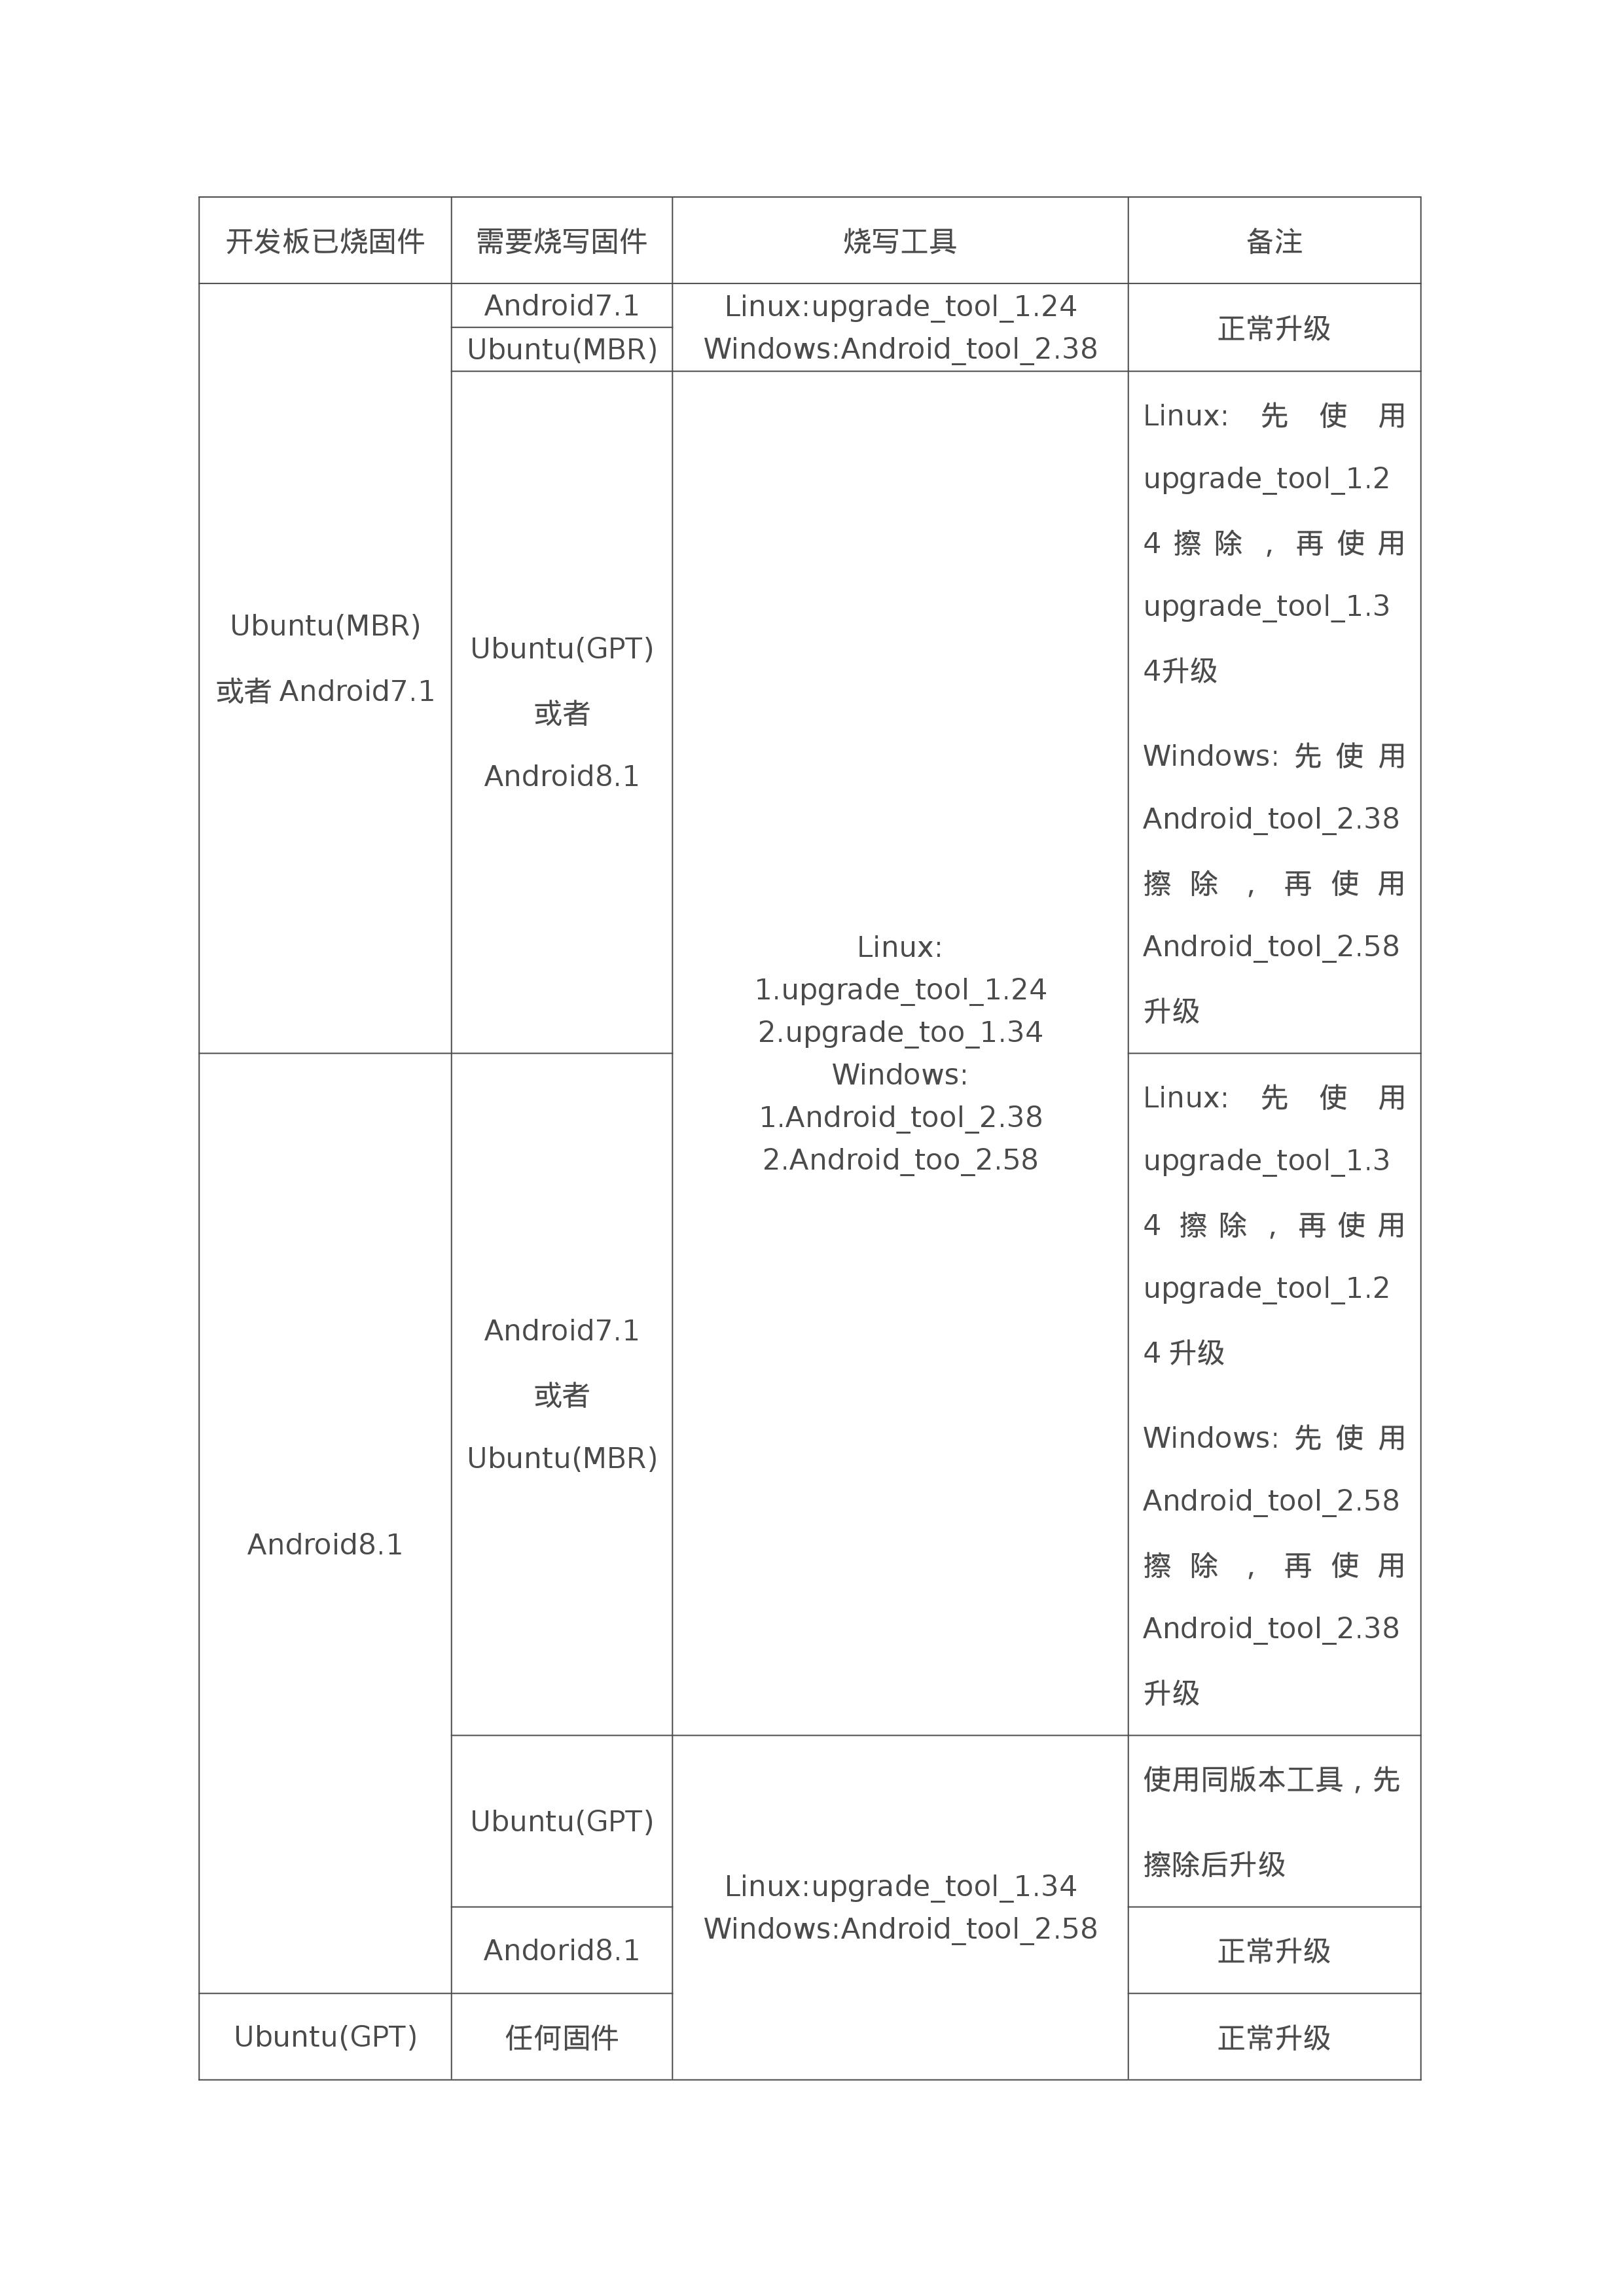
请参照 如何升级固件 一文来烧写分区映像文件。

如果使用的是 Windows 系统,将上述映像文件拷贝到 AndroidTool (Windows 下的固件升级工具)的 rockdev\Image 目录中,之后参照升级文档烧写分区映像即可,这样的好处是使用默认配置即可,不用修改文件的路径。

update.img 方便固件的发布,供终端用户升级系统使用。一般开发时使用分区映像比较方便。

定制 Android 固件
前言

定制 Android 固件,有两种方法:

  • 改源码,然后编译生成固件。

  • 在现有固件的基础上进行裁剪。

前一种方法,可以从各个层面去定制 Android,自由度大,但对编译环境和技术要求比较高,参见《编译 Android 固件》一文。现在介绍后一种方法,分为解包、定制和打包三个阶段。主机操作系统为 Linux,采用的工具为开源软件。

固件格式

统一固件 release_update.img,内含启动加载器 loader.img 和真正的固件数据 update.img

release_update.img |- loader.img `- update.img

update.img 是个复合文件,内含多个文件,由 package-file 描述。一个典型的 package-file 为:

# NAME Relative path package-file package-file bootloader Image/MiniLoaderAll.bin parameter Image/parameter.txt trust Image/trust.img uboot Image/uboot.img misc Image/misc.img resource Image/resource.img kernel Image/kernel.img boot Image/boot.img recovery Image/recovery.img system Image/system.img backup RESERVED #update-script update-script #recover-script recover-script
  • package-file

  • update.img 的打包说明文件,update.img 里也含有一份 package-file。

  • Image/MiniLoaderAll.bin

  • 启动加载器,即 bootloader。

  • Image/parameter.txt

  • 参数文件,可以设定内核启动参数,里面有重要的分区信息。

  • Image/trust.img,trust.img 是U-Boot作为二级loader 的打包。

  • Image/misc.img

  • misc 分区的映像,用来控制 Android 是正常启动,还是进入急救模式(Recovery Mode)。

  • Image/kernel.img

  • Android 内核。

  • Image/resource.img

  • 资源映像,内有内核开机图片和内核设备树信息(Device Tree Blob)。

  • Image/boot.img

  • Android 内核的内存启动盘(initrd),是内核启动后最先加载的根文件系统,包含重要的初始化动作,一般不需要改动。

  • Image/recovery.img

  • Android 急救模式的映像,内含内核和急救模式的根文件系统。

  • Image/system.img

  • 对应于 Android 的 /system 分区,是以下的定制对象。

解包,就是提取 release_update.img 里的 update.img, 然后解压出内含 package-file 所声明的多个文件。打包,则是个逆过程,将 package-file 将所列的多个文件合成 update.img,加进 loader.img,最终生成 release_update.img 。

工具准备
gitclonehttps://github.com/TeeFirefly/rk2918_tools.gitcdrk2918_toolsmakesudocpafptoolimg_unpackimg_makermkkrnlimg/usr/local/bin
解包
  • 解压 release_update.img

$ cd /path/to/your/firmware/dir $ img_unpack Firefly-RK3399_20161027.img img rom version: 6.0.1 build time: 2016-10-27 14:58:18 chip: 33333043 checking md5sum....OK
  • 解压 update.img

$ cd img $ afptool -unpack update.img update Check file...OK ------- UNPACK ------- package-file 0x00000800 0x00000280 Image/MiniLoaderAll.bin 0x00001000 0x0003E94E Image/parameter.txt 0x00040000 0x00000350 Image/trust.img 0x00040800 0x00400000 Image/uboot.img 0x00440800 0x00400000 Image/misc.img 0x00840800 0x0000C000 Image/resource.img 0x0084C800 0x0003FE00 Image/kernel.img 0x0088C800 0x00F5D00C Image/boot.img 0x017EA000 0x0014AD24 Image/recovery.img 0x01935000 0x013C0000 Image/system.img 0x02CF5000 0x2622A000 RESERVED 0x00000000 0x00000000 UnPack OK!
  • 查看 update 目录下的文件树

$ cd update/ $ tree . ├── Image │ ├── boot.img │ ├── kernel.img │ ├── MiniLoaderAll.bin │ ├── misc.img │ ├── parameter.txt │ ├── recovery.img │ ├── resource.img │ ├── system.img │ ├── trust.img │ └── uboot.img ├── package-file └── RESERVED 1 directory, 12 files

这样,固件就解包成功了,下面就开始定制吧。

定制

定制 system.img

system.img 是个 ext4 文件系统格式的映像文件,可以直接挂载到系统进行修改:

sudomkdir-p/mnt/systemsudomount-oloopImage/system.img/mnt/systemcd/mnt/system# 修改里面的东西,注意剩余空间,不能添加太多的 APK# 修改完毕,要卸载cd/sudoumount/mnt/system

注意,该 system.img 的剩余空间基本为 0, 如果不是删除文件,就需要对 system.img 进行扩容,并根据最后的文件大小,相应地调整 parameter 文件里的分区设置。以下是如何扩展空间的示例,在扩展前,先运行 mount 来查看系统挂载情况,确保 system.img 已经卸载:

# 增加 128M 的空间ddif=/dev/zerobs=1Mcount=128>>Image/system.img# 扩展文件系统信息e2fsck-fImage/system.imgresize2fsImage/system.img

打包

首先要检查一下 system.img 的大小,对照 parameter 文件的分区情况(可参考文档Parameter 文件格式,作必要的大小调整。例如,parameter.txt 文件里的 system 分区大小,可以找到 CMDLINE 一行,然后找到 system 字符串:

0x00200000@0x000B0000(system)

@ 前面就是分区的大小,单位是 512 字节,这样该 system 分区的大小就是:

$ echo $(( 0x00200000 * 512 / 1024 / 1024))M 1024M

只要 system.img 的大小不超过 1024M,parameter 文件就不用更改。如果分区不用更改,可以直接用烧写工具将新的 system.img 烧写到开发板的 system 分区上做试验。否则,需要制作新固件并烧写后再行测试。以下是打包成统一固件 update.img 所需要的步骤:

  • 合成 update.img :

# 当前的目录仍然为 update/ ,内有 package-file, package-file 所列的文件均存在 # 将参数文件拷贝一份到 paramter, 因为 afptool 默认要用到 $ cp Image/parameter.txt parameter $ afptool -pack . ../update_new.img ------ PACKAGE ------ Add file: ./package-file Add file: ./Image/MiniLoaderAll.bin Add file: ./Image/parameter.txt Add file: ./Image/trust.img Add file: ./Image/uboot.img Add file: ./Image/misc.img Add file: ./Image/resource.img Add file: ./Image/kernel.img Add file: ./Image/boot.img Add file: ./Image/recovery.img Add file: ./Image/system.img Add file: ./RESERVED Add CRC... ------ OK ------ Pack OK!
  • 合成 release_update.img :

$ img_maker -rk33 loader.img update_new.img release_update_new.img generate image... append md5sum... success!

release_update_new.img 即为最终生成的可烧写的统一固件文件。

常见问题

固件的版本在哪设置

在 parameter 文件中找到下行并修改即可,注意版本号为数字,中间两个点号不能省略。

FIRMWARE_VER:7.1.1

声明:本文内容及配图由入驻作者撰写或者入驻合作网站授权转载。文章观点仅代表作者本人,不代表电子发烧友网立场。文章及其配图仅供工程师学习之用,如有内容侵权或者其他违规问题,请联系本站处理。 举报投诉
  • 嵌入式主板
    +关注

    关注

    7

    文章

    6064

    浏览量

    34614
  • 安卓
    +关注

    关注

    5

    文章

    2081

    浏览量

    54507
  • Firefly
    +关注

    关注

    2

    文章

    534

    浏览量

    6757
收藏 人收藏

    评论

    相关推荐

    Core-3399-JD4更新固件介绍

    进行固件升级。注意:Core-3399-JD4出厂默认安装Android操作系统。原作者:Firefly Team
    发表于 06-30 18:14

    fireflyCORE-3399PRO主板JD4--Android开发

    Android开发 ADB 使用 前言 adb,全称 Android Debug Bridge,是 Android 的命令行调试工具,可以完成多种功能,如跟踪系统日志,上传下载文
    的头像 发表于 12-17 16:30 1363次阅读

    fireflyCORE-3399PRO主板JD4烧写固件简介

    AIO-3399PRO-JD4 有灵活的启动方式。一般情况下,除非硬件损坏,AIO-3399PRO-JD4 开发板是不会变砖的。 如果在升级过程中出现意外,bootloader 损坏,导致无法重新升级,此时仍可以进入 MaskRom 模式来修复。
    的头像 发表于 12-17 16:32 1872次阅读
    <b class='flag-5'>fireflyCORE-3399</b>PRO<b class='flag-5'>主板</b><b class='flag-5'>JD</b>4烧写固件<b class='flag-5'>简介</b>

    fireflyCORE-3399PRO主板JD4产品简介

    Core-3399PRO-JD4核心板采用Rockchip高性能六核64位处理器RK3399Pro,处理器内置AI神经网络处理器NPU,高算力,超高效能,拥有强大的硬解码能力与丰富的扩展接口,可灵活应用到集群服务器、计算机视觉、商显一体设备等行业中。
    的头像 发表于 12-17 16:51 1676次阅读

    fireflyCORE-3399主板JD4--FAQs方案

    FAQs HDMI无法4K显示? AIO-3399JD4默认出厂固件是支持HDMI显示,HDMI分辨率最高4K。如果HDMI无法支持4K分辨率可以重新烧写默认固件,或者重新编译内核make
    的头像 发表于 12-17 16:40 1140次阅读
    <b class='flag-5'>fireflyCORE-3399</b><b class='flag-5'>主板</b><b class='flag-5'>JD</b>4--FAQs方案

    fireflyCORE-3399主板JD4接口定义

    AIO-3399JD4 提供了丰富的接口,主要包括:电源接口, 1 x USB3.0(host/device),8 x USB2.0(接口×6,座子×2),HDMI,以太网,LVDS屏幕接口,eDP
    的头像 发表于 12-18 14:21 1513次阅读
    <b class='flag-5'>fireflyCORE-3399</b><b class='flag-5'>主板</b><b class='flag-5'>JD</b>4接口定义

    fireflyCORE-3399主板JD4驱动开发简介

    AIO-3399JD4 开发板上的 AD 接口有两种
    的头像 发表于 12-17 16:49 2905次阅读
    <b class='flag-5'>fireflyCORE-3399</b><b class='flag-5'>主板</b><b class='flag-5'>JD</b>4驱动开发<b class='flag-5'>简介</b>

    fireflyCORE-3399主板JD4烧写固件简介

    AIO-3399JD4 有灵活的启动方式。
    的头像 发表于 12-17 17:01 1427次阅读
    <b class='flag-5'>fireflyCORE-3399</b><b class='flag-5'>主板</b><b class='flag-5'>JD</b>4烧写固件<b class='flag-5'>简介</b>

    fireflyCORE-3399主板JD4产品简介

    Core-3399-JD4核心板采用Rockchip高性能六核64位处理器RK3399,板载AI神经网络处理器NPU SPR2801S,
    的头像 发表于 12-18 14:11 1407次阅读

    Core 3399Pro JD4工具AndroidTool Release v2.63文件包

    电子发烧友网站提供《Core 3399Pro JD4工具AndroidTool Release v2.63文件包.rar》资料免费下载
    发表于 09-02 14:42 0次下载
    Core <b class='flag-5'>3399</b>Pro <b class='flag-5'>JD</b>4<b class='flag-5'>工具</b><b class='flag-5'>Android</b>Tool Release v2.63文件包

    Core 3399 JD4工具AndroidTool Release v2.38文件包

    电子发烧友网站提供《Core 3399 JD4工具AndroidTool Release v2.38文件包.rar》资料免费下载
    发表于 09-02 10:28 4次下载
    Core <b class='flag-5'>3399</b> <b class='flag-5'>JD</b>4<b class='flag-5'>工具</b><b class='flag-5'>Android</b>Tool Release v2.38文件包

    Core 3399 JD4工具AndroidTool Release v2.71文件包

    电子发烧友网站提供《Core 3399 JD4工具AndroidTool Release v2.71文件包.zip》资料免费下载
    发表于 09-02 10:14 2次下载
    Core <b class='flag-5'>3399</b> <b class='flag-5'>JD</b>4<b class='flag-5'>工具</b><b class='flag-5'>Android</b>Tool Release v2.71文件包

    Core 3399 JD4 V2工具AndroidTool Release v2.54

    电子发烧友网站提供《Core 3399 JD4 V2工具AndroidTool Release v2.54.zip》资料免费下载
    发表于 09-16 10:17 3次下载
    Core <b class='flag-5'>3399</b> <b class='flag-5'>JD</b>4 V2<b class='flag-5'>工具</b><b class='flag-5'>Android</b>Tool Release v2.54

    Core 3399 JD4 V2工具AndroidTool Release v2.63

    电子发烧友网站提供《Core 3399 JD4 V2工具AndroidTool Release v2.63.rar》资料免费下载
    发表于 09-16 10:35 0次下载
    Core <b class='flag-5'>3399</b> <b class='flag-5'>JD</b>4 V2<b class='flag-5'>工具</b><b class='flag-5'>Android</b>Tool Release v2.63

    Core 3399 JD4 V2工具AndroidTool Release v2.71

    电子发烧友网站提供《Core 3399 JD4 V2工具AndroidTool Release v2.71.zip》资料免费下载
    发表于 09-16 10:31 4次下载
    Core <b class='flag-5'>3399</b> <b class='flag-5'>JD</b>4 V2<b class='flag-5'>工具</b><b class='flag-5'>Android</b>Tool Release v2.71