 电子发烧友App


 创作
创作 发文章
发文章 发帖
发帖  提问
提问  发资料
发资料 发视频
发视频资料介绍
描述
该项目将向您展示如何使用超声波传感器计算距离。它将分为三个部分:
- 编程超声波传感器 + 将其显示到串行监视器上
- 如何在 LCD 上显示距离
- 将中断与超声波传感器结合使用
编程超声波传感器 + 将其显示到串行监视器上:
在本节结束时,您的项目应如下所示:
如您所见,当我移动手时,距离会发生变化。当我将手移开时,距离也会发生变化——它会增加。当我将手移近传感器时,距离会缩短。您可能已经注意到,有时距离是一个 3 位数。这是因为我的手离传感器太近了。发送的声波迅速反弹,供传感器读取。
示意图:
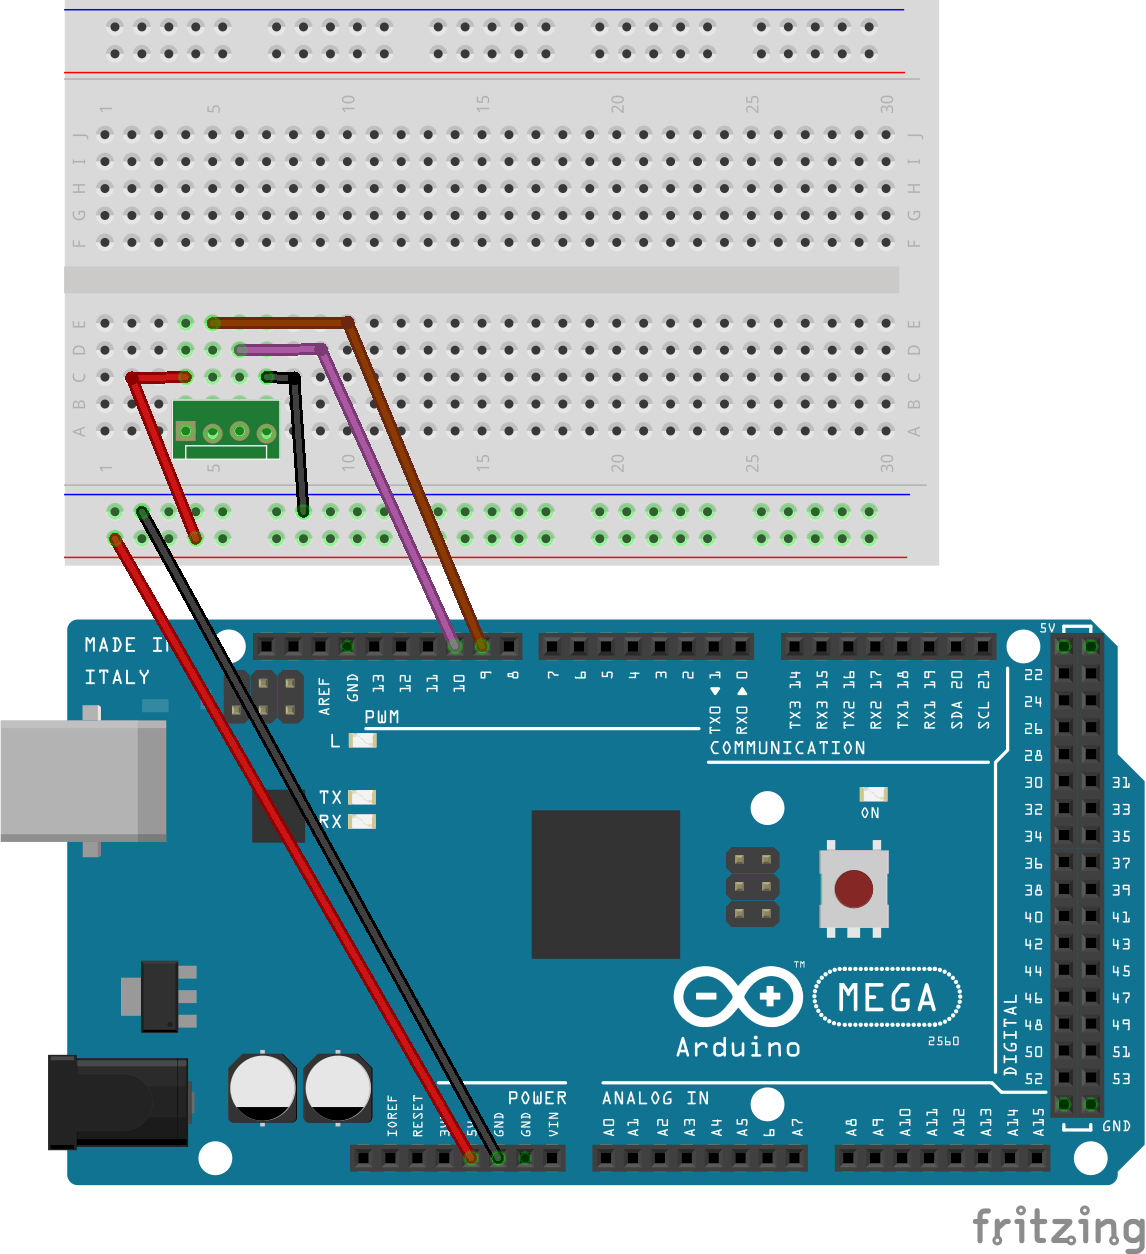
连接到 Gnd 的电线是传感器上的“Gnd”脚,连接到引脚号的电线。9,是“回声”腿,连接到引脚号的电线。10 是“Trig”脚,连接到 5v 的电线是“Vcc”脚。
编码:
首先,将其添加到代码的开头。
// defines pins numbers
const int trigPin = 9;
const int echoPin = 10;
其次,我们需要定义变量。
long duration;
int distance;
在void setup()函数中,我们需要声明每个引脚的输入/输出。我们还需要启动串行通信。
void setup() {
 pinMode(trigPin, OUTPUT); // Sets the trigPin as an Output
 pinMode(echoPin, INPUT); // Sets the echoPin as an Input
 Serial.begin(9600); // Starts the serial communication
}
现在,对于void loop()函数,添加以下内容:
 digitalWrite(trigPin, LOW);
 delayMicroseconds(2);
此代码清除 trigPin。然后,要将引脚设置为高电平 10 微秒,请添加:
 digitalWrite(trigPin, HIGH);
 delayMicroseconds(10);
 digitalWrite(trigPin, LOW);
接下来,编写以下内容:
duration = pulseIn(echoPin, HIGH);
此行读取 echoPin,以微秒为单位返回声波传播时间。
最后,要计算距离并将其打印到您的串行监视器上,请将其写入您的代码。
 distance = duration * 0.034 / 2;
 Serial.print("Distance: ");
 Serial.println(distance);
 delay(10);
您的代码应类似于以下内容:
// defines pins numbers
const int trigPin = 9;
const int echoPin = 10;
// defines variables
long duration;
int distance;
void setup() {
 pinMode(trigPin, OUTPUT); // Sets the trigPin as an Output
 pinMode(echoPin, INPUT); // Sets the echoPin as an Input
 Serial.begin(9600); // Starts the serial communication
}
void loop() {
 // Clears the trigPin
 digitalWrite(trigPin, LOW);
 delayMicroseconds(2);
 // Sets the trigPin on HIGH state for 10 micro seconds
 digitalWrite(trigPin, HIGH);
 delayMicroseconds(10);
 digitalWrite(trigPin, LOW);
 // Reads the echoPin, returns the sound wave travel time in microseconds
 duration = pulseIn(echoPin, HIGH);
 // Calculating the distance
 distance = duration * 0.034 / 2;
 // Prints the distance on the Serial Monitor
 Serial.print("Distance: ");
 Serial.println(distance);
 delay(10);
}
如果您的代码有效,那就太好了。但如果没有,那么您可能需要检查以下内容:
- 电路接线是否正确。
- 你是否有相同的串口和串口连接(9600)。
- 如果您的超声波传感器工作正常。
如何在 LCD 上显示距离
现在,我们不再将距离显示在串行监视器上,而是将其显示在 LCD 上。最后,您的项目应如下所示:
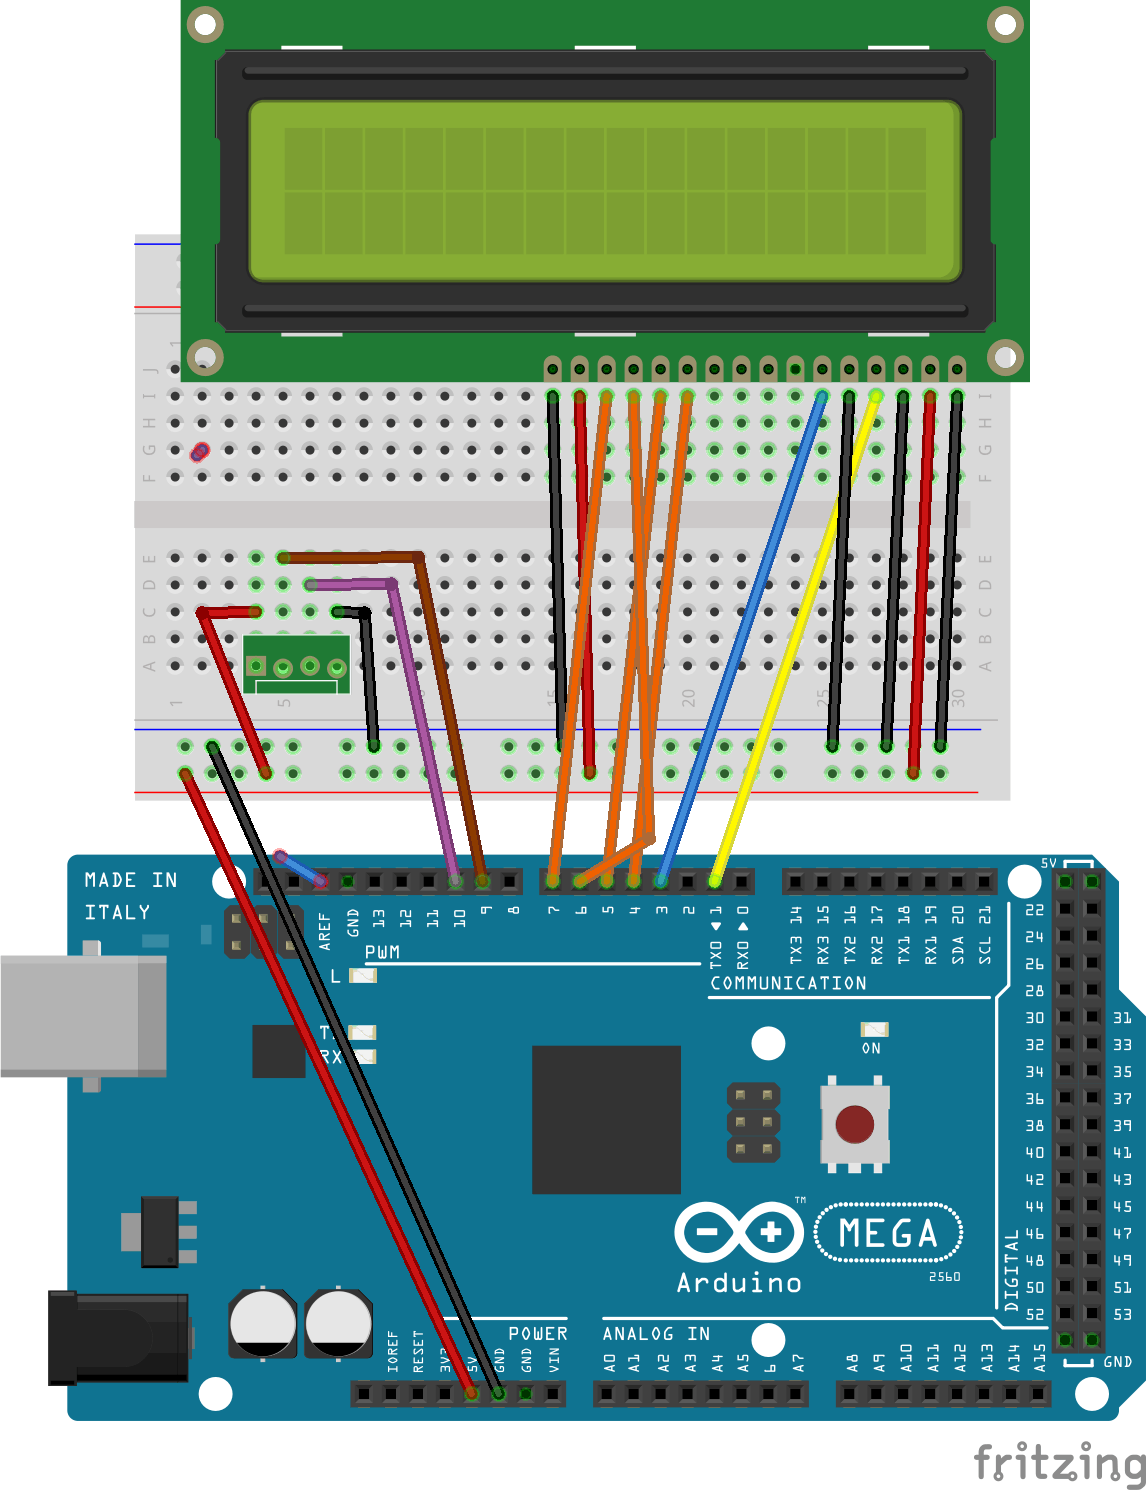
示意图:
编码:
现在,将其添加到代码的开头。
#include <LiquidCrystal.h> // includes the LiquidCrystal Library
LiquidCrystal lcd(
要显示 2 种不同类型的距离,请将“ int distance”更改为以下内容:
int distanceCm, distanceInch;
这意味着 LCD 将以厘米和英寸为单位显示距离。接下来,在void setup()函数中添加:
lcd.begin(16,2);
另外,删除serial.begin()函数,因为我们不需要与 CPU 通信。现在,要计算以英寸为单位的距离,我们需要添加以下代码。
distanceInch = duration * 0.0113 / 2; /*remember to change the 'distance' variable
                                        into distanceCm*/
添加此代码以将距离打印到 LCD 上。
 lcd.setCursor(0,0);
 lcd.print("Distance: ");
 lcd.print(distanceCm);
 lcd.print("cm   ");
 delay(10);
 lcd.setCursor(0,1);
 lcd.print("Distance: ");
 lcd.print(distanceInch);
 lcd.print("inch ");
 delay(10);
在此代码中,光标设置为 LCD 上的第 0 行、第 0 列。然后,将显示“距离:”一词,在其旁边,LCD 上将打印以厘米为单位的距离。与以英寸为单位的距离相同,但将向下一行。您的代码应如下所示:
#include
LiquidCrystal lcd(1,3,4,5,6,7);
// defines pins numbers
const int trigPin = 9;
const int echoPin = 10;
// defines variables
long duration;
int distanceCm, distanceInch;
void setup() {
 lcd.begin(16,2);
 pinMode(trigPin, OUTPUT); // Sets the trigPin as an Output
 pinMode(echoPin, INPUT); // Sets the echoPin as an Input
}
void loop() {
 // Clears the trigPin
 digitalWrite(trigPin, LOW);
 delayMicroseconds(2);
 digitalWrite(trigPin, HIGH);
 delayMicroseconds(10);
 digitalWrite(trigPin, LOW);
 duration = pulseIn(echoPin, HIGH);
 distanceCm = duration * 0.034 / 2;
 distanceInch = duration * 0.0113 / 2;
 lcd.setCursor(0,0);
 lcd.print("Distance: ");
 lcd.print(distanceCm);
 lcd.print("cm   ");
 delay(10);
 lcd.setCursor(0,1);
 lcd.print("Distance: ");
 lcd.print(distanceInch);
 lcd.print("inch ");
 delay(10);
}
。
- 检查您的代码是否正确。
- 检查您的电路和 LCD 接线是否正确。
将中断与超声波传感器结合使用:
在项目的这一部分中,您将使用中断来控制传感器何时测量距离。它应该是这样的:
您可能已经注意到,当我按下按钮时,LCD 上的距离会发生变化。这是因为超声波传感器仅在按下按钮时检查距离。
示意图:
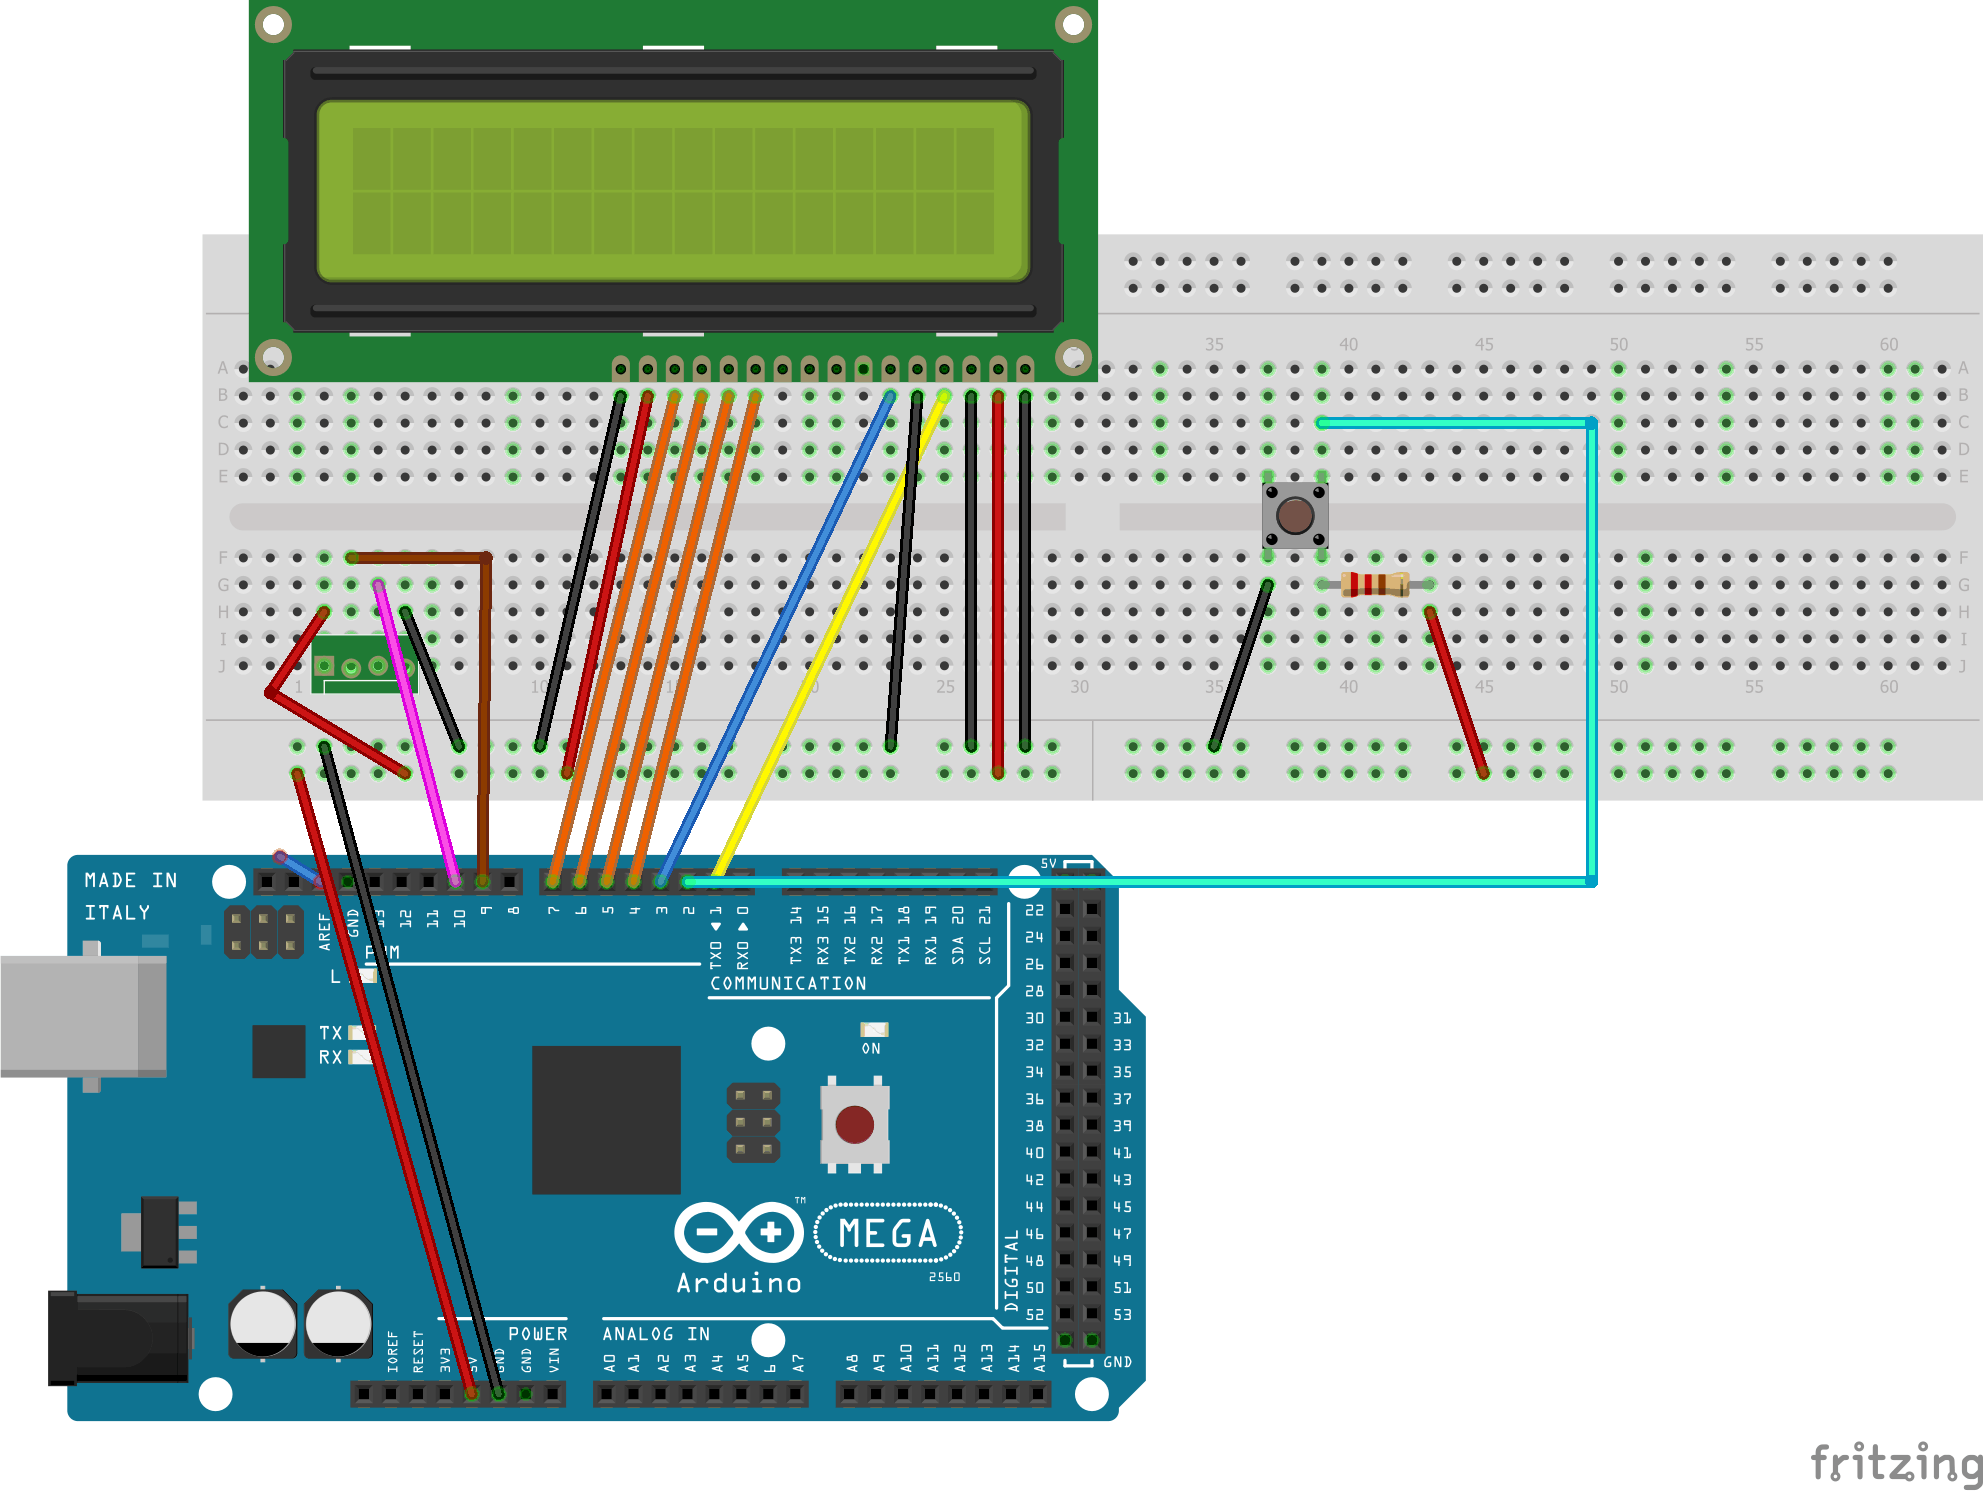
我将按钮连接到 Arduino 板上的 2 号引脚,因为它和 3 号引脚是唯一可以使用 interrupt() 函数的引脚。
更新(08/08/2018):Interrupt()函数实际上可用于引脚 18、19、20 和 21 以及引脚 2 和 3。感谢 Walter Stroebel 指出这一点。
编码:
首先,我们需要说明按钮所连接的引脚,因此将其添加到代码的开头。
const int buttonPin = 2;
然后,要添加interrupt()函数,请将此行添加到void setup()函数中。
attachInterrupt(digitalPinToInterrupt(buttonPin), pin_ISR, FALLING);
我们现在要做的就是从void loop()函数中获取所有内容并将其添加到另一个函数中,这个函数称为pin_ISR() 。最后,您的代码应如下所示:
#include
LiquidCrystal lcd(1,3,4,5,6,7);
// defines pins numbers
const int trigPin = 9;
const int echoPin = 10;
const int buttonPin = 2;
// defines variables
long duration;
int distanceCm, distanceInch;
void setup() {
 lcd.begin(16,2);
 pinMode(trigPin, OUTPUT); // Sets the trigPin as an Output
 pinMode(echoPin, INPUT); // Sets the echoPin as an Input
 pinMode(buttonPin, INPUT);
 attachInterrupt(digitalPinToInterrupt(buttonPin), pin_ISR, FALLING);
}
void loop() {
}
void pin_ISR(){
 // Clears the trigPin
 digitalWrite(trigPin, LOW);
 delayMicroseconds(2);
 digitalWrite(trigPin, HIGH);
 delayMicroseconds(10);
 digitalWrite(trigPin, LOW);
 duration = pulseIn(echoPin, HIGH);
 distanceCm = duration * 0.034 / 2;
 distanceInch = duration * 0.0113 / 2;
 lcd.setCursor(0,0);
 lcd.print("Distance: ");
 lcd.print(distanceCm);
 lcd.print("cm   ");
 delay(10);
 lcd.setCursor(0,1);
 lcd.print("Distance: ");
 lcd.print(distanceInch);
 lcd.print("inch ");
 delay(10);
}
更新(08/08/2018)Walter Stroebel 发表评论,将当前代码改进为以下内容:
#include
LiquidCrystal lcd(1,3,4,5,6,7);
// defines pins numbers
volatile bool buttonPressed = false;
const int trigPin = 9;
const int echoPin = 10;
const int buttonPin = 2;
// defines variables
long duration;
int distanceCm, distanceInch;
void setup() {
 lcd.begin(16,2);
 pinMode(trigPin, OUTPUT); // Sets the trigPin as an Output
 pinMode(echoPin, INPUT); // Sets the echoPin as an Input
 pinMode(buttonPin, INPUT);
 attachInterrupt(digitalPinToInterrupt(buttonPin), pin_ISR, FALLING);
}
void loop() {
 if (buttonPressed) {
 // Clears the trigPin
 digitalWrite(trigPin, LOW);
 delayMicroseconds(2);
 digitalWrite(trigPin, HIGH);
 delayMicroseconds(10);
 digitalWrite(trigPin, LOW);
 duration = pulseIn(echoPin, HIGH);
 distanceCm = duration * 0.034 / 2;
 distanceInch = duration * 0.0113 / 2;
 lcd.setCursor(0,0);
 lcd.print("Distance: ");
 lcd.print(distanceCm);
 lcd.print("cm   ");
 delay(10);
 lcd.setCursor(0,1);
 lcd.print("Distance: ");
 lcd.print(distanceInch);
 lcd.print("inch ");
 delay(10);
 buttonPressed = false;
 }
}
void pin_ISR(){
 buttonPressed = true;
}
// I would like to thank Walter Stroebel for suggesting this code.
这段代码更好,因为它更短意味着中断将更好地工作并且可以同时使用更多。
如果您的代码不起作用,请检查以下内容:
- 如果您已正确连接 LCD、按钮和传感器。
- 如果你的代码写对了。
希望你玩得开心。祝未来的项目好运!
- 基于计算距离超声波传感器工作的护眼器
- 使用超声波传感器和Surilli GSM计算距离
- 使用超声波传感器的距离测量
- 基于超声波传感器的测距系统 2次下载
- 超声波传感器测量距离开源分享
- 使用超声波传感器进行距离测量
- 使用超声波传感器和Arduino进行LED距离测量
- 使用超声波传感器HC SR04和Arduino Uno制作超声波距离传感器
- 超声波测量与接近传感器产品手册下载 1次下载
- 超声波距离传感器技术原理与应用 24次下载
- 具有IO-Link的超声波距离传感器参考设计 20次下载
- 【超声波传感器】超声波传感器使用问题详解! 23次下载
- 位差超声波传感器在智能玩具机器人中的应用 70次下载
- 在线测量酵母浓度的超声波传感器
- 在线测量酵母浓度的超声波传感器
- 超声波传感器如何接线_超声波传感器测距 1.7w次阅读
- 超声波传感器构成的超声波加湿器电路 8250次阅读
- 超声波传感器的优势有哪些 4368次阅读
- 超声波传感器的应用 1890次阅读
- 超声波传感器的使用注意事项说明 3116次阅读
- dfrobotSRF02超声波传感器介绍 1748次阅读
- 超声波液位传感器的组成及工作原理 1.9w次阅读
- 超声波传感器与红外线传感器对比谁更好 1.2w次阅读
- 超声波传感器内部结构及特点 1.8w次阅读
- 超声波液位传感器在油罐液位测量的原理是什么样的 6085次阅读
- 超声波传感器的四个创新应用 3091次阅读
- 超声波传感器及工作原理解析 9866次阅读
- 超声波传感器液位测量方法介绍 9868次阅读
- 超声波传感器工作原理及主要性能指标 3.1w次阅读
- 超声波传感器的原理及应用 1.1w次阅读

 上传资料赚积分
下载排行
本周
- 1山景DSP芯片AP8248A2数据手册
- 1.06 MB | 532次下载 | 免费
- 2RK3399完整板原理图(支持平板,盒子VR)
- 3.28 MB | 339次下载 | 免费
- 3TC358743XBG评估板参考手册
- 1.36 MB | 330次下载 | 免费
- 4DFM软件使用教程
- 0.84 MB | 295次下载 | 免费
- 5元宇宙深度解析—未来的未来-风口还是泡沫
- 6.40 MB | 227次下载 | 免费
- 6迪文DGUS开发指南
- 31.67 MB | 194次下载 | 免费
- 7元宇宙底层硬件系列报告
- 13.42 MB | 182次下载 | 免费
- 8FP5207XR-G1中文应用手册
- 1.09 MB | 178次下载 | 免费
本月
- 1OrCAD10.5下载OrCAD10.5中文版软件
- 0.00 MB | 234315次下载 | 免费
- 2555集成电路应用800例(新编版)
- 0.00 MB | 33566次下载 | 免费
- 3接口电路图大全
- 未知 | 30323次下载 | 免费
- 4开关电源设计实例指南
- 未知 | 21549次下载 | 免费
- 5电气工程师手册免费下载(新编第二版pdf电子书)
- 0.00 MB | 15349次下载 | 免费
- 6数字电路基础pdf(下载)
- 未知 | 13750次下载 | 免费
- 7电子制作实例集锦 下载
- 未知 | 8113次下载 | 免费
- 8《LED驱动电路设计》 温德尔著
- 0.00 MB | 6656次下载 | 免费
总榜
- 1matlab软件下载入口
- 未知 | 935054次下载 | 免费
- 2protel99se软件下载(可英文版转中文版)
- 78.1 MB | 537798次下载 | 免费
- 3MATLAB 7.1 下载 (含软件介绍)
- 未知 | 420027次下载 | 免费
- 4OrCAD10.5下载OrCAD10.5中文版软件
- 0.00 MB | 234315次下载 | 免费
- 5Altium DXP2002下载入口
- 未知 | 233046次下载 | 免费
- 6电路仿真软件multisim 10.0免费下载
- 340992 | 191187次下载 | 免费
- 7十天学会AVR单片机与C语言视频教程 下载
- 158M | 183279次下载 | 免费
- 8proe5.0野火版下载(中文版免费下载)
- 未知 | 138040次下载 | 免费


 工商网监
工商网监
评论