 电子发烧友App


 创作
创作 发文章
发文章 发帖
发帖  提问
提问  发资料
发资料 发视频
发视频资料介绍
描述
为什么需要保持社交距离?这个项目的动机是什么?
COVID-19(也称为新型冠状病毒)是一种致命疾病,已感染超过 2400 万人并导致超过 80 万人死亡。
仅在美国,就有600 万例病例。据Worldometers.info 称,最近 COVID-19 病例一直在增加。
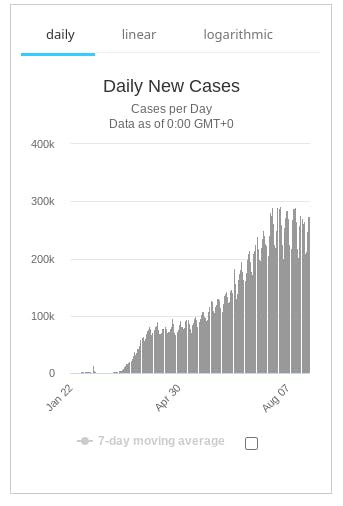
疾病预防控制中心建议保持社交距离,这是一种人们分开 6 英尺的程序,除非他们是同一个家庭的成员。那么,作为一个社区,我们如何使用技术来执行这个程序呢?这就是这个项目的动机。
成本
为了让每个人都可以使用这个项目,我们希望确保成本尽可能低。
一台设备的成本:
- Arduino Nano--10 售价 36.49 美元,因此每个售价 3.65 美元
- HC-05--2 为 12.5 美元,因此每个为6.25 美元
- LCD--2 售价 6.49 美元,因此每个售价 3.25 美元
- 有源蜂鸣器——20 个,9.59 美元,所以每个是0.48 美元
- 10K 欧姆电位器——20 个,6.39 美元,所以每个0.32 美元
- 220 欧姆电阻器 - 100 个 5.69 美元,因此每个0.06 美元
- 9V 电池——8 块10.99 美元,所以每块 1.37 美元
- 9V 电池连接器面包板--40 个,售价 6.48 美元,因此每个售价 0.16 美元
总计高达15.54 美元。这是非常令人印象深刻的,因为这可以挽救无数生命。
准备步骤:安装库
第一步是安装 LCD 库,您将需要这两个库。这可能预装在 Arduino IDE 上,但可能不在某些版本上。
转到工具>管理库。在这里,搜索“液晶”。
我们要查找的库是列表中的第一个。如果您还没有安装它。
还使用了 SoftwareSerial 库,但它已经预先安装。
第 1 步:将 HC-05 配置为 AT 模式
第一步是将 HC-05 配置为 AT 模式。在这里,我们可以执行 AT+INQ 命令来扫描其他设备。
需要两个或更多设备才能相互扫描。在所需的部分中描述了一种“设备”。
对于此步骤,设备应按如下方式接线:
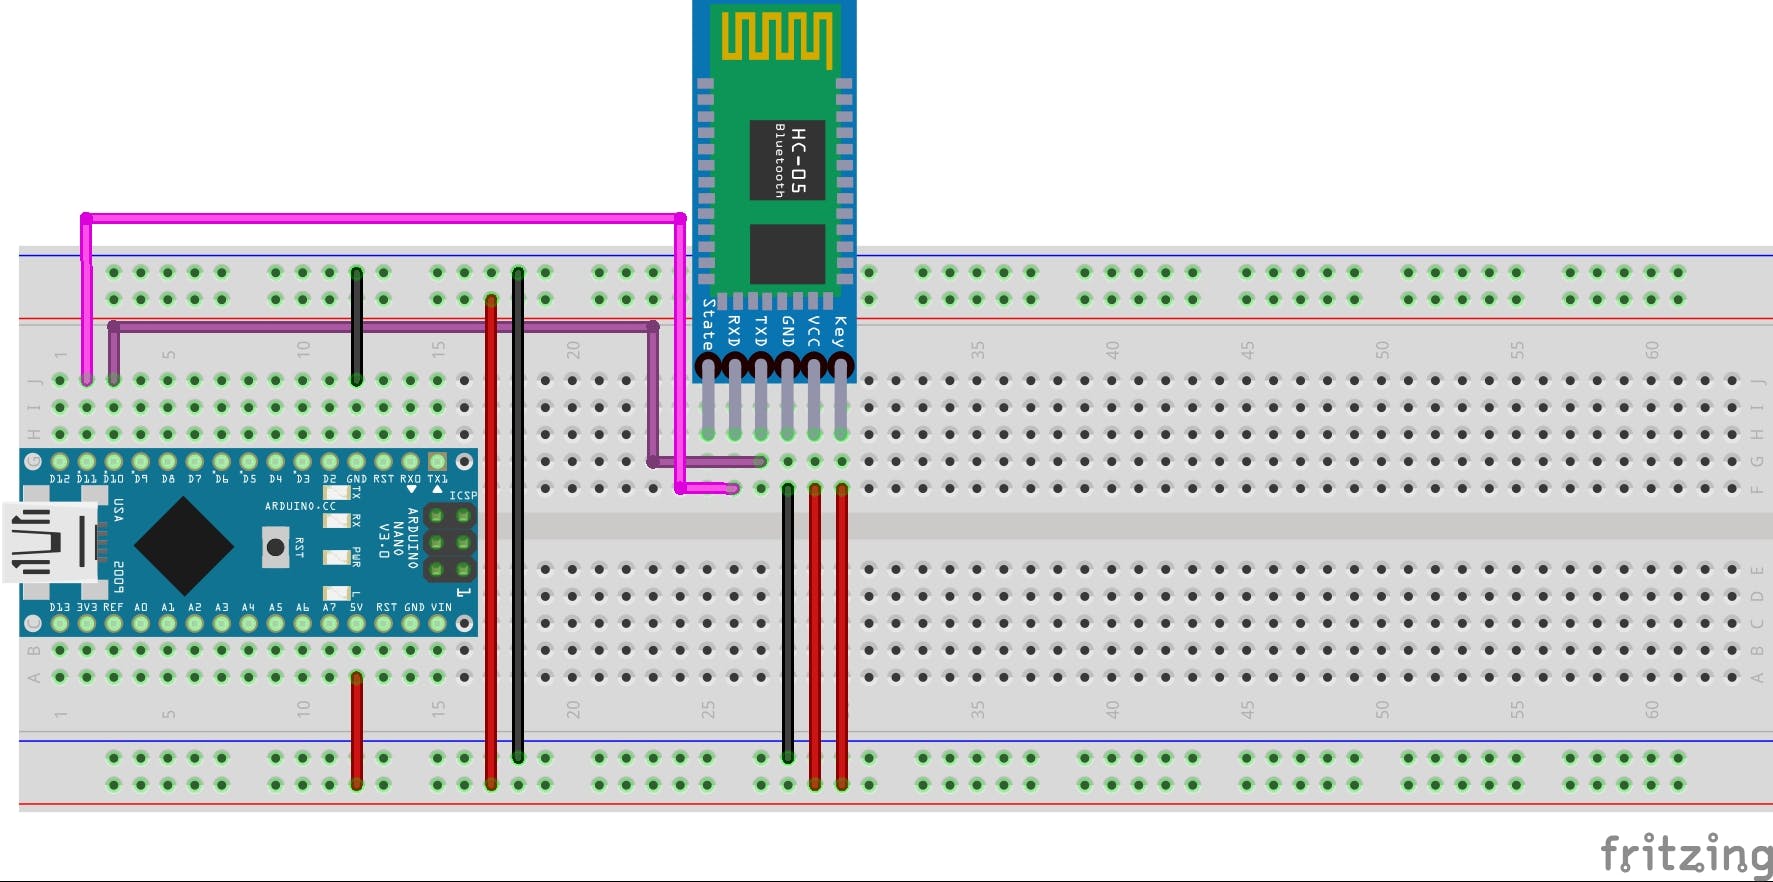
有两种 HC-05 设备:一种带有“KEY”引脚不带按钮,一种带有“EN”引脚带按钮
AT模式HC-05无按键:
如果 KEY 引脚连接到 +5V DC,它应该自动处于 AT 模式。
AT 模式 HC-05 带按钮
在这种情况下,EN 引脚应连接到 +5V DC。插入 Arduino Nano 时,按下按钮,插入设备,然后松开。这应该激活 AT 模式。
将此代码复制并粘贴到 Arduino IDE 中。
#include <SoftwareSerial.h>

SoftwareSerial mySerial(10,11);
void setup()
{
  Serial.begin(9600);
  mySerial.begin(38400);
  Serial.println("Enter AT commands:");

  delay(2000);
}

void loop()
{

  // Keep reading from HC-05 and send to Arduino Serial Monitor
  if (mySerial.available()){
    Serial.write(mySerial.read());}

  // Keep reading from Arduino Serial Monitor and send to HC-05
  if (Serial.available()){
    mySerial.write(Serial.read());}
}
从本质上讲,这会将您在串行监视器中键入的任何内容打印到 HC05,等待消息并打印该消息。
运行代码。
运行代码:
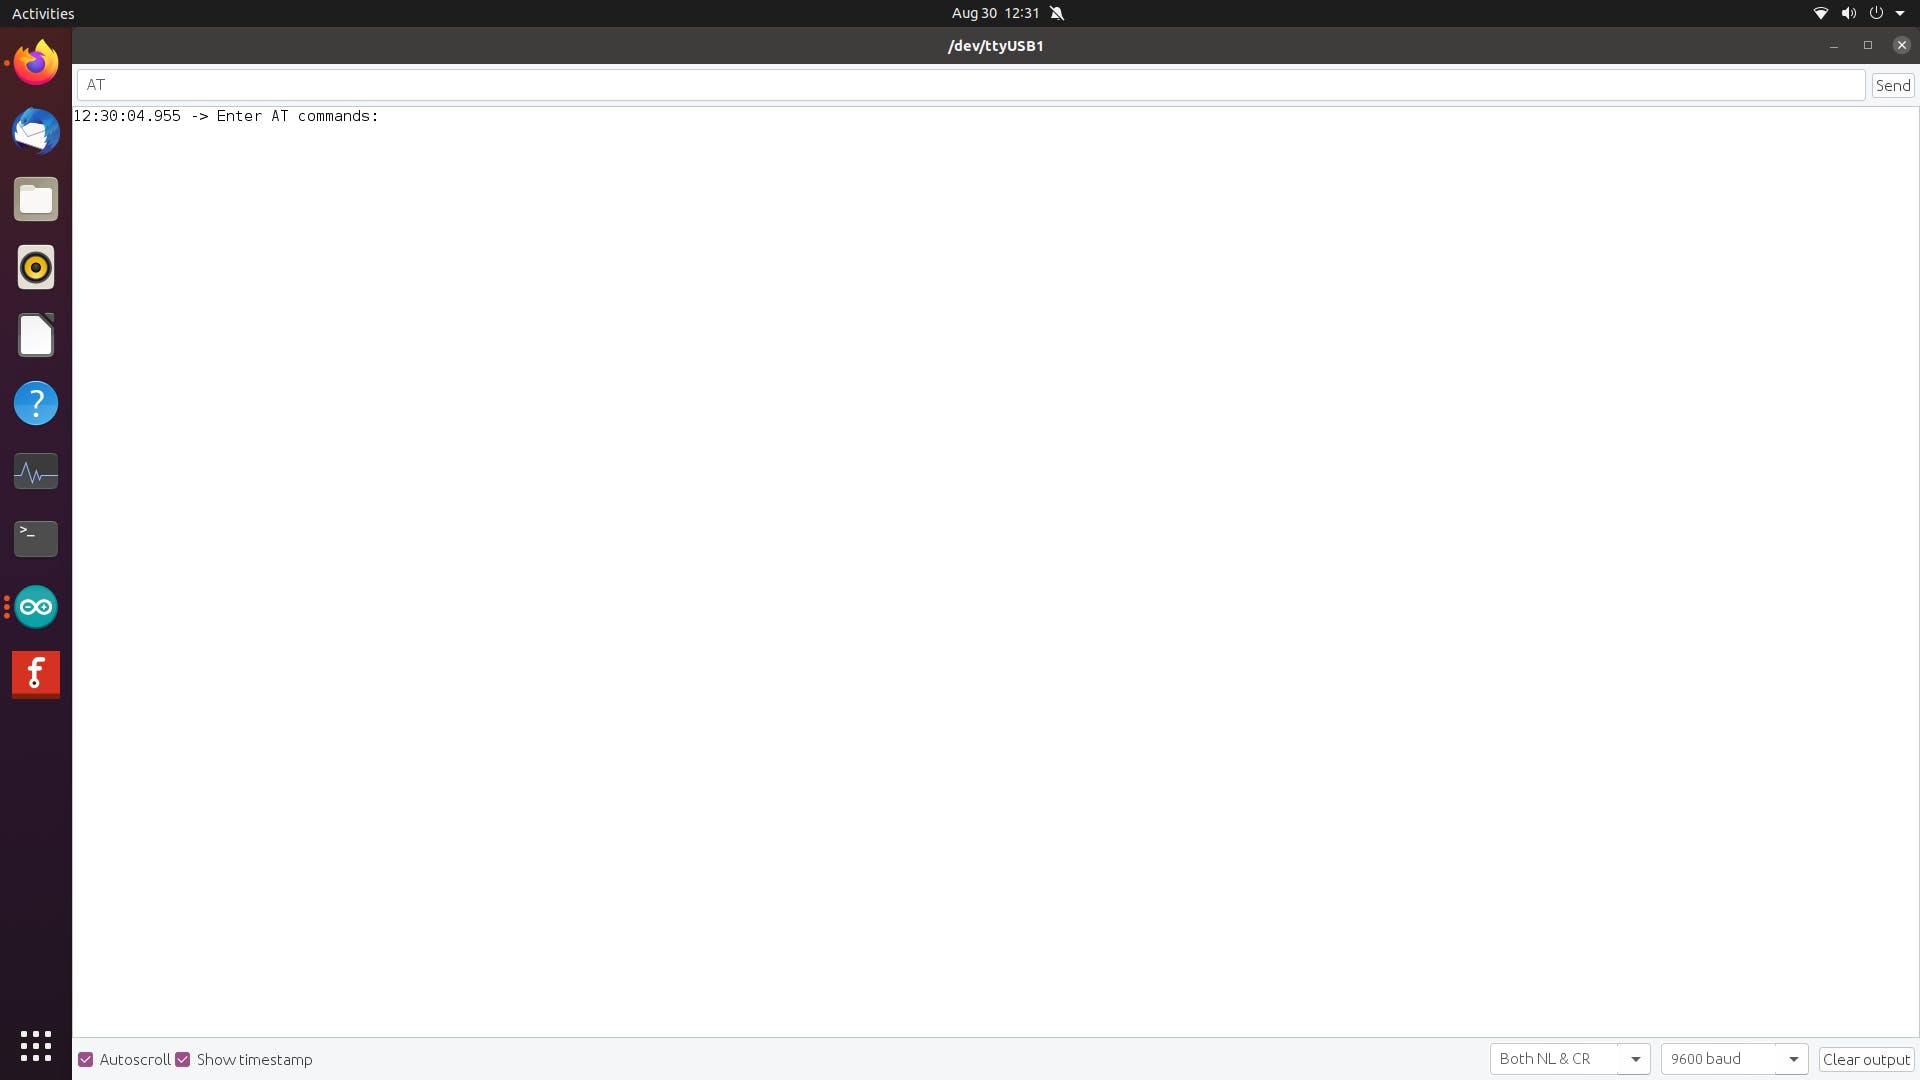
打开串行监视器。
当“Enter AT commands:”出现时,输入“AT”并按下回车键。您应该会收到一条消息说“OK”
键入“AT+NAME”并显示名称。
值
为了获得设备之间的距离,我们需要 rssi 值。要获取 rssi 值,我们需要执行 AT+INQ 命令。但是,在此之前还有一些命令要执行,一一执行:
- AT+复位
- AT+初始化
- AT+IAC=9e8b33
- AT+CLASS=0
- AT+INQM=1, 9, 48
- AT+INQ
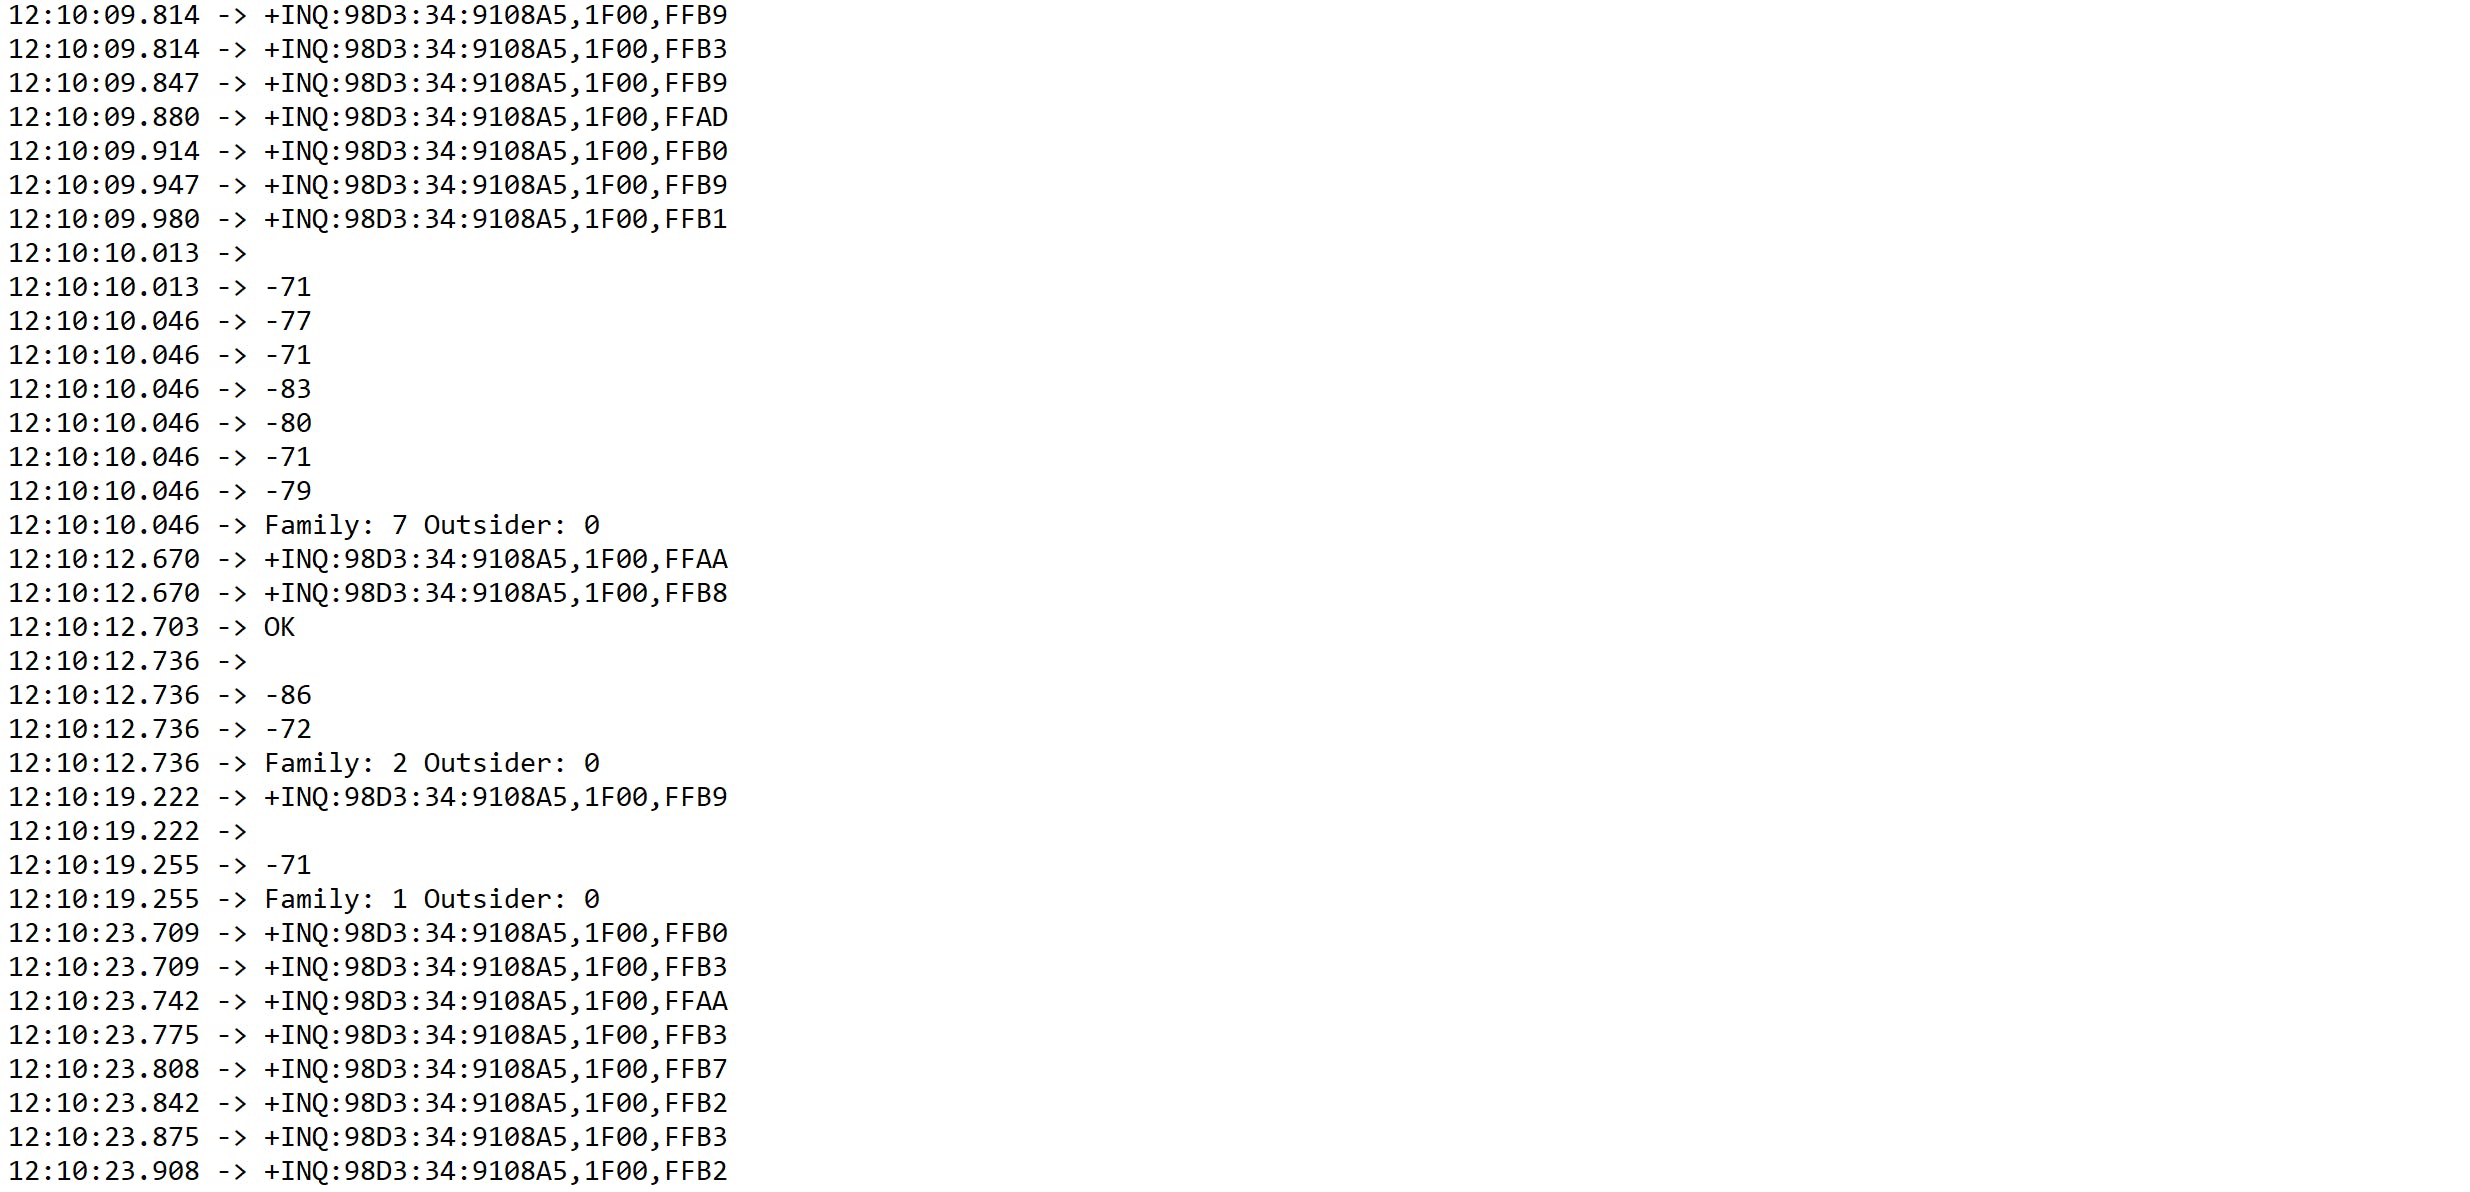
这是执行完所有 6 个命令后串行监视器的外观。(一步步)
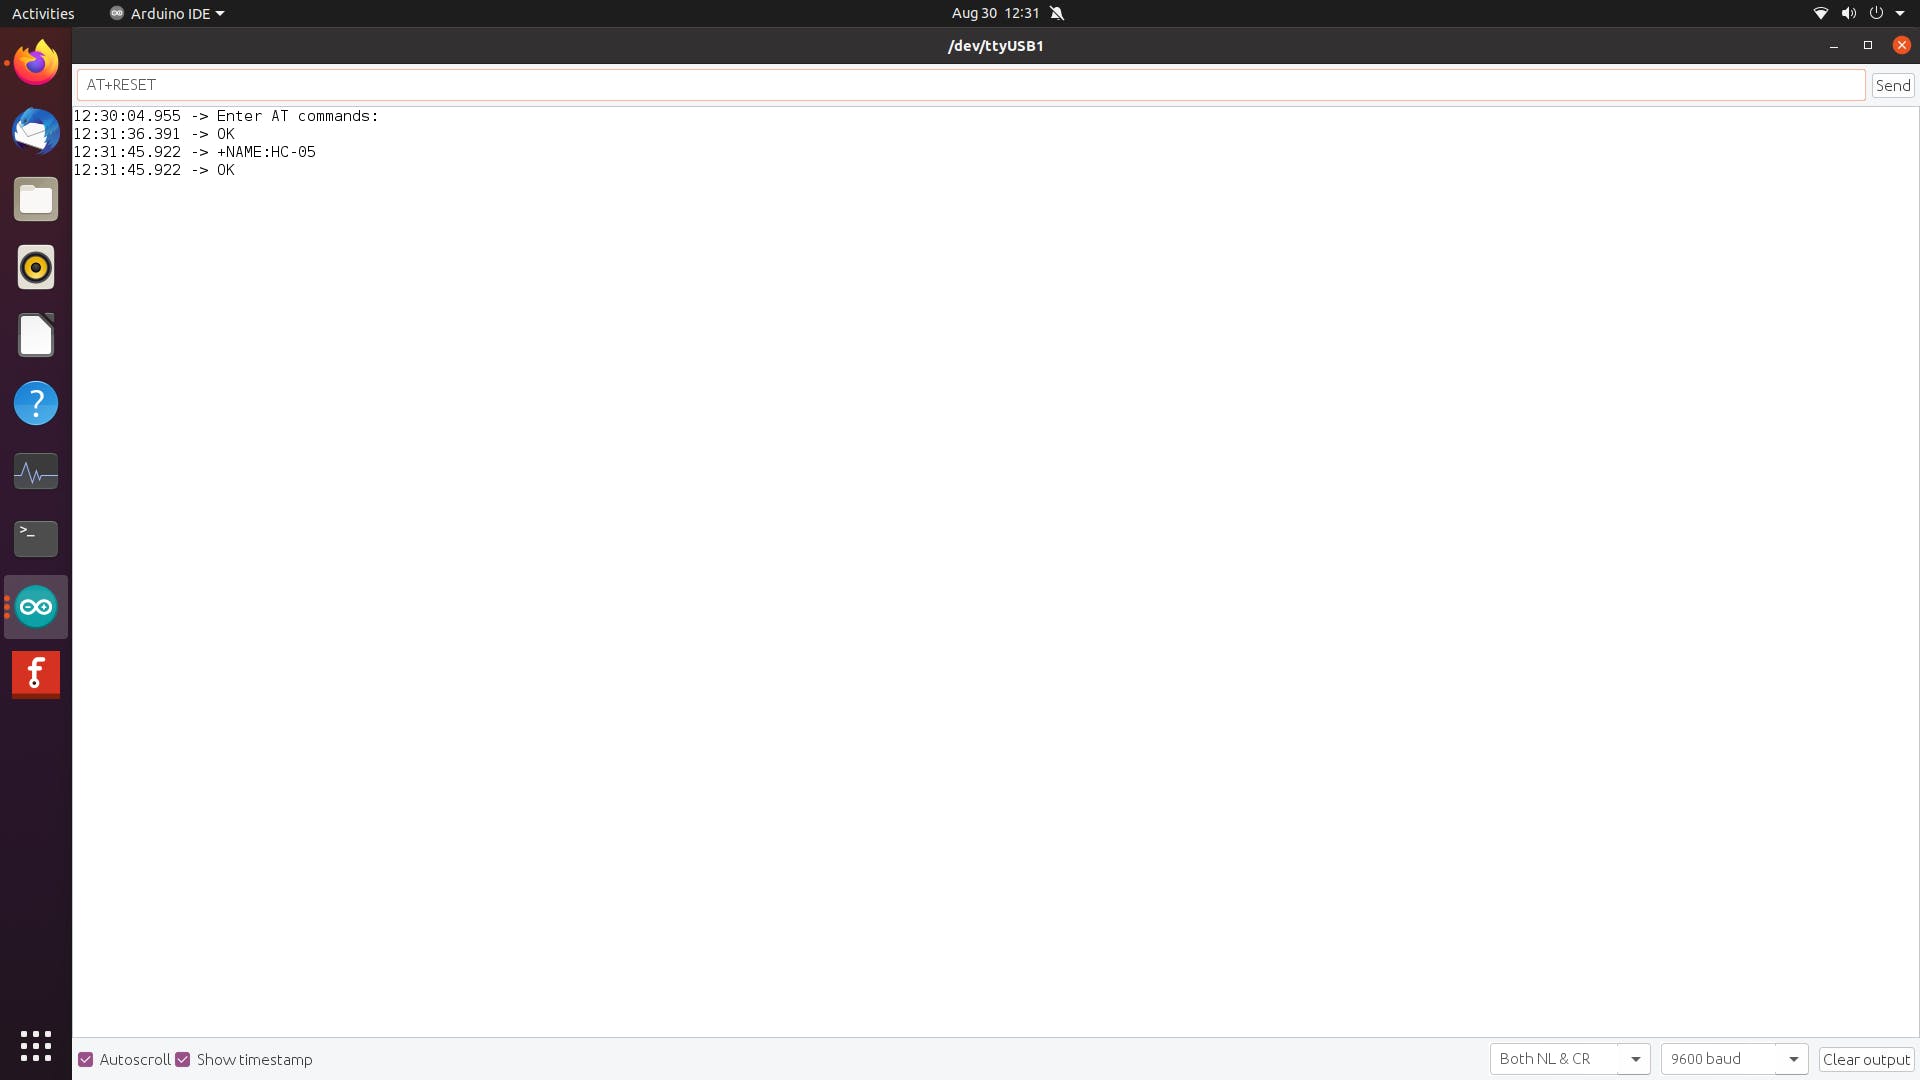
请注意,当我们执行 AT+INQ 命令时,它会显示 +INQ,后跟地址、类别,然后是 RSSI 值。RSSI 值是最后 4 个字符。请注意,这是十六进制;要将其转换为十进制,我们需要使用带符号的二进制补码格式。
如果得到的 RSSI 值为 7FFF,请尝试再次执行上述命令。
如果 rssi 值以 F 开头,那么你很好。
第 2 步:转换 Rssi 值
要转换 rssi 值,我们需要创建一个新函数来执行此操作。
将此代码复制并粘贴到 Arduino IDE
#include

SoftwareSerial mySerial(10,11);
void setup()
{
  Serial.begin(9600);
  mySerial.begin(38400);
  Serial.println("Enter AT commands:");

  delay(2000);
}

unsigned int hexToDec(String hexString) {

  unsigned int decValue = 0;
  int nextInt;

  for (int i = 0; i < hexString.length(); i++) {

    nextInt = int(hexString.charAt(i));
    if (nextInt >= 48 && nextInt <= 57) nextInt = map(nextInt, 48, 57, 0, 9);
    if (nextInt >= 65 && nextInt <= 70) nextInt = map(nextInt, 65, 70, 10, 15);
    if (nextInt >= 97 && nextInt <= 102) nextInt = map(nextInt, 97, 102, 10, 15);
    nextInt = constrain(nextInt, 0, 15);

    decValue = (decValue * 16) + nextInt;
  }

  return decValue;
}

void loop()
{

  // Keep reading from HC-05 and send to Arduino Serial Monitor
  if (mySerial.available()){
    String x = String(mySerial.readString());
    int slashn = x.indexOf("\n");
    Serial.println(slashn);
    int xlen = x.length()/(slashn+1);
    if (x.endsWith("OK\r\n")) {
      x = x.substring(0, x.length() - 4);
    }
    for (int i = 0; i < xlen; i++) {
      if (i != 0) {
        x = x.substring(slashn+1);
      }
      slashn = x.indexOf("\n");
      String rssi = x.substring(slashn-5, slashn-1);
      int decNO = hexToDec(rssi);
      Serial.println(decNO);
}

  // Keep reading from Arduino Serial Monitor and send to HC-05
  if (Serial.available()){

    mySerial.write(Serial.read());
    }

}}
这个程序是如何工作的
首先,它检测数据是否可用。然后,它将数据复制到一个字符串 (X) 并检测 INQ 行的结尾(注意所有 INQ 数据都是一个字符串,这需要为单行 INQ 数据分成不同的字符串)。
请注意一行是 +INQ:ADDR, CLASS, RSSI\r\n
通过 for 循环,它正在检测单独的行并删除已经检测到的行。RSSI 值是倒数第六到第三个(包括 \r\n),因此是 substring(slashn-5, slashn-1); 我们称结尾为“斜线 n”,因为那是结尾,斜线 n。
当你运行这个程序时,你应该在+INQ....之后得到一个十进制的RSSI值。这应该是一个负数。数字越大,两个设备越接近。
在下一步中,我们将向您展示如何将此数据报告给 LCD。我们还将了解如何检测家庭成员
第三步:检测家庭成员
通过设备的地址可以检测到家庭成员。地址从第 5 个索引开始,到第 13 个结束,即 substring(5, slashn-11)。
有了这个,我们还可以统计局外人和家庭成员的数量。
对于外人,可以测量距离,看是否为 6 英尺。通过将设备放在 6 英尺处进行一系列试验后,我们确定为 76.91。
这是代码。
#include

SoftwareSerial mySerial(10, 11); // RX, TX

void setup() {
  Serial.begin(9600);


  Serial.println("Enter AT commands:");

  mySerial.begin(38400);

}


unsigned int hexToDec(String hexString) {

  unsigned int decValue = 0;
  int nextInt;

  for (int i = 0; i < hexString.length(); i++) {

    nextInt = int(hexString.charAt(i));
    if (nextInt >= 48 && nextInt <= 57) nextInt = map(nextInt, 48, 57, 0, 9);
    if (nextInt >= 65 && nextInt <= 70) nextInt = map(nextInt, 65, 70, 10, 15);
    if (nextInt >= 97 && nextInt <= 102) nextInt = map(nextInt, 97, 102, 10, 15);
    nextInt = constrain(nextInt, 0, 15);

    decValue = (decValue * 16) + nextInt;
  }

  return decValue;
}


void loop()

{


  while (!mySerial.available()) {}
  while (mySerial.available()) {

    String x = String(mySerial.readString());
    int slashn = x.indexOf("\n");
    Serial.println(slashn);
    int nod = 0;
    int countf = 0;
    int counto = 0;
    int countd = 0;
    int xlen = x.length()/(slashn+1);
    if (x.endsWith("OK\r\n")) {
      x = x.substring(0, x.length() - 4);

    }
    for (int i = 0; i < xlen; i++) {
      if (i != 0) {
        x = x.substring(slashn+1);
      }
      slashn = x.indexOf("\n");
      String rssi = x.substring(slashn-5, slashn-1);
      int decNO = hexToDec(rssi);
      Serial.println(x.substring(5,slashn-11));
      if (x.substring(5, slashn-11) == "FAMILYADDR") {
        countf++;
      }
      else {
        counto++;
        if (decNO > -76.91) {
          countd++;
        }


      }
      if (decNO > -76.91) {
        Serial.println("near");
      }
      else {
        Serial.println("far");
      }
      Serial.println(decNO);
    }


    Serial.println("Family: " + String(countf) + " Outsider: " + String(counto) + " Danger: " + String(countd));

  }
  delay(100);
}
countf 是家庭成员的数量,counto 是外来者的数量,countd 是小于 6 英尺的危险外来者的数量。
将 FAMILYADDR 替换为您尝试扫描的“家庭”设备。任何外部设备都将自动计为外部设备。对于多个设备,使用 || 列出多个设备的操作。
运行此程序时,您将看到列出的设备地址以及转换后的 RSSI。扫描完所有内容后,它将显示家庭、局外人和危险计数。
第 4 步:向 LCD 报告
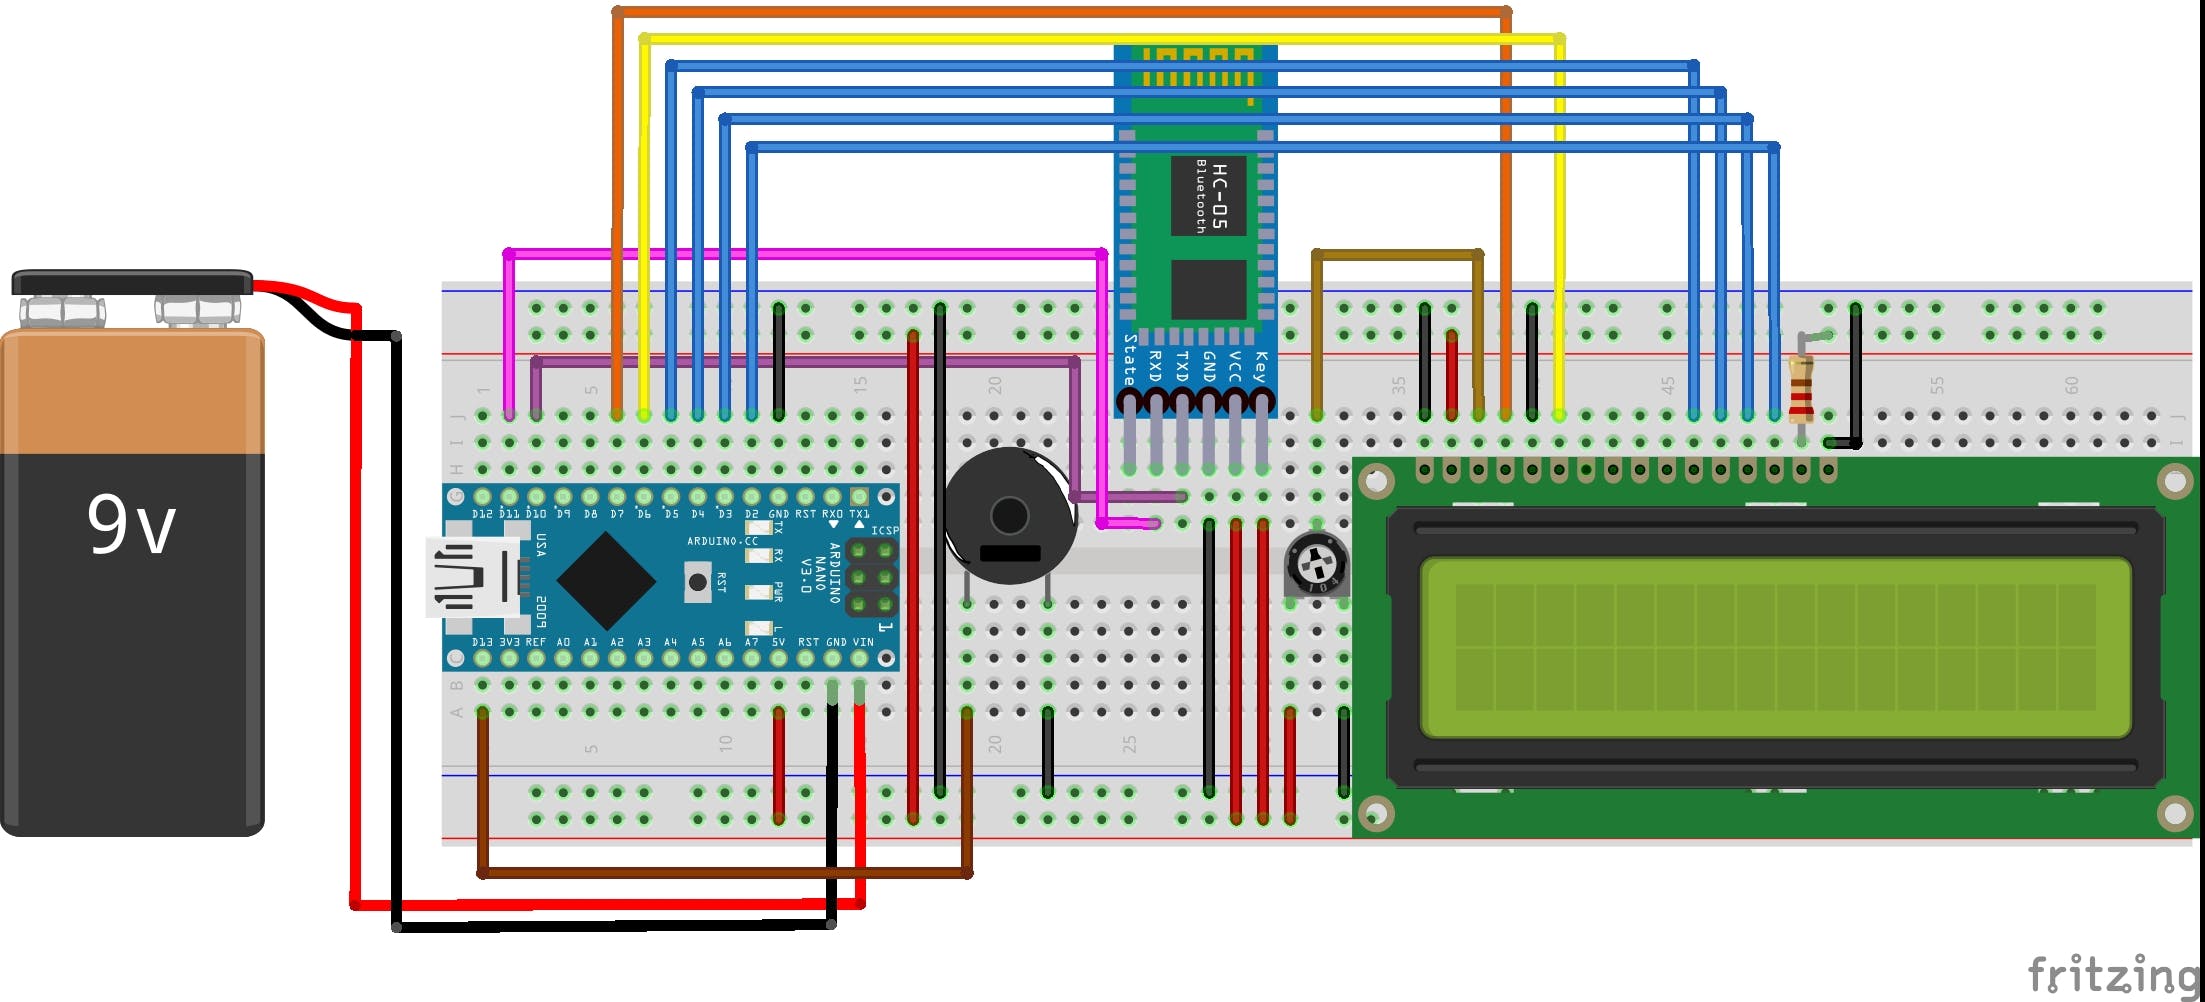
当该设备在现实世界中实施时,设备持有者必须有办法知道 rssi 值以及他们是否有感染 COVID-19 的危险。
如图所示为 LCD 接线:
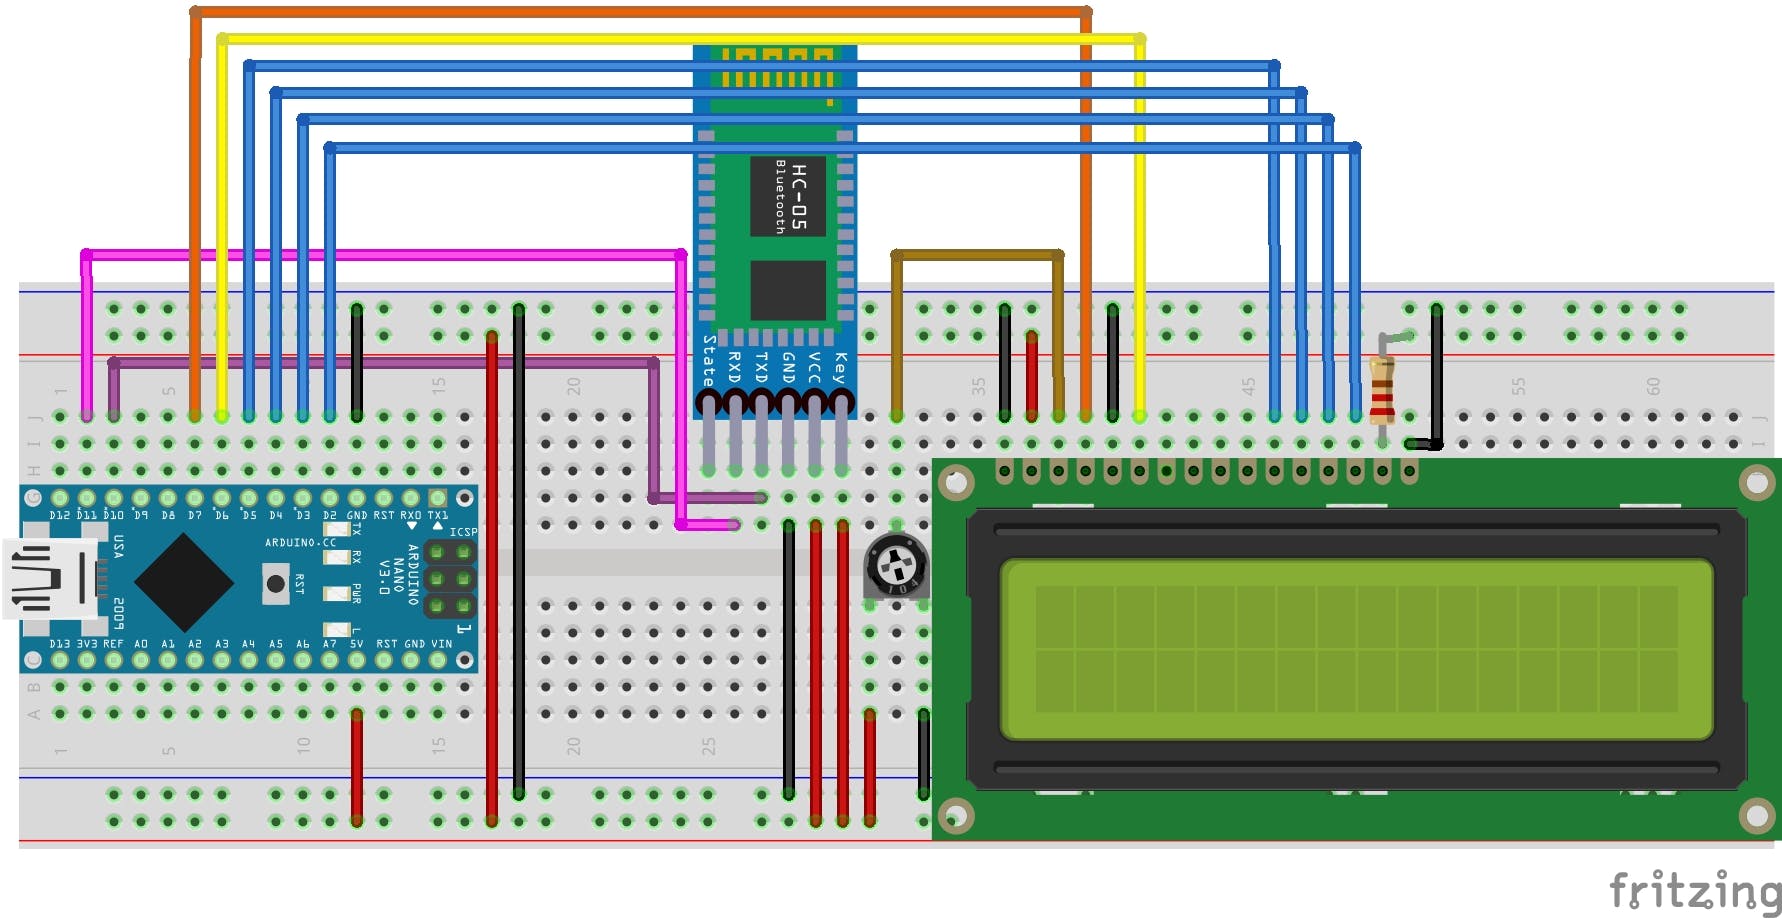
接下来,将此代码复制并粘贴到 Arduino IDE 中。运行。
#include

SoftwareSerial mySerial(10, 11); // RX, TX

#include

// initialize the library with the numbers of the interface pins
LiquidCrystal lcd(7, 6, 5, 4, 3, 2);
int buttonstate = 0;
void setup() {
  lcd.begin(16, 2);
  Serial.begin(9600);


  Serial.println("Enter AT commands:");

}


unsigned int hexToDec(String hexString) {

  unsigned int decValue = 0;
  int nextInt;

  for (int i = 0; i < hexString.length(); i++) {

    nextInt = int(hexString.charAt(i));
    if (nextInt >= 48 && nextInt <= 57) nextInt = map(nextInt, 48, 57, 0, 9);
    if (nextInt >= 65 && nextInt <= 70) nextInt = map(nextInt, 65, 70, 10, 15);
    if (nextInt >= 97 && nextInt <= 102) nextInt = map(nextInt, 97, 102, 10, 15);
    nextInt = constrain(nextInt, 0, 15);

    decValue = (decValue * 16) + nextInt;
  }

  return decValue;
}


void loop()

{


  while (!mySerial.available()) {}
  while (mySerial.available()) {

    String x = String(mySerial.readString());
    int slashn = x.indexOf("\n");
    Serial.println(slashn);
    int nod = 0;
    int countf = 0;
    int counto = 0;
    int countd = 0;
    int xlen = x.length()/(slashn+1);
    if (x.endsWith("OK\r\n")) {
      x = x.substring(0, x.length() - 4);

    }
    for (int i = 0; i < xlen; i++) {
      if (i != 0) {
        x = x.substring(slashn+1);
      }
      slashn = x.indexOf("\n");
      String rssi = x.substring(slashn-5, slashn-1);
      int decNO = hexToDec(rssi);
      lcd.setCursor(0, 1);
      lcd.print("RSSI:" + String(decNO));
      Serial.println(x.substring(5,slashn-11));
      if (x.substring(5, slashn-11) == "20:2:2011FB") {
        countf++;

      }
      else {
        counto++;
        if (decNO > -76.91) {
          countd++;
        }


      }
      if (decNO > -76.91) {
        Serial.println("near");
      }
      else {
        Serial.println("far");
      }
      Serial.println(decNO);
    }


    Serial.println("Family: " + String(countf) + " Outsider: " + String(counto) + " Danger: " + String(countd));
    if (counto/2          lcd.setCursor(10, 1);
          lcd.print("DANGER");
          Serial.println("DANGER");
        }
        else {
          lcd.setCursor(10, 1);
          lcd.print("      ");
          Serial.println("Fine");
        }
  }
  delay(100);
})>
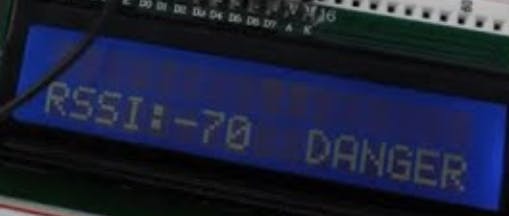
我们觉得我们需要解释背后的逻辑counto/2。请注意,76.91 是平均 rssi 值,这意味着一半的值超过,一半低于。这确保了不超过 5 个值低于 76.91;否则它会说“危险”。<>
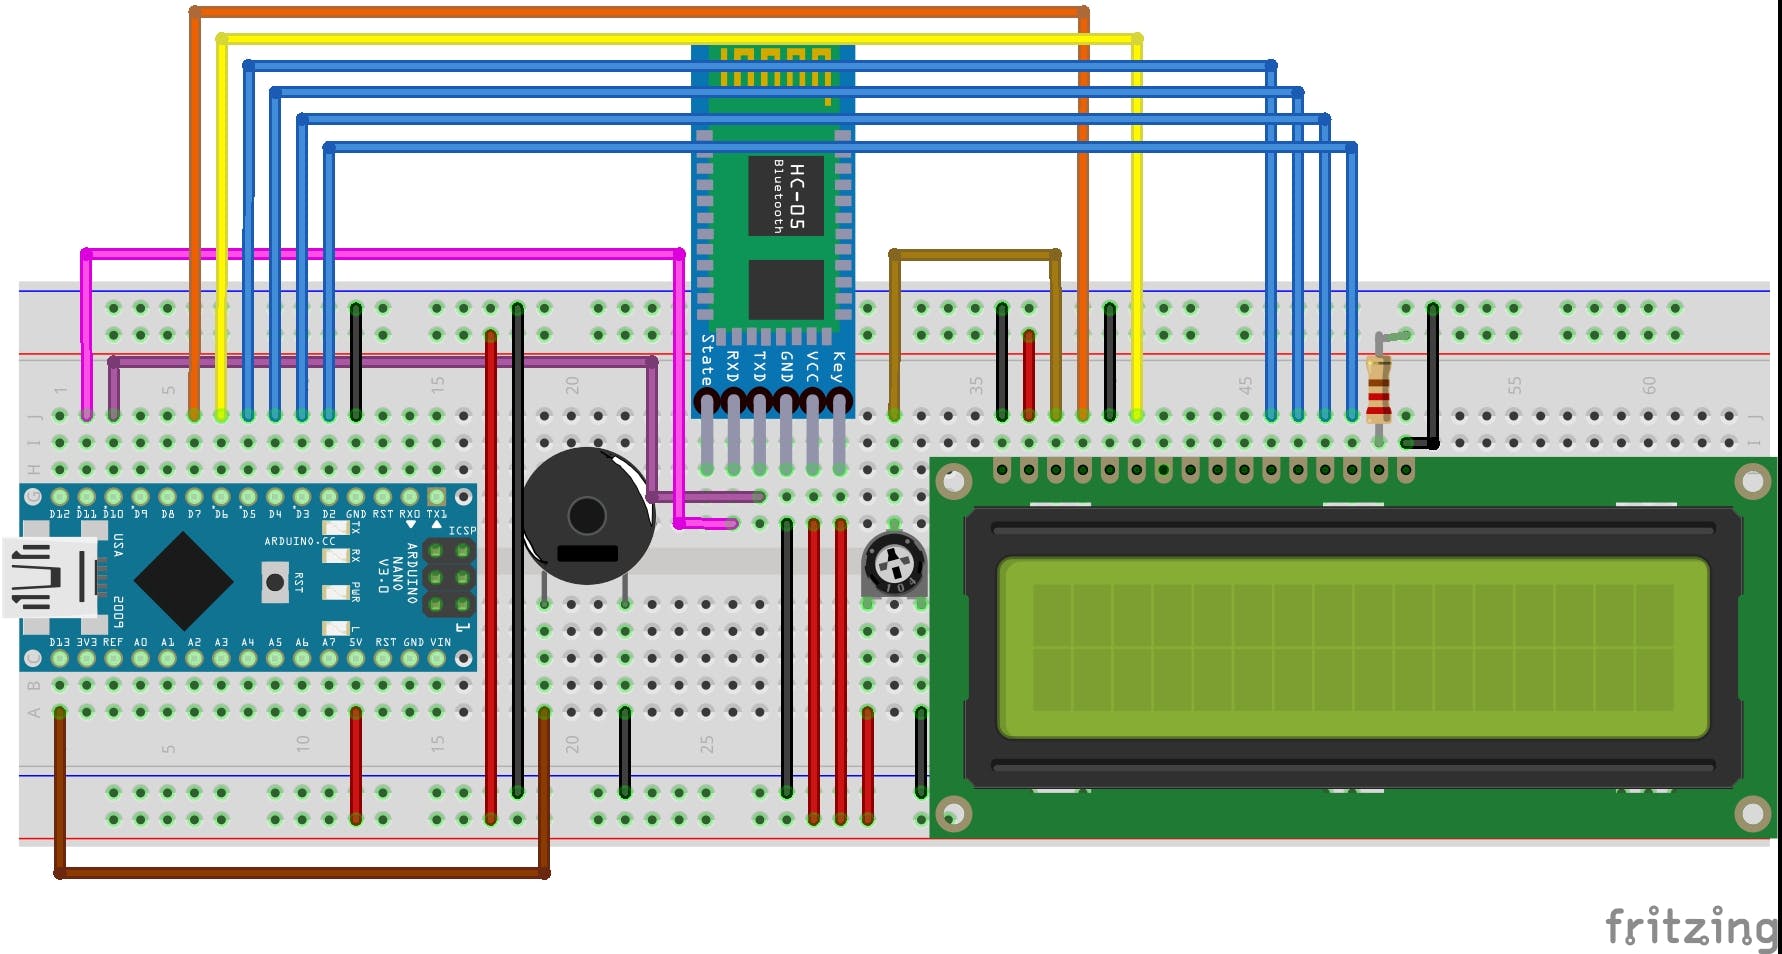
第 5 步:蜂鸣器
在过马路等场景中看设备是很危险的。如果距离小于 6 英尺,我们使用有源蜂鸣器发出警报。只有当任何一个人与另一个人的距离超过 6 英尺时才会关闭。将蜂鸣器连接到 D13,如图所示:
1 / 2
复制并粘贴代码,如图
#include

SoftwareSerial mySerial(10, 11); // RX, TX

#include

// initialize the library with the numbers of the interface pins
LiquidCrystal lcd(7, 6, 5, 4, 3, 2);
int buttonstate = 0;
void setup() {
  pinMode(13,OUTPUT);
  lcd.begin(16, 2);
  Serial.begin(9600);


  Serial.println("Enter AT commands:");

  mySerial.begin(38400);

}


unsigned int hexToDec(String hexString) {

  unsigned int decValue = 0;
  int nextInt;

  for (int i = 0; i < hexString.length(); i++) {

    nextInt = int(hexString.charAt(i));
    if (nextInt >= 48 && nextInt <= 57) nextInt = map(nextInt, 48, 57, 0, 9);
    if (nextInt >= 65 && nextInt <= 70) nextInt = map(nextInt, 65, 70, 10, 15);
    if (nextInt >= 97 && nextInt <= 102) nextInt = map(nextInt, 97, 102, 10, 15);
    nextInt = constrain(nextInt, 0, 15);

    decValue = (decValue * 16) + nextInt;
  }

  return decValue;
}


void loop()

{


  while (!mySerial.available()) {}
  while (mySerial.available()) {

    String x = String(mySerial.readString());
    int slashn = x.indexOf("\n");
    Serial.println(slashn);
    int nod = 0;
    int countf = 0;
    int counto = 0;
    int countd = 0;
    int xlen = x.length()/(slashn+1);
    if (x.endsWith("OK\r\n")) {
      x = x.substring(0, x.length() - 4);
      OK = 1;
    }
    for (int i = 0; i < xlen; i++) {
      if (i != 0) {
        x = x.substring(slashn+1);
      }
      slashn = x.indexOf("\n");
      String rssi = x.substring(slashn-5, slashn-1);
      int decNO = hexToDec(rssi);
      lcd.setCursor(0, 1);
      lcd.print("RSSI:" + String(decNO));
      Serial.println(x.substring(5,slashn-11));
      if (x.substring(5, slashn-11) == "20:2:2011FB") {
        countf++;

      }
      else {
        counto++;
        if (decNO > -76.91) {
          countd++;
        }


      }
      if (decNO > -76.91) {
        Serial.println("near");
      }
      else {
        Serial.println("far");
      }
      Serial.println(decNO);
    }


    Serial.println("Family: " + String(countf) + " Outsider: " + String(counto) + " Danger: " + String(countd));
    if (counto/2          lcd.setCursor(10, 1);
          lcd.print("DANGER");
          Serial.println("DANGER");
          digitalWrite(13,HIGH);
        }
        else {
          lcd.setCursor(10, 1);
          lcd.print("      ");
          Serial.println("Fine");
          digitalWrite(13,LOW);
        }
  }
  delay(100);
})>
运行代码时,如果距离小于 6 英尺,设备会发出嗡嗡声,超过 6 英尺时设备会正常运行。
第 6 步:设备独立性(无计算机)
如果在现实世界中实现,该设备必须在没有计算机的情况下运行并发送命令。
话虽如此,9V 电池必须提供必要的电压。
请注意,可能需要一点透明胶带将电池粘贴到面包板的背面。这使设备更易于握持。
1 / 2
。
- 自动社交距离执行器开源案例 0次下载
- 解析无线电伪码测目标距离系统的设计 0次下载
- 基于牛顿法的自适应高阶跑分距离推荐模型 10次下载
- 单片机C程序编译、执行过程资料下载 14次下载
- Visual C++和MFC创建的应用程序基础知识 0次下载
- 在Linux系统下执行MySQL的SQL文件程序免费下载 4次下载
- 单片机的程序在内存和FLASH中应该如何进行空间分配 3次下载
- 51单片机的程序执行流程是怎么样的 2次下载
- 51单片机的程序存储器和数据存储器的详细资料说明 2次下载
- 使用51单片机设计警报装置的程序免费下载 9次下载
- 如何使用MM7150-PICtail和Explorer 16开发板执行演示程序详细概述 6次下载
- ARM应用程序构架_顺序执行模板 6次下载
- 基于程序执行轨迹的SoC硬件加速模块提取方法 4次下载
- 新型智能阀门电动执行装置的硬件设计和实现 23次下载
- 15路远距离遥控报警装置电路图 14次下载
- 浅谈PLC程序执行的过程 266次阅读
- 执行的单片机程序怎么写? 1238次阅读
- 如何嵌入第三方可执行程序 3183次阅读
- 浅谈RAM 执行应用程序 2759次阅读
- PLC的用户程序执行过程 3630次阅读
- 单片机的主程序是如何执行的 9558次阅读
- 51单片机是如何执行程序运行的 7991次阅读
- 电热执行器是什么_电热执行器工作原理 1.7w次阅读
- 单片机执行编制程序的全过程解析 2023次阅读
- 单片机执行程序的全过程介绍 1.3w次阅读
- 浅析MCU的内存分配与代码执行 4311次阅读
- 一文看懂python程序的执行过程 1.7w次阅读
- ARM程序的执行过程详解 6924次阅读
- java程序的执行过程详解 1.7w次阅读
- mfc程序执行流程小结,MFC程序的执行顺序 9143次阅读

 上传资料赚积分
下载排行
本周
- 1山景DSP芯片AP8248A2数据手册
- 1.06 MB | 532次下载 | 免费
- 2RK3399完整板原理图(支持平板,盒子VR)
- 3.28 MB | 339次下载 | 免费
- 3TC358743XBG评估板参考手册
- 1.36 MB | 330次下载 | 免费
- 4DFM软件使用教程
- 0.84 MB | 295次下载 | 免费
- 5元宇宙深度解析—未来的未来-风口还是泡沫
- 6.40 MB | 227次下载 | 免费
- 6迪文DGUS开发指南
- 31.67 MB | 194次下载 | 免费
- 7元宇宙底层硬件系列报告
- 13.42 MB | 182次下载 | 免费
- 8FP5207XR-G1中文应用手册
- 1.09 MB | 178次下载 | 免费
本月
- 1OrCAD10.5下载OrCAD10.5中文版软件
- 0.00 MB | 234315次下载 | 免费
- 2555集成电路应用800例(新编版)
- 0.00 MB | 33566次下载 | 免费
- 3接口电路图大全
- 未知 | 30323次下载 | 免费
- 4开关电源设计实例指南
- 未知 | 21549次下载 | 免费
- 5电气工程师手册免费下载(新编第二版pdf电子书)
- 0.00 MB | 15349次下载 | 免费
- 6数字电路基础pdf(下载)
- 未知 | 13750次下载 | 免费
- 7电子制作实例集锦 下载
- 未知 | 8113次下载 | 免费
- 8《LED驱动电路设计》 温德尔著
- 0.00 MB | 6656次下载 | 免费
总榜
- 1matlab软件下载入口
- 未知 | 935054次下载 | 免费
- 2protel99se软件下载(可英文版转中文版)
- 78.1 MB | 537798次下载 | 免费
- 3MATLAB 7.1 下载 (含软件介绍)
- 未知 | 420027次下载 | 免费
- 4OrCAD10.5下载OrCAD10.5中文版软件
- 0.00 MB | 234315次下载 | 免费
- 5Altium DXP2002下载入口
- 未知 | 233046次下载 | 免费
- 6电路仿真软件multisim 10.0免费下载
- 340992 | 191187次下载 | 免费
- 7十天学会AVR单片机与C语言视频教程 下载
- 158M | 183279次下载 | 免费
- 8proe5.0野火版下载(中文版免费下载)
- 未知 | 138040次下载 | 免费


 工商网监
工商网监
评论