 电子发烧友App


 创作
创作 发文章
发文章 发帖
发帖  提问
提问  发资料
发资料 发视频
发视频资料介绍
描述
一、简介:-
欢迎大家来我的项目。首先,我想说我们生活在互联网世界中,开发和实践新想法比以前更容易。我们可以很容易地开发出任何可以为我们提供更好的生活水平,也可以帮助社会并给世界带来巨大影响的模型。
如今,许多行业和许多人都大量使用安全系统来获得更好的安全性。由于对高度稳定的安全系统的需求不断增加,许多公司准备投资这个市场以提高可靠性和可扩展性。在这里,我的项目是创建一个安全系统,该系统主要包含两个不同的模块,基于哪个系统工作:
- 图像识别
- 声音识别(文本和语音识别)
这两个模块将由 BOLT IoT 和 Arduino 设备控制,当两个模块都正确识别一个人时,它允许他们锁定或解锁任何设备。在这里,我正在开发一个可以在任何设备上实现的原型,即锁定或解锁桌面上的任何门或文件夹或任何用户或客户想要的任何东西。由于我们的安全系统包含锁定和解锁部分;对于解锁部分,我将使用一个 LED,当两个模块完美识别一个人时它会发光,这意味着系统已解锁,否则将保持关闭状态。并且为了显示锁定部分,当系统解锁时,即当LED发光时,系统再次识别人,如果所有模块都识别人,则系统将被锁定并且它可以用Led显示,即 它将被关闭。在这里,我们还将为用户创建一个 GUI,以决定他们是要锁定还是解锁系统。GUI 中有两个按钮供用户选择是否要解锁系统或锁定系统。可以用任何东西代替 LED,但代码和实现保持不变。此外,如果用户试图解锁一个已经打开的设备,那么系统将提示该设备已经解锁,并保持锁定机制。
在这里,很多人都会有一个问题,为什么我们需要再次识别锁定系统的人。因此,我这样做是为了提供一些额外的安全性,以便在实施该系统的任何设备上,用户都可以在整个过程中感到安全,并且可以相信没有人可以在未经他许可的情况下解锁或锁定任何设备。
似乎是一个令人兴奋的项目,对!所以让我们开始吧。
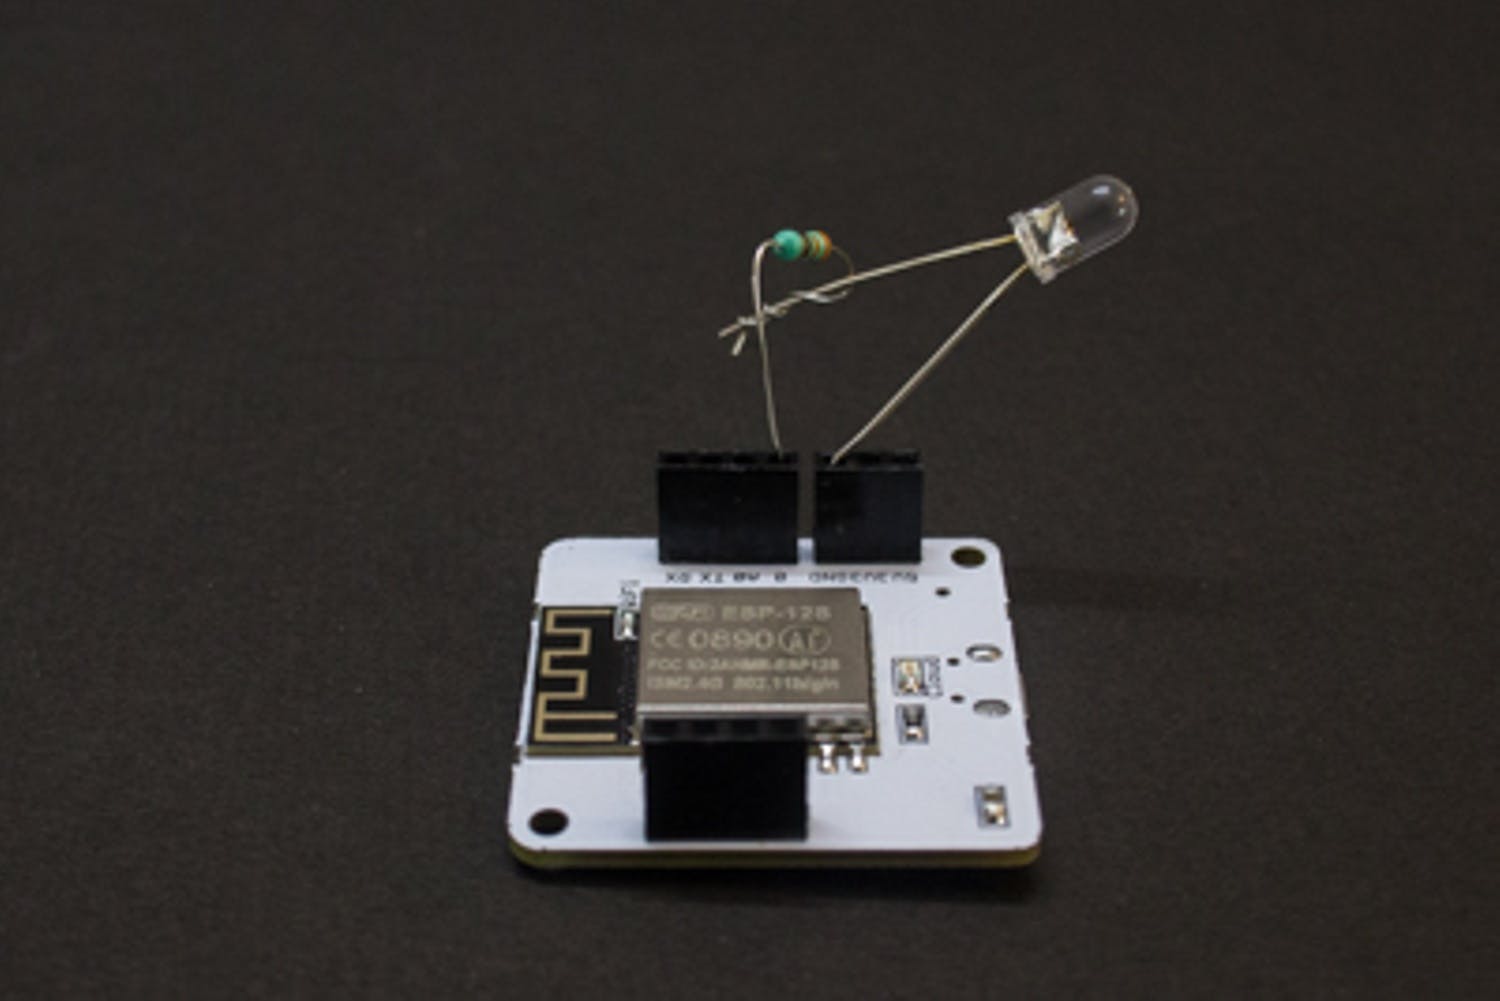
注意:-我目前没有伺服电机,所以我使用 LED 来证明打开和关闭的目的。
2. 基本软件设置:
2.1 窗口:
由于我们在 Windows 上执行所有操作,因此我们需要在继续之前对其进行设置。首先,我们应该在我们的系统上运行 python,如果没有,下载并在您的系统中安装 python。之后,我们需要安装 bolt iot 包来使用 pip 命令访问 windows 中的 bolt 设备。
pip install boltiot
完成此操作后,我们还需要安装其他包来运行我们的代码,即 dlib 包、人脸识别包、termcolor、matplotlib、opencv 和 sklearn 包。可以使用 pip 命令安装所有软件包,后跟安装和软件包名称。例如:
pip install dlib
用户还必须在您的系统中安装 pyqt 工具。这个 pyqt 工具支持 python,将用于为用户创建 GUI。
2.2 Bolt-IoT API 密钥
在这里,Bolt-IoT 用于管理所有任务,如果有任何入侵者,向用户或所有者发送短信。它也有自己的云平台。
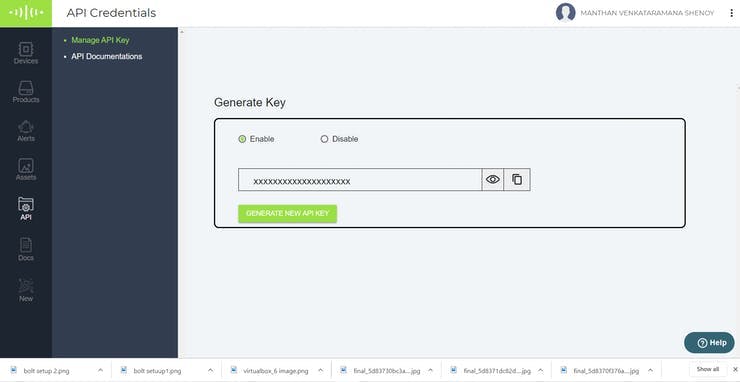
要获取 Bolt API 密钥,请单击菜单中的 API,您将找到您的 API 密钥。您还可以重新生成 API 密钥或复制生成的密钥并妥善保管以供日后使用。还要保存您将在主窗口中看到的唯一 Bolt id。这两个数据稍后可用于向用户发送短信或通过 Internet 访问您的 Bolt 设备。
2.3 暮光之城:
Twilio 用于从远程服务器向所有者发送短信。因此,当任何入侵者试图访问安全系统时,我们将使用此服务通知安全系统的所有者。我们可以利用 python 对设备进行编程,借助 Bolt 设备和 Twilio 帐户的 API 密钥向用户发送短信。您可以访问https://www.twilio.com/开设 Twilio 帐户
您可以使用帐户 SID 和帐户令牌等 Twilio 内容,通过仪表板上显示的手机号码通过 Internet 发送短信。

上图 - 2 代表 Twilio 仪表板,您可以从中获取通过 Internet 向所需人员发送短信所需的信息。
3. 开发软件:
由于我们的软件太大,我们将把它分解成不同的模块,逐步了解每个模块是如何构建的以及它们是如何工作的。
3.1 人脸识别模块:
在这里,对于人脸识别,我将使用 opencv、深度学习和 python。在这里,我们不是试图输出图像的单个标签,而是输出一个实值特征向量。对于我们正在创建的 dlib 面部识别模块,输出特征向量是 128-d,即用于量化面部的 128 个实数值的列表。使用三元组训练网络。所以在这里,我们需要大量的数据集,其中包含将被允许访问安全系统的人的图像。然后将使用 SVM 方法对这些数据集中的图像进行训练。我们将在项目的主要部分中使用这些经过训练的数据集来识别人脸。让我们看一个示例图像:
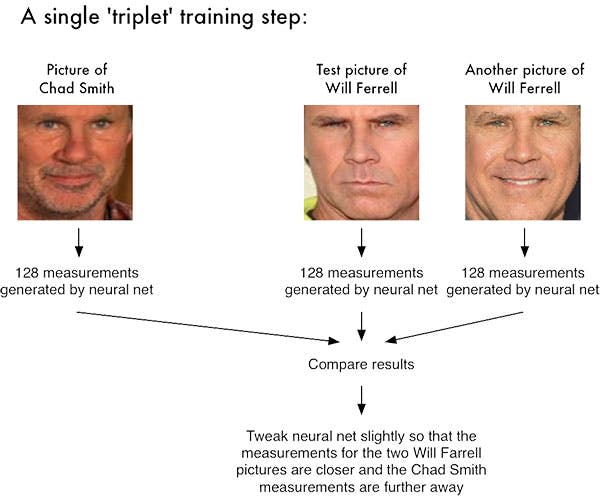
通过深度度量学习进行面部识别涉及“三元组训练步骤”。三元组由 3 个独特的人脸图像组成——3 个中的 2 个是同一个人。神经网络为 3 个人脸图像中的每一个生成一个 128 维向量。对于同一个人的两张人脸图像,我们通过距离度量调整神经网络权重以使向量更接近。
这里我们向网络提供三张图片:
- 其中两个图像是同一个人的示例面孔。
- 第三张图片是我们数据集中的一张随机人脸,与其他两张图片不是同一个人。
作为示例,让我们再次考虑上图 -3,其中我们提供了三张图像:一张是 Chad Smith,两张是 Will Ferrell。我们的网络对人脸进行量化,为每个人脸构建 128 维嵌入(量化)。从那里开始,一般的想法是我们将调整我们的神经网络的权重,以便两个 Will Ferrel 的 128 维测量值将彼此更接近并且远离 Chad Smith 的测量值。
我们的人脸识别模块基于 CNN(卷积神经网络)。
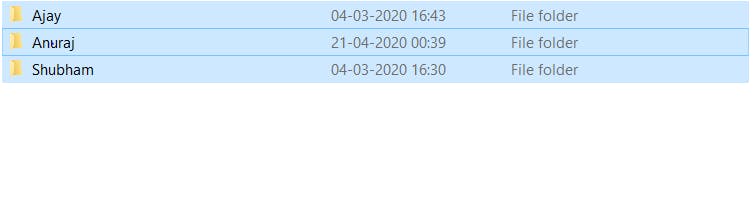
如上图所示,您可以看到我创建的包含三个文件夹的数据集。每个文件夹都包含将被训练的那些人的一些图像。

上图 - 5 显示了用于创建人脸识别系统的文件。encodes_faces python 文件包含用于训练数据集的代码。正确训练数据集后,它将创建一个encodings.pickle文件,其中包含每个人脸的人脸结构和关键值,用于验证实时人脸并提供授权访问等。每当我们想要识别新面孔以授予权限时,recognize_faces_image python 文件都会运行。它将创建新验证人脸的 128 维向量,并将其与经过训练的数据集文件匹配以授予权限。下面提供了训练数据集的完整代码。
# import the necessary packages
from imutils import paths
import face_recognition
import argparse
import pickle
import cv2
import os

# construct the argument parser and parse the arguments
ap = argparse.ArgumentParser()
ap.add_argument("-i", "--dataset", required=True,
	help="path to input directory of faces + images")
ap.add_argument("-e", "--encodings", required=True,
	help="path to serialized db of facial encodings")
ap.add_argument("-d", "--detection-method", type=str,,
	help="face detection model to use: either `hog` or `cnn`")
args = vars(ap.parse_args())

# grab the paths to the input images in our dataset
print("[INFO] quantifying faces...")
imagePaths = list(paths.list_images(args["dataset"]))

# initialize the list of known encodings and known names
knownEncodings = []
knownNames = []

# loop over the image paths
for (i, imagePath) in enumerate(imagePaths):
	# extract the person name from the image path
	print("[INFO] processing image {}/{}".format(i + 1,
		len(imagePaths)))
	name = imagePath.split(os.path.sep)[-2]

	# load the input image and convert it from RGB (OpenCV ordering)
	# to dlib ordering (RGB)
	image = cv2.imread(imagePath)
	rgb = cv2.cvtColor(image, cv2.COLOR_BGR2RGB)

	# detect the (x, y)-coordinates of the bounding boxes
	# corresponding to each face in the input image
	boxes = face_recognition.face_locations(rgb,
		model=args["detection_method"])

	# compute the facial embedding for the face
	encodings = face_recognition.face_encodings(rgb, boxes)

	# loop over the encodings
	for encoding in encodings:
		# add each encoding + name to our set of known names and
		# encodings
		knownEncodings.append(encoding)
		knownNames.append(name)

# dump the facial encodings + names to disk
print("[INFO] serializing encodings...")
data = {"encodings": knownEncodings, "names": knownNames}
f = open(args["encodings"], "wb")
f.write(pickle.dumps(data))
f.close()
一旦我们训练了我们的数据集,它将如上所述创建.pickle 文件。代码中给出的注释将指导我们出于什么目的使用了代码或语句的哪一部分。

上图 6 显示了训练图像的过程。这将需要很长时间,具体取决于您的数据集图像大小以及数据集中的图像总数。接下来,我们将运行识别人脸代码以在 python 中识别人脸。
# import the necessary packages
import face_recognition
import argparse
import pickle
import cv2

# construct the argument parser and parse the arguments
ap = argparse.ArgumentParser()
ap.add_argument("-e", "--encodings", required=True,
	help="path to serialized db of facial encodings")
ap.add_argument("-i", "--image", required=True,
	help="path to input image")
ap.add_argument("-d", "--detection-method", type=str,,
	help="face detection model to use: either `hog` or `cnn`")
args = vars(ap.parse_args())

# load the known faces and embeddings
print("[INFO] loading encodings...")
data = pickle.loads(open(args["encodings"], "rb").read())

# load the input image and convert it from BGR to RGB
image = cv2.imread(args["image"])
rgb = cv2.cvtColor(image, cv2.COLOR_BGR2RGB)

# detect the (x, y)-coordinates of the bounding boxes corresponding
# to each face in the input image, then compute the facial embeddings
# for each face
print("[INFO] recognizing faces...")
boxes = face_recognition.face_locations(rgb,
	model=args["detection_method"])
encodings = face_recognition.face_encodings(rgb, boxes)

# initialize the list of names for each face detected
names = []

# loop over the facial embeddings
for encoding in encodings:
	# attempt to match each face in the input image to our known
	# encodings
	matches = face_recognition.compare_faces(data["encodings"],
		encoding)
	name = "Unknown"

	# check to see if we have found a match
	if True in matches:
		# find the indexes of all matched faces then initialize a
		# dictionary to count the total number of times each face
		# was matched
		matchedIdxs = [i for (i, b) in enumerate(matches) if b]
		counts = {}
		# loop over the matched indexes and maintain a count for
		# each recognized face face
		for i in matchedIdxs:
			name = data["names"][i]
			counts[name] = counts.get(name, 0) + 1
			print (counts)
		key_max = max(counts.keys(), key=(lambda k: counts[k]))
		print (counts[key_max])

		# determine the recognized face with the largest number of
		# votes (note: in the event of an unlikely tie Python will
		# select first entry in the dictionary)

		a = counts[key_max]-8 #adjust this number 8 as per ur dataset
		if (a==0):
			name = max(counts, key=counts.get)
		else:
			name = "Unknown"

	# update the list of names
	names.append(name)

# loop over the recognized faces
for ((top, right, bottom, left), name) in zip(boxes, names):
	# draw the predicted face name on the image
	cv2.rectangle(image, (left, top), (right, bottom), (0, 255, 0), 2)
	y = top - 15 if top - 15 > 15 else top + 15
	cv2.putText(image, name, (left, y), cv2.FONT_HERSHEY_SIMPLEX,
		0.75, (0, 255, 0), 2)

# show the output image
cv2.imshow("Image", image)
cv2.waitKey(0)
训练数据后,我们将仅在项目中使用 .pickle 文件和识别人脸 python 文件以供进一步使用。代码中给出的注释将帮助我们更好地理解代码。
3.2 音频识别:
在这里,在音频识别方面,我们遵循了与 Shazam 大致相同的概念。在这里,我们还将存储一些我们想要验证音频的用户的 mp3。然后,我们将训练这些 mp3 文件来存储 mp3 文件的一些指纹,例如音高、音调等。在这里,我们按照傅里叶变换算法来完成任务。一旦我们训练并记录了一些数据集的指纹以用于匹配目的,我们将运行我们的主要代码来识别来自麦克风的音频并将其与我们训练的数据集进行匹配,如果匹配,我们将提供授权访问。
首先,我们将创建并存储一些需要匹配语音的用户的 mp3 文件。
然后我们将使用下面提供的代码从每个音频文件中识别或收集一些重要的指纹。
import os
from termcolor import colored
import libs.fingerprint as fingerprint
from libs.config import get_config
from libs.db_sqlite import SqliteDatabase
from libs.reader_file import FileReader

if __name__ == '__main__':
    config = get_config()
    db = SqliteDatabase()
    path = "mp3/"
    # fingerprint all files in a directory
    for filename in os.listdir(path):
        if filename.endswith(".mp3"):
            reader = FileReader(path + filename)
            audio = reader.parse_audio()

            song = db.get_song_by_filehash(audio['file_hash'])
            song_id = db.add_song(filename, audio['file_hash'])

            msg = ' * %s %s: %s' % (
                colored('id=%s', 'white', attrs=['dark']),  # id
                colored('channels=%d', 'white', attrs=['dark']),  # channels
                colored('%s', 'white', attrs=['bold'])  # filename
            )
            print(msg % (song_id, len(audio['channels']), filename))

            if song:
                hash_count = db.get_song_hashes_count(song_id)

                if hash_count > 0:
                    msg = '   already exists (%d hashes), skip' % hash_count
                    print(colored(msg, 'red'))

                    continue

            print(colored('   new song, going to analyze..', 'green'))

            hashes = set()
            channel_amount = len(audio['channels'])

            for channeln, channel in enumerate(audio['channels']):
                msg = '   fingerprinting channel %d/%d'
                print(colored(msg, attrs=['dark']) % (channeln + 1, channel_amount))

                channel_hashes = fingerprint.fingerprint(channel, Fs=audio['Fs'],
                                                         plots=config['fingerprint.show_plots'])
                channel_hashes = set(channel_hashes)

                msg = '   finished channel %d/%d, got %d hashes'
                print(colored(msg, attrs=['dark']) % (channeln + 1, channel_amount, len(channel_hashes)))

                hashes |= channel_hashes

            msg = '   finished fingerprinting, got %d unique hashes'

            values = []
            for hash, offset in hashes:
                values.append((song_id, hash, offset))

            msg = '   storing %d hashes in db' % len(values)
            print(colored(msg, 'green'))

            db.store_fingerprints(values)

    print('end')
一旦收集了所有文件的指纹,它将创建一个config.json文件,其中包含所有音频的所有指纹。
注意:- 注释有助于更好地理解代码的不同部分。
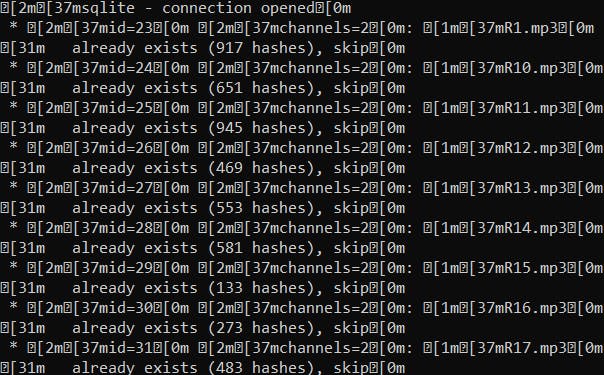
上图 7 显示了从我们数据集中存储的每个音频中收集指纹的片段。接下来,我们将运行另一个 python 代码来识别通过麦克风输入的实时声音。下面的代码片段说明了用于该目的的代码。
import argparse
import sys
from argparse import RawTextHelpFormatter
from itertools import zip_longest as izip_longest
from termcolor import colored
import libs.fingerprint as fingerprint
from libs.config import get_config
from libs.db_sqlite import SqliteDatabase
from libs.reader_microphone import MicrophoneReader
from libs.visualiser_console import VisualiserConsole as visual_peak
from libs.visualiser_plot import VisualiserPlot as visual_plot

def align_matches(matches):
    diff_counter = {}
    largest = 0
    largest_count = 0
    song_id = -1

    for tup in matches:
        sid, diff = tup

        if diff not in diff_counter:
            diff_counter[diff] = {}

        if sid not in diff_counter[diff]:
            diff_counter[diff][sid] = 0

        diff_counter[diff][sid] += 1

        if diff_counter[diff][sid] > largest_count:
            largest = diff
            largest_count = diff_counter[diff][sid]
            song_id = sid

    songM = db.get_song_by_id(song_id)

    nseconds = round(float(largest) / fingerprint.DEFAULT_FS *
                     fingerprint.DEFAULT_WINDOW_SIZE *
                     fingerprint.DEFAULT_OVERLAP_RATIO, 5)

    return {
        "SONG_ID": song_id,
        "SONG_NAME": songM[1],
        "CONFIDENCE": largest_count,
        "OFFSET": int(largest),
        "OFFSET_SECS": nseconds
    }


def grouper(iterable, n, fillvalue=None):
    args = [iter(iterable)] * n
    return (filter(None, values)
            for values in izip_longest(fillvalue=fillvalue, *args))


def find_matches(samples, Fs=fingerprint.DEFAULT_FS):
    hashes = fingerprint.fingerprint(samples, Fs=Fs)
    return return_matches(hashes)


def return_matches(hashes):
    mapper = {}
    for hash, offset in hashes:
        mapper[hash.upper()] = offset
    values = mapper.keys()

    for split_values in map(list, grouper(values, 1000)):
        # @todo move to db related files
        query = """
    SELECT upper(hash), song_fk, offset
    FROM fingerprints
    WHERE upper(hash) IN (%s)
  """
        query = query % ', '.join('?' * len(split_values))

        x = db.executeAll(query, split_values)
        matches_found = len(x)
        print(x)

        if matches_found > 0:
            msg = '   ** found %d hash matches (step %d/%d)'
            print(colored(msg, 'green') % (
                matches_found,
                len(split_values),
                len(values)
            ))
        else:
            msg = '   ** not matches found (step %d/%d)'
            print(colored(msg, 'red') % (len(split_values), len(values)))

        for hash_code, sid, offset in x:
            # (sid, db_offset - song_sampled_offset)
            print(sid)
            print(sum(list(offset)))
            print(offset)
            print(mapper[hash_code])
            print(-(list(offset)-mapper[hash_code]))
            yield (sid, sum(list(offset)) - mapper[hash_code])


if __name__ == '__main__':
    config = get_config()

    db = SqliteDatabase()

    parser = argparse.ArgumentParser(formatter_class=RawTextHelpFormatter)
    parser.add_argument('-s', '--seconds', nargs='?')
    args = parser.parse_args()

    if not args.seconds:
        parser.print_help()
        sys.exit(0)

    seconds = int(args.seconds)

    chunksize = 2 ** 12  # 4096
    channels = 2  # int(config['channels']) # 1=mono, 2=stereo

    record_forever = False
    visualise_console = bool(config['mic.visualise_console'])
    visualise_plot = bool(config['mic.visualise_plot'])

    reader = MicrophoneReader(None)

    reader.start_recording(seconds=seconds,
                           chunksize=chunksize,
                           channels=channels)

    msg = ' * started recording..'
    print(colored(msg, attrs=['dark']))

    while True:
        bufferSize = int(reader.rate / reader.chunksize * seconds)

        for i in range(0, bufferSize):
            nums = reader.process_recording()

            if visualise_console:
                msg = colored('   %05d', attrs=['dark']) + colored(' %s', 'green')
                print(msg % visual_peak.calc(nums))
            else:
                msg = '   processing %d of %d..' % (i, bufferSize)
                print(colored(msg, attrs=['dark']))

        if not record_forever:
            break

    if visualise_plot:
        data = reader.get_recorded_data()[0]
        visual_plot.show(data)

    reader.stop_recording()

    msg = ' * recording has been stopped'
    print(colored(msg, attrs=['dark']))

    data = reader.get_recorded_data()

    msg = ' * recorded %d samples'
    print(colored(msg, attrs=['dark']) % len(data[0]))

    # reader.save_recorded('test.wav')

    Fs = fingerprint.DEFAULT_FS
    channel_amount = len(data)

    result = set()
    matches = []

    for channeln, channel in enumerate(data):
        # TODO: Remove prints or change them into optional logging.
        msg = '   fingerprinting channel %d/%d'
        print(colored(msg, attrs=['dark']) % (channeln + 1, channel_amount))

        matches.extend(find_matches(channel))

        msg = '   finished channel %d/%d, got %d hashes'
        print(colored(msg, attrs=['dark']) % (channeln + 1,
                                              channel_amount, len(matches)))

    total_matches_found = len(matches)
    print(matches)
    print('')

    if total_matches_found > 0:
        msg = ' ** totally found %d hash matches'
        print(colored(msg, 'green') % total_matches_found)

        song = align_matches(matches)

        msg = ' => song: %s (id=%d)\n'
        msg += '    offset: %d (%d secs)\n'
        msg += '    confidence: %d'

        print(colored(msg, 'green') % (song['SONG_NAME'], song['SONG_ID'],
                                       song['OFFSET'], song['OFFSET_SECS'],
                                       song['CONFIDENCE']))
    else:
        msg = ' ** not matches found at all'
        print(colored(msg, 'red'))
一旦我们的conf.json文件被构建,我们将使用它并从麦克风文件中识别音频作为我们的主要目的。
所以完全用于音频和图像识别,我们将只使用四个 file.pickle 包含(128 -d 矢量)图像信息的文件,.json 文件(包含音频指纹),识别图像和音频 python 文件。
3.3 创建用户界面用户界面起着重要的作用,也有更好的外观和更好的理解。因此,为了获得更好的界面,我们将借助 python 中的 pyqt 工具创建一个用户界面,这将帮助我们识别图像和声音。从某种意义上说,我们可以说这个用户界面处理图像和声音识别文件。当我们的系统运行时,它会调用这个用户界面,首先询问用户是否要锁定或解锁设备。根据用户的选择,执行操作。但是如果系统已经被锁定并且如果用户再次按下锁定按钮,那么它将显示设备或系统已经锁定的提示,并且相同的情况下也适用于解锁部分。但是如果系统没有被锁定,而用户想要锁定系统,那么它会先捕获用户图像并进行验证。如果匹配,则通过麦克风识别用户声音,然后判断用户是否被授权。如果模块上的任何一个发生故障,它只会通知螺栓模块向所有者发送警报短信,指示入侵者正在尝试访问安全系统。
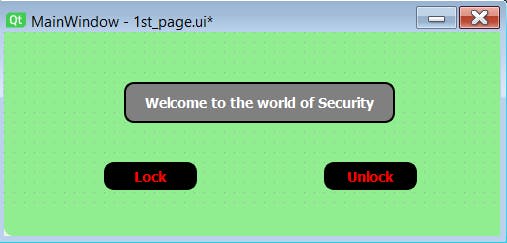
上图 8 显示了当安全系统通过螺栓设备 python 文件运行时将调用的 UI 第一页。系统会提示,询问用户是否要锁定或解锁设备。根据用户的选择,将执行操作并且 UI 将被重定向到下一页是否会处理进一步的处理。

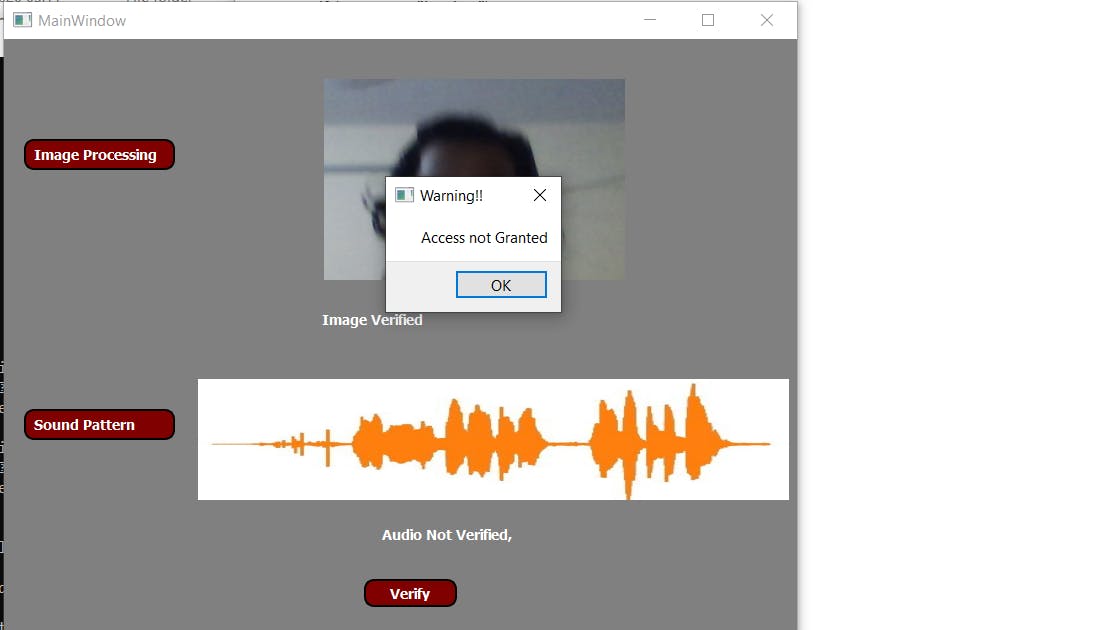
上图 9 显示了为处理图像和音频识别而创建的 UI。当bolt iot调用这个python文件时,它将在右侧空白处显示用户实时图像,在底部空白处显示用户实时音频频谱。当这两个验证正确并且如果访问被授予时,它将向螺栓设备发送确认以进行进一步处理,或者发送警报以向安全系统的所有者发送警报短信。
Note:- The code for UI and rest all other code along with custom built-in libraries will be provided at the end of the project section.代码中给出的注释可以更好地理解不同的部分。
3.4 配置文件:
现在,由于我们所有的模块都准备好了,我们还将准备好我们的配置文件,以便通过互联网调用 Bolt-IoT 设备,并在检测到任何入侵者时发送短信。因此,为此我们需要创建一个包含以下信息的 python 文件:
SID = "Your TWILIO SSID"
AUTH_TOKEN = "Your Twilio Authentication Token"
FROM_NUMBER = "Your TWILIO Generated Number"
TO_NUMBER = "Number to which you want to send sms with +91"
API_KEY = "Your Bolt Cloud API"
Device_ID = "Your Bolt Device ID"
最后,我们所有的模块都是单独构建的,现在我们需要将它们集成在一起使用。我们现在将为 BOLT_IoT 设备创建一个单独的 python 文件,所有这些模块将在其中集成并一一调用以达到预期目的。
4.集成所有模块:
现在,我们将开始将所有模块集成在一起。我们现在将创建一个主 python 文件(例如:-bolt.py),它将控制所有操作。这个 python 文件将导入上面创建的配置文件,并在 python 的 OS 模块的帮助下,它将调用第一个 UI 页面。这个 UI 页面将通过一个一个调用面部和音频模块来处理进一步的处理并识别这个人。如果识别成功完成,则 UI 页面将控制权传回主 python 文件 (bolt.py),指示识别成功并要求螺栓模块成功锁定或解锁系统。这可以通过打开或关闭 Led 来显示,即当从 UI 页面接收到肯定控制时,我们将根据用户从第一个 UI 页面中选择的选择向螺栓模块发送信号,使特定引脚为高电平或低电平,即是锁定还是解锁,并在那里放置一个发光或关闭的 LED。人们可以更换这个 LED,也可以将伺服电机放在那个螺栓 IoT 引脚或任何其他东西以显示代码的物理工作,因为里面的一切都保持不变。
假设,如果模块无法识别该人,即如果识别失败,则 UI 页面会将负面控制发送回主 python 文件(bolt.py)。一旦主 python 文件从 UI 页面接收到负面控制,它将请求 Twilio 向用户发送一条警报短信,提醒他们有入侵者,最后蜂鸣器会发出声音通知附近的人。
import os
import conf,json,time
from boltiot import Sms, Bolt
mybolt = Bolt(conf.API_Key, conf.Device_ID)
sms = Sms(conf.SID,conf.AUTH_Token,conf.TO_Number,conf.FROM_Number)
os.system('python 1st_page.py')
f = open("del.txt", "r")
res = []
for x in f:
	res.append(x)
f.close()
if int(res[0])==0:
	print("Unlocking device")
	mybolt.digitalWrite('0','HIGH')
	os.remove("del.txt")
elif int(res[0])==1:
	print("Locking device")
	mybolt.digitalWrite('0','LOW')
	os.remove("del.txt")
elif int(res[0])==2:
	print("Making request to Twilio to send an sms")
	response = sms.send_sms("Intruder detected, Someone trying to access security system")
	print("Response received from twilio = " + str(response))
	print("Status of sms = " +str(response.status))
	os.remove("del.txt")
上面的代码演示了主代码文件 (bolt.py),它充当驱动程序类并完成上述必要的工作。
简单的电路图
上图 - 10 显示了电路图。由于我们所有的工作都依赖于代码,因此电路设置很小。再次提及,人们还可以设置任何设备或任何其他东西来代替 led,当安全系统为特定用户授予访问权限时,它们将起作用。
注意:-我们的bolt模块必须联网,我们只需要运行我们的驱动python文件即可执行,即bolt.py和rest文件将在内部一一调用。所有文件也应该在同一目录中。
5. 示范
正如上面已经从理论上解释了代码是如何工作的,现在让我们看看它是否实际发生。下面的结果截图展示了实现所有模块的项目的完整工作,并显示了项目是否按上述方式工作。现在为了更好地理解,让我们也将我们的演示分成不同的部分。
We have also talked about the buzzer which will make sound during intruder detection. Bu due to some problem my buzzer destroyed so I have not added it in the circuit. One can add it to the circuit with a small changes in the bolt.py file.
- 第 1 部分 - 如果授予访问权限,则演示锁定或解锁系统
Note :- We can place anything instead of LED. Suppose we connect the door control with the BOLT IOT then when the system identifies the user it performs locking or unlocking of door based on his choice selected on the first page.
Due to lack of equipment's I just used an LED to demonstrate the working.
- 第 2 部分 - 演示当任何模块无法识别人员时会发生什么
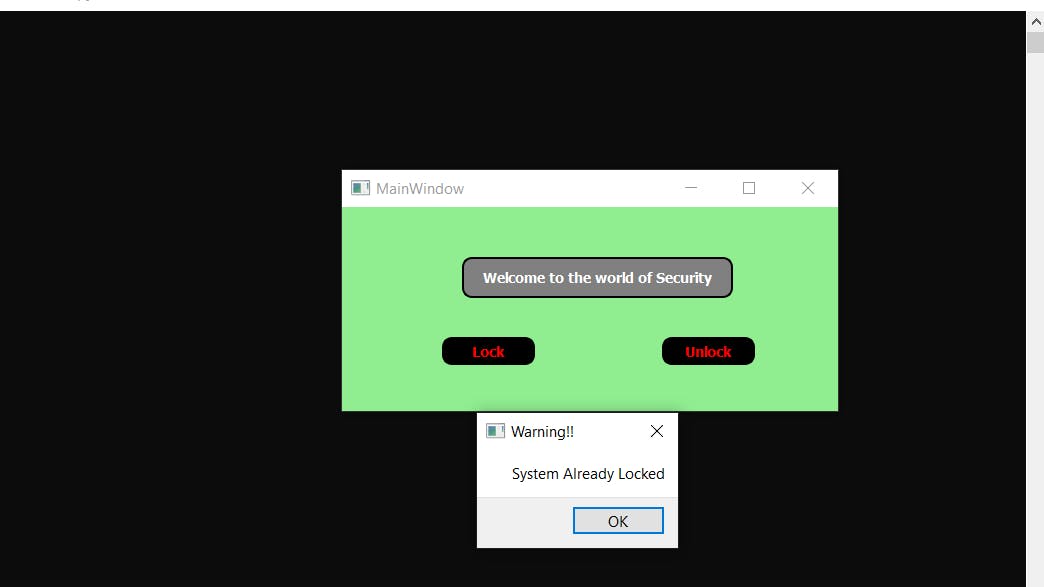
- 第 3 部分 - 演示当用户尝试锁定已锁定的系统或解锁已打开的系统时会发生什么。
Note:- All the codes are provided while explanation. Remaining two GUI codes will be provided at the end of the sections.
5. 结论
该项目演示了使用图像和声音处理的安全系统。人们还可以将生物识别传感器添加到给定的项目中,以使其更加安全。为了保持项目简短,我删除了生物识别部分。一旦我们添加了生物识别传感器,我们就可以实现更高的安全性,包括图像、声音和指纹,入侵者将很难绕过系统。
- 基于远程家庭安全系统的设计 0次下载
- 储物柜安全系统的构建 0次下载
- Lifi安全系统开源设计 0次下载
- 基于Arduino的安全系统 0次下载
- Arduino安全系统 0次下载
- 基于蔡氏电路的通信安全系统设计与实现 13次下载
- 家用火灾安全系统规则标准下载 13次下载
- 嵌入式安全系统产品指南 8次下载
- 车辆电控主动安全系统 0次下载
- 网络信息安全系统的测试方法 23次下载
- TMS320C6201在汽车智能主动安全系统中的应用 62次下载
- 可编程安全系统、安全总线系统 43次下载
- 基于MINIGUI的楼宇安全系统的控制界面开发 24次下载
- 无线多功能家庭安全系统 43次下载
- 仪表型安全系统功能安全评估的应用研究 13次下载
- 让机器控制既“安全”又“高生产力”的智能传感系统 144次阅读
- 助力采用MCU的自主系统实现自主安全性 289次阅读
- DIY一个电子卡锁安全系统 1690次阅读
- 分享一个不错的安全系统报警电路图 2510次阅读
- 如何利用MFRC522制作RFID读卡安全系统 2557次阅读
- 汽车安全气囊的技术特点及应用开发设计 4933次阅读
- 基于SAFERTOS功能安全系统的隔离方案 2156次阅读
- 设计一个家庭安全控制系统的详细资料概述 5788次阅读
- 互联汽车的安全系统与开放应用的关键 479次阅读
- Bolt EV的系统整合情况与Tesla Model3对比 5538次阅读
- 胎压监测系统(TPMS) 已成为继ABS、安全气囊之后的第三大汽车安全系统 4666次阅读
- Hybrid油电混合车的动力、低耗能、主被动安全系统解析 5560次阅读
- 意法半导体安全系统与底盘解决方案 1064次阅读
- GIS煤矿安全实时监测系统设计 1950次阅读
- 汽车安全系统技术架构分析 991次阅读

 上传资料赚积分
下载排行
本周
- 1山景DSP芯片AP8248A2数据手册
- 1.06 MB | 532次下载 | 免费
- 2RK3399完整板原理图(支持平板,盒子VR)
- 3.28 MB | 339次下载 | 免费
- 3TC358743XBG评估板参考手册
- 1.36 MB | 330次下载 | 免费
- 4DFM软件使用教程
- 0.84 MB | 295次下载 | 免费
- 5元宇宙深度解析—未来的未来-风口还是泡沫
- 6.40 MB | 227次下载 | 免费
- 6迪文DGUS开发指南
- 31.67 MB | 194次下载 | 免费
- 7元宇宙底层硬件系列报告
- 13.42 MB | 182次下载 | 免费
- 8FP5207XR-G1中文应用手册
- 1.09 MB | 178次下载 | 免费
本月
- 1OrCAD10.5下载OrCAD10.5中文版软件
- 0.00 MB | 234315次下载 | 免费
- 2555集成电路应用800例(新编版)
- 0.00 MB | 33566次下载 | 免费
- 3接口电路图大全
- 未知 | 30323次下载 | 免费
- 4开关电源设计实例指南
- 未知 | 21549次下载 | 免费
- 5电气工程师手册免费下载(新编第二版pdf电子书)
- 0.00 MB | 15349次下载 | 免费
- 6数字电路基础pdf(下载)
- 未知 | 13750次下载 | 免费
- 7电子制作实例集锦 下载
- 未知 | 8113次下载 | 免费
- 8《LED驱动电路设计》 温德尔著
- 0.00 MB | 6656次下载 | 免费
总榜
- 1matlab软件下载入口
- 未知 | 935054次下载 | 免费
- 2protel99se软件下载(可英文版转中文版)
- 78.1 MB | 537798次下载 | 免费
- 3MATLAB 7.1 下载 (含软件介绍)
- 未知 | 420027次下载 | 免费
- 4OrCAD10.5下载OrCAD10.5中文版软件
- 0.00 MB | 234315次下载 | 免费
- 5Altium DXP2002下载入口
- 未知 | 233046次下载 | 免费
- 6电路仿真软件multisim 10.0免费下载
- 340992 | 191187次下载 | 免费
- 7十天学会AVR单片机与C语言视频教程 下载
- 158M | 183279次下载 | 免费
- 8proe5.0野火版下载(中文版免费下载)
- 未知 | 138040次下载 | 免费


 工商网监
工商网监
评论