 电子发烧友App


 创作
创作 发文章
发文章 发帖
发帖  提问
提问  发资料
发资料 发视频
发视频资料介绍
描述
利用电磁的力量在这个万圣节与灵魂交谈,使用 FPGA 驱动的占卜板,运行网络服务器,允许用户激活板子移动。
在今年万圣节季节开始时播放了我最喜欢的恐怖电影和播客之后,我被 Ouija 板的想法所困扰。我想要一种免提使用的方法,这最初让我想到了使用具有无线功能的 FPGA,运行网络服务器供用户连接。这与在正确时间激活的电磁铁配对以移动板,将允许连接到与 FPGA 相同的 Wi-Fi 网络的用户与网页接口以控制板的运动。
基于 Zynq 的MiniZed非常适合我作为该项目使用的理想 FPGA 板,因为它结构紧凑,内置 Murata“Type 1DX”无线模块,支持 802.11b/g/n Wi-Fi 和蓝牙 4.1,并可通过其 USB 端口供电。它还有一个 8GB eMMC 内存芯片,可以通过 Wi-Fi 连接重新编程,所以我觉得它是一个理想的选择,适合留在你可能不想经常访问的封闭空间。这是该项目的确切用例,其中 FPGA 和相关电路将被封装在本质上是游戏板形状的盒子中。
为了概述所有内容,该项目有四个主要步骤:
- MiniZed 上的 FPGA 设计(网络服务器和 GPIO 驱动程序脚本)
- 游戏板盒的构造与顶盖上的占卜板设计。
- 游戏板箱内的电磁铁和机械部件的电路布局。
- 根据网页上的用户输入,更新 GPIO 驱动程序脚本以及何时打开电磁铁和电机。
FPGA设计
我将使用从 Avnet BSP 为 Vivado/Vitis/PetaLinux 版本 2019.2 创建的 PetaLinux 项目开始该项目的 FPGA 设计部分,然后修改为添加 Arduino 标头 GPIO. 但是,只有 128MB 的 eMMC 被分区用于 initramfs 根文件系统,作为 MiniZed 开箱即用的嵌入式 Linux 映像的默认配置。除了存储所有项目文件之外,这还不足以安装该项目所需的所有 Python 包。对 initramfs 根文件系统的任何更改在电源循环之间也不是持久的。因此,需要重新配置 PetaLinux 项目以从存储在第二个分区中的 ext4 文件系统引导,该分区可以访问 eMMC 芯片的其余 8GB 内存。这也意味着 MiniZed 上的 eMMC 需要重新分区以具有格式化为 FAT 的引导分区和格式化为 ext4 的根文件系统分区。
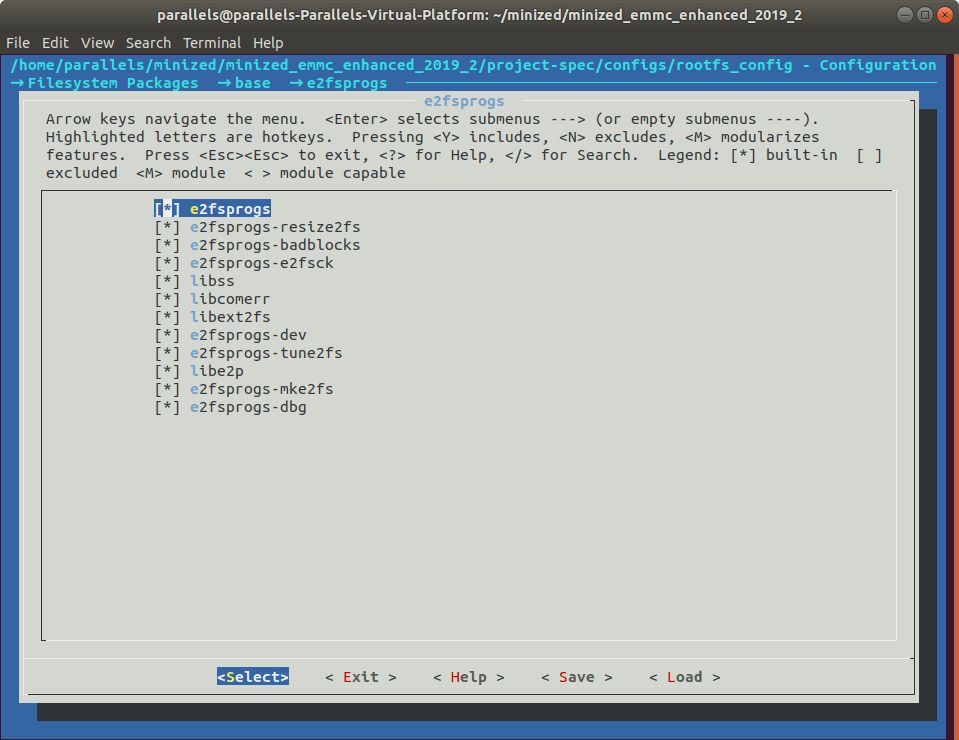
在重新分区和重新格式化 eMMC 之前,我们需要在 initramfs 中运行的当前嵌入式 Linux 版本中添加一些库文件以格式化 eMMC,特别是在 e2fsprogs 实用程序集中用于格式化 ext4 中的分区的库。我尝试添加这些文件系统包并仅从 QSPI 闪存映像生成一个新启动,但它使内核太大而无法放入 MiniZed 的默认分区,所以我使用了这个 hack 解决方法:
- 在 rootfs 中启用 e2fsprogs 构建项目以获得所需的 ext4 文件系统格式化文件。
- 将 rootfs.tar.gz 精确到我计算机上的临时位置。
- 将所需的库文件从 /sbin 和 /lib 复制到闪存驱动器以传输到 MiniZed。
首先,将目录更改为 Petalinux 项目并打开根文件系统配置编辑器:
cd ./minized/minized_emmc_enhanced_2019_2
petalinux-config -c rootfs
导航到 Filesystem Packages > base > e2fsprogs 并启用所有包选项:
构建 PetaLinux 项目:
petalinux-build
构建完成后,在您的 PC 上创建一个临时目录以精确根文件系统,以便您可以将所需的 sbin 和 lib 文件复制到闪存驱动器(获取所有库依赖项以避免 Invalid ELF Header 消息)。
mkdir -p <project path>/image/linux/tmp_rootfs
tar -xvf /im age/linux/rootfs.tar.gz
cp <project path>/image/linux/tmp_rootfs/lib/libcom_err.so /dev/sda1
cp /im age/linux/tmp_rootfs/lib/libcom_err.so.2 /dev/sda1
cp <project path>/image/linux/tmp_rootfs/lib/libcom_err.so.2.1 /dev/sda1
cp /im age/linux/tmp_rootfs/lib/libe2p.so /dev/sda1
cp <project path>/image/linux/tmp_rootfs/lib/libe2p.so.2 /dev/sda1
cp /im age/linux/tmp_rootfs/lib/libe2p.so.2.3 /dev/sda1
cp <project path>/image/linux/tmp_rootfs/lib/libext2fs.so /dev/sda1
cp /im age/linux/tmp_rootfs/lib/libext2fs.so.2 /dev/sda1
cp <project path>/image/linux/tmp_rootfs/lib/libext2fs.so.2.4 /dev/sda1
cp /im age/linux/tmp_rootfs/sbin/mke2fs /dev/sda1
cp <project path>/image/linux/tmp_rootfs/sbin/mkfs.ext4 /dev/sda1
将第二根 USB 电缆连接到 Minized 上的 AUX 电源端口,将 USB 闪存驱动器插入其中,然后将库 (lib) 文件复制到 /lib 目录,并将 make 文件系统文件 (mkfs) 复制到 /sbin 目录。
root@MiniZed:~# cp /dev/sda1/libcom_err.so /lib
root@MiniZed:~# cp /dev/sda1/libcom_err.so.2 /lib
root@MiniZed:~# cp /dev/sda1/libcom_err.so.2.1 /lib
root@MiniZed:~# cp /dev/sda1/libe2p.so /lib
root@MiniZed:~# cp /dev/sda1/libe2p.so.2 /lib
root@MiniZed:~# cp /dev/sda1/libe2p.so.2.3 /lib
root@MiniZed:~# cp /dev/sda1/libext2fs.so /lib
root@MiniZed:~# cp /dev/sda1/libext2fs.so.2 /lib
root@MiniZed:~# cp /dev/sda1/libext2fs.so.2.4 /lib
root@MiniZed:~# cp /dev/sda1/mke2fs /sbin
root@MiniZed:~# cp /dev/sda1/mkfs.ext4 /sbin
将文件复制到 MiniZed 上后,移除闪存驱动器并返回 PC 上的 PetaLinux 项目。回到根文件系统编辑器,禁用 e2fsprogs 包,然后重建项目。
petalinux-build
继续重新配置 Linux 映像以从 ext4 类型的外部文件系统引导,打开 PetaLinux 硬件配置编辑器:
petalinux-config
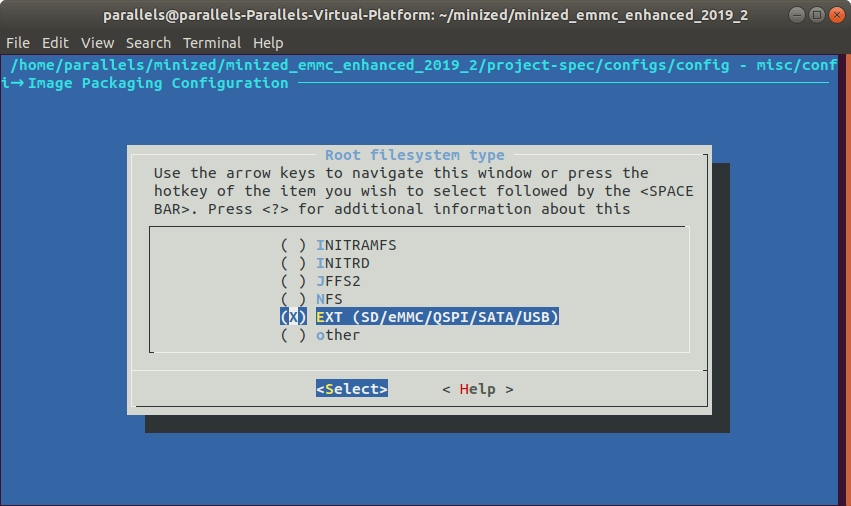
导航到 Image Packaging Configuration 选项卡,首先将 Root 文件系统类型更改为 EXT (SD/eMMC/QSPI/SATA/USB)。然后将 SD 设备的设备节点更新为 /dev/mmcblk1p2,如您所见,它将与我们将在后面的步骤中创建的 eMMC 中的 ext4 分区的名称匹配。
编辑 Root 文件系统格式以仅包含 ext4。最后,禁用 TFTP 引导选项。
保存并退出 PetaLinux 硬件配置编辑器。
我在之前的项目中介绍了如何创建自定义网络服务器以在 MiniZed 上运行,以及如何使用MiniZed 的 Arduino 标头 GPIO驱动电磁铁。我决定通过向 PetaLinux 项目添加自定义配方,从这些项目中获取源文件并将它们打包到根文件系统中的用户包中。这样,它们将始终在 MiniZed 上的这个新的嵌入式 Linux 映像中可用。
在
mkdir -p project path>/project-spec/meta-user/recipe-knitronics
在配方目录中创建特定的包目录:
mkdir -p project path>/project-spec/meta-user/recipe-knitronics/gameboard
创建一个名为“files”的目录和一个与包目录同名的 bitbake 文件:
mkdir -p project path>/project-spec/meta-user/recipe-knitronics/gameboard/files
nano / project-spec/meta-user/recipe-knitronics/gameboard/gameboard.bb

bitbake 文件在 Yocto 工具集(PetaLinux 所基于)中的作用与 Makefile 在 PC 上的一般构建自动化中所起的作用相同。bitbake 指定如何将配方中的文件安装到嵌入式 Linux 映像中。在这种情况下,bitbake 非常简单,因为所需要做的就是复制 Web 服务器的项目源文件并将 GPIO 控制到嵌入式 Linux 映像的根目录中。
为了简化 bitbake 中的代码,我将 webserver 目录压缩到一个 tarball 中,并将其指定为将复制到嵌入式 Linux 映像的根目录中的内容。
将以下代码添加到 bitbake 以将在根目录的“文件”文件夹中指定的所有文件。
SUMMARY = "MiniZed Gameboard"
DESCRIPTION = "Files for MiniZed webserver-enabled gameboard"
LICENSE = "MIT"
LIC_FILES_CHKSUM = "file://${COMMON_LICENSE_DIR}/MIT;md5=0835ade698e0bcf8506ecda2f7b4f302"

#FILESEXTRAPATHS_prepend := "${THISDIR}/files:"

SRC_URI += "file://gpio_driver.py \
            file://gpio_setup.py \
            file://gameboard-webserver.tar.xz;unpack=0 \
"

do_install() {
    install -d ${D}/home/root/
    cp -r ${WORKDIR}/gpio_driver.py ${D}/home/root/
    cp -r ${WORKDIR}/gpio_setup.py ${D}/home/root/
    install -m 0755 ${WORKDIR}/gameboard-webserver.tar.xz ${D}/home/root/
}

FILES_${PN} = " \
    /home/root/gpio_driver.py \
    /home/root/gpio_setup.py \
    /home/root/gameboard-webserver.tar.xz \
"
将所有源文件添加到新配方中的 files 目录并完成 bitbake 文件后,编辑
CONFIG_gameboard
这使根文件系统编辑器知道新配方可作为用户定义包的选项使用。要将其添加到下一个构建,请打开根文件系统编辑器:
petalinux-config -c rootfs
导航到用户包,您将看到新包作为启用选项。
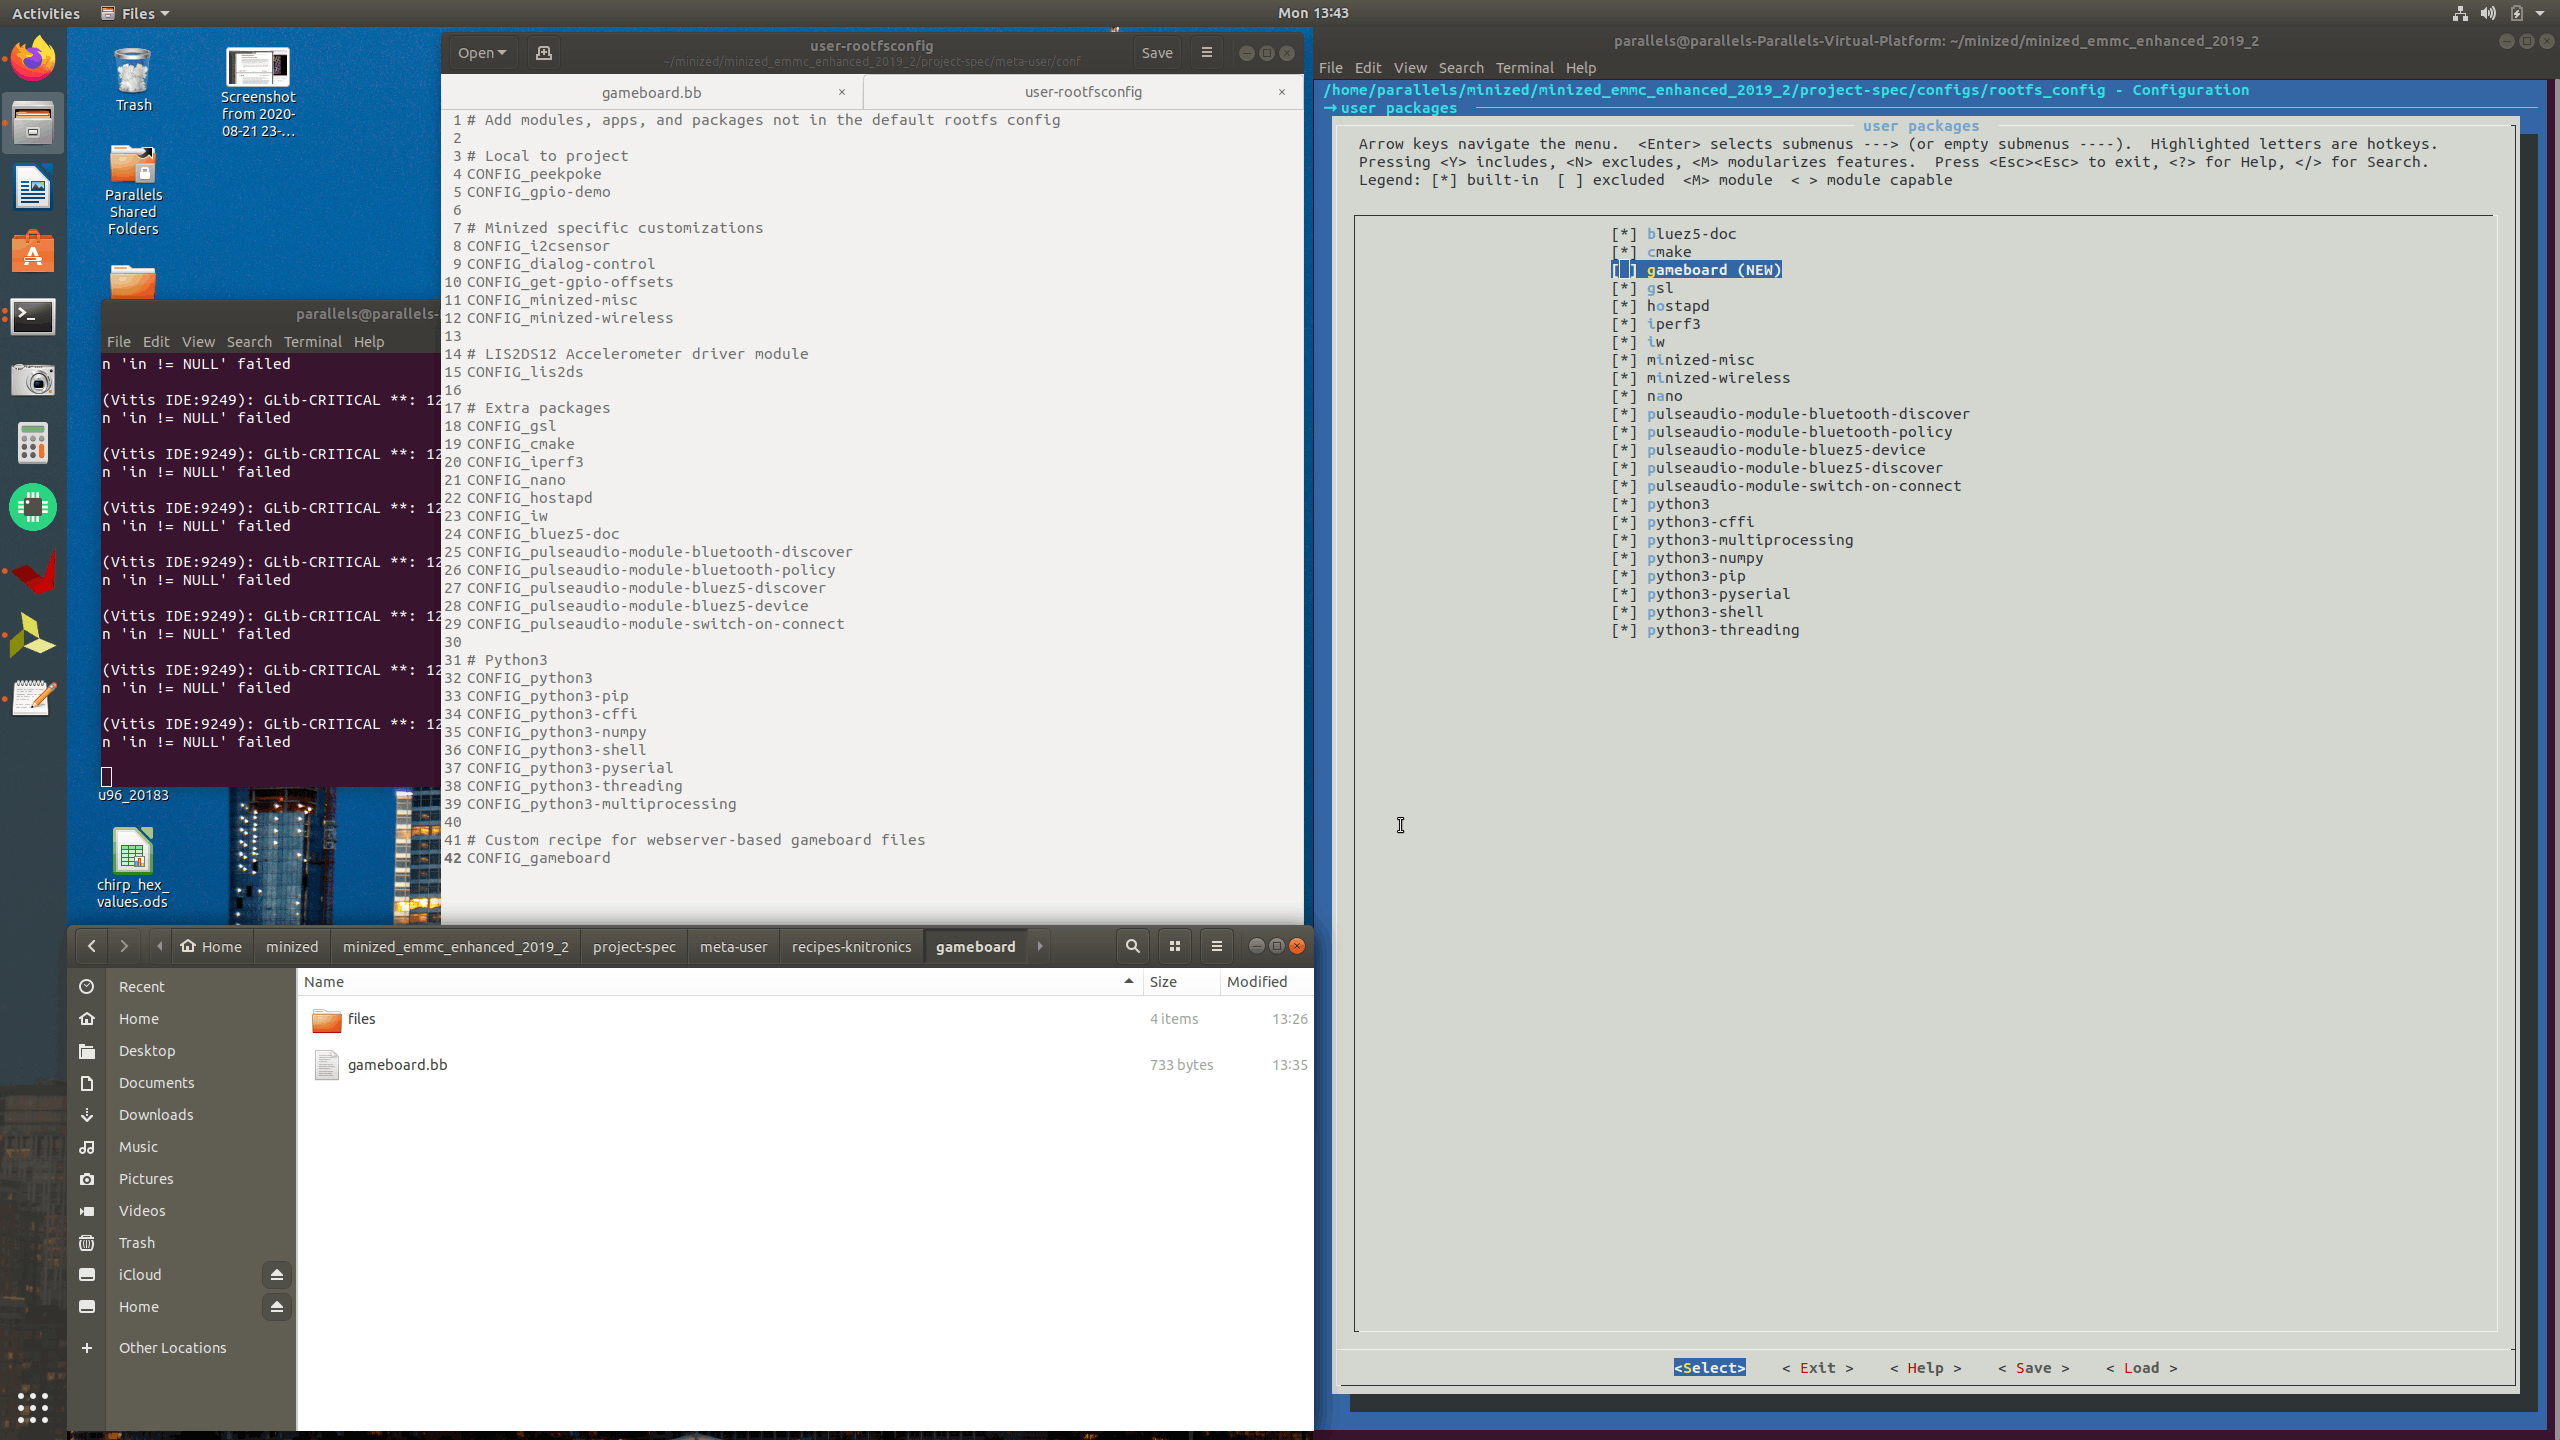
启用游戏板包,然后保存并关闭根文件系统编辑器。
编辑
最后,构建 PetaLinux 项目:
petalinux-build
构建完成后,使用 petalinux-package 命令创建新的引导二进制映像:
petalinux-package --boot --fsbl <project directory>/images/linux/zynq_fsbl.elf --fpga . /im ages/linux/system.bit --u-boot --force
旁注:PetaLinux 2020.1 在为 SD 设备打包根文件系统和引导二进制文件的方式上进行了重大升级,因此虽然我认为这种方法与旧版本的 PetaLinux 相当向后兼容,但我认为它不适用于2020.1.
从
再次,将第二条 USB 电缆连接到 MiniZed 上的 AUX 电源端口,然后将闪存驱动器插入其中。
从根本上说,我遵循与为 FPGA 准备 SD 卡以启动和运行其文件系统相同的过程,将 eMMC 视为 SD 卡。
卸载 eMMC 并在其上运行 fdisk 实用程序:
root@MiniZed:~# umount /dev/mmcblk1p1
root@MiniZed:~# fdisk /dev/mmcblk1
调整默认分区的大小,使 eMMC 的引导分区 mmcblk1p1 为 512MB,而 mmcblk1p2 的剩余大小为根文件系统的 8GB。
Command (m for help): d
Selected partition 1
Command (m for help): n
Command action
  e   extended
  p   primary partition (1-4)
p
Partition number (1-4): 1
First cylinder (1-232448, default 1): 1
Last cylinder or +size or +sizeM or +sizeK (122-232448, default 232448): +512M
Command (m for help): a
Partition number (1-4): 1
Command (m for help): p
Disk /dev/mmcblk1: 7616 MB, 7616856064 bytes
4 heads, 16 sectors/track, 232448 cylinders
Units = cylinders of 64 * 512 = 32768 bytes
       Device Boot      Start         End      Blocks  Id System
/dev/mmcblk1p1   *          1       15747      500032  83 Linux
Command (m for help): n
Command action
  e   extended
  p   primary partition (1-4)
p
Partition number (1-4): 2
First cylinder (1-232448, default 1): 15748
Last cylinder or +size or +sizeM or +sizeK (15748-232448, default 232448): Using default value 232448
Command (m for help): p
Disk /dev/mmcblk1: 7616 MB, 7616856064 bytes
4 heads, 16 sectors/track, 232448 cylinders
Units = cylinders of 64 * 512 = 32768 bytes
       Device Boot      Start         End      Blocks  Id System
/dev/mmcblk1p1   *           1       15747      500032  83 Linux
/dev/mmcblk1p2           15748      232448     6934432  83 Linux
Command (m for help): w
键入“w”将新分区写入磁盘。
退出 fdisk 实用程序后,将第二个分区 (mmcblk1p2) 格式化为 ext4:
root@MiniZed:~# mkfs.ext4 -L root /dev/mmcblk1p2
创建一个目录来挂载分区。
root@MiniZed:~# root@MiniZed:~# mkdir /mnt/emmc_rootfs
root@MiniZed:~# mount /dev/mmcblk1p2 /mnt/emmc_rootfs
将压缩的根文件系统映像 (rootfs.ext4) 复制到该目录。
root@MiniZed:~# cp /run/media/sda1/linux_ver1/rootfs.ext4 /mnt/emmc_rootfs/
创建一个临时目录以挂载到以防需要额外空间,然后将根文件系统内容复制回第一个目录。
root@MiniZed:~# mkdir /mnt/ext4
root@MiniZed:~# mount /mnt/emmc_rootfs/rootfs.ext4 /mnt/ext4/ -o loop
root@MiniZed:~# cp -rf /mnt/ext4/* /mnt/emmc_rootfs/
卸载临时目录并删除压缩的根文件系统映像。
root@MiniZed:~# umount /mnt/ext4/
root@MiniZed:~# rm /mnt/emmc_rootfs/rootfs.ext4
使用新的启动二进制映像刷新 QSPI:
root@MiniZed:~# flashcp /run/media/sda1/linux_ver1/BOOT.BIN /dev/mtd0
将第一个分区 (mmcblk1p1) 格式化为 FAT:
root@MiniZed:~# mkfs.vfat -F 32 -n BOOT /dev/mmcblk1p1
创建一个目录来挂载分区。
root@MiniZed:~# mkdir /mnt/emmc_BOOT
root@MiniZed:~# mount /dev/mmcblk1p1 /mnt/emmc_BOOT/
将内核映像和引导二进制映像复制到引导分区。
root@MiniZed:~# cp /run/media/sda1/linux_ver1/BOOT.BIN /mnt/emmc_BOOT/
root@MiniZed:~# cp /run/media/sda1/linux_ver1/image.ub /mnt/emmc_BOOT/
完全关闭 MiniZed,然后使用重置按钮重新开启。
root@MiniZed:~# shutdown -h now
重新开机后,运行 Wi-Fi 连接脚本以在 wpa_supplicant.conf 中指定的无线网络上获取 MiniZed:
root@MiniZed:~# wifi.sh
运行 GPIO 设置 Python 脚本以导出 MiniZed 的 Arduino 接头上的所有引脚,以便它们可供 GPIO 驱动程序脚本使用。
root@MiniZed:~# python3 ./gpio_setup.py
将 webserver tarball 解压缩到根目录并通过运行主要 Python 脚本来启动它:
root@MiniZed:~# tar -xvf gameboard-webserver.tar.xz ./
root@MiniZed:~# python3 ./gameboard-webserver/webserver.py
通过在您的 PC 或手机上的网络浏览器中连接到 MiniZed 的分配 IP 来测试网络服务器。
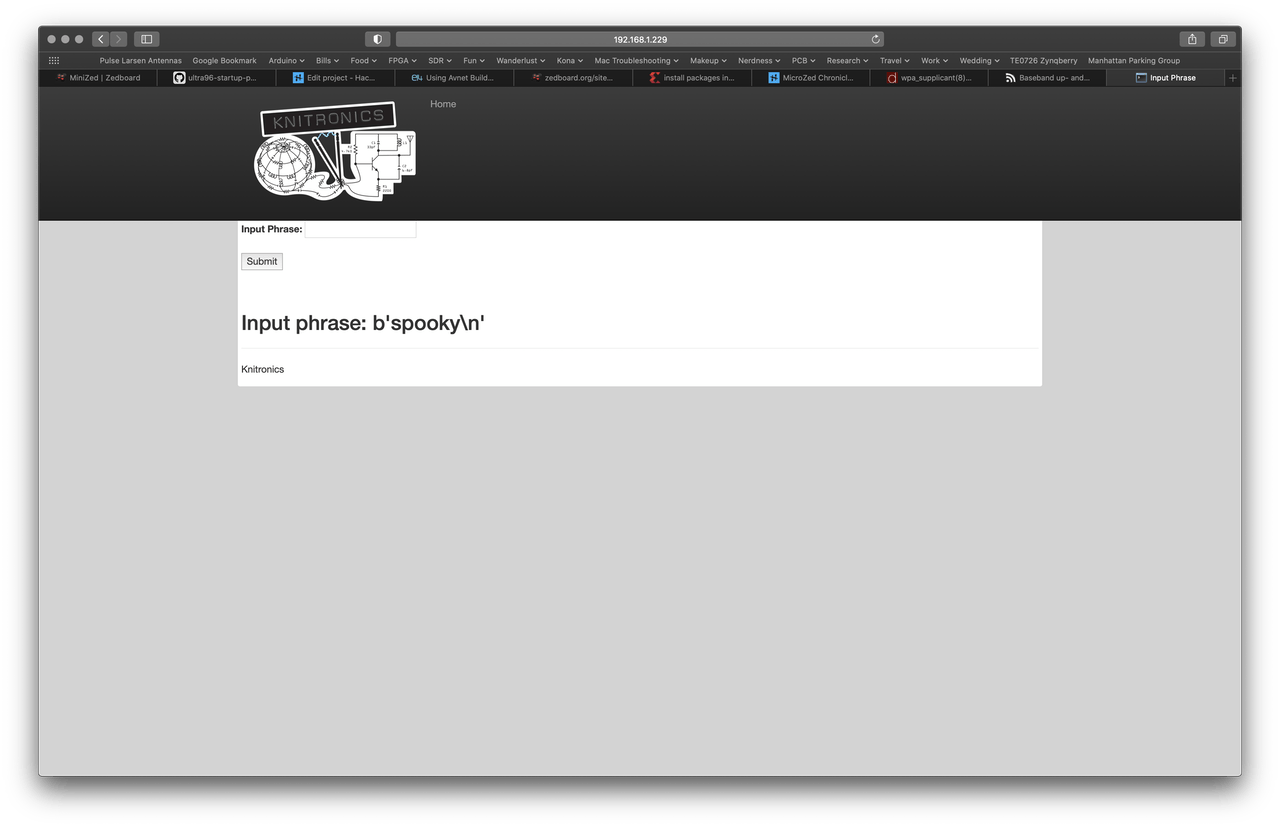
现在,任何连接到同一个 Wi-Fi 网络的设备都可以连接到游戏板的主页,为游戏板键入下一个短语。
构建游戏板盒
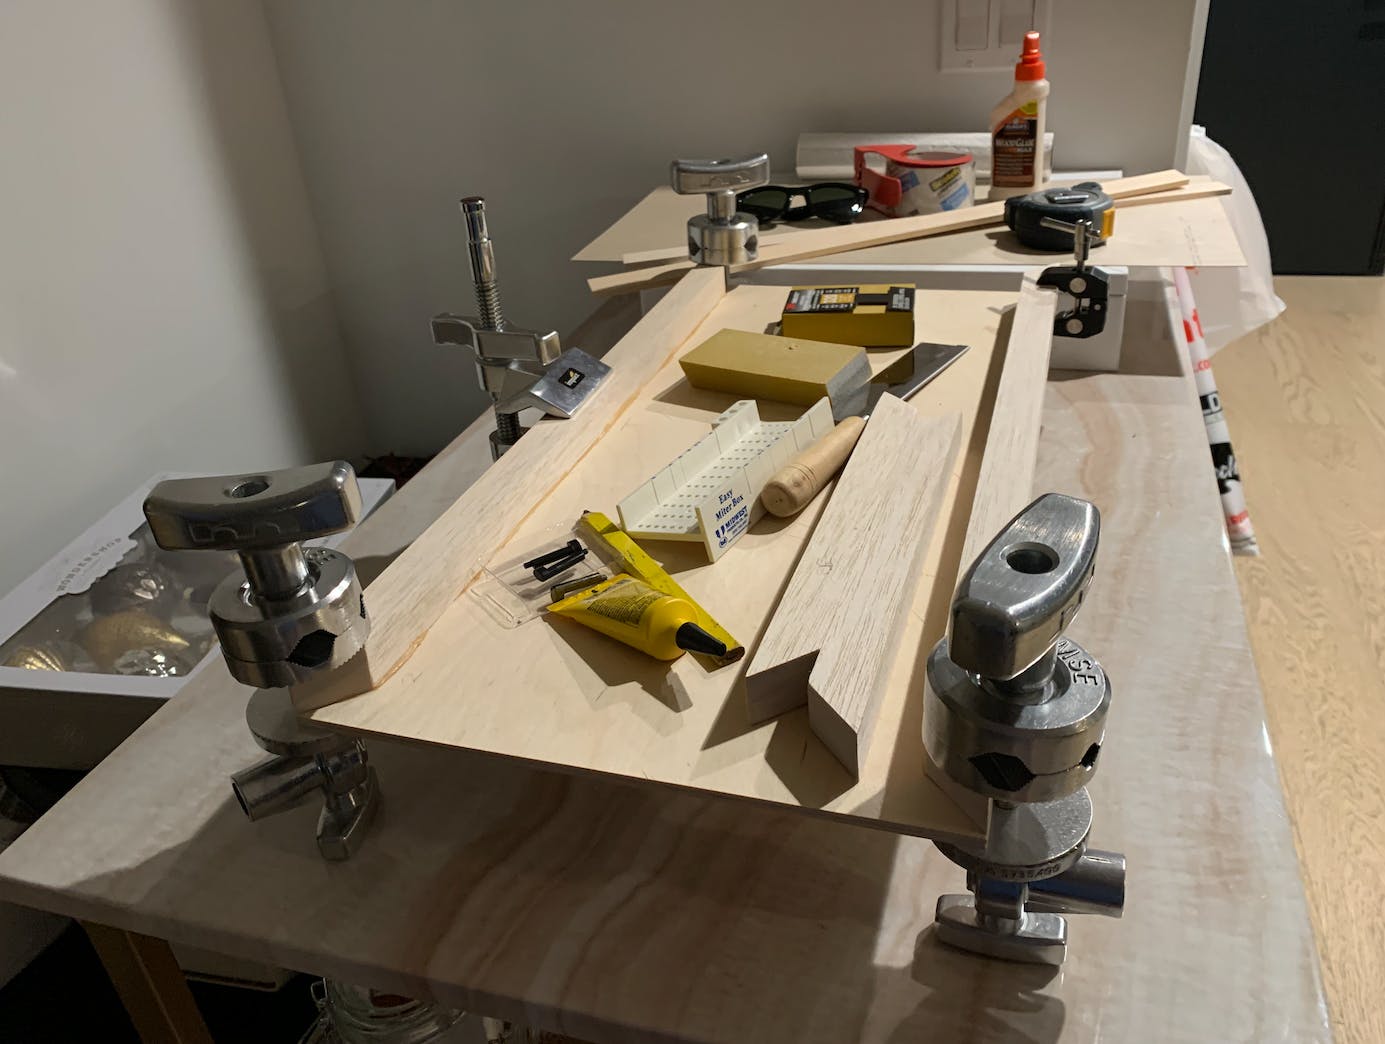
当我第一次有这个项目的想法时,建造围栏是我最缺乏经验的,所以我决定在我当地的艺术用品商店四处逛逛,看看我的一些选择是什么。由于整个项目都是基于电磁铁的使用,我知道我想要一些薄的、有色金属的,但也很坚固。我一直倾向于木材,当我在艺术用品商店遇到一整块各种形状和大小的工艺木材时,我的选择就被巩固了。
我想在盒子里留出足够的空间来舒适地容纳游戏板的所有内容,并能够添加未来的更新/修复,但它至少在某种程度上仍然类似于游戏板的尺寸。所以我决定一个 1 英寸的内部厚度,只有顶部和底部的胶合板加上外部厚度是最好的中间地带。我还想尽量减少我必须做的切割量,因为木工是一个新发现对我来说技能,所以我选择将游戏板盒保持为胶合板进来的尺寸,即 12"x24"。
我最终使用的木材和用品是:
- 24 英寸 x 1 英寸 x 1/2 英寸低音木板 - (x2) 作为盒子盖的支撑支柱,因为胶合板非常薄,对电磁铁的干扰最小。
- 24 英寸 x 1 英寸 x 1 英寸低音木板 - (x4) 用于游戏板盒的侧面。
- 24 英寸 x 12 英寸 x 1/4 英寸工艺胶合板 - (x1) 作为游戏板盒的底部。
- 24 英寸 x 12 英寸 x 1/32 英寸桦木胶合板 - (x1) 用于带有显灵板设计的游戏板盒盖。
- 斜接盒用于切割游戏板盒侧面的低音木板和盒内的支撑支柱。
- 埃尔默木匠的木胶
- 金属薄膜胶带用于装饰盒子的外部。
- 打磨任何边缘和表面的砂纸块。
- 用于安装盖子的螺丝,但也可以选择在将来移除以进行更新/修复。
我首先使用斜接盒切割 24" x 1" x 1" 低音木板,使其末端具有 45 度角,为游戏板盒创建框架。然后我使用木胶将框架粘合在一起。然后我将框架粘在 24" x 12" x 1/4" 工艺胶合板上,形成盒子的下半部分。
我想得到一些字母印章和油漆,以在 24" x 12" x 1/32" 桦木胶合板上手工重新创建占卜板设计,但经过短暂的反复试验,很快就发现我没有没有艺术技巧让它看起来像我想要的那样。所以我跑到我当地的运输商店打印出一张 11"x 17" 小报大小的占卜板图像,粘在游戏板的顶部(1/32英寸厚的胶合板)。
为了构图,我使用了在艺术用品商店找到的令人敬畏的金属金色薄膜胶带。我很快就知道,虽然我那把可怜的剪刀非常钝,但这胶带是相当坚硬的东西。
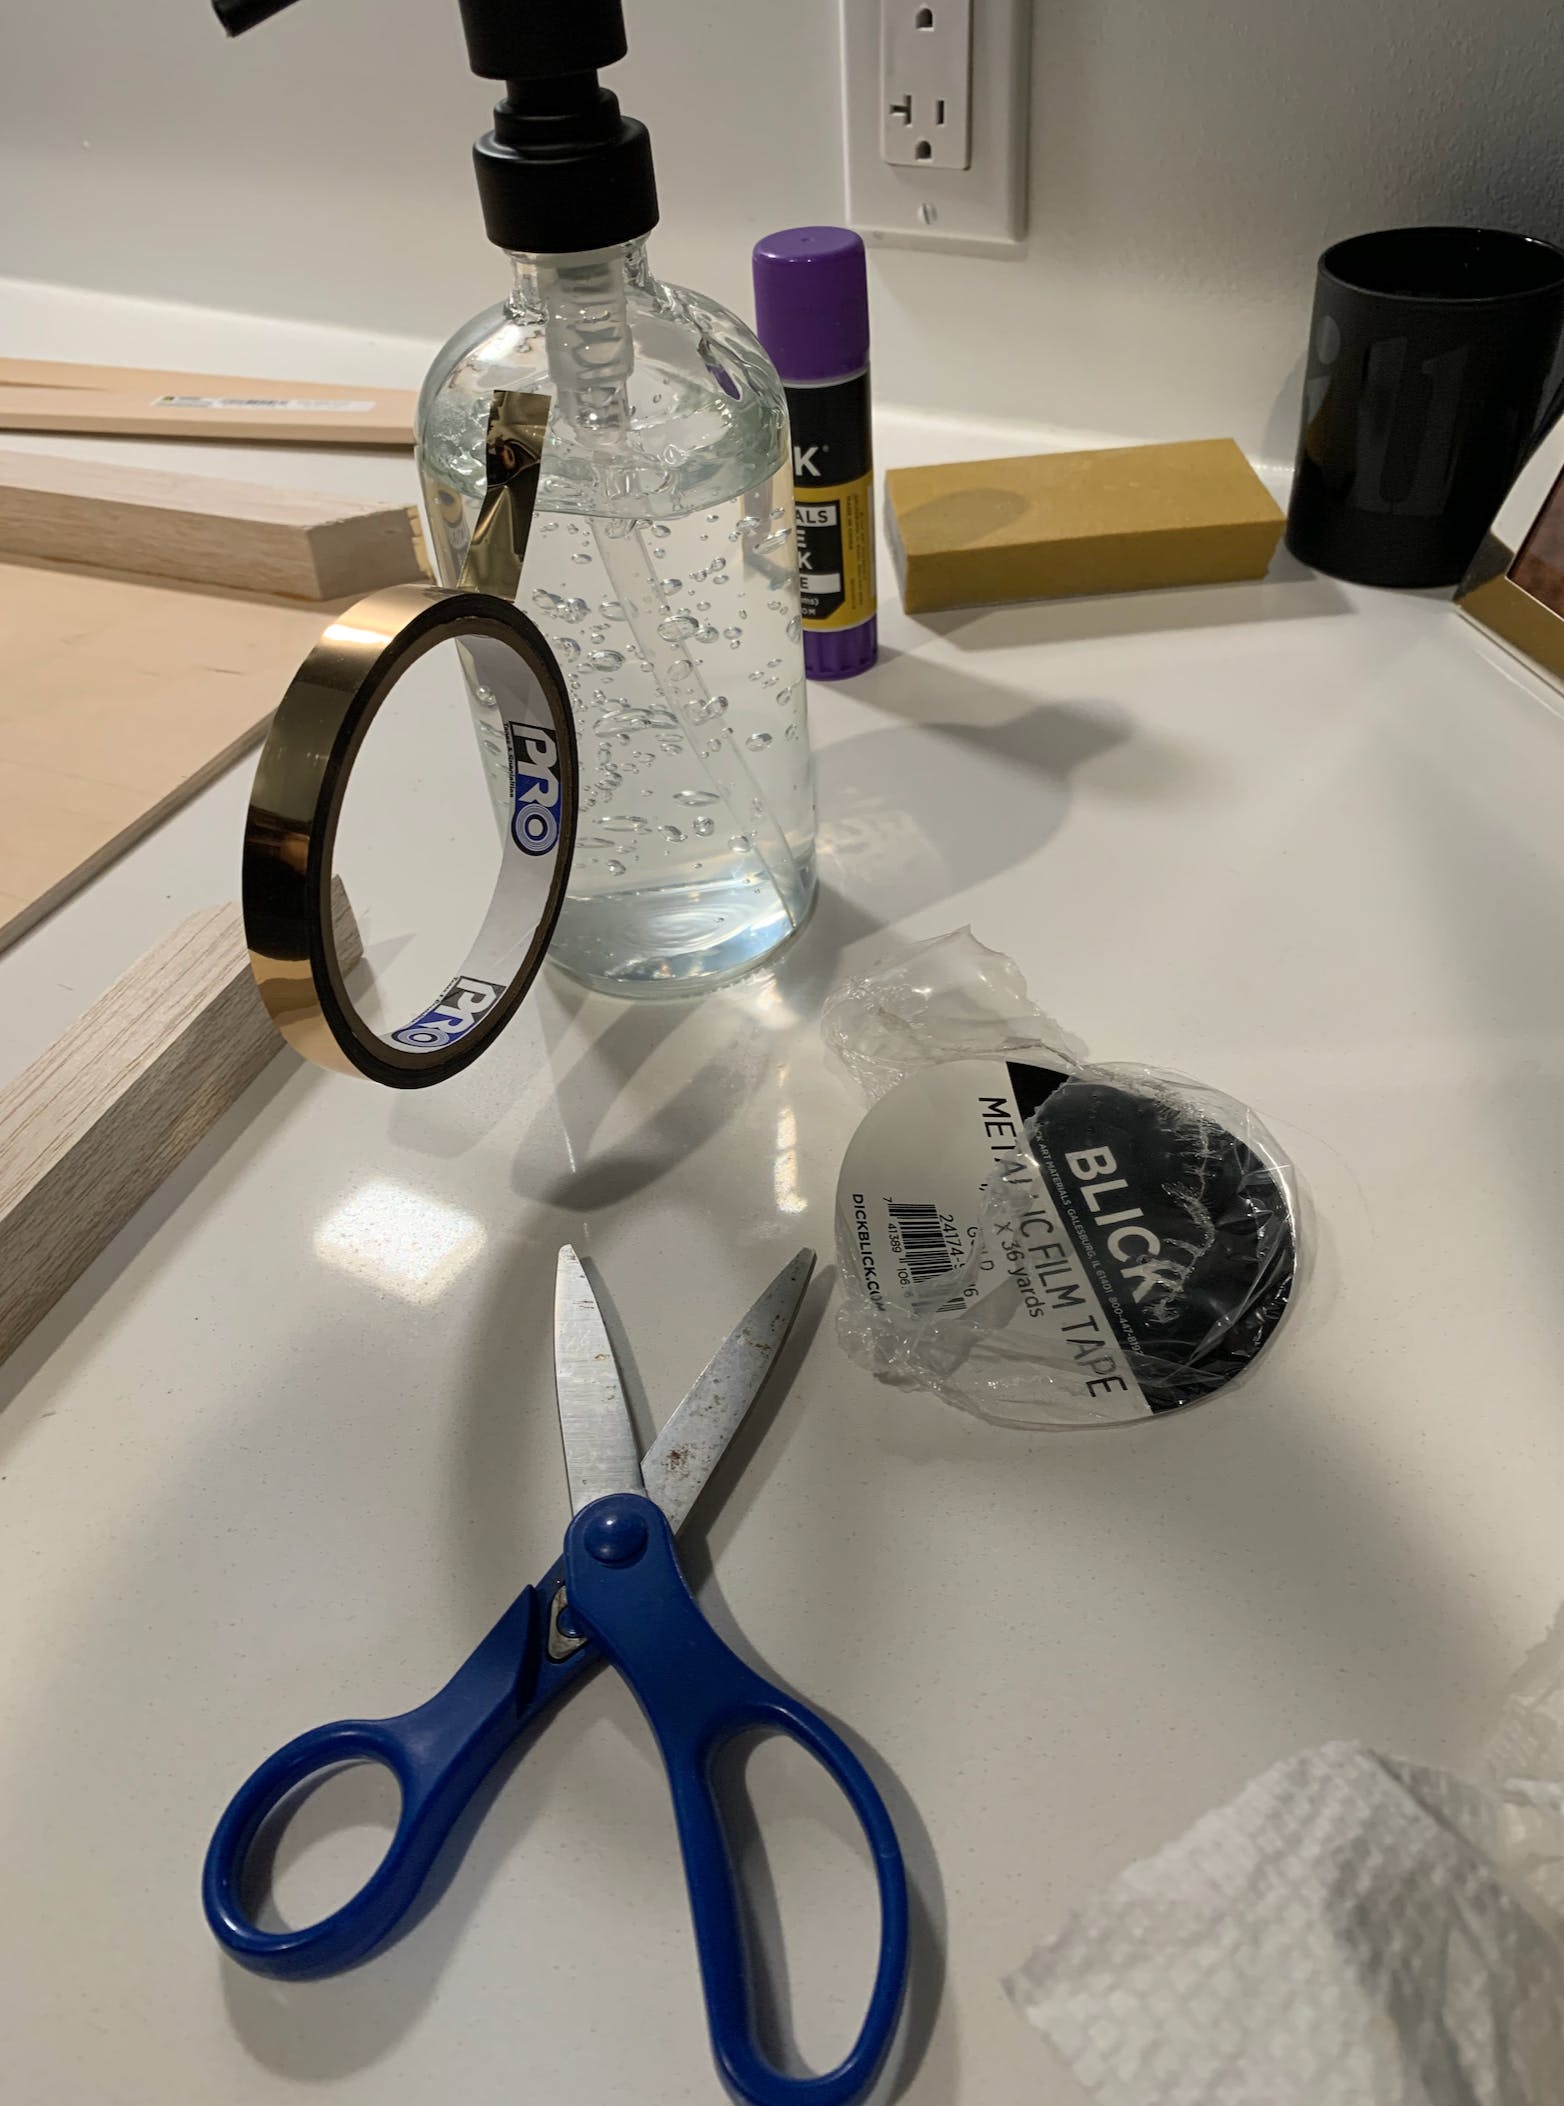
我打破了我心爱的 Dymo 标签制造商,添加了“Knitronics”和“Halloween 2020”标签。
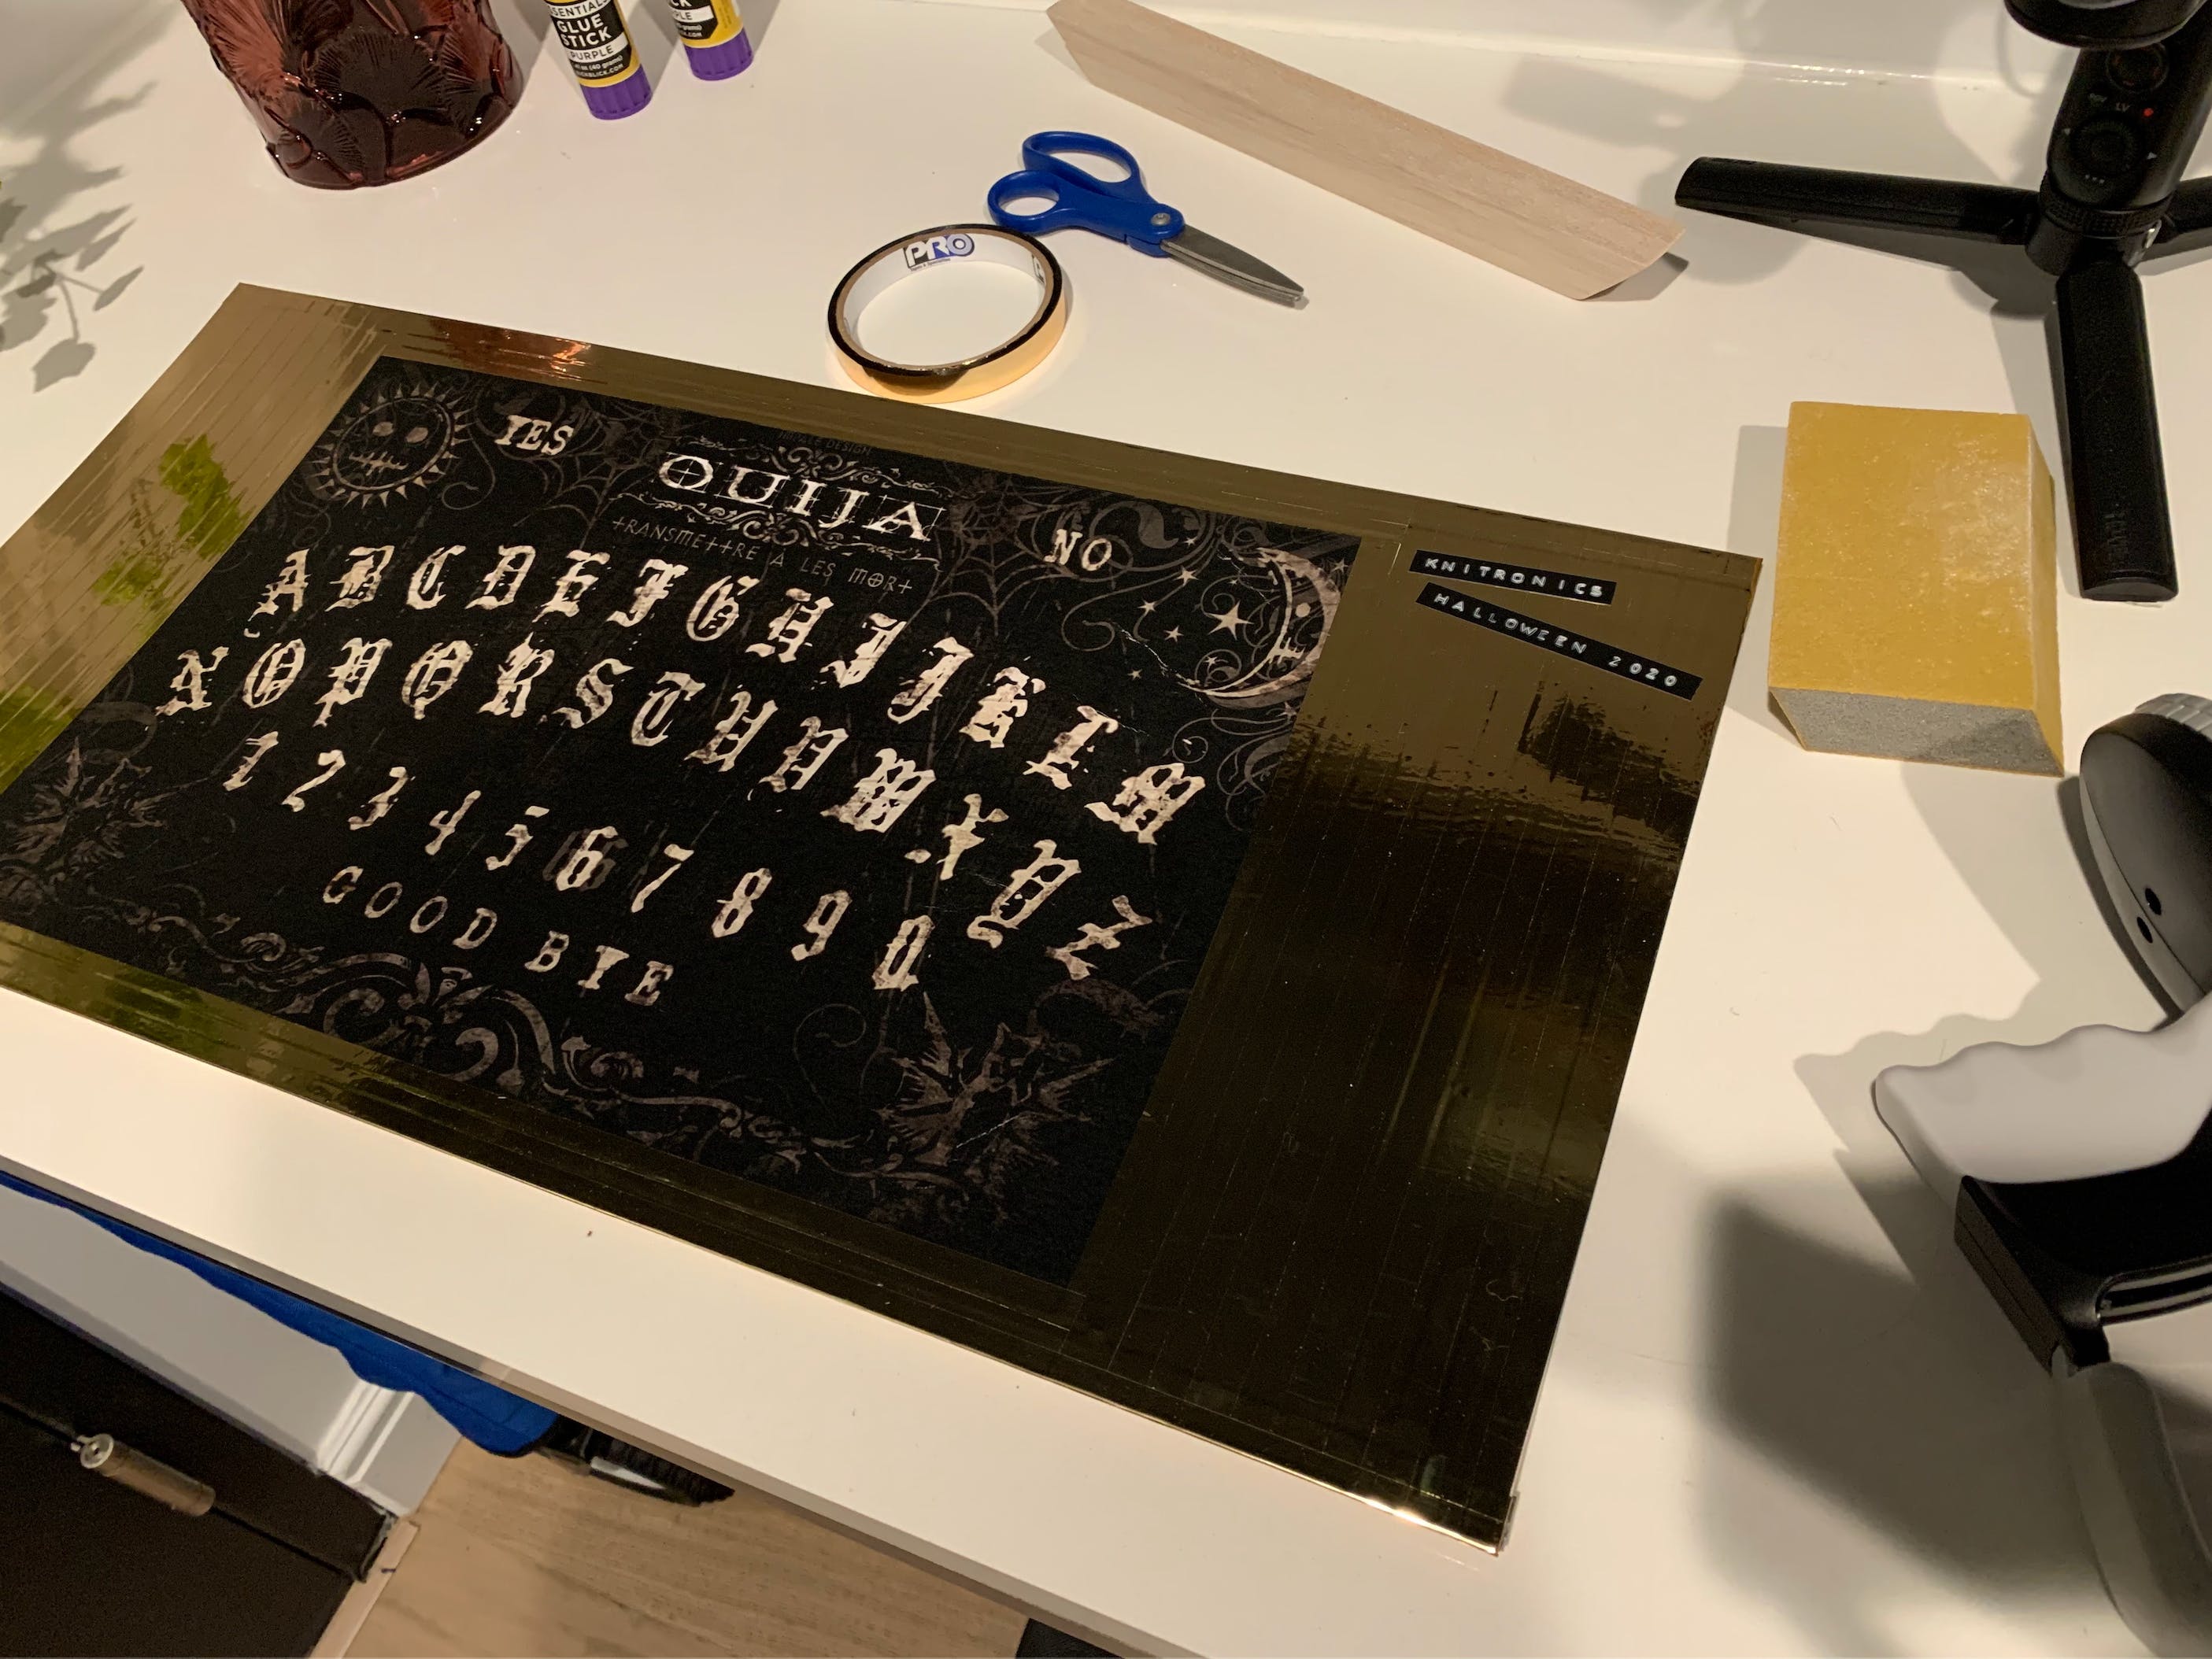
我还将游戏板底座的边缘包裹在相同的金色胶带中。
游戏板盒中的电路布局
对于游戏板的胆量,我打算让电磁铁足够坚固,成为唯一必要的机械部件。我购买了直径为 1 英寸的空白金属撞击板,它是钕磁铁(不是永磁体,但非常含铁),用于连接到压板的脚上,以便电磁铁拉动它。
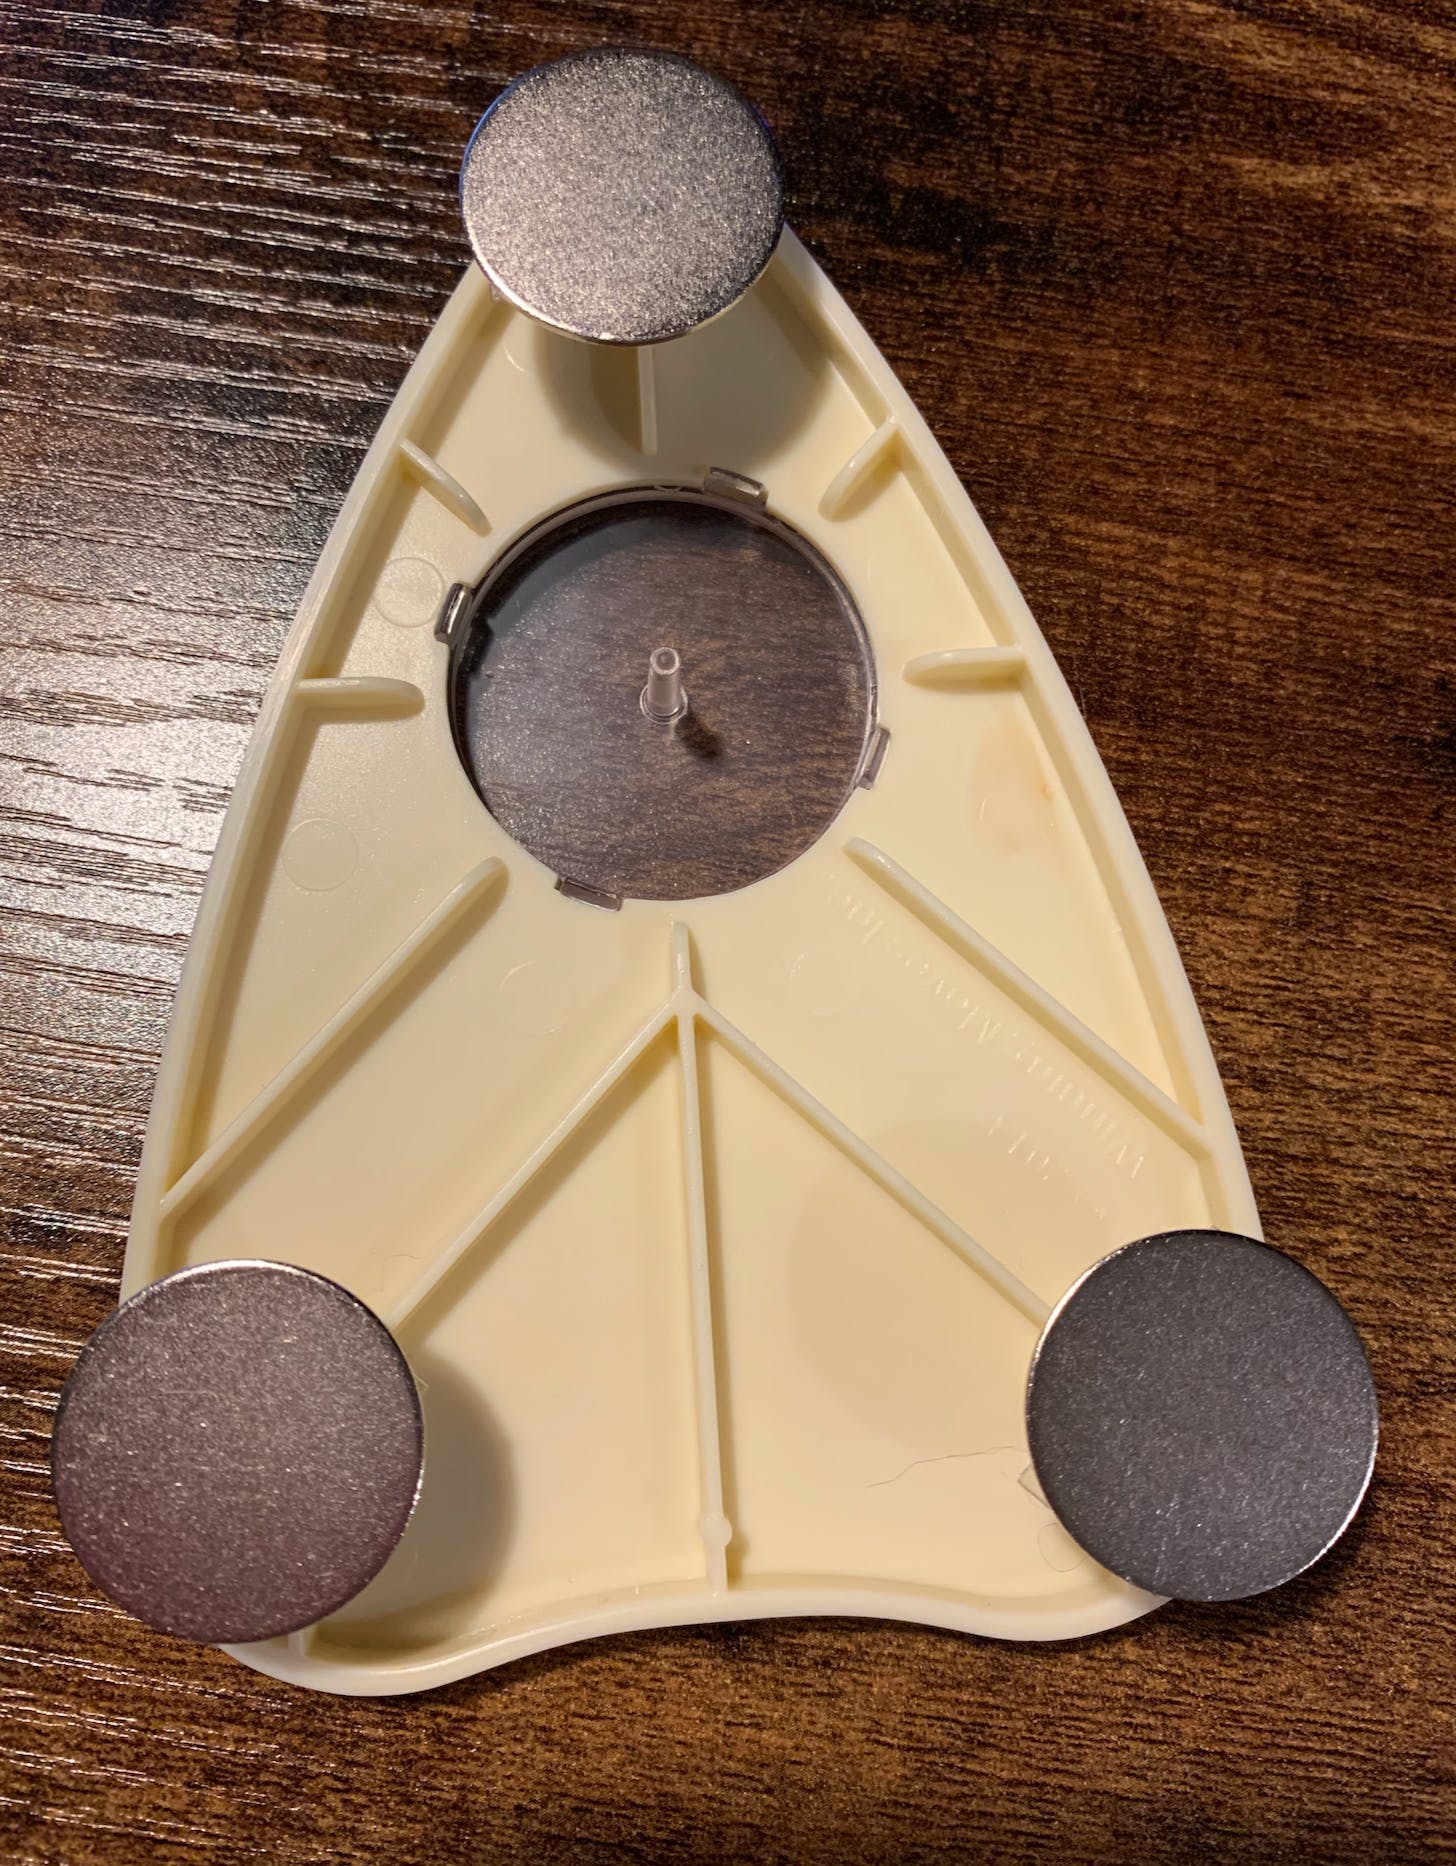
然而,我发现没有一个爱好者大小(又名合理大小)的电磁铁足够强大,可以从半厘米以上的地方吸引木板。
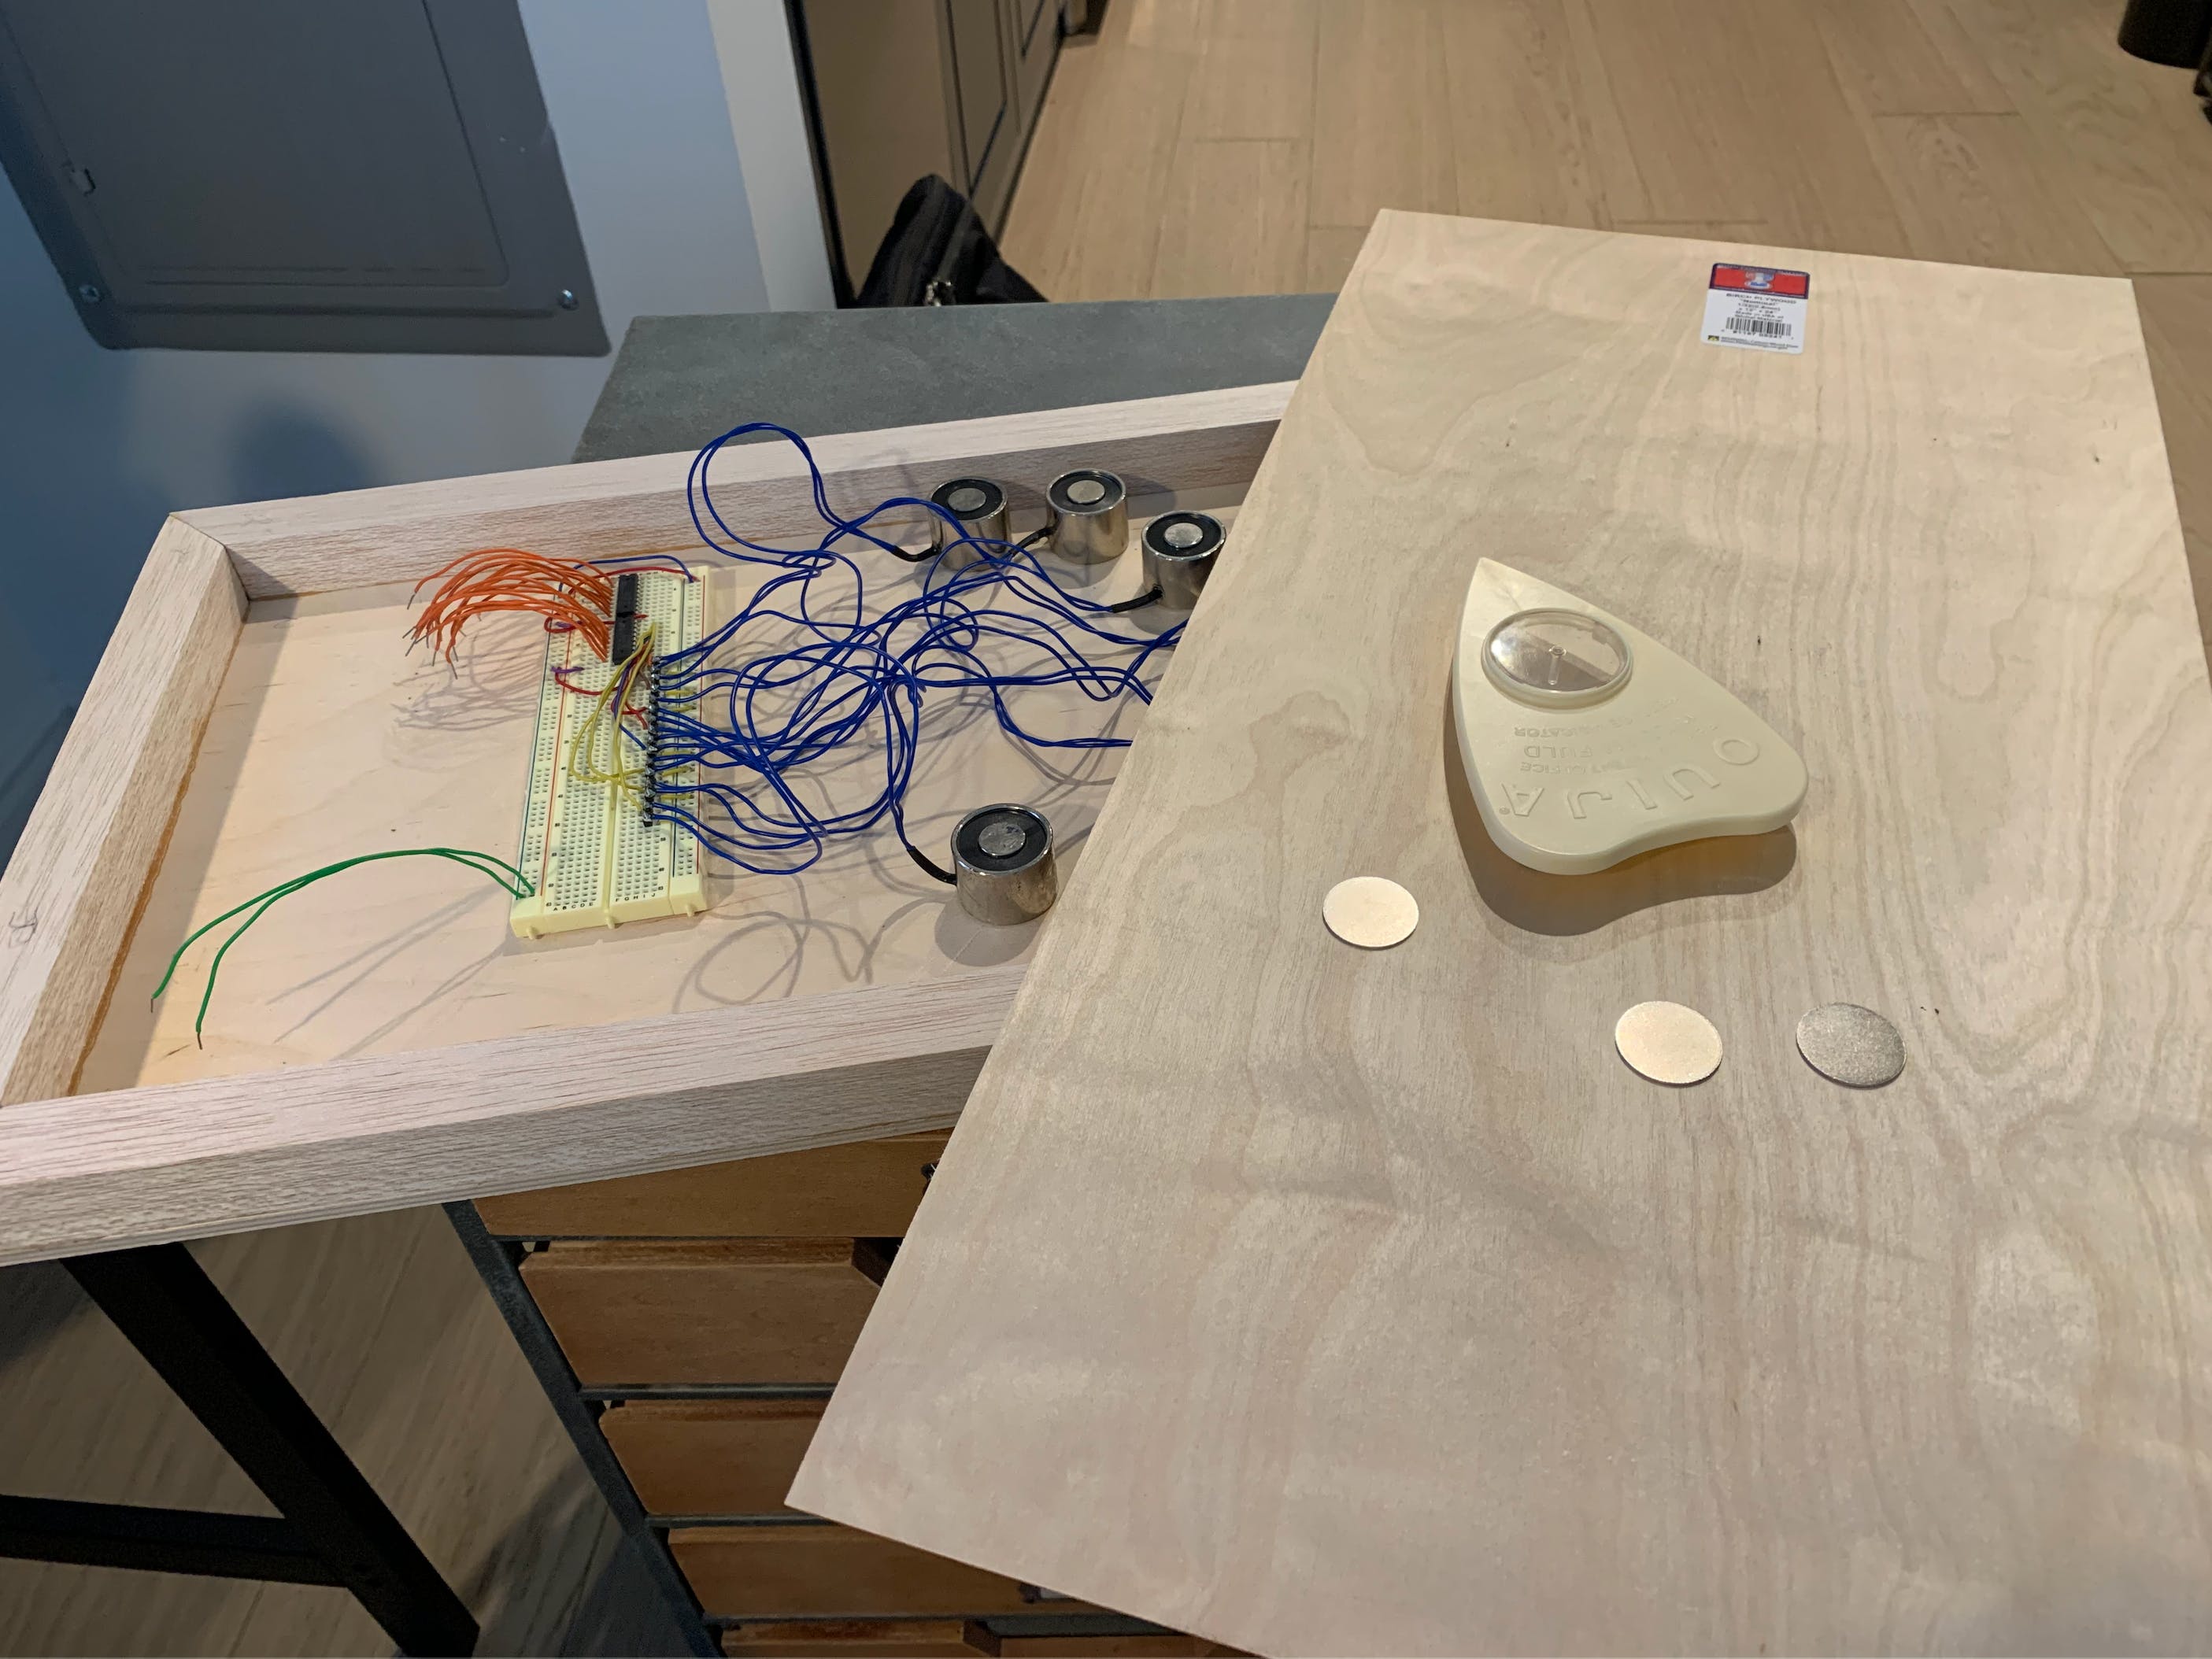
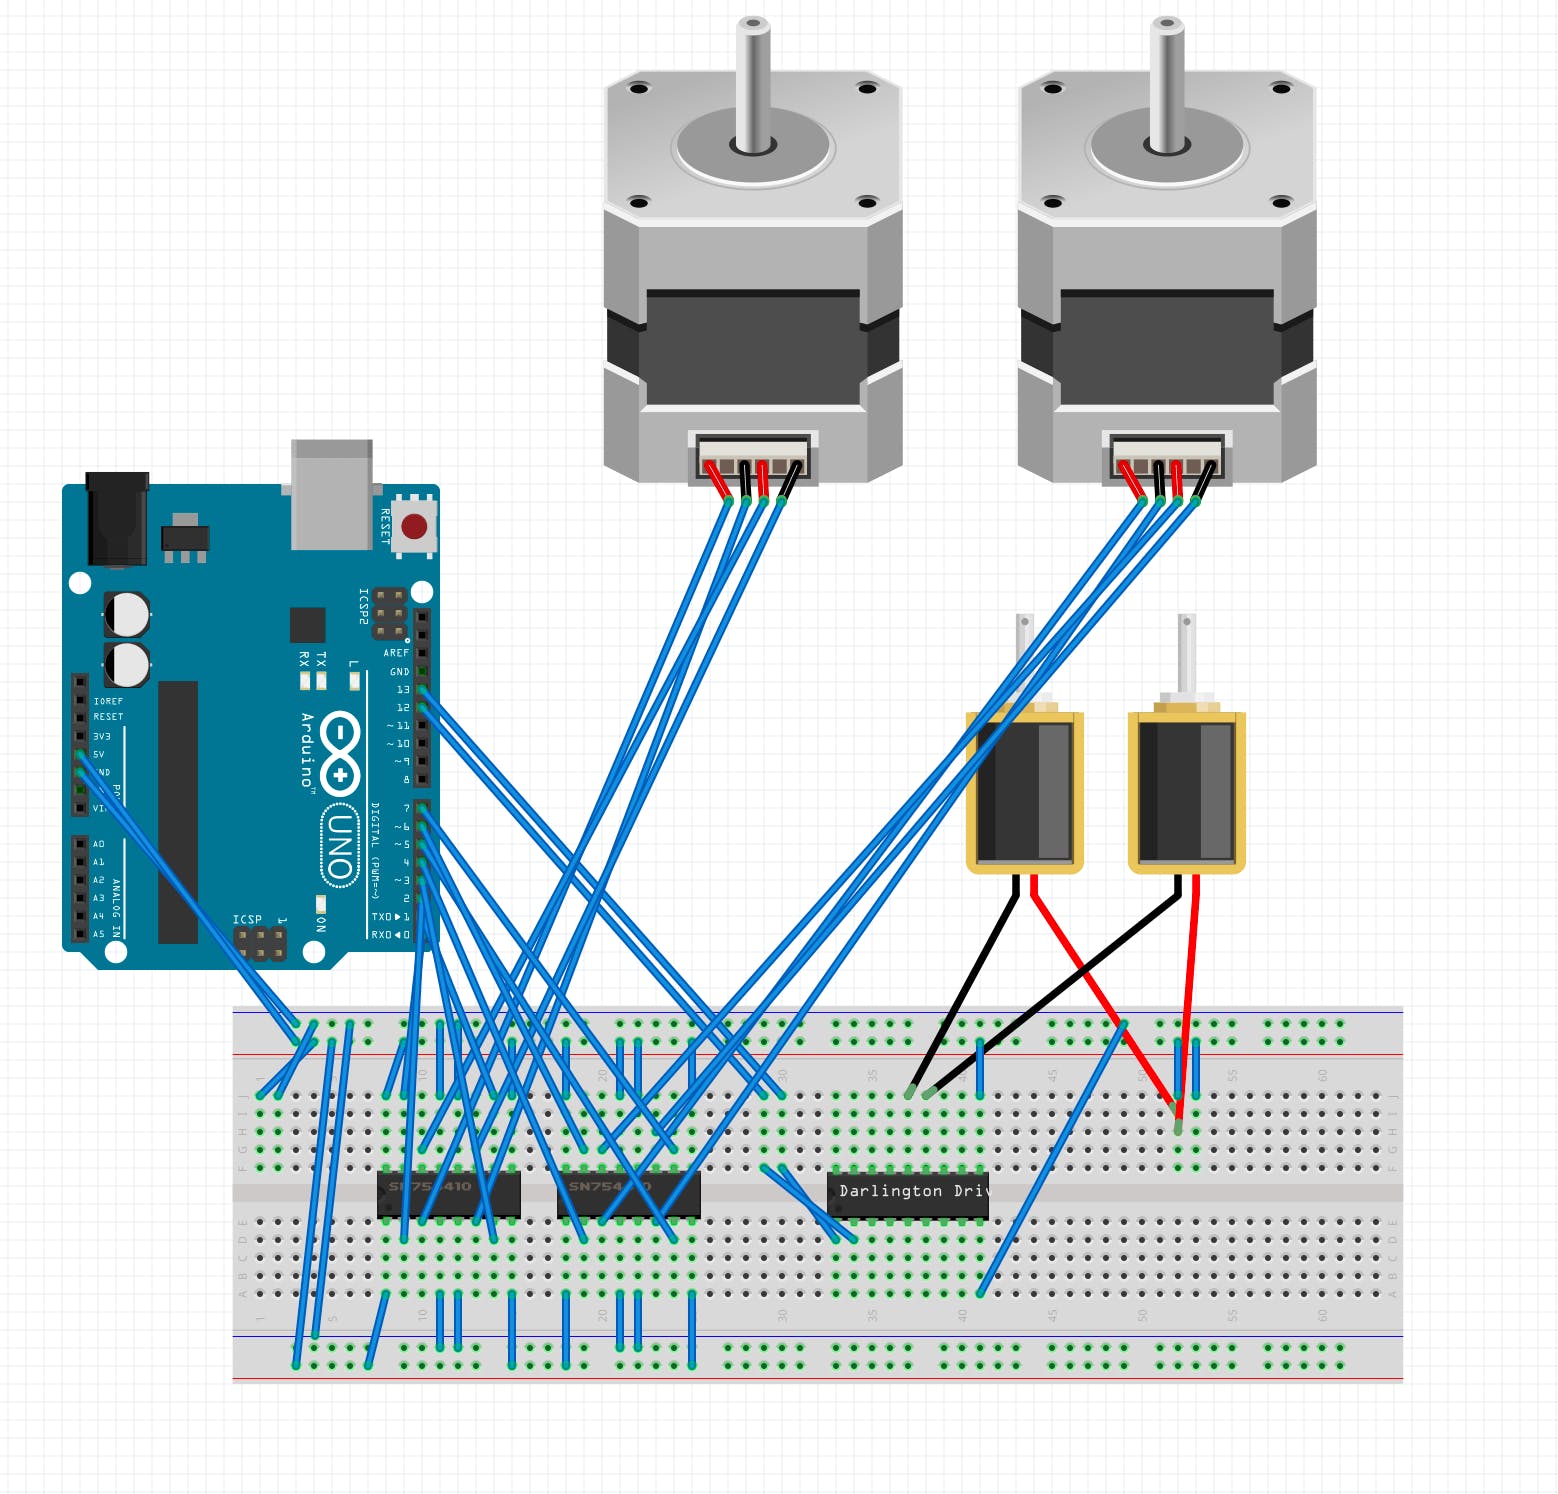
这导致我实施了一个带皮带和滑轮系统的直流电机,它可以拉动电磁铁。通过使用带皮带的双极电机,我将电磁铁连接到皮带的底部,电机能够在任一方向旋转以前后拉动电磁铁。
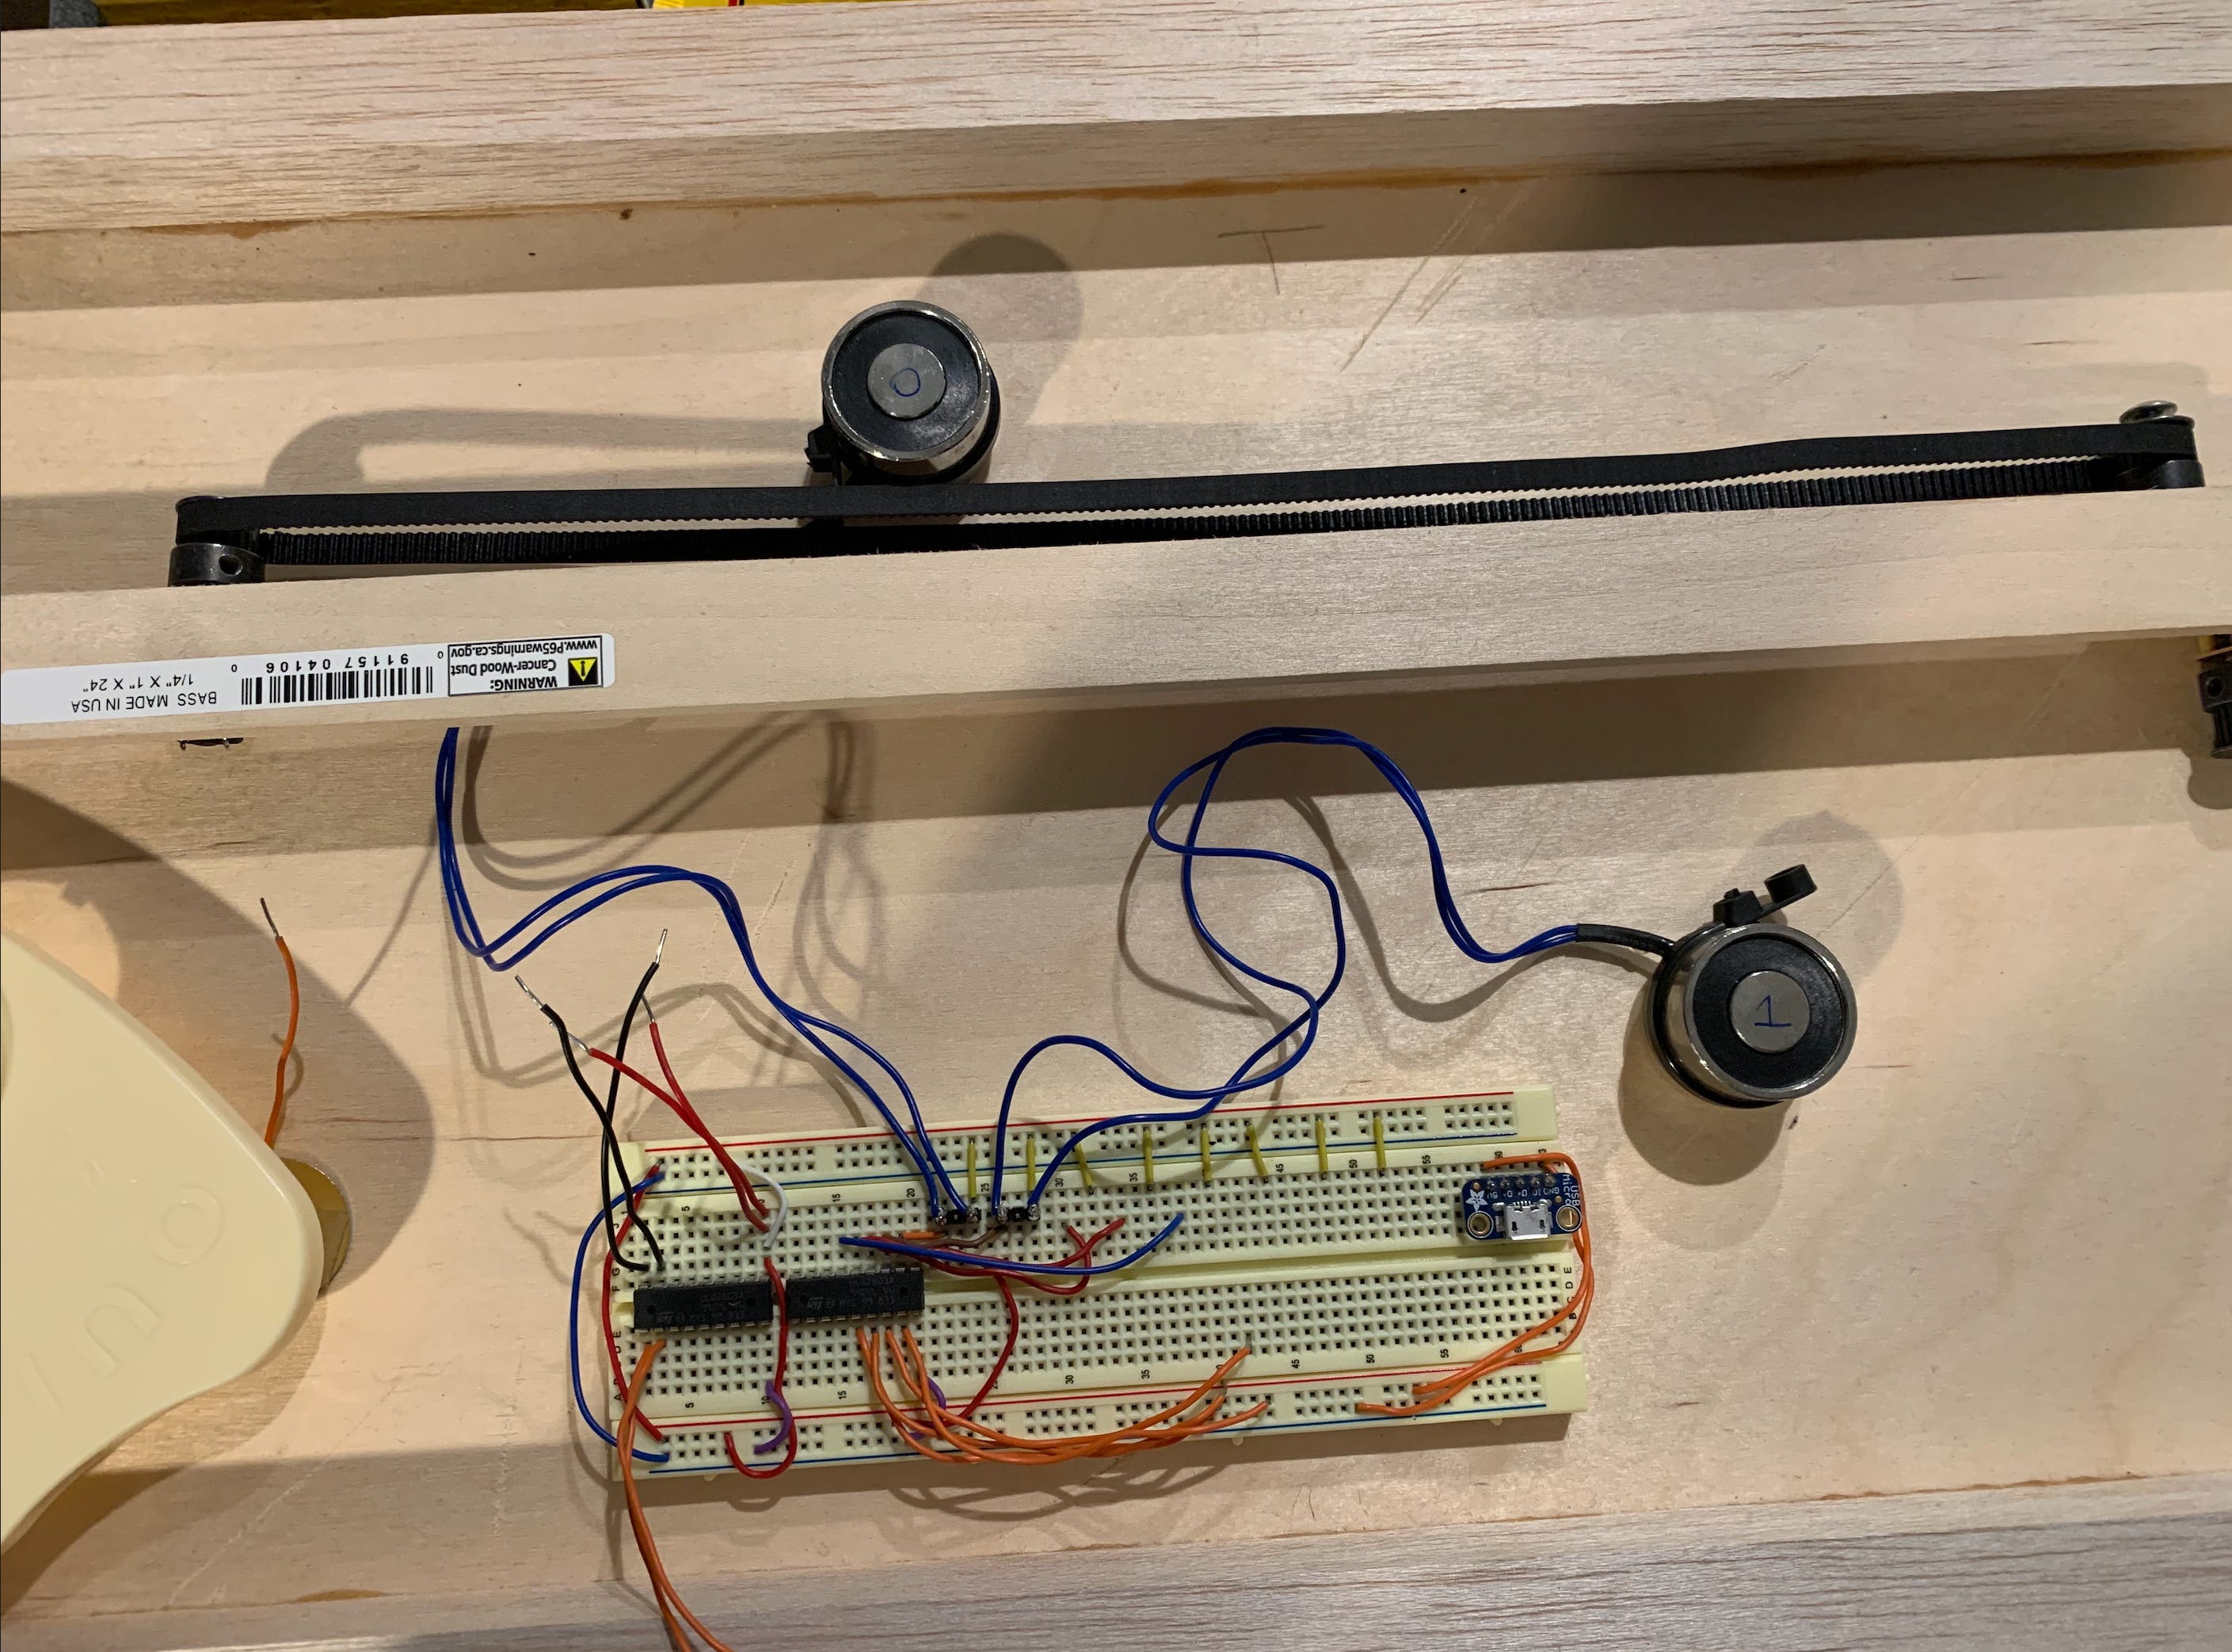
我从 Adafruit 找到了一些非常适合这项工作的迷你双极步进电机,最后我使用 3D 打印机更换零件来更换滑轮和皮带。
为了驱动电磁铁,我使用了一个简单的达林顿驱动电路(使用ULN2803 )来允许 MiniZed 的 GPIO 打开和关闭它们,同时保护 MiniZed 的 IO 免受从电源断开时产生的反向电流的影响电磁铁。对于步进电机,我使用了L293N H 桥 IC。
更新 GPIO 驱动程序脚本
由 webserver (spell_phrase.py) 调用的 GPIO 驱动程序脚本最终负责将网页中的字符串形式的输入短语转换为相应的 GPIO 切换以控制电磁铁和电机的逻辑。
最后一分钟的短片只让我有一行工作,所以这就是我在这里包含的代码。最终,该脚本由 main 函数中的一个 case 语句组成,用于在 Ouija 板 (A - M) 的第一行中的可访问字符,以及其他四个函数。其他四个功能是用于电磁铁和电机的 GPIO 控制器功能。
电磁铁函数将 MiniZed 的每个 GPIO 引脚作为文件对象打开 GPIO 编号,导出引脚,然后将其设置引脚的方向输出。
电机正向和反向功能也将每个 GPIO 引脚作为文件对象打开 GPIO 编号,导出引脚,然后将其设置引脚的方向输出。由于步进电机将其一个完整的旋转分成多个相等的步数,这转化为一次将电流施加到步进电机的四个相位输入之一的特定顺序;这意味着切换 H 桥的 4 个 GPIO 输入的特定序列。
由于我使用的是 4 针步进电机,因此将其向前驱动一圈的顺序如下:
步骤1:
- 引脚0(1)
- 引脚1(0)
- 引脚2(1)
- 引脚3(0)
第2步:
- 引脚0(0)
- 引脚1(1)
- 引脚2(1)
- 引脚3(0)
第 3 步:
- 引脚0(0)
- 引脚1(1)
- 引脚2(0)
- 引脚3(1)
第4步:
- 引脚0(1)
- 引脚1(0)
- 引脚2(0)
- 引脚3(1)
以相反方向驱动步进电机只需向后重复此序列即可。
最终,我测量到步进器需要大约 381 转才能将连接在皮带上的电磁铁从 A 到 M 移动字母行的整个长度,字母之间大约需要 30 转。这意味着重复上述序列 30 次将使电磁铁(以及最终在打开时被吸引到它的板)从一个字母移动到下一个相邻字母。
总体而言,脚本从网页前端获取输入短语并将其解析为单个字符,然后通过一个巨大的 if else 语句(case 语句的 Python 版本),其中每个字符都被分配一个数值。保存前一个字符的值,两个数值之间的差乘以在相邻字母之间移动所需的步进器转数提供所需的距离和方向数据。
spell_phrase.py 的代码:
import os
import re
import sys
import time
import requests
import subprocess

emag0 = '/sys/class/gpio/gpio999/'
emag1 = '/sys/class/gpio/gpio1000/'
motor0a = '/sys/class/gpio/gpio1001/'
motor0c = '/sys/class/gpio/gpio1002/'
motor0b = '/sys/class/gpio/gpio1003/'
motor0d = '/sys/class/gpio/gpio1004/'

def emag_on(emag):
    emagPath = emag + 'value'
    emagFile = open(emagPath,'w')
    emagFile.write('1')
    emagFile.close()

def emag_off(emag):
    emagPath = emag + 'value'
    emagFile = open(emagPath,'w')
    emagFile.write('0')
    emagFile.close()

def motor0_forward(distance):
    for x in range(1, distance):
        motorPath0a = motor0a + 'value'
        motorPath0c = motor0c + 'value'
        motorPath0b = motor0b + 'value'
        motorPath0d = motor0d + 'value'

        motorFile0a = open(motorPath0a,'w')
        motorFile0c = open(motorPath0c,'w')
        motorFile0b = open(motorPath0b,'w')
        motorFile0d = open(motorPath0d,'w')

        motorFile0a.write('1')
        motorFile0c.write('0')
        motorFile0b.write('1')
        motorFile0d.write('0')

        motorFile0a.close()
        motorFile0c.close()
        motorFile0b.close()
        motorFile0d.close()

        motorFile0a = open(motorPath0a,'w')
        motorFile0c = open(motorPath0c,'w')
        motorFile0b = open(motorPath0b,'w')
        motorFile0d = open(motorPath0d,'w')

        motorFile0a.write('0')
        motorFile0c.write('1')
        motorFile0b.write('0')
        motorFile0d.write('1')

        motorFile0a.close()
        motorFile0c.close()
        motorFile0b.close()
        motorFile0d.close()

        motorFile0a = open(motorPath0a,'w')
        motorFile0c = open(motorPath0c,'w')
        motorFile0b = open(motorPath0b,'w')
        motorFile0d = open(motorPath0d,'w')

        motorFile0a.write('1')
        motorFile0c.write('0')
        motorFile0b.write('0')
        motorFile0d.write('1')

        motorFile0a.close()
        motorFile0c.close()
        motorFile0b.close()
        motorFile0d.close()

def motor0_backward(distance):
    for x in range(1, distance):
        motorPath0a = motor0a + 'value'
        motorPath0c = motor0c + 'value'
        motorPath0b = motor0b + 'value'
        motorPath0d = motor0d + 'value'

        motorFile0a = open(motorPath0a,'w')
        motorFile0c = open(motorPath0c,'w')
        motorFile0b = open(motorPath0b,'w')
        motorFile0d = open(motorPath0d,'w')

        motorFile0a.write('1')
        motorFile0c.write('0')
        motorFile0b.write('0')
        motorFile0d.write('1')

        motorFile0a.close()
        motorFile0c.close()
        motorFile0b.close()
        motorFile0d.close()

        motorFile0a = open(motorPath0a,'w')
        motorFile0c = open(motorPath0c,'w')
        motorFile0b = open(motorPath0b,'w')
        motorFile0d = open(motorPath0d,'w')

        motorFile0a.write('0')
        motorFile0c.write('1')
        motorFile0b.write('0')
        motorFile0d.write('1')

        motorFile0a.close()
        motorFile0c.close()
        motorFile0b.close()
        motorFile0d.close()

        motorFile0a = open(motorPath0a,'w')
        motorFile0c = open(motorPath0c,'w')
        motorFile0b = open(motorPath0b,'w')
        motorFile0d = open(motorPath0d,'w')

        motorFile0a.write('0')
        motorFile0c.write('1')
        motorFile0b.write('1')
        motorFile0d.write('0')

        motorFile0a.close()
        motorFile0c.close()
        motorFile0b.close()
        motorFile0d.close()

        motorFile0a = open(motorPath0a,'w')
        motorFile0c = open(motorPath0c,'w')
        motorFile0b = open(motorPath0b,'w')
        motorFile0d = open(motorPath0d,'w')

        motorFile0a.write('1')
        motorFile0c.write('0')
        motorFile0b.write('1')
        motorFile0d.write('0')

        motorFile0a.close()
        motorFile0c.close()
        motorFile0b.close()
        motorFile0d.close()

def spell_phrase(phrase):
    char_num = 1
    emag_on(emag0)

    if(phrase!=None):
        [char for char in phrase]:
            if char == 'a' or char == 'A':
                next_char_num = 1
                distance = (char_num - next_char_num)*30
                if distance == 0 or distance < 0:
                    # already at edge of board
                else:
                    motor0_forward(distance)

            elif char == 'b' or char == 'B':
                next_char_num = 2
                distance = (char_num - next_char_num)*30
                if distance < 0:
                    motor0_backward(distance)
                else:
                    motor0_forward(distance)

            elif char == 'c' or char == 'C':
                next_char_num = 3
                distance = (char_num - next_char_num)*30
                if distance < 0:
                    motor0_backward(distance)
                else:
                    motor0_forward(distance)

            elif char == 'd' or char == 'D':
                next_char_num = 4
                distance = (char_num - next_char_num)*30
                if distance < 0:
                    motor0_backward(distance)
                else:
                    motor0_forward(distance)

            elif char == 'e' or char == 'E':
                next_char_num = 5
                distance = (char_num - next_char_num)*30
                if distance < 0:
                    motor0_backward(distance)
                else:
                    motor0_forward(distance)

            elif char == 'f' or char == 'F':
                next_char_num = 6
                distance = (char_num - next_char_num)*30
                if distance < 0:
                    motor0_backward(distance)
                else:
                    motor0_forward(distance)

            elif char == 'g' or char == 'G':
                next_char_num = 7
                distance = (char_num - next_char_num)*30
                if distance < 0:
                    motor0_backward(distance)
                else:
                    motor0_forward(distance)

            elif char == 'h' or char == 'H':
                next_char_num = 8
                distance = (char_num - next_char_num)*30
                if distance < 0:
                    motor0_backward(distance)
                else:
                    motor0_forward(distance)

            elif char == 'i' or char == 'I':
                next_char_num = 9
                distance = (char_num - next_char_num)*30
                if distance < 0:
                    motor0_backward(distance)
                else:
                    motor0_forward(distance)

            elif char == 'j' or char == 'J':
                next_char_num = 10
                distance = (char_num - next_char_num)*30
                if distance < 0:
                    motor0_backward(distance)
                else:
                    motor0_forward(distance)

            elif char == 'k' or char == 'K':
                next_char_num = 11
                distance = (char_num - next_char_num)*30
                if distance < 0:
                    motor0_backward(distance)
                else:
                    motor0_forward(distance)

            elif char == 'l' or char == 'L':
                next_char_num = 12
                distance = (char_num - next_char_num)*30
                if distance < 0:
                    motor0_backward(distance)
                else:
                    motor0_forward(distance)

            elif char == 'm' or char == 'M':
                next_char_num = 13
                distance = (char_num - next_char_num)*30
                if distance == 0 or distance < 0:
                    motor0_backward(distance)
                else:
                    # already at edge of baord

            else:
                motor0_backward(1)
                motor0_forward(1)

        char_num = next_char_num
    else:
        phrase = "noPhrase"

    emag_off(emag0)

    return phrase

def main(arg):
    phraseOut = spell_phrase(arg)

if __name__ == "__main__":
    main(sys.argv[1])
项目总结
我在这个项目上遇到了一些障碍,然后才把它带到我想要这个万圣节的确切点,当前版本只依赖于输入由字母 A - M 组成的字符串。我还想找到更安静的步进电机,但它仍然是一个今年有趣的道具!我对 MiniZed 机械地融入这个项目感到非常满意,我认为它将成为我未来道具建造项目的首选板。
我已经列出了一份清单,我将继续升级主板!我认为这将成为现在每个万圣节都适合我的主食。我还从机械设计和外壳制造中学到了很多东西,我已经想要升级了。明年继续关注!
未来更新:
- 修改网页以在启动时启动。
- 让 GPIO 设置 Python 脚本在启动时运行,或者让网络服务器在第一次启动时运行它,然后再接受第一个输入短语。
- 修复短路以使其他 4 行正常工作。
- DIN11 IPO EM系列小体积单输入单输出单电源供电电磁隔离转换器
- 不要这样为您的 FPGA 供电! 0次下载
- 综合性CPLD/FPGA软件Quartus 13.0下载 17次下载
- 医疗行业的电磁兼容试验标准总结 23次下载
- AXU2CG FPGA XLINX核心板原理图 33次下载
- 美的电磁炉系列电路图参考下载 238次下载
- 基于FPGA芯片的软硬件平台的使用 20次下载
- 基于FPGA块存储器的多位反转容错 19次下载
- 接收机在软件定义无线电中的电磁兼容问题 11次下载
- 基于FPGA和DSP的机载图形显示系统 36次下载
- 如何使用FPGA实现空间电磁悬浮系统中样品监视系统的设计 6次下载
- 电磁屏蔽理论与屏蔽设计接地设计资料下载 27次下载
- 尽量降低无线系统供电时的电磁干扰 5次下载
- 以太网POE供电磁兼容标准电路原理图免费下载 73次下载
- 当今高性能FPGA成功供电的几点建议 6次下载
- 多轨供电系统中的监控和排序 489次阅读
- 无线供电的方式有哪些?什么叫电磁感应方式? 1465次阅读
- FPGA电源设计有哪些规范设计 2216次阅读
- poe供电是什么意思_poe供电用哪几芯 8.5w次阅读
- 用降压型稳压器或线性稳压器电源时值来会为负载供电 872次阅读
- 数字电源模块在FPGA供电设计的应用 1862次阅读
- FPGA的电源电压种类,你知道多少? 1.2w次阅读
- FPGA学习:电源电路设计 7137次阅读
- 基于FPGA的交流电磁场检测仪的激励源设计 4848次阅读
- FPGA电源需求供电要求解析 4971次阅读
- 搭配最佳供电序列方案 FPGA系统电源管理效率大增 1046次阅读
- 用TI Designs加快你的FPGA电源设计 1122次阅读
- Maxim为三款Xilinx FPGA参考设计提供电源管理方案 1114次阅读
- 透过设计实例揭秘FPGA电源的N个考虑事项 4349次阅读
- 写给使用FPGA的数字工程师:如何简化FPGA供电 929次阅读

 上传资料赚积分
下载排行
本周
- 1山景DSP芯片AP8248A2数据手册
- 1.06 MB | 532次下载 | 免费
- 2RK3399完整板原理图(支持平板,盒子VR)
- 3.28 MB | 339次下载 | 免费
- 3TC358743XBG评估板参考手册
- 1.36 MB | 330次下载 | 免费
- 4DFM软件使用教程
- 0.84 MB | 295次下载 | 免费
- 5元宇宙深度解析—未来的未来-风口还是泡沫
- 6.40 MB | 227次下载 | 免费
- 6迪文DGUS开发指南
- 31.67 MB | 194次下载 | 免费
- 7元宇宙底层硬件系列报告
- 13.42 MB | 182次下载 | 免费
- 8FP5207XR-G1中文应用手册
- 1.09 MB | 178次下载 | 免费
本月
- 1OrCAD10.5下载OrCAD10.5中文版软件
- 0.00 MB | 234315次下载 | 免费
- 2555集成电路应用800例(新编版)
- 0.00 MB | 33566次下载 | 免费
- 3接口电路图大全
- 未知 | 30323次下载 | 免费
- 4开关电源设计实例指南
- 未知 | 21549次下载 | 免费
- 5电气工程师手册免费下载(新编第二版pdf电子书)
- 0.00 MB | 15349次下载 | 免费
- 6数字电路基础pdf(下载)
- 未知 | 13750次下载 | 免费
- 7电子制作实例集锦 下载
- 未知 | 8113次下载 | 免费
- 8《LED驱动电路设计》 温德尔著
- 0.00 MB | 6656次下载 | 免费
总榜
- 1matlab软件下载入口
- 未知 | 935054次下载 | 免费
- 2protel99se软件下载(可英文版转中文版)
- 78.1 MB | 537798次下载 | 免费
- 3MATLAB 7.1 下载 (含软件介绍)
- 未知 | 420027次下载 | 免费
- 4OrCAD10.5下载OrCAD10.5中文版软件
- 0.00 MB | 234315次下载 | 免费
- 5Altium DXP2002下载入口
- 未知 | 233046次下载 | 免费
- 6电路仿真软件multisim 10.0免费下载
- 340992 | 191187次下载 | 免费
- 7十天学会AVR单片机与C语言视频教程 下载
- 158M | 183279次下载 | 免费
- 8proe5.0野火版下载(中文版免费下载)
- 未知 | 138040次下载 | 免费


 工商网监
工商网监
评论