 电子发烧友App


 创作
创作 发文章
发文章 发帖
发帖  提问
提问  发资料
发资料 发视频
发视频资料介绍
描述
这是我在 TensorFlow 下使用 Google Summer of Code (GSoC) 的第二个项目。互联网上没有合适的文档来构建自定义图像识别 TinyML 模型,所以我的 GSoC 导师 Paul Ruiz 建议我应该尝试解决它。下面介绍了如何构建图像识别 TinyML 应用程序。快乐修补!
项目背后的理念:
我想解决变量较少的问题,因为有关如何使用相机模块和处理其数据的文档不是很好。我选择构建一个 MNIST TinyML 模型,因为在这种情况下,我不需要担心训练数据集,它可以让我专注于项目的基本部分来启动和运行。但是,既然我已经弄清楚了构建自定义图像识别项目的所有部分,我已经记录了如何使用相机模块收集训练数据集。
博客的主题/基调?
我想警告你,这个博客可能会有点难以理解。对此有一个正确的解释:使用基于加速度计的应用程序,只需在串行监视器或绘图仪上打印出一个轴的加速度计值,就可以很容易地进行完整性检查。相比之下,对图像识别应用程序进行健全性检查至少要麻烦 10 倍,因为无法实时可视化检查一段代码是否正在执行所需的操作。
一些评论
由于单元测试的复杂性,这个博客可能有点难以理解。我想通过读者的反馈来解决解释中的任何空白。因此,请在下面评论您对嵌入式系统图像识别相关的任何疑问和问题。
TinyML 是否有意义?
我建议您阅读TinyML 书的作者 Pete Warden 撰写的这篇精彩文章,以了解为什么在微控制器上运行机器学习模型是有意义的,并且是机器学习的未来。
即使 TinyML 有意义,图像识别在 TinyML 上有意义吗?
我们将在这里使用的 OV7670 相机的完整 VGA(640×480 分辨率)输出对于当前的 TinyML 应用程序来说太大了。uTensor 通过使用 28×28 图像的 MNIST 运行笔迹检测。TensorFlow Lite for Microcontrollers 示例中的人员检测示例使用 96×96,这绰绰有余。即使是最先进的“Big ML”应用程序通常也只使用 320×320 的图像。总之,在微型微控制器上运行图像识别应用程序很有意义

本教程简而言之:
- 集成摄像头和 LCD 模块
- 构建 MNIST TinyML 模型
- 测试 TinyML 模型
- 结论
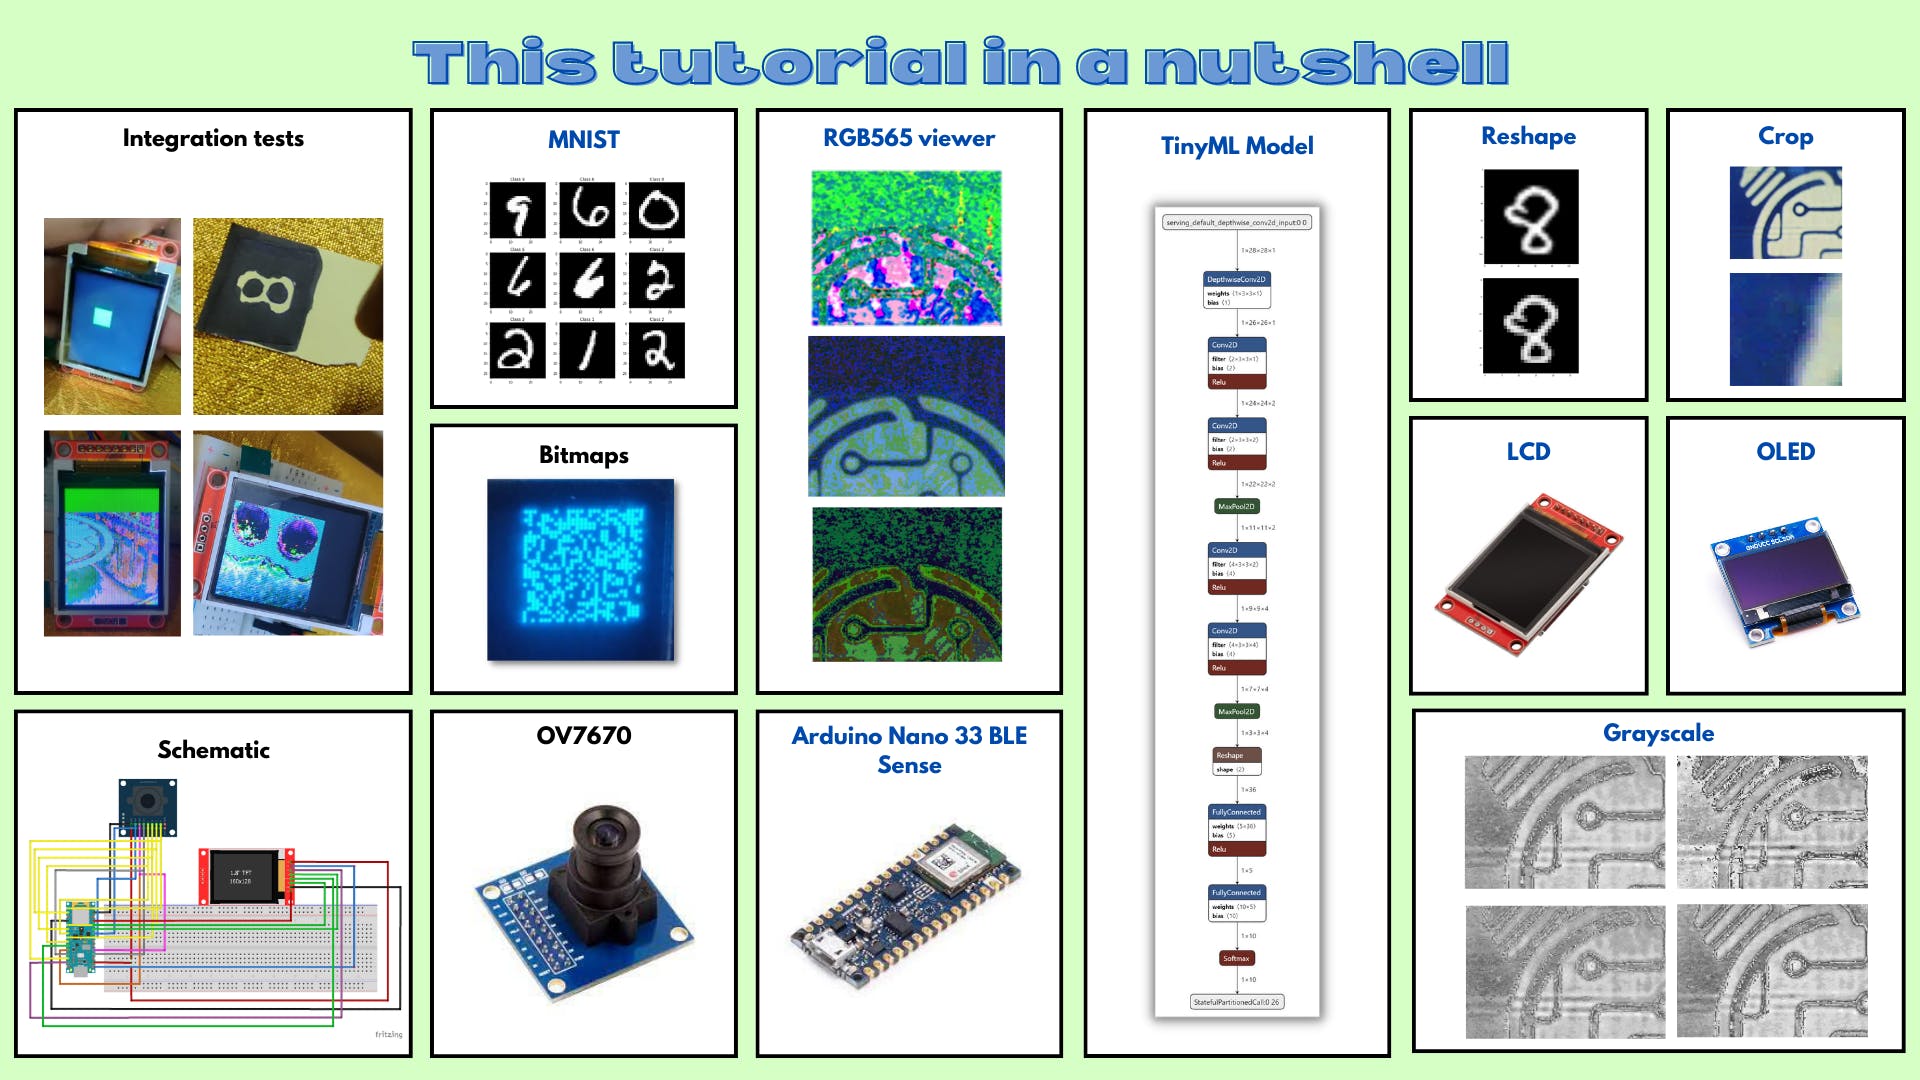
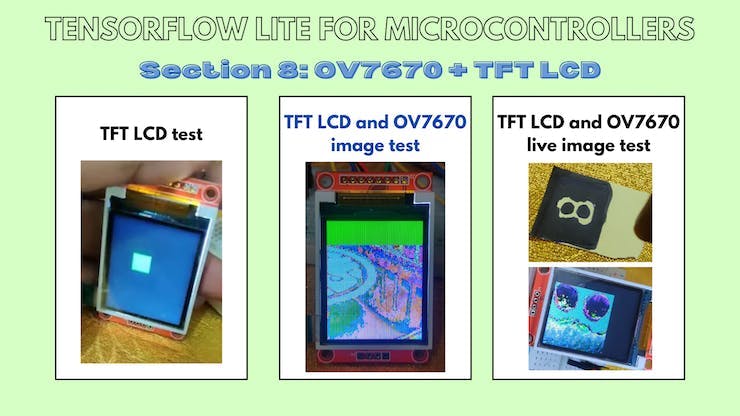
8.集成摄像头和液晶模组
8.a TFT+OV7670:显示测试
本小节的 Github 链接
代码说明:
tft.fillScreen(ST77XX_BLACK);
这行代码用黑色填充屏幕。
for(int i =0; i<28;i++){
    for(int j =0;j<28;j++){
      tft.drawPixel(i,j,ST77XX_GREEN);
      delay(0);
    }
  }
  delay(1000);
这些代码行绘制了一个 28x28 的绿色块。
草图:
#include // Core graphics library
#include // Hardware-specific library for ST7735
#include
8.b TFT + OV7670:静态图像测试
本小节的 Github 链接。
现在我们已经知道如何显示绿色块,让我们从存储的 HEX 值数组中显示图像。
代码说明:
uint16_t pixels[176 * 144]= {0x0D2A,0xED29,0xED29,0xED29,.....0x95B5,0xB6B5,0xB6B5};
该数组存储所有像素的十六进制值。
for(int i =0; i<50;i++){
    for(int j =0;j<50;j++){
       pixel = pixels[176*i +j];
       tft.drawPixel(i,j,pixel);
}
}
这些代码行通过阵列循环并在 TFT LCD 显示器上绘制图像。
草图:
#include // Core graphics library
#include // Hardware-specific library for ST7735
#include
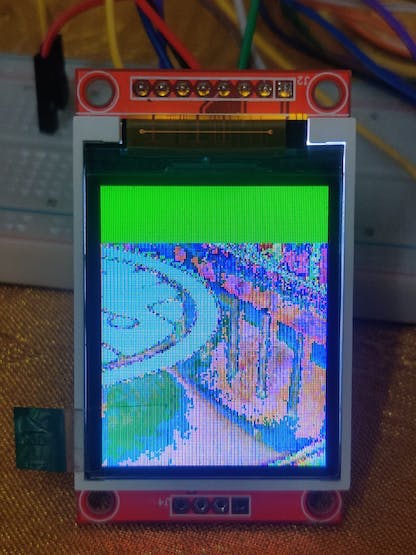
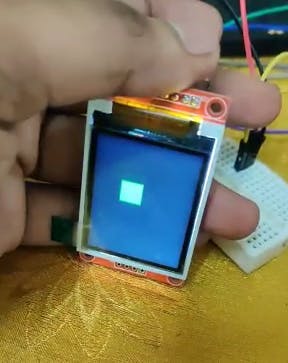
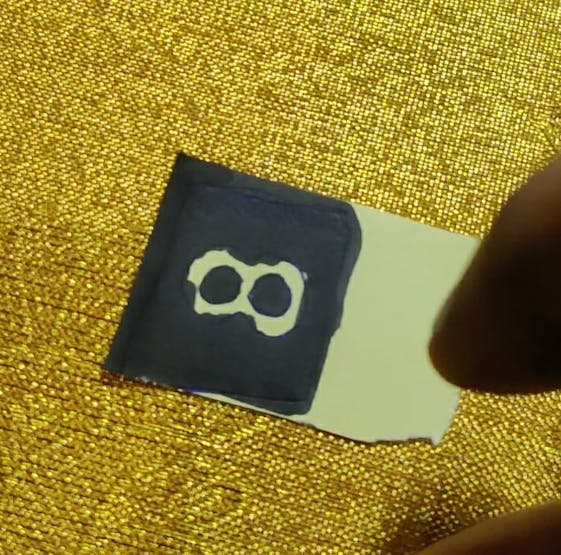
8.c TFT + OV7670:Liveimagetest
本小节的 Github 链接。
现在我们已经知道如何从存储的 HEX 值数组中显示图像,让我们扩展它以显示实时图像。
代码说明:
uint16_t pixels[176 * 144];
这行代码声明了一个数组来存储从相机捕获的图像。
Camera.readFrame(pixels);
这行代码从相机读取一帧并将其存储在像素数组中。
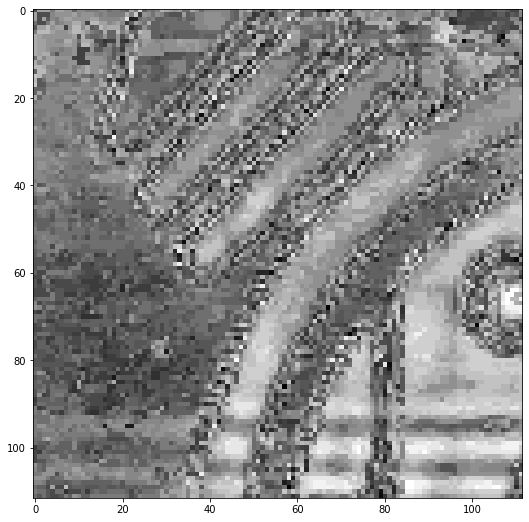
for (int i = 0; i < 112; i++)
{
   for(int j = 0; j < 112; j++)
   {
      uint16_t pixel = pixels[176*i +j];
      tft.drawPixel(i,j,pixel);
   }
}
这些代码行遍历像素阵列并在 TFT LCD 显示器上绘制图像。
草图:
/*
OV767X - Camera Test Pattern
This sketch waits for the letter 'c' on the Serial Monitor,
it then reads a frame from the OmniVision OV7670 camera and
prints the data to the Serial Monitor as a hex string.
The website https://rawpixels.net - can be used the visualize the data:
width: 176
height: 144
RGB565
Little Endian
Circuit:
- Arduino Nano 33 BLE board
- OV7670 camera module:
- 3.3 connected to 3.3
- GND connected GND
- SIOC connected to A5
- SIOD connected to A4
- VSYNC connected to 8
- HREF connected to A1
- PCLK connected to A0
- XCLK connected to 9
- D7 connected to 4
- D6 connected to 6
- D5 connected to 5
- D4 connected to 3
- D3 connected to 2
- D2 connected to 0 / RX
- D1 connected to 1 / TX
- D0 connected to 10
This example code is in the public domain.
*/
#include // Core graphics library
#include // Hardware-specific library for ST7735
#include
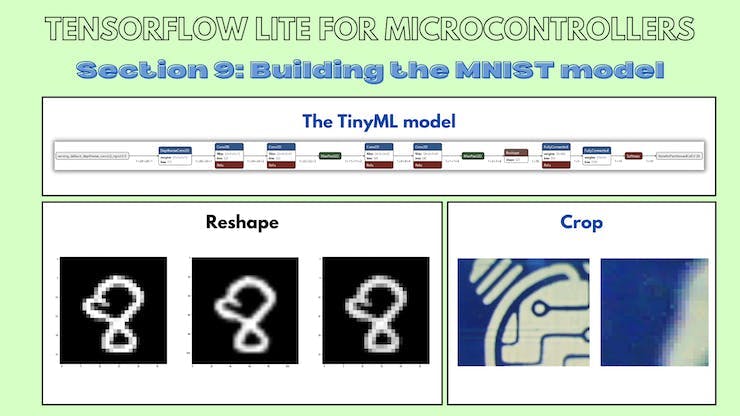
9. 构建 MNIST TinyML 模型
注意:如果您是 TensorFlow 或 TinyML 的新手,我强烈建议您通读这篇TinyML 简介博客,以便在深入了解本节之前很好地掌握这些概念。
现在我们已经让相机和显示器工作并集成了,让我们构建机器学习模型来识别数字。
9.a 探索 Colab 笔记本
本小节的 Github 链接。
代码说明:
import numpy as np                   # advanced math library
import matplotlib.pyplot as plt      # MATLAB like plotting routines
import random                        # for generating random numbers

from keras.datasets import mnist     # MNIST dataset is included in Keras
from keras.models import Sequential  # Model type to be used

from keras.layers.core import Dense, Dropout, Activation # Types of layers to be used in our model
from keras.utils import np_utils                         # NumPy related tools
import tensorflow as tf

tf.config.run_functions_eagerly(True)
这些代码行导入必要的库来构建和可视化我们的模型。
(X_train, y_train), (X_test, y_test) = mnist.load_data()
print("X_train shape", X_train.shape)
print("y_train shape", y_train.shape)
print("X_test shape", X_test.shape)
print("y_test shape", y_test.shape)

>>X_train shape (60000, 28, 28)
>>y_train shape (60000,)
>>X_test shape (10000, 28, 28)
>>y_test shape (10000,)
这些代码行加载 MNIST 测试并将图像训练到正确的变量中。
plt.rcParams['figure.figsize'] = (9,9) # Make the figures a bit bigger

for i in range(9):
    plt.subplot(3,3,i+1)
    num = random.randint(0, len(X_train))
    plt.imshow(X_train[num], cmap='gray', interpolation='none')
    plt.title("Class {}".format(y_train[num]))

plt.tight_layout()
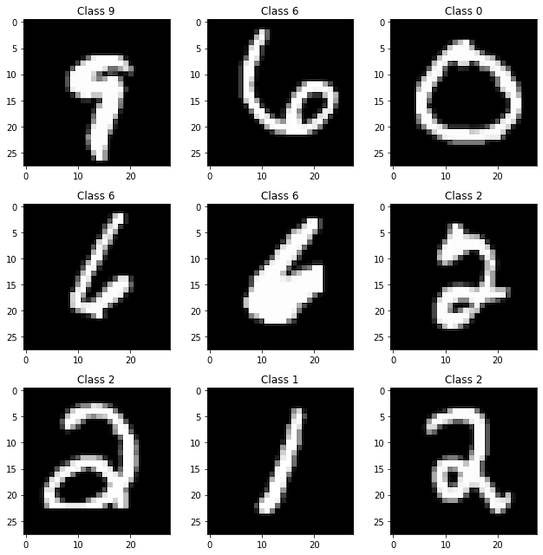
这些代码行从 MNIST 数据集的训练数据中可视化了九个不同的图像。
def matprint(mat, fmt="g"):
    col_maxes = [max([len(("{:"+fmt+"}").format(x)) for x in col]) for col in mat.T]
    for x in mat:
        for i, y in enumerate(x):
            print(("{:"+str(col_maxes[i])+fmt+"}").format(y), end=",")
        print("")

matprint(X_train[num])
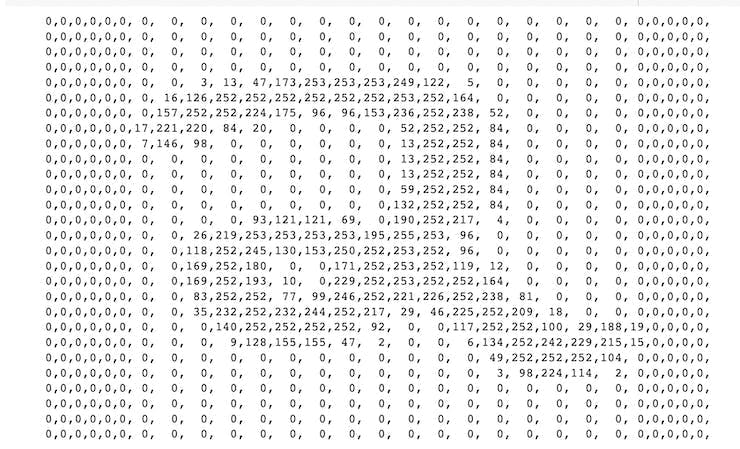
这些代码行将训练数据中的随机图像显示为值数组。
from keras.preprocessing.image import ImageDataGenerator
from keras.layers import Conv2D, MaxPooling2D, ZeroPadding2D, GlobalAveragePooling2D, Flatten
from keras.layers import BatchNormalization
这些代码行导入必要的层来构建机器学习模型。
# Again, do some formatting
# Except we do not flatten each image into a 784-length vector because we want to perform convolutions first

X_train = X_train.reshape(60000, 28, 28, 1) #add an additional dimension to represent the single-channel
X_test = X_test.reshape(10000, 28, 28, 1)

X_train = X_train.astype('float32')         # change integers to 32-bit floating point numbers
X_test = X_test.astype('float32')

#X_train /= 255                              # normalize each value for each pixel for the entire vector for each input
#X_test /= 255

print("Training matrix shape", X_train.shape)
print("Testing matrix shape", X_test.shape)
这些代码行对训练和测试数据进行预处理以使其正常工作,例如:标准化、Float64 到 Float32 的转换和重塑。
# one-hot format classes

nb_classes = 10 # number of unique digits

Y_train = np_utils.to_categorical(y_train, nb_classes)
Y_test = np_utils.to_categorical(y_test, nb_classes)
这些代码行 one-hot 对训练和测试图像的标签进行编码。
from keras.layers.convolutional import DepthwiseConv2D
from keras.backend import relu
from keras.activations import softmax
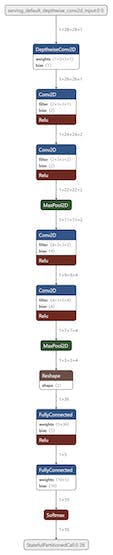
model = Sequential() # Linear stacking of layers
model.add(DepthwiseConv2D((3,3),input_shape=(28,28,1)))
# Convolution Layer 1
model.add(Conv2D(2, (3, 3))) # 2 different 3x3 kernels -- so 2 feature maps
model.add(BatchNormalization(axis=-1)) # normalize each feature map before activation
convLayer1 = Activation('relu') # activation
model.add(convLayer1)
# Convolution Layer 2
model.add(Conv2D(2, (3, 3))) # 2 different 3x3 kernels -- so 2 feature maps
model.add(BatchNormalization(axis=-1)) # normalize each feature map before activation
model.add(Activation('relu')) # activation
convLayer2 = MaxPooling2D(pool_size=(2,2)) # Pool the max values over a 2x2 kernel
model.add(convLayer2)
# Convolution Layer 3
model.add(Conv2D(4,(3, 3))) # 4 different 3x3 kernels -- so 4 feature maps
model.add(BatchNormalization(axis=-1)) # normalize each feature map before activation
convLayer3 = Activation('relu') # activation
model.add(convLayer3)
# Convolution Layer 4
model.add(Conv2D(4, (3, 3))) # 4 different 3x3 kernels -- so 64 feature maps
model.add(BatchNormalization(axis=-1)) # normalize each feature map before activation
model.add(Activation('relu')) # activation
convLayer4 = MaxPooling2D(pool_size=(2,2)) # Pool the max values over a 2x2 kernel
model.add(convLayer4)
model.add(Flatten())
model.add(Dense(5,activation = relu))
model.add(Dense(10, activation = softmax))
这些代码行定义了机器学习模型中的实际层。
model.summary()
这行代码向用户显示有关模型架构的信息。
model.compile(loss='categorical_crossentropy', optimizer='adam', metrics=['accuracy'])
这行代码定义了机器学习模型在训练时要使用的损失、优化器和其他指标。
history = model.fit(X_train,Y_train, steps_per_epoch=60000//128, epochs=3, verbose=1,
                    validation_data=(X_test,Y_test))
这行代码训练机器学习模型。
score = model.evaluate(X_test, Y_test)
print('Test score:', score[0])
print('Test accuracy:', score[1])
这些代码行评估机器学习模型并将准确性和分数打印给用户。
!apt-get -qq install xxd
converter = tf.lite.TFLiteConverter.from_keras_model(model)
tflite_model = converter.convert()

# Save the model to disk
open("gesture_model.tflite", "wb").write(tflite_model)

import os
basic_model_size = os.path.getsize("gesture_model.tflite")
print("Model is %d bytes" % basic_model_size)
这些代码行将 TensorFlow 模型转换为 TensorFlow Lite 模型。
!echo "const unsigned char model[] = {" > /content/model.h
!cat gesture_model.tflite | xxd -i      >> /content/model.h
!echo "};"                              >> /content/model.h

import os
model_h_size = os.path.getsize("model.h")
print(f"Header file, model.h, is {model_h_size:,} bytes.")
print("\nOpen the side panel (refresh if needed). Double click model.h to download the file.")
这些代码行将 TensorFlow Lite 模型转换为 C 文件以供微控制器使用。
现在我们已经构建并训练了我们的模型,我们现在需要弄清楚如何将数据从相机发送到 TinyML 模型。
相机的输出尺寸为 176x144,模型的输入尺寸为 28x28。我们可以尝试两种方法:
- 1. 从相机的输出中裁剪出 28x28 的图像。
- 2. 从相机的输出中裁剪出 128x128 的图像并将其重新整形为 28x28
我们将在以下部分尝试这两种方法。
9.b OV7670:作物测试
本小节的 Github 链接。
代码说明:
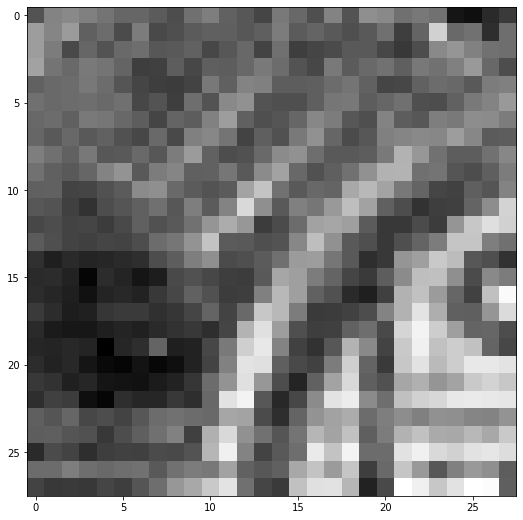
uint16_t pixels[176 * 144]= {0x0D2A,0xED29,0xED29,0xED29,....,0xB5AD,0x95B5,0xB6B5,0xB6B5};
这行代码将 HEX 值存储在大小为 176X144 的数组中。
for(int a = 0; a< 112; a++)
   {
    for(int b = 0; b< 112; b++)
    {
      Serial.print( pixels[176*a +b]);
      Serial.print(", ");
    }
    Serial.println("");
   }
这些代码行遍历数组并打印出图像的前 28x28 像素。
草图:
/*
  OV767X - Camera Test Pattern

  This sketch waits for the letter 'c' on the Serial Monitor,
  it then reads a frame from the OmniVision OV7670 camera and
  prints the data to the Serial Monitor as a hex string.

  The website https://rawpixels.net - can be used the visualize the data:
    width: 176
    height: 144
    RGB565
    Little Endian

  Circuit:
    - Arduino Nano 33 BLE board
    - OV7670 camera module:
      - 3.3 connected to 3.3
      - GND connected GND
      - SIOC connected to A5
      - SIOD connected to A4
      - VSYNC connected to 8
      - HREF connected to A1
      - PCLK connected to A0
      - XCLK connected to 9
      - D7 connected to 4
      - D6 connected to 6
      - D5 connected to 5
      - D4 connected to 3
      - D3 connected to 2
      - D2 connected to 0 / RX
      - D1 connected to 1 / TX
      - D0 connected to 10

  This example code is in the public domain.
*/

#include <Arduino_OV767X.h>

uint16_t pixels[176 * 144]= {0x0D2A,0xED29,0xED29,0xED29,....,0xB5AD,0x95B5,0xB6B5,0xB6B5};
int arr1[28*28];
void setup() {
  Serial.begin(9600);
  while (!Serial);

  Serial.println("OV767X Camera Capture");
  Serial.println();
  Serial.println("Send the 'c' character to read a frame ...");
  Serial.println();
}

void loop() {
  if (Serial.read() == 'c') {

    for(int a =0; a< 112; a++)
   {
    for(int b =0; b< 112; b++)
    {
      Serial.print( pixels[176*a +b]);
      Serial.print(", ");
    }
    Serial.println("");
   }
   Serial.println("");
  }
}

9.c OV7670:重塑测试
本小节的 Github 链接。
代码说明:
for(int i=0; i < 28; i++){
    for(int j=0; j< 28; j++){
      int sum =0;

     for(int k =0; k<4;k++){
      for(int l =0; l<4; l++){
        sum += arr[4*(112*i+j) + 112 * k + l];
      }
     }
      sum = sum /16;
      arr1[i*28+j] = sum;
      Serial.print(sum);
     Serial.print(", ");
    }
    Serial.println("");
  }

Serial.println("");
这些代码行使用 4x4 池化内核,步长为 1,遍历 112x112 2D 数组以输出 28x28 图像。

草图:
#include "num.h"
float arr1[28 * 28];
int filterWidth = 4;
int filterheight = 4;
void setup() {
  Serial.begin(9600);


}

void loop() {
  // put your main code here, to run repeatedly:
  for(int i=0; i < 28; i++){
    for(int j=0; j< 28; j++){
      int sum =0;

     for(int k =0; k<4;k++){
      for(int l =0; l<4; l++){
        sum += arr[4*(112*i+j) + 112 * k + l];
      }
     }
      sum = sum /16;
      arr1[i*28+j] = sum;
      Serial.print(sum);
     Serial.print(", ");
    }
    Serial.println("");
  }

Serial.println("");

}

9.d 探索 reshape.ipynb Colab 笔记本
本小节的 Github 链接。
代码说明:
from skimage.transform import resize
t = number28.reshape(28,28)
print(t.shape)
number112 = resize(t, (112, 112))
print(number112.dtype)
"""
for i in range(0,112):
  for j in range(0,112):
    if number112[i][j] < 10e-20:
      number112[i][j] = 0
      /
"""
for i in range(0,112):
  for j in range(0,112):
      number112[i][j] = number112[i][j] * 10e+19
      if number112[i][j] < 10:
       number112[i][j] = 0
np.amax(number112)
number112 = number112 /12
np.amax(number112)
plt.imshow(number112, cmap='gray', interpolation='none')
plt.imshow(t, cmap='gray', interpolation='none')
这些代码行将 28X28 MNIST 图像放大为 112X112 图像。
def matprint(mat, fmt="g"):
    col_maxes = [max([len(("{:"+fmt+"}").format(x)) for x in col]) for col in mat.T]
    for x in mat:
        for i, y in enumerate(x):
            print(("{:"+str(col_maxes[i])+fmt+"}").format(y), end=",")
        print("")
matprint(number112)
这些代码行打印放大的 112X112 MNIST 图像。
number28new = number28new.reshape(28,28)
for i in range(0,28):
  for j in range(0,28):
      if number28new[i][j] < 35:
       number28new[i][j] = 0
plt.imshow(number28new, cmap='gray', interpolation='none')
这些代码行打印重新整形的 28x28 MNIST 图像。
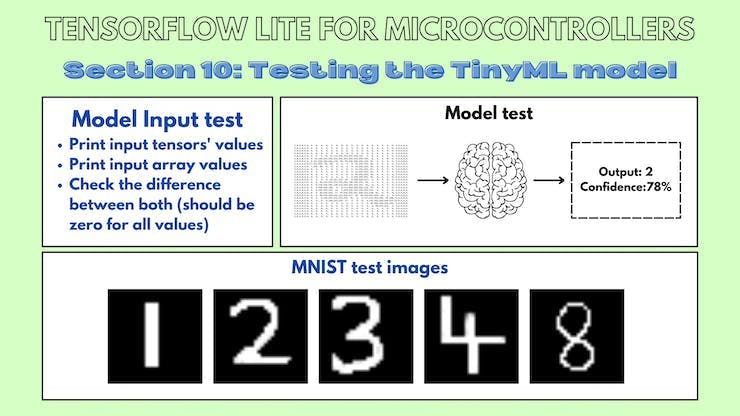
10. 测试 TinyML 模型
现在我们已经构建了一个 TinyML 模型并测试了将数据输入模型的两种方法,是时候将 TinyML 模型集成到主应用程序中了。
10.a TinyML 模型:输入测试
本小节的 Github 链接。
我们如何发送输入数据?
对于基于时间序列的模型,很明显发送输入数据是因为输入张量是一维数组。
//1D input tensor
tflInputTensor->data.f[i * 3 + 0] = (ax + 8.0) / 16.0;
tflInputTensor->data.f[i * 3 + 1] = (ay + 8.0) / 16.0;
tflInputTensor->data.f[i * 3 + 2] = (az + 8.0) / 16.0;
我不知道如何将数据发送到这个特定的 TinyML 模型,所以我设计了一个测试。
我将 MNIST 训练数据的数组值存储到 num.h 文件中。
数小时:
float num[784] = {0,0,0,0,0,0,  0,  0,  0,  0,  0,  0,  0,  0,  0,  0,  0,  0,  0,  0,  0,  0,0,0,0,0,0,0,
0,0,0,0,0,0,  0,  0,  0,  0,  0,  0,  0,  0,  0,  0,  0,  0,  0,  0,  0,  0,0,0,0,0,0,0,
0,0,0,0,0,0,  0,  0,  0,  0,  0,  0,  0,  0,  0,  0,  0,  0,  0,  0,  0,  0,0,0,0,0,0,0,
0,0,0,0,0,0,  0,  0,  0,  0,  0,  0,  0,  0,  0,  0,  0,  0,  0,  0,  0,  0,0,0,0,0,0,0,
0,0,0,0,0,0,  0,  0,  0,  0,  0,  0,  0,  0,  0,  0,  0,  0,  0,  0,  0,  0,0,0,0,0,0,0,
0,0,0,0,0,0,  0,  0,  0,  0,  0,  0, 49,143,223,196,149, 73,  0,  0,  0,  0,0,0,0,0,0,0,
0,0,0,0,0,0,  0,  0,  0,  0,  0,126,228,252,257,252,248,242,193, 67,  0,  0,0,0,0,0,0,0,
0,0,0,0,0,0,  0,  0,  0,  0,176,247,254,213,156,149,175,236,256,204, 53,  0,0,0,0,0,0,0,
0,0,0,0,0,0,  0,  0,  0,119,246,248,156,  0,  0,  0,  0, 69,216,259,221, 50,0,0,0,0,0,0,
0,0,0,0,0,0,  0,  0,  0,166,246,160,  0,  0,  0,  0,  0,  0,107,225,259,177,0,0,0,0,0,0,
0,0,0,0,0,0,  0,  0,115,229,234, 86,  0,  0,  0,  0,  0,  0,  0,142,252,209,0,0,0,0,0,0,
0,0,0,0,0,0,107,223,230,214,237,192, 50,  0,  0,  0,  0,  0,  0,124,245,186,0,0,0,0,0,0,
0,0,0,0,0,0,201,251,147, 44, 95,154,127,  0,  0,  0,  0,  0,116,224,235, 91,0,0,0,0,0,0,
0,0,0,0,0,0,192,254,178, 89,  0,  0,  0,  0,  0,  0,  0, 80,224,242,149,  0,0,0,0,0,0,0,
0,0,0,0,0,0, 67,227,256,244,190, 94,  0,  0,  0,  0, 82,218,248,163,  0,  0,0,0,0,0,0,0,
0,0,0,0,0,0,  0, 91,210,245,244,227,184, 90,  0, 84,219,256,188, 38,  0,  0,0,0,0,0,0,0,
0,0,0,0,0,0,  0,  0,  0, 76,114,127,201,234,231,244,263,218, 74,  0,  0,  0,0,0,0,0,0,0,
0,0,0,0,0,0,  0,  0,  0,  0,  0,  0, 47,205,266,273,250, 92,  0,  0,  0,  0,0,0,0,0,0,0,
0,0,0,0,0,0,  0,  0,  0,  0,  0,  0, 44,227,264,260,253,145,  0,  0,  0,  0,0,0,0,0,0,0,
0,0,0,0,0,0,  0,  0,  0,  0,  0,  0,173,251,208,158,218,239,163,  0,  0,  0,0,0,0,0,0,0,
0,0,0,0,0,0,  0,  0,  0,  0,  0,120,245,236, 92,  0, 52,201,227, 98,  0,  0,0,0,0,0,0,0,
0,0,0,0,0,0,  0,  0,  0,  0,  0,184,256,192,  0,  0,  0, 65,205,213, 40,  0,0,0,0,0,0,0,
0,0,0,0,0,0,  0,  0,  0,  0,  0,192,250,146,  0,  0,  0, 70,206,225, 42,  0,0,0,0,0,0,0,
0,0,0,0,0,0,  0,  0,  0,  0,  0,173,247,232,186,181,199,240,249,178,  0,  0,0,0,0,0,0,0,
0,0,0,0,0,0,  0,  0,  0,  0,  0, 39,140,201,226,230,232,233,184, 65,  0,  0,0,0,0,0,0,0,
0,0,0,0,0,0,  0,  0,  0,  0,  0,  0,  0,  0,  0,  0,  0,  0,  0,  0,  0,  0,0,0,0,0,0,0,
0,0,0,0,0,0,  0,  0,  0,  0,  0,  0,  0,  0,  0,  0,  0,  0,  0,  0,  0,  0,0,0,0,0,0,0,
0,0,0,0,0,0,  0,  0,  0,  0,  0,  0,  0,  0,  0,  0,  0,  0,  0,  0,  0,  0,0,0,0,0,0,0};
模型.h:
//MPU6050_model.ino
#include
代码说明:输入张量:
for(int i = 0; i < 28; i++){
  for(int j =0; j < 28; j++){
      tflInterpreter->input(0)->data.f[28*i+j] = num[28*i+j] / 255;
    }
  }
为了测试输入张量,我使用 2D 循环发送输入数据。
for(int i = 0; i < 28; i++){
  for(int j =0; j < 28; j++){
      Serial.print(tflInterpreter->input(0)->data.f[28*i+j]);
      Serial.print(", ");
    }
      Serial.println("");
  }
Serial.println("");
然后,我打印出存储在 TinyML 模型的输入张量中的值。
for(int i = 0; i < 28; i++){
  for(int j =0; j < 28; j++){
      Serial.print(num[28*i+j]);
      Serial.print(", ");
    }
      Serial.println("");
  }
Serial.println("");
然后我打印出存储在循环中的实际值。
for(int i = 0; i < 28; i++){
  for(int j =0; j < 28; j++){
      Serial.print(tflInterpreter->input(0)->data.f[28*i+j]-num[28*i+j]);
      Serial.print(", ");
    }
      Serial.println("");
  }
最后,我打印出存储在输入张量中的值与存储在数组中的值之间的差异。如果所有差异都为零,则输入已按照我们想要的方式正确存储在输入张量中。
10.b TinyML 模型:模型测试
本小节的 Github 链接。
现在我们已经弄清楚了如何发送输入数据,是时候测试模型了。这段代码与上面的代码相同,只是调用了推理并打印了输出张量。
num.h 文件:
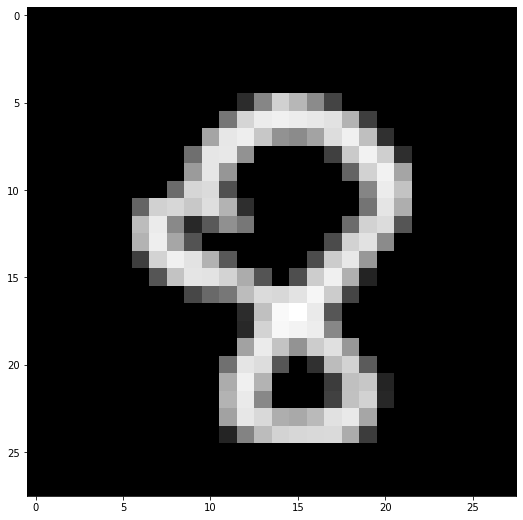
float num[784] = {0,0,0,0,0,0,  0,  0,  0,  0,  0,  0,  0,  0,  0,  0,  0,  0,  0,  0,  0,  0,0,0,0,0,0,0,
0,0,0,0,0,0,  0,  0,  0,  0,  0,  0,  0,  0,  0,  0,  0,  0,  0,  0,  0,  0,0,0,0,0,0,0,
0,0,0,0,0,0,  0,  0,  0,  0,  0,  0,  0,  0,  0,  0,  0,  0,  0,  0,  0,  0,0,0,0,0,0,0,
0,0,0,0,0,0,  0,  0,  0,  0,  0,  0,  0,  0,  0,  0,  0,  0,  0,  0,  0,  0,0,0,0,0,0,0,
0,0,0,0,0,0,  0,  0,  0,  0,  0,  0,  0,  0,  0,  0,  0,  0,  0,  0,  0,  0,0,0,0,0,0,0,
0,0,0,0,0,0,  0,  0,  0,  0,  0,  0, 49,143,223,196,149, 73,  0,  0,  0,  0,0,0,0,0,0,0,
0,0,0,0,0,0,  0,  0,  0,  0,  0,126,228,252,257,252,248,242,193, 67,  0,  0,0,0,0,0,0,0,
0,0,0,0,0,0,  0,  0,  0,  0,176,247,254,213,156,149,175,236,256,204, 53,  0,0,0,0,0,0,0,
0,0,0,0,0,0,  0,  0,  0,119,246,248,156,  0,  0,  0,  0, 69,216,259,221, 50,0,0,0,0,0,0,
0,0,0,0,0,0,  0,  0,  0,166,246,160,  0,  0,  0,  0,  0,  0,107,225,259,177,0,0,0,0,0,0,
0,0,0,0,0,0,  0,  0,115,229,234, 86,  0,  0,  0,  0,  0,  0,  0,142,252,209,0,0,0,0,0,0,
0,0,0,0,0,0,107,223,230,214,237,192, 50,  0,  0,  0,  0,  0,  0,124,245,186,0,0,0,0,0,0,
0,0,0,0,0,0,201,251,147, 44, 95,154,127,  0,  0,  0,  0,  0,116,224,235, 91,0,0,0,0,0,0,
0,0,0,0,0,0,192,254,178, 89,  0,  0,  0,  0,  0,  0,  0, 80,224,242,149,  0,0,0,0,0,0,0,
0,0,0,0,0,0, 67,227,256,244,190, 94,  0,  0,  0,  0, 82,218,248,163,  0,  0,0,0,0,0,0,0,
0,0,0,0,0,0,  0, 91,210,245,244,227,184, 90,  0, 84,219,256,188, 38,  0,  0,0,0,0,0,0,0,
0,0,0,0,0,0,  0,  0,  0, 76,114,127,201,234,231,244,263,218, 74,  0,  0,  0,0,0,0,0,0,0,
0,0,0,0,0,0,  0,  0,  0,  0,  0,  0, 47,205,266,273,250, 92,  0,  0,  0,  0,0,0,0,0,0,0,
0,0,0,0,0,0,  0,  0,  0,  0,  0,  0, 44,227,264,260,253,145,  0,  0,  0,  0,0,0,0,0,0,0,
0,0,0,0,0,0,  0,  0,  0,  0,  0,  0,173,251,208,158,218,239,163,  0,  0,  0,0,0,0,0,0,0,
0,0,0,0,0,0,  0,  0,  0,  0,  0,120,245,236, 92,  0, 52,201,227, 98,  0,  0,0,0,0,0,0,0,
0,0,0,0,0,0,  0,  0,  0,  0,  0,184,256,192,  0,  0,  0, 65,205,213, 40,  0,0,0,0,0,0,0,
0,0,0,0,0,0,  0,  0,  0,  0,  0,192,250,146,  0,  0,  0, 70,206,225, 42,  0,0,0,0,0,0,0,
0,0,0,0,0,0,  0,  0,  0,  0,  0,173,247,232,186,181,199,240,249,178,  0,  0,0,0,0,0,0,0,
0,0,0,0,0,0,  0,  0,  0,  0,  0, 39,140,201,226,230,232,233,184, 65,  0,  0,0,0,0,0,0,0,
0,0,0,0,0,0,  0,  0,  0,  0,  0,  0,  0,  0,  0,  0,  0,  0,  0,  0,  0,  0,0,0,0,0,0,0,
0,0,0,0,0,0,  0,  0,  0,  0,  0,  0,  0,  0,  0,  0,  0,  0,  0,  0,  0,  0,0,0,0,0,0,0,
0,0,0,0,0,0,  0,  0,  0,  0,  0,  0,  0,  0,  0,  0,  0,  0,  0,  0,  0,  0,0,0,0,0,0,0
草图:
//MPU6050_model.ino
#include
代码说明:
TfLiteStatus invokeStatus = tflInterpreter->Invoke();
这些代码行对存储在输入张量中的数据调用推理。
out[0] = tflInterpreter->output(0)->data.f[0];
  out[1] = tflInterpreter->output(0)->data.f[1];
  out[2] = tflInterpreter->output(0)->data.f[2];
  out[3] = tflInterpreter->output(0)->data.f[3];
  out[4] = tflInterpreter->output(0)->data.f[4];
  out[5] = tflInterpreter->output(0)->data.f[5];
  out[6] = tflInterpreter->output(0)->data.f[6];
  out[7] = tflInterpreter->output(0)->data.f[7];
  out[8] = tflInterpreter->output(0)->data.f[8];
  out[9] = tflInterpreter->output(0)->data.f[9];
这些代码行访问输出张量并将它们存储在一个数组中以供以后使用。
float maxVal = out[0];
int maxIndex = 0;
for(int k =0; k < 10;k++){
  if (out[k] > maxVal) {
      maxVal = out[k];
      maxIndex = k;
    }
  }
Serial.print("Number ");
Serial.print(maxIndex);
Serial.println(" detected");
Serial.print("Confidence: ");
Serial.println(maxVal);
这几行代码打印出输出值最高的类的类索引和置信度值。
Serial.print(out[0]);
  Serial.print(",");
  Serial.print(out[1]);
  Serial.print(",");
  Serial.print(out[2]);
  Serial.print(",");
  Serial.print(out[3]);
  Serial.print(",");
  Serial.print(out[4]);
  Serial.print(",");
  Serial.print(out[5]);
  Serial.print(",");
  Serial.print(out[6]);
  Serial.print(",");
  Serial.print(out[7]);
  Serial.print(",");
  Serial.print(out[8]);
  Serial.print(",");
  Serial.println(out[9]);
这些代码行打印出每个单独类的置信度值。
10.c MNIST:测试图像
本小节的 Github 链接。
您可以使用这些转换为 NumPy 数组的图像来测试您的 MNIST TinyML 模型。

结论
我感谢我的 GSoC 导师 Paul Ruiz 在整个项目中对我的指导!
- 带有OV7670相机模块的TinyML 2次下载
- 教程第4部分:带有OV7670相机模块的TinyML 0次下载
- 基于OV7670的视觉捕捉系统 2次下载
- 教程第2部分:带有OV7670摄像头模块的TinyML 2次下载
- (兼容正点原子引脚)OV7670 FIFO 30W摄像头介绍(一) --- 整体介绍/SCCB时序 25次下载
- 基于stm32控制OV7670摄像头 125次下载
- STM32单片机移植带有FIFO摄像头的OV7670 104次下载
- 使用STM32单片机应用OV7670摄像头的AD原理图免费下载 0次下载
- OV7670的驱动程序和模块经典资料合集免费下载 52次下载
- OV7670摄像头模块的资料合集免费下载 121次下载
- OV7670模块的详细资料合集免费下载 26次下载
- OV7670图象传感器摄像头的调试资料和程序资料免费下载 56次下载
- ov7670电路原理图 0次下载
- OV7670使用说明和程序讲解-参考精英板 76次下载
- OV7670模块(资料总包) 205次下载
- 如何通过OV5640摄像头显示在VGA显示屏上 2105次阅读
- 微雪电子OV5640 摄像头模块B型简介 3314次阅读
- 微雪电子OV5640摄像头模块A型简介 5358次阅读
- 微雪电子OV5640 摄像头模块C型简介 2464次阅读
- 微雪电子OV7670数码摄像头模块简介 3926次阅读
- 微雪电子OV2710高清USB摄像头简介 5540次阅读
- fireflyAIO-3288J摄像头模组介绍 1968次阅读
- fireflyAIO-3399J摄像头模组简介 1683次阅读
- 飞凌嵌入式500W摄像头介绍 2016次阅读
- 关于Firefly摄像头模组的简介 2895次阅读
- 天嵌科技OV5640摄像头模块-CMOS摄像头介绍 1.1w次阅读
- 基于OmniVision的OV5640设计的USB摄像头模块 5371次阅读
- 天嵌科技OV3640摄像头模块介绍 2178次阅读
- OV7620 cmos摄像头的使用 1.1w次阅读
- 一文看懂ov7620与ov7670的区别 5w次阅读

 上传资料赚积分
下载排行
本周
- 1山景DSP芯片AP8248A2数据手册
- 1.06 MB | 532次下载 | 免费
- 2RK3399完整板原理图(支持平板,盒子VR)
- 3.28 MB | 339次下载 | 免费
- 3TC358743XBG评估板参考手册
- 1.36 MB | 330次下载 | 免费
- 4DFM软件使用教程
- 0.84 MB | 295次下载 | 免费
- 5元宇宙深度解析—未来的未来-风口还是泡沫
- 6.40 MB | 227次下载 | 免费
- 6迪文DGUS开发指南
- 31.67 MB | 194次下载 | 免费
- 7元宇宙底层硬件系列报告
- 13.42 MB | 182次下载 | 免费
- 8FP5207XR-G1中文应用手册
- 1.09 MB | 178次下载 | 免费
本月
- 1OrCAD10.5下载OrCAD10.5中文版软件
- 0.00 MB | 234315次下载 | 免费
- 2555集成电路应用800例(新编版)
- 0.00 MB | 33566次下载 | 免费
- 3接口电路图大全
- 未知 | 30323次下载 | 免费
- 4开关电源设计实例指南
- 未知 | 21549次下载 | 免费
- 5电气工程师手册免费下载(新编第二版pdf电子书)
- 0.00 MB | 15349次下载 | 免费
- 6数字电路基础pdf(下载)
- 未知 | 13750次下载 | 免费
- 7电子制作实例集锦 下载
- 未知 | 8113次下载 | 免费
- 8《LED驱动电路设计》 温德尔著
- 0.00 MB | 6656次下载 | 免费
总榜
- 1matlab软件下载入口
- 未知 | 935054次下载 | 免费
- 2protel99se软件下载(可英文版转中文版)
- 78.1 MB | 537798次下载 | 免费
- 3MATLAB 7.1 下载 (含软件介绍)
- 未知 | 420027次下载 | 免费
- 4OrCAD10.5下载OrCAD10.5中文版软件
- 0.00 MB | 234315次下载 | 免费
- 5Altium DXP2002下载入口
- 未知 | 233046次下载 | 免费
- 6电路仿真软件multisim 10.0免费下载
- 340992 | 191187次下载 | 免费
- 7十天学会AVR单片机与C语言视频教程 下载
- 158M | 183279次下载 | 免费
- 8proe5.0野火版下载(中文版免费下载)
- 未知 | 138040次下载 | 免费


 工商网监
工商网监
评论