 用树莓派RP2350 DIY 桌面动态温湿度计

本文原文地址:https://bbs.elecfans.com/jishu_2489798_1_1.html
作者:@jf_07365693
树莓派RP2350 - 桌面动态温湿度计
本文介绍了DFrobotBeetle RP2350 开发板结合 DHT11 模块、锂电池模块、随机眨眼动画,实现 OLED 显示的桌面动态温湿度计的项目设计。
一、项目介绍
本项目包括
工程调试:电量获取、电量图标显示、DHT11 温湿度显示、OLED 眨眼动画
工程代码:合并调试代码,实现完整的项目设计功能
效果演示:帧动画显示、动态展示
最终实现桌面动态温湿度计的制作。
工作原理
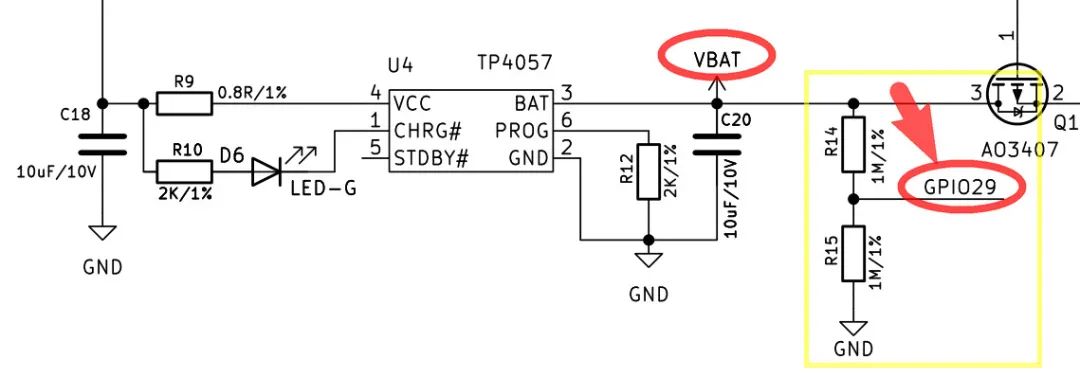
根据开发板原理图可知,电池 VBAT 的分压电路与主控的 GPIO29 模拟接口相连,因此通过该引脚可实时采集监测电池电压信息,进而实现电量显示。
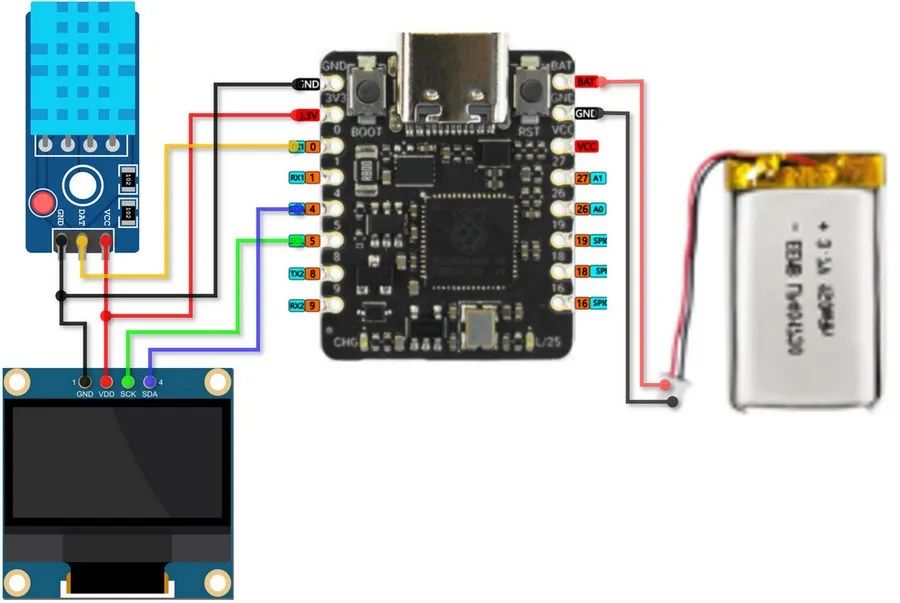
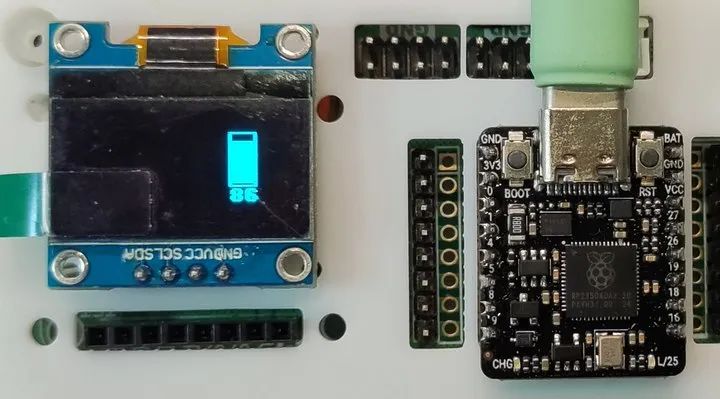
二、硬件连接
GP0 -> DATA (DHT11)
GP4 -> SDA (OLED)
GP5 -> SCL (OLED)
BAT -> Battery Positive
GND -> Battery Negative
示意图
三、工程调试
包括 ADC 电量采集、电量的 OLED 显示、DHT11温湿度数据和电量图标的显示、眨眼动画等调试项目。
1. 电量获取
通过 ADC 读取 GPIO29 电压值并终端打印
代码
from machine import Pin, ADC
import utime
# initialize ADC pin
adc = ADC(Pin(29))
# parameters for voltage divide resistor
R1, R2 = 1000000, 1000000
DIV_RATIO = (R1 + R2) / R1
def get_battery_level():
adc_value = adc.read_u16()
voltage = (adc_value / 65535) * 3.3
actual_voltage = voltage * DIV_RATIO # voltage division compensation
percent = min(max((actual_voltage - 3.3) / (4.2 - 3.3) * 100, 0), 100)
return percent, actual_voltage
while True:
percent, voltage = get_battery_level()
print('Battery Voltage: {:.2f} V, Battery Level: {:.1f}%'.format(voltage,percent))
utime.sleep(1)
保存代码,连接开发板,配置解释器并运行。
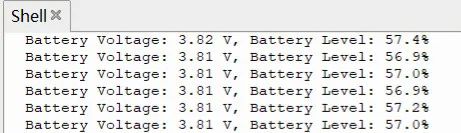
效果
终端打印 ADC 采集的电池电压值以及电量百分比
2. 电量显示
OLED 显示 ADC 采集的电量百分比。
代码
from machine import Pin, ADC, I2C
import ssd1306
import utime
# initialize ADC pin
adc = ADC(Pin(29))
# initialize OLED
i2c = I2C(0, scl=Pin(5), sda=Pin(4))
oled = ssd1306.SSD1306_I2C(128, 64, i2c)
# parameters of voltage divide resistor
R1, R2 = 1000000, 1000000 # 1M
Vref_BAT = 3.9 # battery voltage in full charged state
def get_battery_level():
adc_value = adc.read_u16()
voltage = (adc_value / 65535) * 3.3
DIV_RATIO = (R1 + R2) / R1
actual_voltage = voltage * DIV_RATIO # voltage division compensation
percent = min(max((actual_voltage - 3.3) / (Vref_BAT - 3.3) * 100, 0), 100)
return percent, actual_voltage
def draw_battery(percent):
oled.fill(0)
oled.text('{:.0f}%'.format(percent), 0, 17)
# draw battery cartoon icon
oled.rect(0, 0, 30, 15, 1) # frame (x,y,width,height)
oled.rect(30, 5, 3, 5, 1) # anode
oled.fill_rect(2, 2, int(26 * percent / 100), 11, 1) # electric percent column
oled.rotate(0)
oled.show()
def BAT_display(percent,x,y): # battery percent, icon position (x,y)
oled.fill(0)
oled.text('{:.0f}%'.format(percent), 0+x, 17+y)
# draw battery cartoon icon
oled.rect(0+x, 0+y, 30, 15, 1) # frame (x,y,width,height)
oled.rect(30+x, 5+y, 3, 5, 1) # anode
oled.fill_rect(2+x, 2+y, int(26 * percent / 100), 11, 1) # electric percent column
oled.rotate(0)
oled.show()
def draw_vertical_battery(percent,x,y): # battery percent, icon position (x,y)
oled.fill(0)
oled.text('{:.0f}'.format(percent), 0+x, 33+y)
# draw battery cartoon icon
oled.rect(0+x, 2+y, 15, 30, 1) # frame (x,y,width,height)
oled.rect(5+x, 0+y, 5, 3, 1) # anode
fill_h = int(27 * percent / 100)
oled.fill_rect(2+x, 2 + (28 - fill_h) + y, 11, fill_h, 1) # percent column
oled.rotate(0)
oled.show()
while True:
percent, voltage = get_battery_level()
#draw_battery(percent)
BAT_display(percent,90,2)
#draw_vertical_battery(percent,90,9)
print('Battery Voltage: {:.2f} V, Battery Level: {:.1f}%'.format(voltage,percent))
utime.sleep(2)
保存代码,连接开发板,配置解释器并运行。
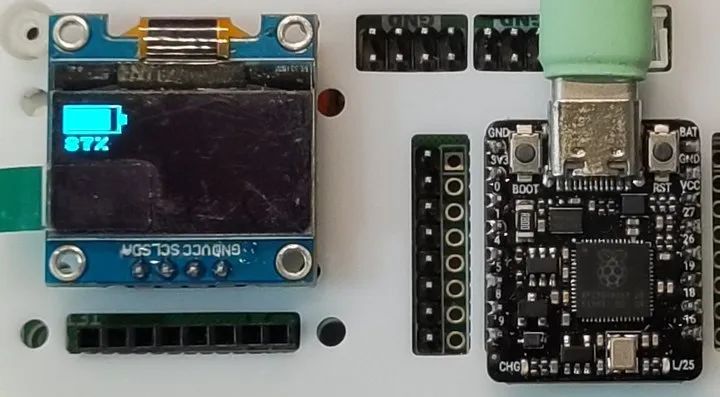
效果
电量图标的水平显示
电量图标的竖直显示
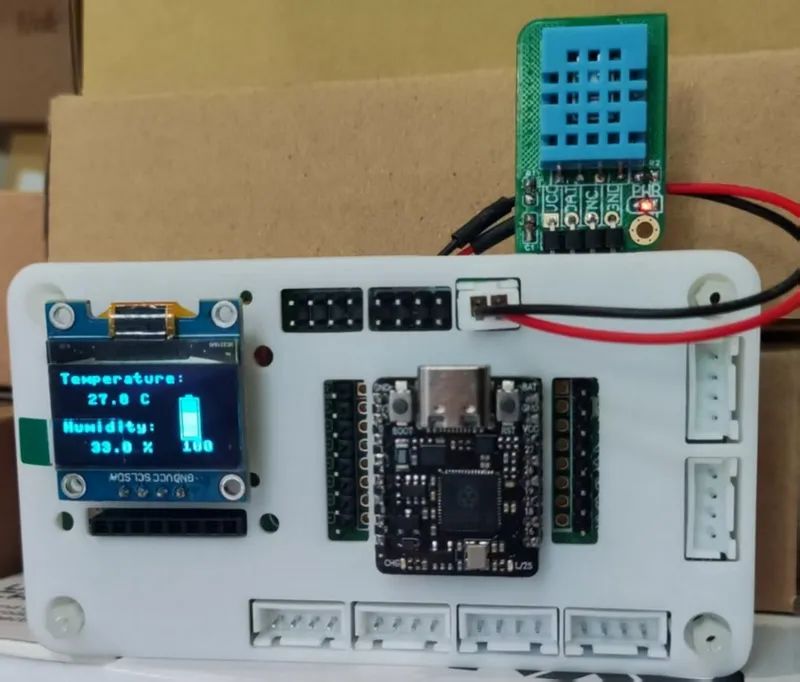
3. DHT11 温湿度计
带电量显示的 DHT11 温湿度计
代码
from machine import Pin, ADC, I2C
from PicoDHT22 import PicoDHT22
import ssd1306
import utime
# initialize ADC pin
adc = ADC(Pin(29))
# initialize OLED
i2c = I2C(0, scl=Pin(5), sda=Pin(4))
oled = ssd1306.SSD1306_I2C(128, 64, i2c)
# parameters of voltage divide resistor
R1, R2 = 1000000, 1000000
Vref_BAT = 3.81 # battery voltage in full charged state
def get_battery_level():
adc_value = adc.read_u16()
voltage = (adc_value / 65535) * 3.3
DIV_RATIO = (R1 + R2) / R1
actual_voltage = voltage * DIV_RATIO # voltage division compensation
percent = min(max((actual_voltage - 3.3) / (Vref_BAT - 3.3) * 100, 0), 100)
return percent, actual_voltage
def draw_battery(percent):
oled.fill(0)
oled.text('{:.0f}%'.format(percent), 90, 27)
# draw battery cartoon icon
oled.rect(90, 10, 30, 15, 1) # frame
oled.rect(120, 15, 3, 5, 1) # anode
oled.fill_rect(92, 12, int(26 * percent / 100), 11, 1) # electric percent column
oled.show()
def BAT_display(percent):
oled.fill(0)
oled.text('{:.0f}%'.format(percent), 90, 27)
# draw battery cartoon icon
oled.rect(90, 10, 30, 15, 1) # frame
oled.rect(120, 15, 3, 5, 1) # anode
oled.fill_rect(92, 12, int(26 * percent / 100), 11, 1)
oled.show()
def draw_vertical_battery(percent,x,y):
# 局部清屏并显示电量百分比
oled.fill_rect(x,y,15+8,30+16,0)
oled.text('{:.0f}'.format(percent), 0+x, 33+y)
# 竖版电池绘制
oled.rect(0+x, 2+y, 15, 30, 1) # frame (x,y,width,height)
oled.rect(5+x, 0+y, 5, 3, 1) # anode
fill_h = int(26 * percent / 100)
oled.fill_rect(2+x, 2 + (28 - fill_h) + y, 11, fill_h, 1) # percent column
oled.rotate(0)
oled.show()
def display_TH(temp,humi):
oled.fill_rect(20,15,6*8,64-15,0) # 局部清屏
oled.text("Temperature:", 0, 0)
oled.text("{:.1f} C".format(temp), 20, 15)
oled.text("Humidity:", 0, 35)
oled.text("{:.1f} %".format(humi), 20, 50)
oled.rotate(0) # rotate the screen display for a more comfortable position
oled.show()
dht_sensor=PicoDHT22(Pin(0,Pin.IN,Pin.PULL_UP),dht11=True)
while True:
temp,humi = dht_sensor.read()
percent, voltage = get_battery_level()
#draw_battery(percent)
#BAT_display(percent)
draw_vertical_battery(percent,90,16)
display_TH(temp,humi)
print('Battery Voltage: {:.2f} V, Battery Level: {:.1f}%'.format(voltage,percent))
utime.sleep(2)
效果
电量和温湿度显示,数据刷新的时间间隔为 2 秒
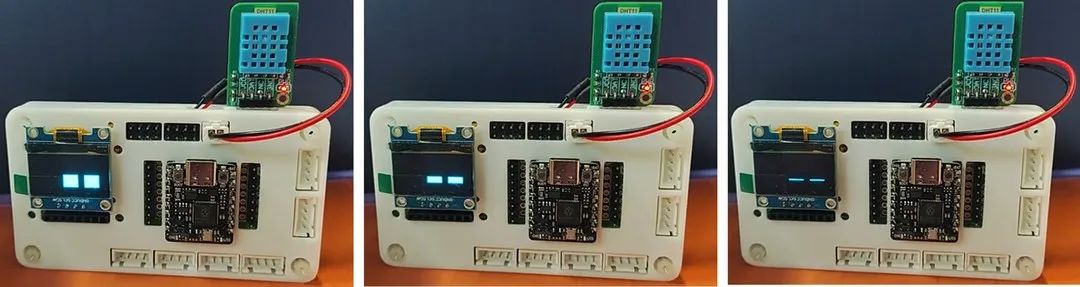
4. 眨眼动画
OLED 显示矩形填充状眼睛,改变形状并利用人眼的视觉暂留效应实现眨眼效果。
代码
from machine import Pin, I2C
import ssd1306
import utime
import urandom
i2c = I2C(0, scl=Pin(5), sda=Pin(4))
oled_width = 128
oled_height = 64
oled = ssd1306.SSD1306_I2C(oled_width, oled_height, i2c)
def draw_eyes(state,xshift,yshift):
"""state: 0=完全睁开, 1=半闭, 2=完全闭上"""
width,height = (int)(oled_width/5),(int)(oled_height/3)
cx,cy = (int)((oled_width-2.5*width)/2),(int)((oled_height-height)/2) # eyes at scrren center 定位点为矩形左上角
x = cx + xshift
y = cy + yshift
oled.fill_rect(x, y, int(2.5*width), height, 0)
# draw left eye
if state == 0: # 完全睁开
oled.fill_rect(x, y, width, height, 1)
elif state == 1: # 半闭
oled.fill_rect(x, y+(int)(height/4), width, (int)(height/2), 1)
else: # 完全闭上
oled.hline(x, y+(int)(height/2), width, 1)
# draw right eye
if state == 0: # 完全睁开
oled.fill_rect(x+width+(int)(width/2), y, width, height, 1)
elif state == 1: # 半闭
oled.fill_rect(x+width+(int)(width/2), y+(int)(height/4), width, (int)(height/2), 1)
else: # 完全闭上
oled.hline(x+width+(int)(width/2), y+(int)(height/2), width, 1)
oled.show()
def blink_eyes(xshift,yshift):
# 睁眼状态保持
draw_eyes(0,xshift,yshift)
utime.sleep(1)
# 眨眼动画序列
draw_eyes(1,xshift,yshift) # 半闭
utime.sleep(0.1)
draw_eyes(2,xshift,yshift) # 全闭
utime.sleep(0.1)
draw_eyes(1,xshift,yshift) # 半闭
utime.sleep(0.1)
draw_eyes(0,xshift,yshift) # 全开
def random_eyes():
xshift = urandom.randint(-(int)(oled_width/4),(int)(oled_width/4))
yshift = urandom.randint(-(int)(oled_height/3),(int)(oled_height/3))
oled.fill(0)
blink_eyes(xshift,yshift)
#print(xshift,yshift)
while True:
random_eyes()
#blink_eyes(0,0)
保存代码,连接开发板,配置解释器并运行。
效果
眨眼效果(眼睛位置在屏幕内随机移动)
四、工程代码
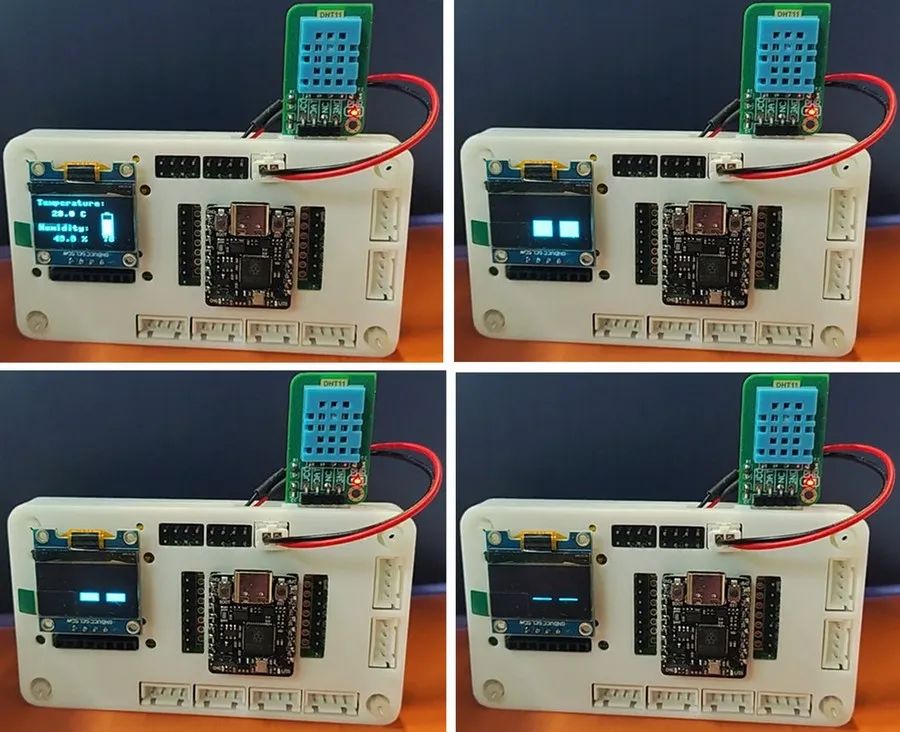
将工程调试的代码合并,实现温湿度数据(包括电池电量)与息屏随机眨眼动画的切换显示。
from machine import Pin, ADC, I2C
from PicoDHT22 import PicoDHT22
import ssd1306
import utime
import urandom
# initialize ADC pin
adc = ADC(Pin(29))
# initialize OLED
i2c = I2C(0, scl=Pin(5), sda=Pin(4))
oled_width = 128
oled_height = 64
oled = ssd1306.SSD1306_I2C(oled_width, oled_height, i2c)
# parameters of voltage divide resistor
R1, R2 = 1000000, 1000000
Vref_BAT = 3.81 # battery voltage in full charged state
def get_battery_level():
adc_value = adc.read_u16()
voltage = (adc_value / 65535) * 3.3
DIV_RATIO = (R1 + R2) / R1
actual_voltage = voltage * DIV_RATIO # voltage division compensation
percent = min(max((actual_voltage - 3.3) / (Vref_BAT - 3.3) * 100, 0), 100)
return percent, actual_voltage
def draw_vertical_battery(percent,x,y):
# 局部清屏并显示电量百分比
oled.fill_rect(x,y,15+8,30+16,0)
oled.text('{:.0f}'.format(percent), 0+x, 33+y)
# 竖版电池绘制
oled.rect(0+x, 2+y, 15, 30, 1) # frame (x,y,width,height)
oled.rect(5+x, 0+y, 5, 3, 1) # anode
fill_h = int(26 * percent / 100)
oled.fill_rect(2+x, 2 + (28 - fill_h) + y, 11, fill_h, 1) # percent column
oled.rotate(0)
oled.show()
def display_TH(temp,humi):
oled.fill_rect(20,15,6*8,64-15,0) # part clear
oled.text("Temperature:", 0, 0)
oled.text("{:.1f} C".format(temp), 20, 15)
oled.text("Humidity:", 0, 35)
oled.text("{:.1f} %".format(humi), 20, 50)
oled.rotate(0) # rotate the screen display for a more comfortable position
oled.show()
def draw_eyes(state,xshift,yshift):
"""state: 0=full open, 1=half open, 2=close"""
width,height = (int)(oled_width/5),(int)(oled_height/3)
cx,cy = (int)((oled_width-2.5*width)/2),(int)((oled_height-height)/2) # eyes at scrren center
x = cx + xshift
y = cy + yshift
oled.fill_rect(x, y, int(2.5*width), height, 0)
# draw left eye
if state == 0: # full open
oled.fill_rect(x, y, width, height, 1)
elif state == 1: # half open
oled.fill_rect(x, y+(int)(height/4), width, (int)(height/2), 1)
else: # close
oled.hline(x, y+(int)(height/2), width, 1)
# draw right eye
if state == 0: # full open
oled.fill_rect(x+width+(int)(width/2), y, width, height, 1)
elif state == 1: # half open
oled.fill_rect(x+width+(int)(width/2), y+(int)(height/4), width, (int)(height/2), 1)
else: # close
oled.hline(x+width+(int)(width/2), y+(int)(height/2), width, 1)
oled.show()
def blink_eyes(xshift,yshift):
# keep opening
draw_eyes(0,xshift,yshift)
utime.sleep(0.5)
# blink eyes order
draw_eyes(1,xshift,yshift) # half open
utime.sleep(0.1)
draw_eyes(2,xshift,yshift) # close
utime.sleep(0.1)
draw_eyes(1,xshift,yshift) # half open
utime.sleep(0.1)
draw_eyes(0,xshift,yshift) # full open
utime.sleep(0.5)
def random_eyes():
xshift = urandom.randint(-(int)(oled_width/4),(int)(oled_width/4))
yshift = urandom.randint(-(int)(oled_height/3),(int)(oled_height/3))
oled.fill(0)
blink_eyes(xshift,yshift)
#print(xshift,yshift)
dht_sensor = PicoDHT22(Pin(0,Pin.IN,Pin.PULL_UP),dht11=True)
def TH_BAT():
''' temperature and humidity and battery '''
temp,humi = dht_sensor.read()
percent, voltage = get_battery_level()
oled.fill(0)
display_TH(temp,humi)
draw_vertical_battery(percent,90,16)
print('Temperature: {:.2f} C, Humidity: {:.2f} RH, Battery Voltage: {:.2f} V, Battery Level: {:.1f}%'.format(temp,humi,voltage,percent))
utime.sleep(2)
while True:
TH_BAT()
random_eyes()
连接开发板,配置解释器,将代码保存至根目录,取下数据线,连接电池,实现显示效果。
五、最终效果展示
帧动画分别如下
六、项目总结
本文介绍了树莓派 RP2350 开发板结合 DHT11 模块、锂电池模块、随机眨眼动画,实现 OLED 显示的桌面动态温湿度计的项目设计。通过多任务结合,为更多 DIY 设计提供了可能,如添加按键扫描或语音控制模块,实现指定的功能切换与人机交互,拓展和丰富了该开发板在物联网领域的创新与应用,为 RP2350 的开发设计和产品应用提供了参考。
-
DIY
+关注
关注
176文章
900浏览量
360440 -
温湿度计
+关注
关注
1文章
29浏览量
8838 -
树莓派
+关注
关注
122文章
2086浏览量
110879
发布评论请先 登录
树莓派Pico 2发布,搭载RP2350双核RISC-V和Arm Cortex-M33微控制器!
DHT11温湿度计 实时温湿度记录曲线 记录存盘 上下限报警 .....
蓝牙温湿度计常用的场景
【天启教育M1开发板试用体验】MQTT温湿度计
如何自己设计一款温湿度计

工业级温湿度传感器与日常温湿度计的区别

RP2350 现已上市!变体即将发布!


评论