 用python写验证环境cocotb

本文介绍了cocotb的安装、python tb文件的写法、用xrun仿真cocotb的脚本等,我们来看看体验如何。
一、准备
centos7
python3.6+
yum install python3-devel
pip3 install --upgradecocotb
二、写RTL
// top.sv
module top
  (
   input wire       clk,
   input wire       rst_n,
   input wire [7:0] din,
   output reg [7:0] dout
   );


  initial begin
    $fsdbDumpfile("top.fsdb");
    $fsdbDumpvars(0, top);
  end

  always@(posedge clk, negedge rst_n)
    if(!rst_n)
      dout <= 'd0;
    else
      dout <= din;

endmodule // top
三、写tb
# tb.py


import cocotb
fromcocotb.triggersimportTimer, FallingEdge


async def gen_clk(dut):
    for cycle in range(100):
        dut.clk.value = 0
        await Timer(10, units="ns")
        dut.clk.value = 1
awaitTimer(10,units="ns")


async def gen_rst(dut):
    dut.rst_n.value = 0
    await Timer(22, units="ns")
    dut.rst_n.value = 1
print("ResetDone")


@cocotb.test()
async def tb(dut):


    await cocotb.start(gen_clk(dut))
    await cocotb.start(gen_rst(dut))


    test_data_list = range(0,50, 5)
    for test_data in test_data_list:
        await FallingEdge(dut.clk)
dut.din.value=test_data

    await Timer(100, units="ns")
6~11行:定义了一个时钟,50MHz,100个周期。
13~17行:定义了一个复位信号,低电平有效。复位拉高打印“Reset Done”,方便看log。
19行:用@cocotb.test()装饰器指定了tb的顶层主函数。
22行:异步启动gen_clk
23行:异步启动gen_rst
25~28行:产生了一些测试数据,在时钟下降沿后驱动dut的din。
30行:等待100ns结束仿真
四、写仿真脚本Makefile
SIM ?= xcelium
TOPLEVEL_LANG ?= verilog


VERILOG_SOURCES += ./top.sv
TOPLEVEL = top


MODULE = tb


include $(shell cocotb-config --makefiles)/Makefile.sim
设置默认仿真器为cadence xcellium,RTL语言选verilog,指定RTL顶层模块名字(就是dut的名字),testbench的名字为tb,最后include一个cocotb共用的makefile。
五、仿真和看波形
把top.sv、tb.py、Makefile放同一个目录下,敲linux命令:make。不出意外的话,仿真可以正确编译和仿真,如下图:
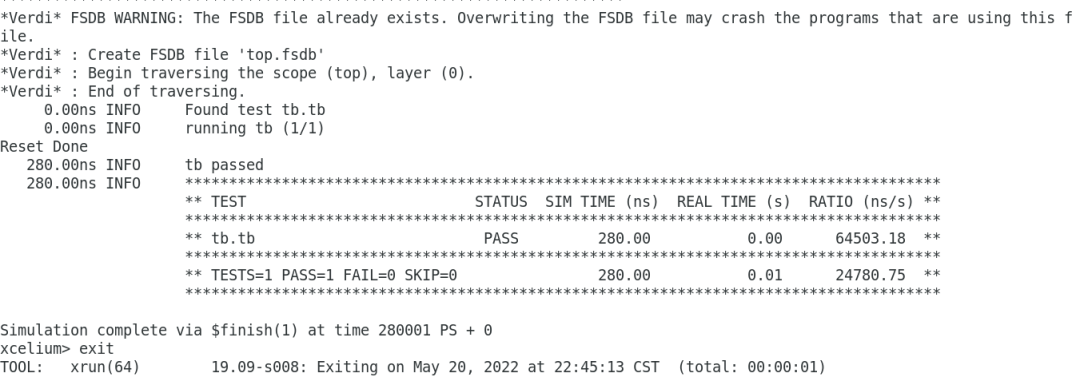
由于我们在RTL顶层加入了dump fsdb波形的代码,所以在log里可以看到有波形产生。280ns仿真结束,并显示“tb passed”,并打印出汇总信息。可见log还是很友好的。
用verdi打开fsdb,与预期一致:

-
仿真
+关注
关注
55文章
4567浏览量
138817 -
文件
+关注
关注
1文章
599浏览量
26169 -
python
+关注
关注
59文章
4892浏览量
90417
原文标题:厌倦了sv/uvm?来看看用python写验证环境-cocotb
文章出处:【微信号:Open_FPGA,微信公众号:OpenFPGA】欢迎添加关注!文章转载请注明出处。
发布评论请先 登录
Python硬件验证——摘要

如何写一个会讲笑话的Python程序

90条关于写Python 程序的建议
基于python的用于构建仿真及测试用例的lib库cocotb
1.2 Python 开发环境的搭建
cocotb中的基础语法
cocotb的安装、python tb文件的写法
Python的虚拟环境究竟是什么
如何测试Python环境
Python写机器人上位机


评论