 自己编写函数示例代码很难吗?分享几个示例!

问:Arduino Uno的函数示例
我决定自己编写函数示例代码,因为这应该是Arduino中的基本示例。网络上确实有关于使用函数的文档,但是,如果要尝试使用代码环境,则必须得访问Arduino网站,而且他们的示例扩展的效果并不好。本帖将分成以下几个部分:以不包含任何函数的起始代码为例、使用一个函数转换相同的程序、展示可以利用函数做些什么的扩展示例、与没有函数的代码版本进行比较,表明更少的代码更易于使用。注意,本例假设已知一些基本的Arduino示例。
无函数的起始代码
/*
* This code is the starting code for my functionExample, I want to turn pins 13, 12, 11 high; wait for half a second; turn all the pins off; wait for half a second;
* and turn pins 13 and 11 on while keeping 12 off and wait for another half second.
*/
void setup() {
pinMode(13, OUTPUT);
pinMode(12, OUTPUT);
pinMode(11, OUTPUT);
}
boolean writePin = HIGH; //set a global variable to make it easier to turn things on and off in the function, use !writePin for LOW
void loop() {
//first, let's see how cumbersome writing code can be when trying to run several LEDs
//write all output pins high:
digitalWrite(13, writePin);
digitalWrite(12, writePin);
digitalWrite(11, writePin);
delay(500); //delay half a second
//write all pins low
digitalWrite(13, !writePin);
digitalWrite(12, !writePin);
digitalWrite(11, !writePin);
delay(500); //delay half a second
//write 13 and 11 high, keep 12 low
digitalWrite(13, writePin);
digitalWrite(12, !writePin);
digitalWrite(11, writePin);
delay(500);//delay half a second
//doing that sequence alone takes 12 lines of code to accomplish something that could probably be done in less
}
// 20 lines of code not including comments
向上滑动查看完整代码
我通常会计算包含{}的重要代码行的数量,而不计算注释,因为这些注释无论如何都会在编译器中被忽略。这篇代码看起来非常笨拙,包含很多重复的行,因此如果需要执行不同的操作,你就必须进行更改。在进行故障排除或开发更为复杂的程序时,其效率会非常低下。
利用函数重新改造起始代码
/*
TheArduino home page does
try toexplain funcitons using a math example and reading an analog pin, which iscool, but there are more things one can
do withfunctions. The anatomy of a function in Arduino is as follows:
dataTypevariableName(dataType parameterVariable1, dataType parameterVariable2, ...){}
Allfunctions have to have a valid Arduino dataType at the beginning of the line ofcode because we use a variable to reference the entire code that will be runbetween the {}
If youwant numbers or some sort of result with measurable values, you will have touse a data type that can store those values; examples are
int,double, unsigned long, long, boolean, float (and all the other types that canstore data)
The onlything to mention is that functions with these dataTypes must have a returnstatement; Example:
intaddTwoNumb(int one, int two){
intresult = one + two;
returnresult;
}
Thefunction above returns the calculation of one and two and can be stored in anew variable when called/used in the main loop.
Thevalues inside the () are called parameters, functions don't always requireparameters (most do though), so the () can be empty.
Parameters are placeholder variables with anydata type valid in Arduino. These variables do not have to be assigned valuesuntil the function is used/called in the main loop, values are passed as soonas they are called. Any number of new variables can be added into a functionand any amount of code can be added to a function, even functions can callother functions! (gets a little confusing at that point)
*/
void setup() {
pinMode(13, OUTPUT);
pinMode(12, OUTPUT);
pinMode(11, OUTPUT);
}
boolean writePin = HIGH; //set a globalvariable to make it easier to turn things on and off in the function, use!writePin for LOW
void loop() {
sequenceLights(13, 12, 11, writePin, writePin, writePin, 500);//call/use sequence lights on pins 13, 12, 11; use the default value forwritePin (HIGH), delay for half a second (500 mS)
sequenceLights(13, 12, 11, !writePin, !writePin, !writePin, 500);
sequenceLights(13, 12, 11, writePin, !writePin, writePin, 500);
}
/* Functions are typically defined or writtenbelow the loop statement for clarity*/
//notice that the function below uses the exactsame code but uses different variables and that we don't use a datatype (void),we aren't calculating anything, so there doesn't need to be a datatype
//the function takes 3 integers to begin with:pin13, pin12, pin11; these represent the values for the pins we want to control
//then the next three values are writeFunc1,writeFunc2, writeFunc3 which are boolean values used to control the pins (HIGHor LOW), we want to be able to use unique instructions per light as that is howthe original sequence worked
//finaly delayPeriod is used in place of 500,because what if we want to change the timing, why not?
void sequenceLights(int pin13, int pin12, intpin11, boolean writeFunc1, boolean writeFunc2, boolean writeFunc3, intdelayPeriod){
digitalWrite(pin13, writeFunc1);
digitalWrite(pin12, writeFunc2);
digitalWrite(pin11, writeFunc3);
delay(delayPeriod);
}
//17 lines of code not including comments
void setup() {
//Serial.begin(9600); //I often use the serial monitor to debug myprogram or to do some testing, I then comment the line of code to increase someruntime speed (counted this line of commented code as it was essential to myprocess)
pinMode(13, OUTPUT);
pinMode(12, OUTPUT);
pinMode(11, OUTPUT);
pinMode(10, OUTPUT);
pinMode(9, OUTPUT);
pinMode(8, OUTPUT);
}
int countRndSeq = 0; //set initial variable forcounting variable for the random sequence to "reset"
int randPin = random(8, 14); //set the randomPin variable to a random number between 8 and 13 (14 for including 13 as achoice); we only need 8-13 as those are the pins I use
void loop() {
randSequenceLightSlow(5, 125, 1200); //run function for a randomsequence, set counting interval at 5, set minimum delay at 125, set the maxdelay to 1200 (1.2 seconds) (I decided to move the randMode into the functionbecause it was easier to accomplish)
countRndSeq = 0; //reset the counter for the next sequence
delay(3000); //wait three seconds then turn off all the lights (made afunction for that)
allPinsWrite(13, 12, 11, 10, 9, 8 , LOW);
randSequenceLightSlow(7, 125, 1450); //run function for random sequenceusing counting interval at 7, minimum delay at 125, set max delay to 1450(1.450 seconds)
countRndSeq = 0; //reset counter for next sequence
delay(3000); //wait three seconds and turn off all the lights
allPinsWrite(13, 12, 11, 10, 9, 8, LOW);
}
/*
* Thefollowing uses a while loop for control, it does random lights and slows downdelay by a set interval between steps (larger interval will make it count andslow down much quicker)
* Aslong as that counting number (countRndSeq) is less than the max delay (maxDel),it will do the following in order:
* 1.chose a random pin 8-13 and set it equal to a variable
* 2.Pick the random Mode value each time the while loop runs again (increaseschance to get modes 0-2)
* 2.turn off the pin associated to that number using the delay amount of the samenumber that countrRndSeq is currently at
* 3.Increase countRndSeq by the interval amount set by calling the function (can beany integer)
* 4.Check if the current count is greater than the minimum delay and then checkwhich mode (remember I set it to random above); there are 3 modes 0, 1, 2
* NOTE:For #4, 0 has a high chance of adding less to countRndSeq, 1 has a mediumchance of adding a bit more to countRndSeq, 2 has a low chance of adding quitea bit to countRndSeq
* 5. Setthe final pin after the sequence has finished to high to simulate that is thefinal pin the program landed on
* SeecalcThreshChance for an explanation of how I made weighted random events forthe chance for the lights to slow faster
*/
void randSequenceLightSlow(int interval, intminDel, int maxDel){
while(countRndSeq < maxDel){
randPin = random(8, 14);
intmode = random(0, 3);
digitalWrite(randPin, HIGH);
delay(countRndSeq);
digitalWrite(randPin, LOW);
delay(countRndSeq);
countRndSeq += interval;
if(countRndSeq > minDel && mode == 0){
countRndSeq += calcThreshChance(mode, interval);
}else if(countRndSeq > minDel && mode == 1){
countRndSeq += calcThreshChance(mode, interval);
}else if(countRndSeq > minDel && mode == 2){
countRndSeq += calcThreshChance(mode, interval);
}
}
digitalWrite(randPin, HIGH);
}
/*
* Simplefunction that uses integers 8-13 and a boolean value to turn on or off all theLEDs at once
*/
void allPinsWrite(int p1, int p2, int p3, intp4, int p5, int p6, boolean writeInst){
digitalWrite(p1, writeInst);
digitalWrite(p2, writeInst);
digitalWrite(p3, writeInst);
digitalWrite(p4, writeInst);
digitalWrite(p5, writeInst);
digitalWrite(p6, writeInst);
}
/*
* Thefollowing function takes an integer 0-2 and calculates the chance for it to addmore to the number countRndSeq
* Firstit sets up three variables local to the function (chance for around 50, achance for around 200, and a chance for around 300)
* Thenthe following first check is made: check which mode is selected, 0, 1, or 2 (ifsomeone entered something else or not calculated it will return 0 and count bythe regular interval in the randomSequence)
* If itis mode 0, use a relatively short random range from 45 to 69 and check if thatrandom number falls between 50 and 60 which is a pretty high chance based onthe short range, so it will more than likely add 1000 plus that random numberto countRndSeq
* If itis mode 1, use a larger range from 200 to 299 and check if that random numberlies between 250 and 255, which is a medium chance, so it may or may not usethat random number + 2000
* If itis mode 2, use a much larger range from 300 to 599 and check if that randomnumber lies between 320 and 324, which is a low chance, so it has lesslikelihood of using that random number and adding 3000
* Allother cases it will just add the regular interval
*/
int calcThreshChance(int mode, int interval){
intrandCh50 = 0;
intrandCh200 = 0;
intrandCh300 = 0;
if(mode == 0){
randCh50 = random(45, 70);
if(randCh50 >= 50 && randCh50 <= 60){
return randCh50 + 1000;
}else {
return interval;
}
}else if (mode == 1){
randCh200 = random(200, 300);
if(randCh200 >= 250 && randCh200 <= 255){
return randCh200 + 2000;
}else {
return interval;
}
}else if (mode == 2){
randCh300 = random(300, 600);
if(randCh300 >= 320 && randCh300 <= 324){
return randCh300 + 3000;
}else {
return interval;
}
}else {
return interval;
}
}
//77 lines of code not including comments
向上滑动查看完整代码
即使整篇代码只减少了3行,但在希望试验延迟值或者引脚是变高还是变低等情况下,你就能轻松快速地调整相关值。如果没有函数,你每次都需要手动添加四行代码。
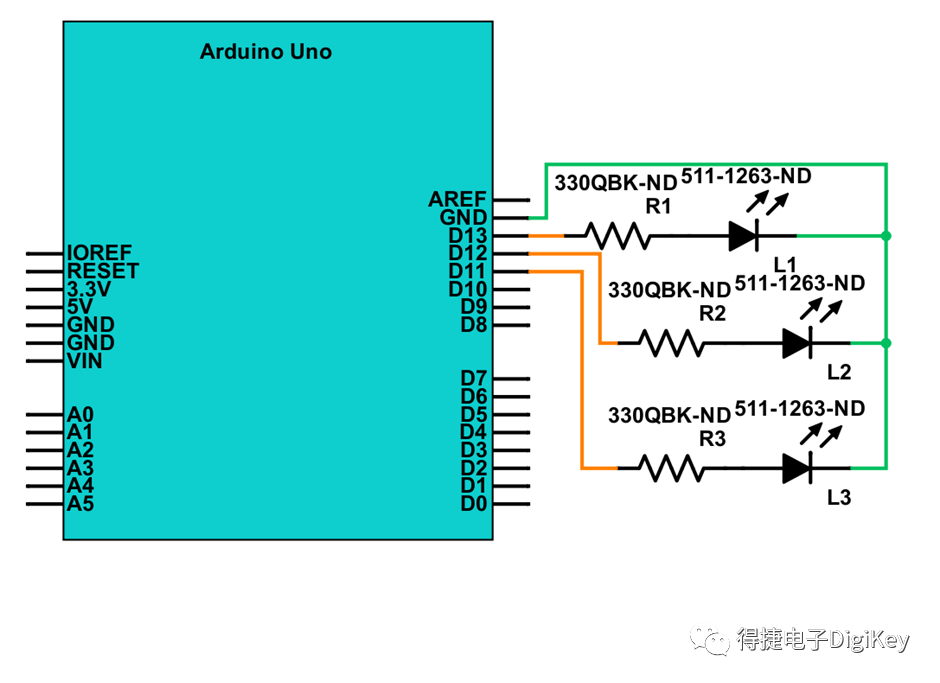
初始代码接线图
使用函数的扩展代码
void setup() {//Serial.begin(9600); //I often use the serial monitor to debug my program or to do some testing, I then comment the line of code to increase some runtime speed (counted this line of commented code as it was essential to my process)
pinMode(13, OUTPUT);
pinMode(12, OUTPUT);
pinMode(11, OUTPUT);
pinMode(10, OUTPUT);
pinMode(9, OUTPUT);
pinMode(8, OUTPUT);
}
int countRndSeq = 0; //set initial variable for counting variable for the random sequence to "reset"
int randPin = random(8, 14); //set the random Pin variable to a random number between 8 and 13 (14 for including 13 as a choice); we only need 8-13 as those are the pins I use
void loop() {
randSequenceLightSlow(5, 125, 1200); //run function for a random sequence, set counting interval at 5, set minimum delay at 125, set the max delay to 1200 (1.2 seconds) (I decided to move the randMode into the function because it was easier to accomplish)
countRndSeq = 0; //reset the counter for the next sequence
delay(3000); //wait three seconds then turn off all the lights (made a function for that)
allPinsWrite(13, 12, 11, 10, 9, 8 , LOW);
randSequenceLightSlow(7, 125, 1450); //run function for random sequence using counting interval at 7, minimum delay at 125, set max delay to 1450 (1.450 seconds)
countRndSeq = 0; //reset counter for next sequence
delay(3000); //wait three seconds and turn off all the lights
allPinsWrite(13, 12, 11, 10, 9, 8, LOW);
}
/*
* The following uses a while loop for control, it does random lights and slows down delay by a set interval between steps (larger interval will make it count and slow down much quicker)
* As long as that counting number (countRndSeq) is less than the max delay (maxDel), it will do the following in order:
* 1. chose a random pin 8-13 and set it equal to a variable
* 2. Pick the random Mode value each time the while loop runs again (increases chance to get modes 0-2)
* 2. turn off the pin associated to that number using the delay amount of the same number that countrRndSeq is currently at
* 3. Increase countRndSeq by the interval amount set by calling the function (can be any integer)
* 4. Check if the current count is greater than the minimum delay and then check which mode (remember I set it to random above); there are 3 modes 0, 1, 2
* NOTE: For #4, 0 has a high chance of adding less to countRndSeq, 1 has a medium chance of adding a bit more to countRndSeq, 2 has a low chance of adding quite a bit to countRndSeq
* 5. Set the final pin after the sequence has finished to high to simulate that is the final pin the program landed on
* See calcThreshChance for an explanation of how I made weighted random events for the chance for the lights to slow faster
*/
void randSequenceLightSlow(int interval, int minDel, int maxDel){
while(countRndSeq < maxDel){
randPin = random(8, 14);
int mode = random(0, 3);
digitalWrite(randPin, HIGH);
delay(countRndSeq);
digitalWrite(randPin, LOW);
delay(countRndSeq);
countRndSeq += interval;
if(countRndSeq > minDel && mode == 0){
countRndSeq += calcThreshChance(mode, interval);
} else if(countRndSeq > minDel && mode == 1){
countRndSeq += calcThreshChance(mode, interval);
} else if(countRndSeq > minDel && mode == 2){
countRndSeq += calcThreshChance(mode, interval);
}
}
digitalWrite(randPin, HIGH);
}
/*
* Simple function that uses integers 8-13 and a boolean value to turn on or off all the LEDs at once
*/
void allPinsWrite(int p1, int p2, int p3, int p4, int p5, int p6, boolean writeInst){
digitalWrite(p1, writeInst);
digitalWrite(p2, writeInst);
digitalWrite(p3, writeInst);
digitalWrite(p4, writeInst);
digitalWrite(p5, writeInst);
digitalWrite(p6, writeInst);
}
/*
* The following function takes an integer 0-2 and calculates the chance for it to add more to the number countRndSeq
* First it sets up three variables local to the function (chance for around 50, a chance for around 200, and a chance for around 300)
* Then the following first check is made: check which mode is selected, 0, 1, or 2 (if someone entered something else or not calculated it will return 0 and count by the regular interval in the randomSequence)
* If it is mode 0, use a relatively short random range from 45 to 69 and check if that random number falls between 50 and 60 which is a pretty high chance based on the short range, so it will more than likely add 1000 plus that random number to countRndSeq
* If it is mode 1, use a larger range from 200 to 299 and check if that random number lies between 250 and 255, which is a medium chance, so it may or may not use that random number + 2000
* If it is mode 2, use a much larger range from 300 to 599 and check if that random number lies between 320 and 324, which is a low chance, so it has less likelihood of using that random number and adding 3000
* All other cases it will just add the regular interval
*/
int calcThreshChance(int mode, int interval){
int randCh50 = 0;
int randCh200 = 0;
int randCh300 = 0;
if(mode == 0){
randCh50 = random(45, 70);
if(randCh50 >= 50 && randCh50 <= 60){
return randCh50 + 1000;
} else {
return interval;
}
} else if (mode == 1){
randCh200 = random(200, 300);
if(randCh200 >= 250 && randCh200 <= 255){
return randCh200 + 2000;
} else {
return interval;
}
} else if (mode == 2){
randCh300 = random(300, 600);
if(randCh300 >= 320 && randCh300 <= 324){
return randCh300 + 3000;
} else {
return interval;
}
} else {
return interval;
}
}
//77 lines of code not including comments
向上滑动查看完整代码
这篇代码的主题是在一定程度上模拟六面骰子的滚动,该骰子起先快速滚动,后来逐渐减慢到静止不动。该代码包含内置随机函数,该函数使用了起始编号(包含在生成中)和在生成中排除的结束编号。它不仅随机化了引脚(8-13),还随机化了和一些骰子一样明显减速的几率。我用了三种几率“模式”来实现这一效果:高几率:计数变量的增量较少;中等几率:计数变量的增量稍多;低几率:计数变量的增量较多(请参见代码中的注释,了解完整的代码环境)。我创建了三个自定义函数,使这个概念更加易于理解和试验。
无自定义函数的扩展代码
void setup() {
pinMode(13, OUTPUT);
pinMode(12, OUTPUT);
pinMode(11, OUTPUT);
pinMode(10, OUTPUT);
pinMode(9, OUTPUT);
pinMode(8, OUTPUT);
}
int countRndSeq = 0;
int randPin = random(8,14);
int minDel1 = 125;
int maxDel1 = 1200;
int interval1 = 5;
int minDel2 = 125;
int maxDel2 = 1450;
int interval2 = 7;
int randCh50 = 0;
int randCh200 = 0;
int randCh300 = 0;
void loop() {
while(countRndSeq < maxDel1){
randPin = random(8, 14);
int randMode = random(0, 3);
digitalWrite(randPin, HIGH);
delay(countRndSeq);
digitalWrite(randPin, LOW);
delay(countRndSeq);
countRndSeq += interval1;
if(countRndSeq > minDel1 &&randMode == 0){
randCh50 = random(45, 70);
if(randCh50 >= 50 && randCh50<= 60){
countRndSeq += randCh50 + 1000;
} else {
countRndSeq += interval1;
}
} else if(countRndSeq > minDel1&& randMode == 1){
randCh200 = random(200, 300);
if(randCh200 >= 250 &&randCh200 <= 255){
countRndSeq += randCh200 + 2000;
} else {
countRndSeq += interval1;
}
} else if(countRndSeq > minDel1&& randMode == 2){
randCh200 = random(300, 600);
if(randCh200 >= 320 &&randCh200 <= 324){
countRndSeq += randCh200 + 3000;
} else {
countRndSeq += interval1;
}
} else {
countRndSeq += interval1;
}
}
digitalWrite(randPin, HIGH);
countRndSeq = 0;
delay(3000);
digitalWrite(13, LOW);
digitalWrite(12, LOW);
digitalWrite(11, LOW);
digitalWrite(10, LOW);
digitalWrite(9, LOW);
digitalWrite(8, LOW);
while(countRndSeq < maxDel2){
randPin = random(8, 14);
int randMode = random(0, 3);
digitalWrite(randPin, HIGH);
delay(countRndSeq);
digitalWrite(randPin, LOW);
delay(countRndSeq);
countRndSeq += interval2;
if(countRndSeq > minDel2 &&randMode == 0){
randCh50 = random(45, 70);
if(randCh50 >= 50 && randCh50<= 60){
countRndSeq += randCh50 + 1000;
} else {
countRndSeq += interval2;
}
} else if(countRndSeq > minDel2&& randMode == 1){
randCh200 = random(200, 300);
if(randCh200 >= 250 &&randCh200 <= 255){
countRndSeq += randCh200 + 2000;
} else {
countRndSeq += interval2;
}
} else if(countRndSeq > minDel2&& randMode == 2){
randCh200 = random(300, 600);
if(randCh200 >= 320 &&randCh200 <= 324){
countRndSeq += randCh200 + 3000;
} else {
countRndSeq += interval2;
}
} else {
countRndSeq += interval2;
}
}
digitalWrite(randPin, HIGH);
countRndSeq = 0;
delay(3000);
digitalWrite(13, LOW);
digitalWrite(12, LOW);
digitalWrite(11, LOW);
digitalWrite(10, LOW);
digitalWrite(9, LOW);
digitalWrite(8, LOW);
}
//105 lines of code not includingcomments
向上滑动查看完整代码
注意,在实现相同效果的情况下,此部分的代码数量显著增加(函数版本的代码少了28行,这在构建更大的程序时非常重要)。它不仅减少了代码数量,而且这些函数的使用方式非常便于利用不同的值进行试验。而手动编码版本的代码需要在代码中更改若干变量才能进行试验。想象一下,在需要进行大量试验的情况下,如果进行每个操作都需要更改代码,那将是多么的恐怖:而如果使用函数,那么只需编辑一个代码块即可快速测试功能。
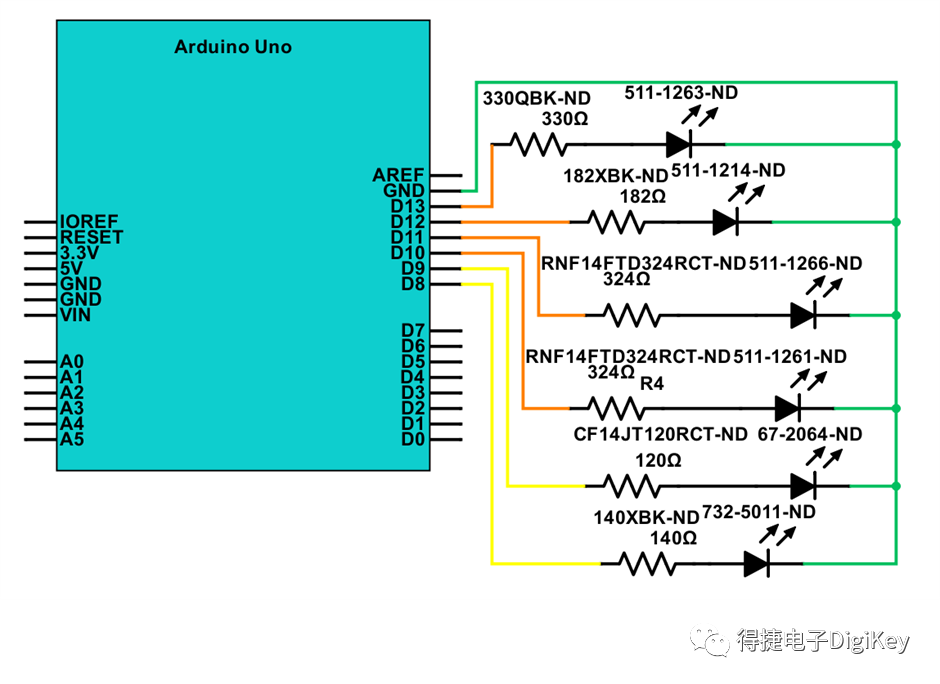
扩展代码接线图

-
适合Arduino 和 Raspberry Pi 匹配的摄像头
-
Arduino 睡眠模式示例
-
如何选择适用于Arduino的IR、UV和可见光放射体
-
Arduino 扩展板
- Arduino setup() 和 loop() 函数的目的是什么?
最后,如果你喜欢这篇文章,快分享给更多的小伙伴吧!切记点个赞哦!
提示点击菜单设计支持:工程师锦囊,获取更多工程师小贴士
秘技知识学不停 专属福利享不停
就等您加入!
点此登记
赚积分、换好礼
立即到「会员权益」查看您的礼遇! 如有任何问题,欢迎联系得捷电子DigiKey的客服团队中国(人民币)客服
 400-920-1199
 服务支持 > 联系客服 > 微信客服
 service.sh@digikey.com
 QQ在线实时咨询:4009201199
中国(美金)/ 香港客服
400-882-4440
852-3104-0500china.support@digikey.com

点击下方“阅读原文”查看更多
让我知道你在看哟
原文标题:自己编写函数示例代码很难吗?分享几个示例!
文章出处:【微信公众号:得捷电子DigiKey】欢迎添加关注!文章转载请注明出处。
-
得捷电子
+关注
关注
1文章
255浏览量
14200
原文标题:自己编写函数示例代码很难吗?分享几个示例!
文章出处:【微信号:得捷电子DigiKey,微信公众号:得捷电子DigiKey】欢迎添加关注!文章转载请注明出处。
发布评论请先 登录
EtherCAT应用示例,GOAL 应用说明
RTD 3.0.0 示例代码无法编译是哪里的问题?
基于TinyUSB的RNDIS主机示例
ICU-X0201 Hello Chirp示例应用用户指南
MCU软件核心库及示例代码速览 !

CW32F030 FLASH读操作的示例
Video Processing Subsystem与HDMI示例设计
淘宝京东API商品详情接口示例参考
淘宝拍立淘接口实战:图像优化、识别调优与避坑代码示例
用VSCode编写自己的KiCad插件(上)详细步骤教程


评论