 在OpenHarmony上如何使用不同的弹窗

应用中经常用到弹窗,比如警告弹窗、日期选择弹窗、文本选择弹窗以及其他自定义弹窗等等。本例将为大家介绍如何使用不同的弹窗。
效果呈现
本例最终效果如下:
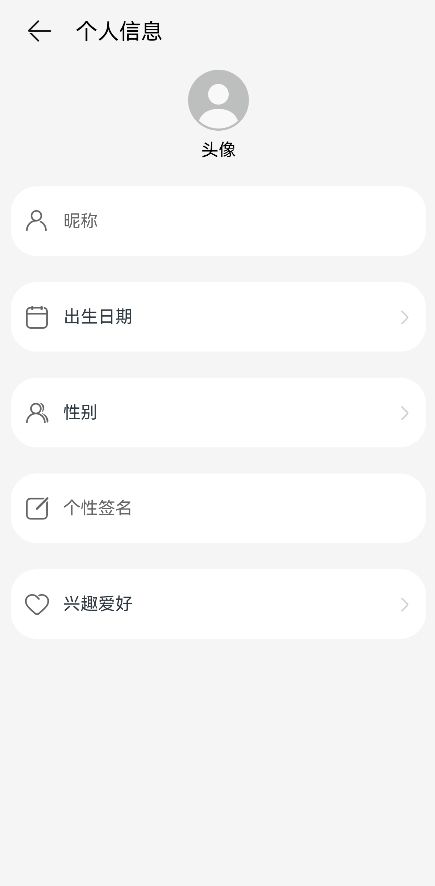
示例中共涉及四类弹窗:
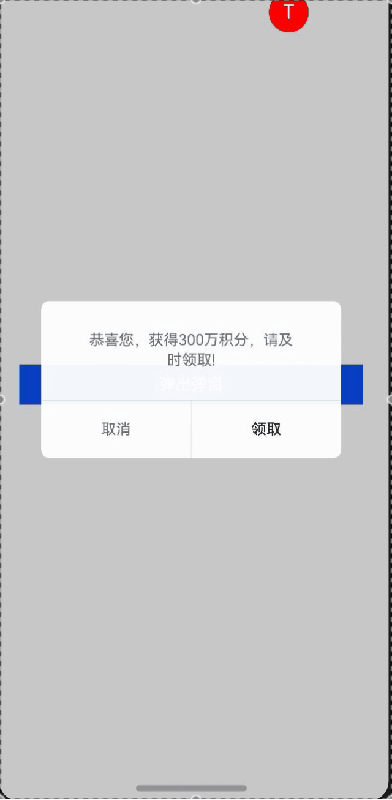
警告弹窗:提示信息尚未保存。
日期滑动选择器弹窗:选择出生日期。
文本滑动选择器弹窗:选择性别。
自定义弹窗:填写兴趣爱好。
说明:自定义弹窗可以根据业务需要自行定义弹窗的形式和内容,比如文本输入、单选、多选等等,本例以文本输入为例进行介绍。
运行环境
本例基于以下环境开发,开发者也可以基于其他适配的版本进行开发:
IDE:DevEco Studio 3.1 Release
SDK:Ohos_sdk_public 3.2.12.5(API Version 9 Release)
实现思路
本例中涉及的 4 类弹窗及实现方案如下:
警告弹窗:使用 AlertDialog 实现。
日期滑动选择器弹窗:使用 DatePickerDialog 实现。
文本滑动选择器弹窗:使用 TextPickerDialog 实现。
自定义弹窗:使用 CustomDialogController 实现。
开发步骤
由于本例重点讲解对话框的使用,所以开发步骤会着重讲解相关实现,不相关的内容不做介绍,全量代码可参考完整代码章节。
①首先,使用 AlertDialog 实现警告弹窗
通过 message 参数设置告警信息,alignment 设置弹窗在界面中垂直方向的对齐方式;通过 primaryButton 和 secondaryButton 添加按钮。
具体代码如下:
alertDialog(context:Context.UIAbilityContext){
AlertDialog.show({
//通过message设置告警信息
message:'当前数据未保存,是否确认离开?',
//通过alignment设置弹窗在界面垂直方向的对齐方式,此处设置为底部对齐
alignment:DialogAlignment.Bottom,
//通过offset设置基于对齐位置的便宜量
offset:{
dx:0,
dy:-20
},
//弹窗中左起第一个按钮
primaryButton:{
value:'取消',
action:()=>{
console.info('Callbackcancelbuttonisclicked');
}
},
//弹窗中左起第二个按钮
secondaryButton:{
value:'确定',
action:()=>{
//Exitingtheapp.
context.terminateSelf();
console.info('Callbackdefinitebuttonisclicked');
}
}
});
}
②使用 DatePickerDialog 实现日期滑动选择器弹窗通过 start 和 end 分别设置日期区间的起始时间和末尾时间;通过 lunar 设置使用农历还是阳历;使用 onAccept 监听选择的日期,本例中通过变量 selectedDate 将选中的日期设置给参数 selected,这样弹窗弹出时的日期就默认为上次选中的日期。
具体代码如下:
datePickerDialog(dateCallback){
DatePickerDialog.show({
start:newDate('1900-1-1'),
end:newDate('2100-1-1'),
//通过变量selectedDate将选中的日期设置给参数selected
selected:this.selectedDate,
lunar:false,
//使用onAccept监听选择的日期
onAccept:(value:DatePickerResult)=>{
letyear=value.year;
letmonth=value.month+1;
letday=value.day;
letbirthdate:string=this.getBirthDateValue(year,month,day);
//通过setFullYear将选中的日期传递给变量selectedDate
this.selectedDate.setFullYear(value.year,value.month,value.day)
//返回选中的日期
dateCallback(birthdate);
}
});
}
③使用 TextPickerDialog 实现文本滑动选择器弹窗
通过 range 设置文本选择项,使用 onAccept 监听选择的文本项,本例中通过变量 selectedGender 将选中的性别的索引设置给参数 selected,这样弹窗弹出时的性别就默认为上次选中的性别。
具体代码如下:
textPickerDialog(sexArray:Resource,sexCallback){
//判断文本项的列表是否为空
if(this.isEmptyArr(sexArray)){
console.error('sexisnull');
return;
}
TextPickerDialog.show({
//通过range设置文本选择项
range:sexArray,
//通过变量selectedGender将选中的性别的索引设置给参数selected
selected:this.selectedGender,
//使用onAccept监听选择的文本项
onAccept:(result:TextPickerResult)=>{
sexCallback(result.value);
//获取选中项的索引
this.selectedGender=result.index
},
onCancel:()=>{
console.info('TextPickerDialogonCancel');
}
});
}
④使用 CustomDialogController 实现自定义弹窗
当现有弹窗不能满足业务诉求时,开发者可以自行设计弹窗的样式。在实现自定义弹窗时,需要将弹窗的 UI 放在被 @CustomDialog 修饰的自定义组件中,然后使用 CustomDialogController 的实例来控制弹窗的弹出和关闭。
具体代码如下:
//使用@CustomDialog修饰自定义弹窗
@CustomDialog
structCustomDialogFrame{
...
//定义CustomDialogController
controller:CustomDialogController

build(){
Column(){
Text('兴趣爱好').fontSize(20).margin({top:10,bottom:10})
TextInput({placeholder:'',text:this.textValue}).height(60).width('90%')
.onChange((value:string)=>{
this.textValue=value
})
Flex({justifyContent:FlexAlign.SpaceAround}){
Button('取消')
.onClick(()=>{
//点击‘取消’,弹窗关闭
this.controller.close()
})
.backgroundColor('')
.fontColor('#007DFF')
Button('保存')
.onClick(()=>{
this.inputValue=this.textValue
//点击‘保存’,弹窗关闭
this.controller.close()
})
.backgroundColor(0xffffff)
.fontColor('#007DFF')
}.margin({bottom:10})
}.justifyContent(FlexAlign.Start)
}
}
...
//实例化自定义弹窗
customDialogController:CustomDialogController=newCustomDialogController({
//使用上文创建的自定义弹窗进行实例化
builder:CustomDialogFrame({
textValue:$textValue,
inputValue:$inputValue
}),
alignment:DialogAlignment.Bottom,
offset:{
dx:0,
dy:-20
}
});
...
完整代码
本例完整代码如下:
importContextfrom'@ohos.app.ability.common';
importhilogfrom'@ohos.hilog';

@Component
structTextFrame{
@Linkcontent:string;
privatetextImage:Resource;
privatetext:string;
onTextClick:()=>void;

build(){
Row(){
Image(this.textImage)
.width(24)
.height(24)
.margin({left:12})
Text(this.text)
.fontSize(16)
.margin({left:12})
.height(24)
Text(this.content)
.fontSize(16)
.textAlign(TextAlign.End)
.textOverflow({overflow:TextOverflow.Ellipsis})
.maxLines(1)
.margin({
left:16,
right:7
})
.layoutWeight(1)
.width('100%')
Image($r('app.media.ic_arrow'))
.width(12)
.height(24)
.margin({right:14})
}
.margin({top:24})
.borderRadius(24)
.backgroundColor(Color.White)
.width('93.3%')
.height(64)
.onClick(this.onTextClick)
}
}

@Component
structInputFrame{
privateinputImage:Resource;
privatehintText:string;

build(){
Row(){
Image(this.inputImage)
.width(24)
.height(24)
.margin({left:12})
TextInput({placeholder:this.hintText})
.fontSize(16)
.padding({left:12})
.placeholderColor('#99000000')
.backgroundColor(Color.White)
.fontWeight(FontWeight.Normal)
.fontStyle(FontStyle.Normal)
.fontColor(Color.Black)
.margin({right:32})
.layoutWeight(1)
.height(48)
}
.margin({top:24})
.borderRadius(24)
.backgroundColor(Color.White)
.width('93.3%')
.height(64)
}
}

@CustomDialog
structCustomDialogFrame{
@LinktextValue:string
@LinkinputValue:string
controller:CustomDialogController

build(){
Column(){
Text('兴趣爱好').fontSize(20).margin({top:10,bottom:10})
TextInput({placeholder:'',text:this.textValue}).height(60).width('90%')
.onChange((value:string)=>{
this.textValue=value
})
Flex({justifyContent:FlexAlign.SpaceAround}){
Button('取消')
.onClick(()=>{
this.controller.close()
}).backgroundColor('').fontColor('#007DFF')
Button('保存')
.onClick(()=>{
this.inputValue=this.textValue
this.controller.close()
}).backgroundColor(0xffffff).fontColor('#007DFF')
}.margin({bottom:10})
}.justifyContent(FlexAlign.Start)
}
}

@Entry
@Component
structIndex{
@Statebirthdate:string='';
@Statesex:string='';
@StatetextValue:string='';
@StateinputValue:string='';
selectedDate:Date=newDate("2010-1-1")
selectedGender:number=0
privatesexArray:Resource=$r('app.strarray.sex_array');
customDialogController:CustomDialogController=newCustomDialogController({
builder:CustomDialogFrame({
textValue:$textValue,
inputValue:$inputValue
}),
alignment:DialogAlignment.Bottom,
offset:{
dx:0,
dy:-20
}
});

alertDialog(context:Context.UIAbilityContext){
AlertDialog.show({
message:'当前数据未保存,是否确认离开?',
alignment:DialogAlignment.Bottom,
offset:{
dx:0,
dy:-20
},
primaryButton:{
value:'取消',
action:()=>{
console.info('Callbackcancelbuttonisclicked');
}
},
secondaryButton:{
value:'确定',
action:()=>{
//Exitingtheapp.
context.terminateSelf();
console.info('Callbackdefinitebuttonisclicked');
}
}
});
}

datePickerDialog(dateCallback){
DatePickerDialog.show({
start:newDate('1900-1-1'),
end:newDate('2100-1-1'),
selected:this.selectedDate,
lunar:false,
onAccept:(value:DatePickerResult)=>{
letyear=value.year;
letmonth=value.month+1;
letday=value.day;
letbirthdate:string=this.getBirthDateValue(year,month,day);
this.selectedDate.setFullYear(value.year,value.month,value.day)
dateCallback(birthdate);
}
});
}

textPickerDialog(sexArray:Resource,sexCallback){
if(this.isEmptyArr(sexArray)){
console.error('sexisnull');
return;
}
TextPickerDialog.show({
range:sexArray,
selected:this.selectedGender,
onAccept:(result:TextPickerResult)=>{
sexCallback(result.value);
this.selectedGender=result.index
},
onCancel:()=>{
console.info('TextPickerDialogonCancel');
}
});
}

getBirthDateValue(year:number,month:number,day:number):string{
letbirthdate:string=`${year}${'年'}${month}`+
`${'月'}${day}${'日'}`;
returnbirthdate;
}

isEmpty(obj):boolean{
returnobj===undefined||obj===null||obj==='';
}

isEmptyArr(array):boolean{
returnthis.isEmpty(array)||array.length===0;
}

build(){
Row(){
Column(){
Row(){
Image($r('app.media.ic_back'))
.width(26)
.height(26)
.alignSelf(ItemAlign.Start)
.margin({
left:'7.2%',
top:19
})
.onClick(()=>{
letcontext=getContext(this)asContext.UIAbilityContext;
this.alertDialog(context);
})
Text('个人信息')
.fontColor(Color.Black)
.fontSize(20)
.margin({top:20,left:20})
.alignSelf(ItemAlign.Center)
}.width('100%')
Image($r('app.media.ic_avatar'))
.width(56)
.height(56)
.alignSelf(ItemAlign.Center)
.margin({top:'5.5%'})
Text('头像')
.fontColor(Color.Black)
.fontSize(16)
.margin({top:'2.1%'})
.alignSelf(ItemAlign.Center)
InputFrame({
inputImage:$r('app.media.ic_nickname'),
hintText:'昵称'
})
TextFrame({
textImage:$r('app.media.ic_birthdate'),
text:'出生日期',
content:$birthdate,
onTextClick:()=>{
this.datePickerDialog((birthValue:string)=>{
this.birthdate=birthValue;
});
}
})
TextFrame({
textImage:$r('app.media.ic_sex'),
text:'性别',
content:$sex,
onTextClick:()=>{
this.textPickerDialog(this.sexArray,(sexValue:string)=>{
this.sex=sexValue;
});
}
})
InputFrame({
inputImage:$r('app.media.ic_signature'),
hintText:'个性签名'
})
TextFrame({
textImage:$r('app.media.ic_hobbies'),
text:'兴趣爱好',
content:$textValue,
onTextClick:()=>{
this.customDialogController.open();
}
})
}
.backgroundColor('#F5F5F5')
.height('100%')
.width('100%')
}
.height('100%')
}
}
审核编辑:刘清
-
OpenHarmony
+关注
关注
33文章
3973浏览量
21343
原文标题:OpenHarmony上使用弹窗
文章出处:【微信号:gh_834c4b3d87fe,微信公众号:OpenHarmony技术社区】欢迎添加关注!文章转载请注明出处。
发布评论请先 登录


鸿蒙版微信消息弹窗不能进入聊天界面
安装了platformIO插件,重启过软件,在通用项目中点击 基于platformIO,就弹窗说没安装,怎么解决?
在树莓派Pico上运用不同的并行化手段

分享---超声波焊接机设备实现告 \"警弹窗\" 效果的简单方法
鸿蒙非侵入式弹窗新解法,企查查正式开源“QuickDialog”弹窗组件库

《仿盒马》app开发技术分享-- 分类模块顶部导航列表弹窗(16)
HarmonyOS实战:首页多弹窗顺序弹出终极解决方案


评论