 MediaPipe + OpenCV五分钟搞定手势识别

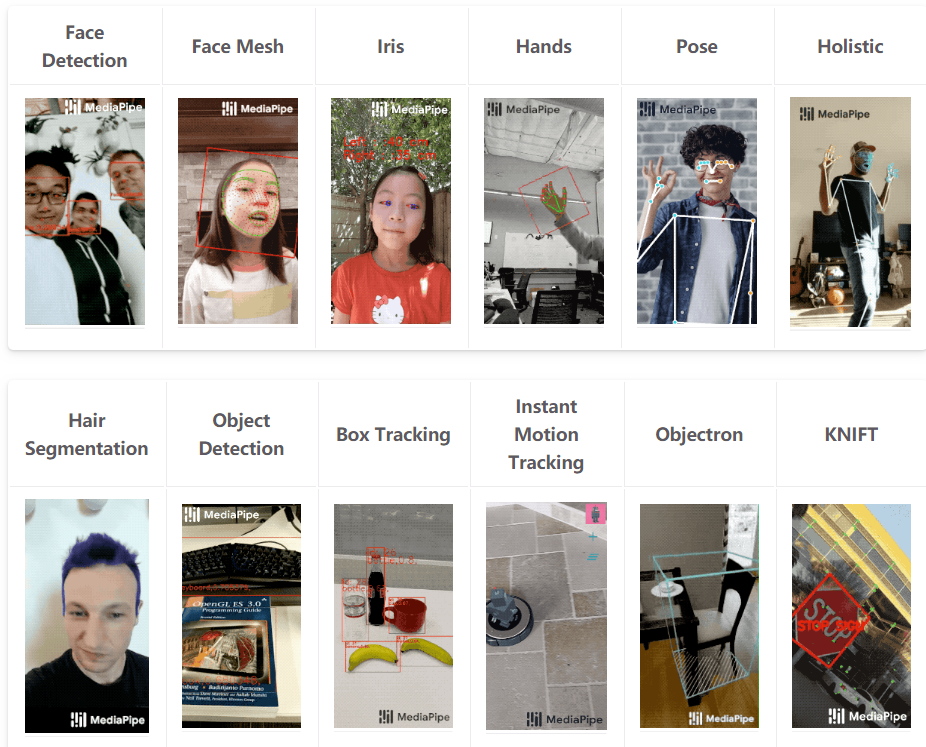
MediaPipe介绍
这个是真的,首先需要从Google在2020年发布的mediapipe开发包说起,这个开发包集成了人脸、眼睛、虹膜、手势、姿态等各种landmark检测与跟踪算法。
https://google.github.io/mediapipe/
请看下图比较详细
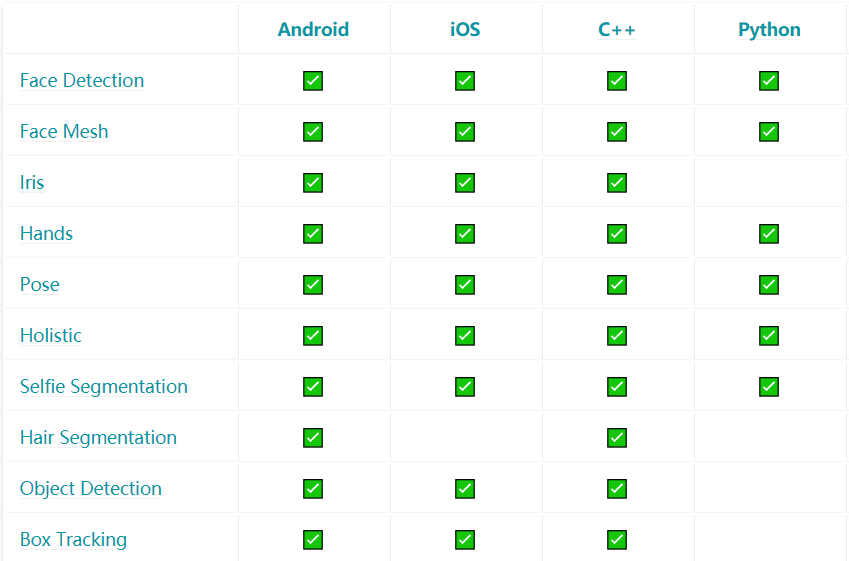
是个不折不扣的现实增强的宝藏工具包,特别实用!支持的平台跟语言也非常的丰富,图示如下:
只说一遍,感觉要逆天了,依赖库只有一个就是opencv,python版本的安装特别简单,直接运行下面的命令行:
pip install mediapipe
手势landmark检测
直接运行官方提供的Python演示程序,需要稍微修改一下,因为版本更新了,演示程序有点问题,改完之后执行运行视频测试,完美get到手势landmark关键点:
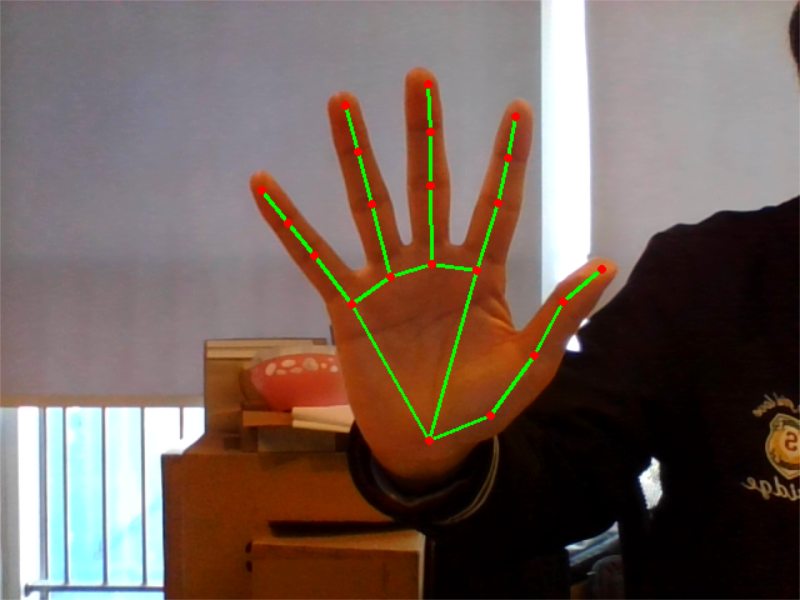
手势landmark的关键点编号与解释如下:

修改后的代码如下:
importcv2
importmediapipeasmp
mp_drawing=mp.solutions.drawing_utils
mp_hands=mp.solutions.hands

#Forwebcaminput:
cap=cv2.VideoCapture(0)
withmp_hands.Hands(
min_detection_confidence=0.5,
min_tracking_confidence=0.5)ashands:
whilecap.isOpened():
success,image=cap.read()
ifnotsuccess:
print("Ignoringemptycameraframe.")
#Ifloadingavideo,use'break'insteadof'continue'.
continue

#Toimproveperformance,optionallymarktheimageasnotwriteableto
#passbyreference.
image.flags.writeable=False
image=cv2.cvtColor(image,cv2.COLOR_BGR2RGB)
results=hands.process(image)

#Drawthehandannotationsontheimage.
image.flags.writeable=True
image=cv2.cvtColor(image,cv2.COLOR_RGB2BGR)
ifresults.multi_hand_landmarks:
forhand_landmarksinresults.multi_hand_landmarks:
mp_drawing.draw_landmarks(
image,
hand_landmarks,
mp_hands.HAND_CONNECTIONS)
cv2.imwrite('D:/result.png',cv2.flip(image,1))
#Fliptheimagehorizontallyforaselfie-viewdisplay.
cv2.imshow('MediaPipeHands',cv2.flip(image,1))
ifcv2.waitKey(5)&0xFF==27:
break
cap.release()
手势识别
基于最简单的图象分类,收集了几百张图象,做了一个简单的迁移学习,实现了三种手势分类,运行请看视频:
声明:本文内容及配图由入驻作者撰写或者入驻合作网站授权转载。文章观点仅代表作者本人,不代表电子发烧友网立场。文章及其配图仅供工程师学习之用,如有内容侵权或者其他违规问题,请联系本站处理。
举报投诉
-
手势识别
+关注
关注
8文章
232浏览量
49291 -
跟踪算法
+关注
关注
0文章
41浏览量
13251 -
OpenCV
+关注
关注
33文章
652浏览量
45076
原文标题:MediaPipe + OpenCV五分钟搞定手势识别
文章出处:【微信号:CVSCHOOL,微信公众号:OpenCV学堂】欢迎添加关注!文章转载请注明出处。
发布评论请先 登录
相关推荐
热点推荐
如何用OpenCV进行手势识别--基于米尔全志T527开发板
本文将介绍基于米尔电子MYD-LT527开发板(米尔基于全志T527开发板)的OpenCV手势识别方案测试。摘自优秀创作者-小火苗米尔基于全志T527开发板一、软件环境安装1.安装OpenCVsudoapt-getinstall

基于毫米波雷达的手势识别算法
)信息提取:该模块将信号构建成手势点云模型,并将其提供给下一个神经网络模块进行识别。在点云模型中,每个内部点都有自己的五个特征,即反射点的x-y-z坐标、速度和强度。从点云上,我们还可以清楚地观察
发表于 06-05 19:09
红外手势识别方案 红外手势感应模块 红外识别红外手势识别
红外手势识别方案,适用于多种领域,如音响,可实现通过手势识别暂停,开始,上一首,下一首;智能家居,如电动窗帘,感应马桶等;电子产品,如台灯开关以及亮度的调节。
发表于 08-27 16:37
【UT4418申请】手势识别系统
申请理由:我是一名嵌入式软件工程师 。 大学花了很长一段时间开发一套手势识别系统。该系统是基于Xilinx 的 Zedboard开发板。Zedboard中包含有Cotex-A9处理器 。现在回忆起
发表于 09-23 14:54
【NanoPi Duo开发板试用申请】基于nanopi的手势识别
项目名称:基于nanopi的手势识别试用计划:基于nanopi硬件,通过摄像头采集图像,利用opencv来进行手部动作捕捉,达到无触摸操控。可用于智能家居,只需利用手部动作,就可以控制智能家具。
发表于 10-11 17:05
手势识别控制器制作
目录智能家居硬件小制作(含源码)《手势识别控制器》基于PAJ7620手势模块、L298N驱动板、arduino介绍材料PAJ7620手势模块参数硬件连接库文件使用其他硬件制作
发表于 09-07 06:45
五分钟读懂WiFi基础知识
家1、嵌入式技术常识科普【物联网】WiFi基础知识五分钟读懂TCP/IP;协议STM32开发 -- Keil基本使用如何看懂时序图(以SPI/I2C为例)ESP8266配网思路(不使用...
发表于 12-01 06:36
手势识别系统的程序和资料说明
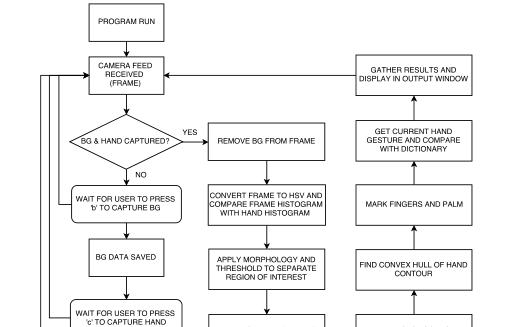
本项目在python 2.7上使用opencv实现了一个手势识别和手势识别系统。一种基于直方图的方法被用来从背景图像中分离出一只手。背景消除
发表于 04-28 08:00
•12次下载
opencv 轮廓放大_OpenCV开发笔记(六十六):红胖子8分钟带你总结形态学操作-膨胀、腐蚀、开运算、闭运算、梯
opencv 轮廓放大_OpenCV开发笔记(六十六):红胖子8分钟带你总结形态学操作-膨胀、腐蚀、开运算、闭运算、梯......
发表于 11-24 14:21
•21次下载

手势识别技术及其应用
手势识别技术是一种通过计算机视觉和人工智能技术来分析和识别人类手势动作的技术。它主要利用传感器、摄像头等设备捕捉手势信息,然后通过算法对捕捉
如何打造一个属于自己的手势识别应用
上一期小编给大家介绍了和MediaPipe的相遇之路,本期小编将带着大家一起来动手,如何打造一个属于自己的手势识别应用。

零成本钢铁侠手套!树莓派+OpenCV 秒变手势遥控器!
大家好,这是一个树莓派和OpenCV的连载专题。使用树莓派与OpenCV实现姿态估计和面部特征点追踪使用树莓派与OpenCV实现面部和运动追踪的云台系统使用树莓派和OpenCV实现手部


评论