 用Lilypad制作音板的教程

Arduino平台的设计非常灵活,使用Uno等单个开发板就可以创建出无数项目。但是,专为执行特定任务而设计的专用板对某些项目来说尤其有用。为了展示这一点,我们将用LilyPad MP3(一种变体Arduino开发板)来构建一个音板。
变体开发板的工作原理
开源软件平台允许开发人员检查和修改他们的代码。同样,像Arduino这样的开源硬件平台允许第三方构建他们自己版本的兼容板。Arduino板的LilyPad系列就是这样的一种变体。该板专为电子纺织品设计,可以缝制到织物项目中。这使其成为服装和智能服装的理想选择。
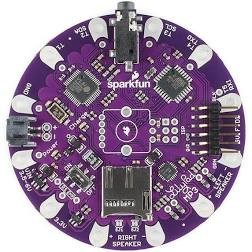
LilyPad MP3是LilyPad系列的另一个子变体,包括一个内置SD卡读卡器、一个立体声音频放大器和3.5毫米耳机插孔,以及五个预编程过的触发器输入。无需任何编码设置,您最多可以连接五个触发器来播放预先录制的声音文件。如果您曾在迪士尼见过可以播放一组预先编写好的语句的星球大战冲锋队 ,那么可以告诉您LilyPad MP3的功能与其非常相似。
虽然LilyPad MP3可以像任何Arduino板那样编程,但是该项目的优点是您可以在不修改任何现有代码的情况下对音板进行设置。它可以向您证明为您的项目尽早选择合适的开发板有多么值得。使用普通的Arduino Uno需要有一个外部扩展板才能具有与LilyPad MP3相同的功能,而且体积会更大。由于大多数Arduino板都可以与大部分草图兼容,因此找到满足您需求的外形尺寸可以为您省去大量的时间和麻烦。
所需组件
对于本项目,我们将演示LilyPad MP3如何在面包板上工作的,其实就是让线路能够正常工作。首先,您需要一个LilyPad MP3。
您还需要1-5个按钮(只需要一个,但是LilyPad最多支持5个)、一个扬声器(或耳机)和3.5毫米电缆。
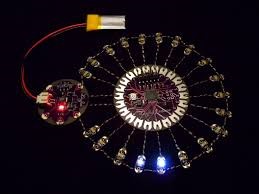
由于LilyPad旨在用于服装,您可以选择使用一些线和针将设备缝制到外套、衣服或任何其他您想要装上音板的地方。使用导电布线可以让您将电线直接编织到衣服的面料中。
代码
如上所述,LilyPad MP3上默认触发器草图的代码预装在了每块板上。您不需要上传此文件,但查看这些代码来了解工作原理会很有帮助。
// “Trigger” example sketch for Lilypad MP3 Player
// Mike Grusin, SparkFun Electronics
// http://www.sparkfun.com
// This sketch (which is preloaded onto the board by default),
// will play a specific audio file when one of the five trigger
// inputs (labeled T1 – T5) is momentarily grounded.
// You can place up to five audio files on the micro-SD card.
// These files should have the desired trigger number (1 to 5)
// as the first character in the filename. The rest of the
// filename can be anything you like. Long file names will work,
// but will be translated into short 8.3 names. We recommend using
// 8.3 format names without spaces, but the following characters
// are OK: .$%’-_@~`!(){}^#&. The VS1053 can play a variety of
// audio formats, see the datasheet for information.
// By default, a new trigger will interrupt a playing file, except
// itself. (In other words, a new trigger won’t restart an
// already-playing file). You can easily change this behavior by
// modifying the global variables “interrupt” and “interruptself”
// below.
// This sketch can output serial debugging information if desired
// by changing the global variable “debugging” to true. Note that
// this will take away trigger inputs 4 and 5, which are shared
// with the TX and RX lines. You can keep these lines connected to
// trigger switches and use the serial port as long as the triggers
// are normally open (not grounded) and remain ungrounded while the
// serial port is in use.
// Uses the SdFat library by William Greiman, which is supplied
// with this archive, or download from http://code.google.com/p/sdfatlib/
// Uses the SFEMP3Shield library by Bill Porter, which is supplied
// with this archive, or download from http://www.billporter.info/
// License:
// We use the “beerware” license for our firmware. You can do
// ANYTHING you want with this code. If you like it, and we meet
// someday, you can, but are under no obligation to, buy me a
// (root) beer in return.
// Have fun!
// -your friends at SparkFun
// Revision history:
// 1.0 initial release MDG 2012/11/01
// We’ll need a few libraries to access all this hardware!
#include // To talk to the SD card and MP3 chip
#include // SD card file system
#include // MP3 decoder chip
// Constants for the trigger input pins, which we’ll place
// in an array for convenience:
const int TRIG1 = A0;
const int TRIG2 = A4;
const int TRIG3 = A5;
const int TRIG4 = 1;
const int TRIG5 = 0;
int trigger[5] = {TRIG1, TRIG2, TRIG3, TRIG4, TRIG5};
// And a few outputs we’ll be using:
const int ROT_LEDR = 10; // Red LED in rotary encoder (optional)
const int EN_GPIO1 = A2; // Amp enable + MIDI/MP3 mode select
const int SD_CS = 9; // Chip Select for SD card
// Create library objects:
SFEMP3Shield MP3player;
SdFat sd;
// Set debugging = true if you’d like status messages sent
// to the serial port. Note that this will take over trigger
// inputs 4 and 5. (You can leave triggers connected to 4 and 5
// and still use the serial port, as long as you’re careful to
// NOT ground the triggers while you’re using the serial port).
boolean debugging = false;
// Set interrupt = false if you would like a triggered file to
// play all the way to the end. If this is set to true, new
// triggers will stop the playing file and start a new one.
boolean interrupt = true;
// Set interruptself = true if you want the above rule to also
// apply to the same trigger. In other words, if interrupt = true
// and interruptself = false, subsequent triggers on the same
// file will NOT start the file over. However, a different trigger
// WILL stop the original file and start a new one.
boolean interruptself = false;
// We’ll store the five filenames as arrays of characters.
// “Short” (8.3) filenames are used, followed by a null character.
char filename[5][13];
void setup()
{
int x, index;
SdFile file;
byte result;
char tempfilename[13];
// Set the five trigger pins as inputs, and turn on the
// internal pullup resistors:
for (x = 0; x <= 4; x++) { pinMode(trigger[x], INPUT); digitalWrite(trigger[x], HIGH); } // If serial port debugging is inconvenient, you can connect // a LED to the red channel of the rotary encoder to blink // startup error codes: pinMode(ROT_LEDR, OUTPUT); digitalWrite(ROT_LEDR, HIGH); // HIGH = off // The board uses a single I/O pin to select the // mode the MP3 chip will start up in (MP3 or MIDI), // and to enable/disable the amplifier chip: pinMode(EN_GPIO1, OUTPUT); digitalWrite(EN_GPIO1, LOW); // MP3 mode / amp off // If debugging is true, initialize the serial port: // (The ‘F’ stores constant strings in flash memory to save RAM) if (debugging) { Serial.begin(9600); Serial.println(F(“Lilypad MP3 Player trigger sketch”)); } // Initialize the SD card; SS = pin 9, half speed at first if (debugging) Serial.print(F(“initialize SD card… “)); result = sd.begin(SD_CS, SPI_HALF_SPEED); // 1 for success if (result != 1) // Problem initializing the SD card { if (debugging) Serial.print(F(“error, halting”)); errorBlink(1); // Halt forever, blink LED if present. } else if (debugging) Serial.println(F(“success!”)); // Start up the MP3 library if (debugging) Serial.print(F(“initialize MP3 chip… “)); result = MP3player.begin(); // 0 or 6 for success // Check the result, see the library readme for error codes. if ((result != 0) && (result != 6)) // Problem starting up { if (debugging) { Serial.print(F(“error code “)); Serial.print(result); Serial.print(F(“, halting.”)); } errorBlink(result); // Halt forever, blink red LED if present. } else if (debugging) Serial.println(F(“success!”)); // Now we’ll access the SD card to look for any (audio) files // starting with the characters ‘1’ to ‘5’: if (debugging) Serial.println(F(“reading root directory”)); // Start at the first file in root and step through all of them: sd.chdir(“/”, true); while (file.openNext(sd.vwd(), O_READ)) { // get filename file.getFilename(tempfilename); // Does the filename start with char ‘1’ through ‘5’? if (tempfilename[0] >= ‘1’ && tempfilename[0] <= ‘5’)
{
// Yes! subtract char ‘1’ to get an index of 0 through 4.
index = tempfilename[0] – ‘1’;
// Copy the data to our filename array.
strcpy(filename[index], tempfilename);
if (debugging) // Print out file number and name
{
Serial.print(F(“found a file with a leading “));
Serial.print(index + 1);
Serial.print(F(“: “));
Serial.println(filename[index]);
}
}
else if (debugging)
{
Serial.print(F(“found a file w/o a leading number: “));
Serial.println(tempfilename);
}
file.close();
}
if (debugging)
Serial.println(F(“done reading root directory”));
if (debugging) // List all the files we saved:
{
for(x = 0; x <= 4; x++)
{
Serial.print(F(“trigger “));
Serial.print(x + 1);
Serial.print(F(“: “));
Serial.println(filename[x]);
}
}
// Set the VS1053 volume. 0 is loudest, 255 is lowest (off):
MP3player.setVolume(10, 10);
// Turn on the amplifier chip:
digitalWrite(EN_GPIO1, HIGH);
delay(2);
}
void loop()
{
int t; // current trigger
static int last_t; // previous (playing) trigger
int x;
byte result;
// Step through the trigger inputs, looking for LOW signals.
// The internal pullup resistors will keep them HIGH when
// there is no connection to the input.
// If serial debugging is on, only check triggers 1-3,
// otherwise check triggers 1-5.
for(t = 1; t <= (debugging ? 3 : 5); t++)
{
// The trigger pins are stored in the inputs[] array.
// Read the pin and check if it is LOW (triggered).
if (digitalRead(trigger[t – 1]) == LOW)
{
// Wait for trigger to return high for a solid 50ms
// (necessary to avoid switch bounce on T2 and T3
// since we need those free for I2C control of the
// amplifier)
x = 0;
while(x < 50)
{
if (digitalRead(trigger[t – 1]) == HIGH)
x++;
else
x = 0;
delay(1);
}
if (debugging)
{
Serial.print(F(“got trigger “));
Serial.println(t);
}
// Do we have a valid filename for this trigger?
// (Invalid filenames will have 0 as the first character)
if (filename[t – 1][0] == 0)
{
if (debugging)
Serial.println(F(“no file with that number”));
}
else // We do have a filename for this trigger!
{
// If a file is already playing, and we’ve chosen to
// allow playback to be interrupted by a new trigger,
// stop the playback before playing the new file.
if (interrupt && MP3player.isPlaying() && ((t != last_t) || interruptself))
{
if (debugging)
Serial.println(F(“stopping playback”));
MP3player.stopTrack();
}
// Play the filename associated with the trigger number.
// (If a file is already playing, this command will fail
// with error #2).
result = MP3player.playMP3(filename[t – 1]);
if (result == 0) last_t = t; // Save playing trigger
if(debugging)
{
if(result != 0)
{
Serial.print(F(“error “));
Serial.print(result);
Serial.print(F(” when trying to play track “));
}
else
{
Serial.print(F(“playing “));
}
Serial.println(filename[t – 1]);
}
}
}
}
}
void errorBlink(int blinks)
{
// The following function will blink the red LED in the rotary
// encoder (optional) a given number of times and repeat forever.
// This is so you can see any startup error codes without having
// to use the serial monitor window.
int x;
while(true) // Loop forever
{
for (x = 0; x < blinks; x++) // Blink the given number of times
{
digitalWrite(ROT_LEDR, LOW); // Turn LED ON
delay(250);
digitalWrite(ROT_LEDR, HIGH); // Turn LED OFF
delay(250);
}
delay(1500); // Longer pause between blink-groups
}
}
虽然逐行看下来代码实在太多了(而且很多都在本项目中用不到),但是有几个关键点值得强调。首先,有一些函数是Bill Porter的MP3播放器库的一部分。这些函数通过VS1053B解码芯片控制音频文件。这些独特的函数包括:
● setVolume(): 该函数可以调节输出音量的级别。
● isPlaying(): 该函数可用于确定当前是否正在播放MP3(可用于中断或停止播放)。
● stopTrack(): 可以停止当前正在播放的曲目。
● playMP3(): 该函数用于播放SD卡中的文件。默认草图设置为播放与输入所连接触发器匹配的文件。
要在LilyPad上设置音轨,您最多可以将五个音频文件添加到微SD卡中。尽管LilyPad的名称是MP3,但是它支持多种音频文件格式。您可以在此处找到所支持的格式列表。您可以随意命名文件,只要文件名以1到5之间的数字开头即可。
默认草图将播放与激活的触发器对应的音频文件。触发器1(在LilyPad上标记为T1)将激活以1开头的音频文件。触发器2将播放以2开头的文件,以此类推。只要您正确命名音频文件,就不必对代码进行任何处理。
接线
将所有组件连接到LilyPad很简单。将微SD卡插入微SD卡槽,然后将扬声器或一副耳机插入耳机插孔。如果您想将扬声器直接连接到开发板,LilyPad还具有用于左右扬声器的正负极触点。
接下来,将按钮连接到您要使用的每个触发器。按钮的一侧连接到GND,而另一侧连接到您要激活的触发器触点。LilyPad上的触发器触点中有一个大圆形触点和一个紧邻大触点的较小触点。您可以将电线焊接到较小的触点,或将电线缠绕在较大的触点上。
按下按钮,此时应该会触发音频文件的播放。确认接线正常后,您就可以尝试使用导电布线将接线缝入织物中了。
这篇文章来源于DevicePlus.com英语网站的翻译稿。
DevicePlus 编辑团队
设备升级版适用于所有热爱电子和机电一体化的人。
审核编辑黄宇
-
触发器
+关注
关注
14文章
2065浏览量
63629 -
代码
+关注
关注
30文章
4983浏览量
74534 -
Arduino
+关注
关注
191文章
6534浏览量
197658
发布评论请先 登录
EasyEDA开源硬件——Arduino LilyPad 带USB 的Atmega32U4板
EasyEDA开源硬件——LilyPad MP3
EasyEDA开源硬件——LilyPad Arduino SimpleSnap (Open hardware)
EasyEDA开源硬件项目——LilyPad 简单电源
EasyEDA开源硬件——LilyPad 供应电源
EasyEDA开源硬件——LilyPad像素板
EasyEDA开源硬件电路——LilyPad Xbee 模块
Arduino Lilypad可控NeoPixel耳环的制作
Arduino LilyPad控制的NeoPixel耳环


评论