 如何使用Arduino和图形LCD创建体面的游戏
编程一直很有趣,使用Arduino等开发平台变得更好。几乎每个程序员都会尝试使用他们学习/练习的语言开发某种游戏。这有助于他们以有趣而富有成效的方式调整他们的编程技能。自从我接触到Arduino以来,我一直是它的忠实粉丝,并且一直想尝试一些很酷的东西,当我发现像诺基亚5110这样的图形LCD和Arduino可以变得多么酷时,我开发游戏的想法开始了。这是一种有趣的方式,可以调整一些编程技能,同时又能获得乐趣,所以尽管你们可能也对开发游戏感兴趣。因此,在本教程中,我们将学习如何使用 Arduino 和图形 LCD 创建体面的游戏。
游戏计划:
在我们开始之前,计划你的游戏的实际运作方式是非常重要的。我选择了诺基亚5110图形LCD和操纵杆作为我的硬件选择。我假设在本教程中您也选择了相同的内容。由于诺基亚5110没有太多空间,因此我们将整个游戏计划在显示器的84 * 48像素分辨率内。
在这个空间内,我们必须紧密地适应游戏区域和记分板区域,该区域将显示分数等内容。了解放置东西的像素位置非常重要,以跟踪像素位置并在屏幕上更新它们。
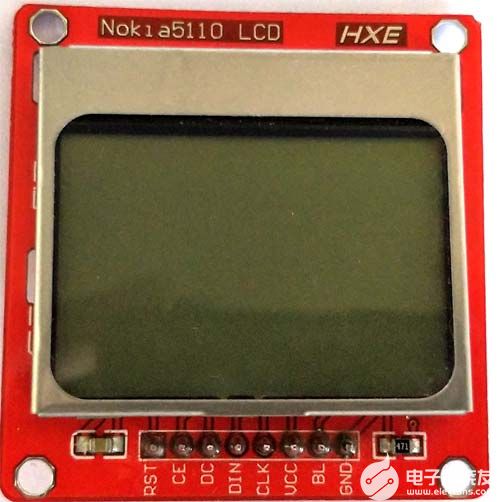
一旦确定了游戏屏幕外观,我们就必须决定游戏中的角色。对于我的游戏,我们只有两个,玩家角色是一艘宇宙飞船,一个是敌人角色,它应该看起来像一艘外星飞船。诺基亚LCD可以显示位图图像,所以我决定使用该选项来显示我的宇宙飞船和敌人。
因此,我们将有一艘宇宙飞船正在穿越外星人的宇宙飞船,这艘宇宙飞船将有三条车道可以改变,以避免与外星人撞击。在任何时候,外星人只能占据两条轨道,玩家应该能够开车穿过自由轨道。一旦这些想法结束,我们就可以继续硬件,然后进行编程。
电路图:
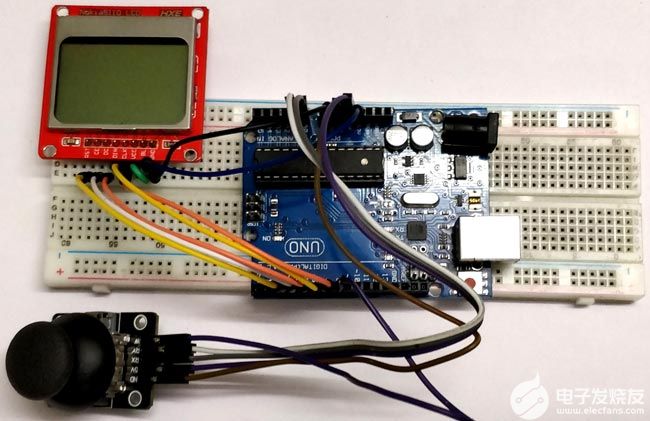
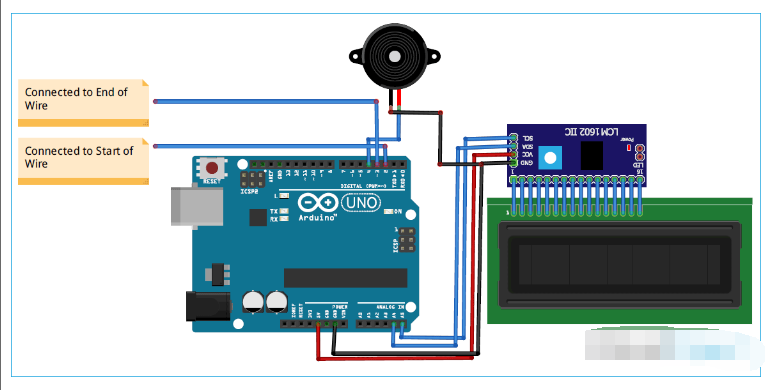
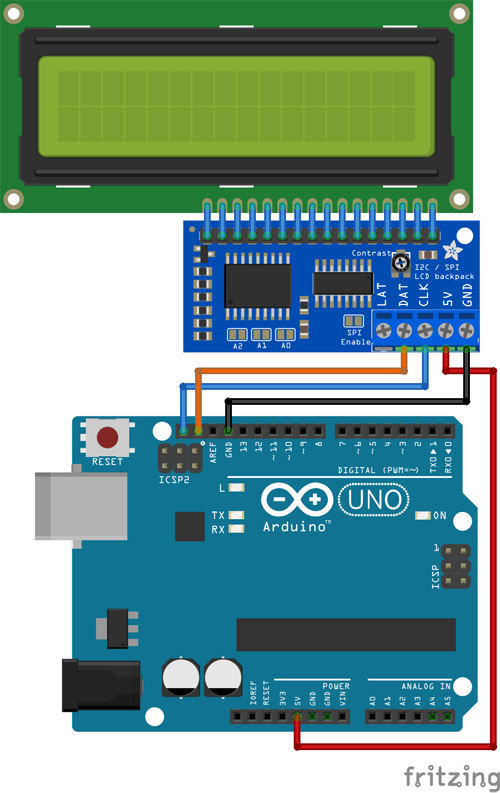
这款Arduino游戏的电路非常简单;我们只需要将诺基亚5110 LCD模块和操纵杆与Arduino连接即可。完整的电路图如下所示

诺基亚 5110 LCD 与 3.3V 配合使用,操纵杆模块使用 5V 工作,因此请确保仅使用 3.3V 连接 LCD,因为 5V 可能会永久损坏它。LCD通过SPI协议与Arduino通信,操纵杆仅读取ADC以读取电压变化。连接设置如下所示
先决条件:
在我们深入研究编程部分之前,重要的是你们使用显示模块和操纵杆很方便,因此您可以使用以下教程来了解有关它们的更多信息,然后回到这里以确保事情按照我们需要的方式工作!
为太空竞赛游戏编程Arduino:
游戏的完整程序可以在本页末尾找到;您可以直接在Arduino IDE上使用它并将其上传到Board。但是,如果您想知道代码中实际发生了什么,请进一步阅读。
与往常一样,我们从添加库头文件开始程序,我们需要为这个项目提供三个库,默认情况下,SPI 库会添加到您的 IDE 中。另外两个库必须从Adafruit Github页面下载。如果您不确定如何添加库,请按照先决条件部分中提到的 LCD 接口教程进行操作。
#include //SPI librarey for Communication
#include //Graphics lib for LCD
#include //Nokia 5110 LCD library
如果您遵循了本教程,您应该知道可以在LCD中显示位图图像。因此,我们必须使用教程中提到的软件将所需的图像转换为位图代码,您可以从Internet中选择任何图像并通过将它们转换为位图代码来使用它。确保图像足够简单,可以显示在我们的LCD屏幕上,在实际尝试LCD屏幕之前检查预览。在我们的程序中,我们使用了两个位图字符,一个是宇宙飞船,另一个是敌方飞船,两者的位图代码都添加到我们的代码中,如下所示。
//Bitmap Data for SpaceShip
static const unsigned char PROGMEM ship[] =
{
B00000000,B00000000,
B00000001,B00000000,
B00000011,B10000000,
B00000010,B10000000,
B00000010,B11000000,
B00000111,B11000000,
B00001101,B11100000,
B00011111,B11110000,
B00111111,B11111000,
B01111111,B11111100,
B01111111,B11111100,
B01111111,B11111100,
B00011111,B11110000,
B00000111,B11100000,
B00000000,B00000000,
};
//Bitmap Data for enemyship
static const unsigned char PROGMEM enemy[] =
{
B00000101,B11000000,
B00001011,B11100000,
B00000011,B11100000,
B00110011,B11111000,
B01111111,B11111100,
B10111111,B11111010,
B01110111,B11011100,
B01111110,B11111100,
B00111111,B11111100,
B11101111,B11101110,
B11000001,B00000110,
B10000001,B00000010,
B10000000,B00000010,
B00000000,B00000000,
};
我们必须指定诺基亚LCD 5110显示器连接到的引脚。显示器使用SPI通信进行通信,如果您遵循了上面的电路图,则初始化LCD的代码将如下所示,您无需更改它。
Adafruit_PCD8544 display = Adafruit_PCD8544(7, 6, 5, 4, 3); //Specifiy the pins to which the LCD is connected
在设置功能中,我们只需以9600波特率启动串行监视器,以便我们可以调试内容,然后初始化LCD显示。我们还必须设置LCD显示器的对比度,每个显示器在不同的对比度水平下效果最好,因此请使用该值来检查哪个最适合您。最后,我们还清除显示屏以重新开始。
void setup() {
Serial.begin(9600); //Serial Monitor for Debugging
display.begin(); //Begin the LCD communication
display.setContrast(30); //Set the contrast of the display
display.clearDisplay(); // clears the screen and start new
}
清除屏幕后,我们立即跳入循环功能,然后显示游戏屏幕。游戏屏幕只不过是显示游戏的基本骨架以及分数和速度级别。我们使用线条功能绘制三条线作为边框,并在右侧显示文本分数和速度,就像旧的复古手持游戏设备一样。
void gamescreen()
{
//Draw the Border for Screen
display.drawLine(0, 0, 0, 47, BLACK);
display.drawLine(50, 0, 50, 47, BLACK);
display.drawLine(0, 47, 50, 47, BLACK);
//Enter Default Texts
display.setTextSize(1);
display.setTextColor(BLACK);
display.setCursor(52,2);
display.println("Speed");
display.setCursor(54,12);
display.println(game_speed);
display.setCursor(52,25);
display.println("Score");
display.setCursor(54,35);
display.println(score);
}
接下来,我们必须从用户那里获得输入,以允许他/她控制宇宙飞船。输入将从连接到引脚 A1 的操纵杆模块接收。如果不移动,传感器的模拟值将为 512,沿 X 轴移动时将增加和减少。我们使用这些值来确定用户是要向左还是向右移动。如果您发现难以理解以下程序,您应该阅读先决条件中提到的与 Arduino 接口的操纵杆接口教程。
//Get input from user
Joy_X = analogRead(A1); //Read the X vaue from Joystick
if (Joy_X < 312 && POS!=1 && control==true) //If joy stick moves right
{ POS--; control = false;} //Decrement position of spaceship
else if (Joy_X > 712 && POS!=3 && control==true) //If joy stick moves right
{ POS++; control = false;} //Increment position of spaceship
else if (Joy_X >502 && Joy_X<522) //If joystick back to initial position
control = true; //Preare it for next move
//Input from user received
从用户那里获得宇宙飞船的位置后,我们必须将宇宙飞船放置在该特定位置。我们使用以下函数并将位置值作为参数传递,然后根据位置将宇宙飞船放置在其各自的轨道上。
void player_car(char pos) //Place the spaceship based on the user selected position
{
if (pos==1)
display.drawBitmap(2, 32, ship, 15, 15, BLACK);
if (pos==2)
display.drawBitmap(18, 32, ship, 15, 15, BLACK);
if (pos==3)
display.drawBitmap(34, 32, ship, 15, 15, BLACK);
}
现在我们的飞船已经放在屏幕上并准备好参加比赛,我们必须介绍将与玩家一起竞争的敌舰。每当一艘敌舰越过屏幕时,我们都会假设他已经死了,当他死了时,我们必须制造一艘新的宇宙飞船。下面的函数也做同样的事情。它为两艘敌舰创建一个新位置,并将它们放置在屏幕顶部。
if (enemy_dead) //Check of enemy ships are dead
{ //If they are dead
enemy_0_pos = POS; //create first enemy above the space ship
enemy_1_pos = random(0,4); //create secound enemy at some other random place
enemy_phase = 0; //Bring the enemy form the top
enemy_dead = false; //Enemy is created so they are not dead anymore
}
将敌舰放在屏幕顶部后,我们必须将其放下,使其像我们的玩家正在向上奔跑一样长矛,为此,我们只需要增加相位(显示图像的位置),以便它慢慢下降。对两艘敌舰都做了同样的事情,如下所示
enemy_ship (enemy_0_pos,enemy_phase); enemy_phase++; //Place the first enemy on screen and drive him down
enemy_ship (enemy_1_pos,enemy_phase); enemy_phase++; //Place the secound enemy on screen and drive him down
函数enemy_ship如下所示,它与播放器汽车函数非常相似,但这里我们有两个参数。一种是将敌人放在轨道上,另一种是将敌人移动到底部。
void enemy_ship(int place, int phase) //Place the enemy_ship in the new place and phase
{
if (place==1)
display.drawBitmap(2, phase, enemy, 15, 15, BLACK);
if (place==2)
display.drawBitmap(18, phase, enemy, 15, 15, BLACK);
if (place==3)
display.drawBitmap(34, phase, enemy, 15, 15, BLACK);
}
下一段代码应该检查宇宙飞船是否避开了敌舰。要检查这一点,我们需要知道敌舰和玩家的宇宙飞船的位置。既然我们知道了这一切,我们只需要检查宇宙飞船的位置是否与敌舰相同。只有当敌舰到达宇宙飞船附近时,我们才会检查这一点。如果玩家没有避开敌人,则意味着游戏结束。
if (enemy_phase>22 && ((enemy_0_pos == POS) || (enemy_1_pos == POS)) ) //If the Spaceship touches any one of the enemy
game_over(); //Display game over
如果玩家成功避开了敌人,那么我们应该杀死敌人并给玩家一分。为此,我们只需检查敌人是否已到达屏幕底部,如果是,我们将使用以下代码将其杀死
if (enemy_phase>40) //If thespace ship escapes the enemies
{enemy_dead = true; score++;} //Increase the score and kill the enemies
如果我们在获得高分时不增加游戏的难度,那将是多么有趣。因此,我们使用另一个功能来监控玩家的分数,并根据分数提高游戏速度。速度实际上是通过使用延迟功能来控制的,这将控制游戏的刷新间隔,从而使它变得快或慢。
void Level_Controller() //Increase the speed of game based on the score.
{
if (score>=0 && score<=10) //If score 0-10
{
game_speed = 0; delay(80); //slow the game by 80ms
}
if (score>10 && score<=20) //If score 10-40
{
game_speed = 1; delay(70); //slow the game by 70ms
}
if (score>20 && score<=30) //If score 20-40
{
game_speed = 2; delay(60); //slow the game by 60ms
}
if (score>30 && score<=40) //If score 30-40
{
game_speed = 3; delay(50); //slow the game by 50ms
}
}
Arduino太空赛车游戏工作:
在确保了解硬件和程序后,只需构建电路并将代码上传到Arduino板即可。您应该注意到游戏开始,如下所示
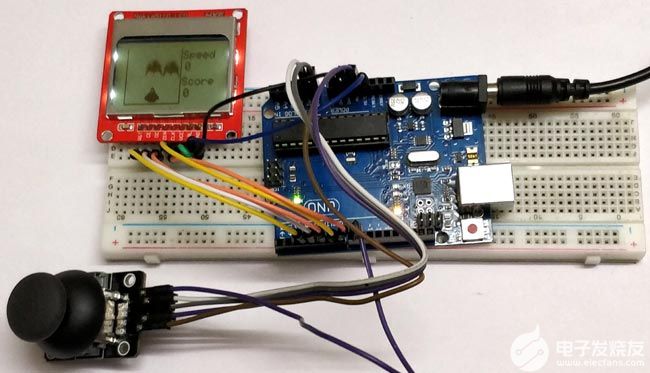
使用操纵杆通过向左或向右移动来逃离敌舰。为了避开每个敌人,你的分数会增加一个。当分数变高时,游戏的速度也会增加,也就是说,每获得 10 分,速度就会增加 10 毫秒。您可以继续在此游戏的基础上引入新的关卡,或者每个人都使用加速度计进行一些硬件更改以通过运动来控制它。
/* SPACE RACE Game using Arduino and Nokia 5110 LCD
* Coded by: Aswinth Raj
* Input -> Joystick (A0,A1)
*/
#include //SPI librarey for Communication
#include //Graphics lib for LCD
#include //Nokia 5110 LCD librarey
//Bitmap Data for SpaceShip
static const unsigned char PROGMEM ship[] =
{
B00000000,B00000000,
B00000001,B00000000,
B00000011,B10000000,
B00000010,B10000000,
B00000010,B11000000,
B00000111,B11000000,
B00001101,B11100000,
B00011111,B11110000,
B00111111,B11111000,
B01111111,B11111100,
B01111111,B11111100,
B01111111,B11111100,
B00011111,B11110000,
B00000111,B11100000,
B00000000,B00000000,
};
//Bitmap Data for enemyship
static const unsigned char PROGMEM enemy[] =
{
B00000101,B11000000,
B00001011,B11100000,
B00000011,B11100000,
B00110011,B11111000,
B01111111,B11111100,
B10111111,B11111010,
B01110111,B11011100,
B01111110,B11111100,
B00111111,B11111100,
B11101111,B11101110,
B11000001,B00000110,
B10000001,B00000010,
B10000000,B00000010,
B00000000,B00000000,
};
Adafruit_PCD8544 display = Adafruit_PCD8544(7, 6, 5, 4, 3); //Specifiy the pins to which the LCD is connected
int enemy_0_pos, enemy_1_pos, enemy_phase;
int Joy_X;
int game_speed = 0;
int score = 0;
char POS=2;
boolean enemy_dead = true;
boolean control = true;
void setup() {
Serial.begin(9600); //Serial Monitor for Debugging
display.begin(); //Begin the LCD communication
display.setContrast(30); //Set the contrast of the display
display.clearDisplay(); // clears the screen and start new
}
void loop() {
display.clearDisplay(); // clears the screen and start new
gamescreen(); //Displays the box, score and speed values
//Get input from user
Joy_X = analogRead(A1); //Read the X vaue from Joystick
if (Joy_X < 312 && POS!=1 && control==true) //If joy stick moves right
{ POS--; control = false;} //Decrement position of spaceship
else if (Joy_X > 712 && POS!=3 && control==true) //If joy stick moves right
{ POS++; control = false;} //Increment position of spaceship
else if (Joy_X >502 && Joy_X<522) //If joystick back to initial position
control = true; //Preare it for next move
//Input from user received
player_car(POS); //Place the Space ship based on the input from user
if (enemy_dead) //Check of enemy ships are dead
{ //If they are dead
enemy_0_pos = POS; //create first enemy above the space ship
enemy_1_pos = random(0,4); //create secound enemy at some other random place
enemy_phase = 0; //Bring the enemy form the top
enemy_dead = false; //Enemy is created so they are not dead anymore
}
enemy_ship (enemy_0_pos,enemy_phase); enemy_phase++; //Place the first enemy on screen and drive him down
enemy_ship (enemy_1_pos,enemy_phase); enemy_phase++; //Place the secound enemy on screen and drive him down
if (enemy_phase>22 && ((enemy_0_pos == POS) || (enemy_1_pos == POS)) ) //If the Spaceship touches any one of the enemy
game_over(); //Display game over
if (enemy_phase>40) //If thespace ship escapes the enemys
{enemy_dead = true; score++;} //Increase the score and kill the enemys
Level_Controller(); //BAsed on score increase the speed of game
display.display(); //Update the display with all the changes made so far
}
void Level_Controller() //Increase the speed of game based on the score.
{
if (score>=0 && score<=10) //If score 0-10
{
game_speed = 0; delay(80); //slow the game by 80ms
}
if (score>10 && score<=20) //If score 10-40
{
game_speed = 1; delay(70); //slow the game by 70ms
}
if (score>20 && score<=30) //If score 20-40
{
game_speed = 2; delay(60); //slow the game by 60ms
}
if (score>30 && score<=40) //If score 30-40
{
game_speed = 3; delay(50); //slow the game by 50ms
}
}
void enemy_ship(int place, int phase) //Place the enemy_ship in the new place and phase
{
if (place==1)
display.drawBitmap(2, phase, enemy, 15, 15, BLACK);
if (place==2)
display.drawBitmap(18, phase, enemy, 15, 15, BLACK);
if (place==3)
display.drawBitmap(34, phase, enemy, 15, 15, BLACK);
}
void game_over() //Display game over screen
{
while(1) //The program will be stuck here for ever
{
delay(100);
display.clearDisplay();
display.setCursor(20,2);
display.println("GAME OVER");
display.display();
}
}
void gamescreen()
{
//Draw the Border for Screen
display.drawLine(0, 0, 0, 47, BLACK);
display.drawLine(50, 0, 50, 47, BLACK);
display.drawLine(0, 47, 50, 47, BLACK);
//Enter Default Texts
display.setTextSize(1);
display.setTextColor(BLACK);
display.setCursor(52,2);
display.println("Speed");
display.setCursor(54,12);
display.println(game_speed);
display.setCursor(52,25);
display.println("Score");
display.setCursor(54,35);
display.println(score);
}
void player_car(char pos) //Place the spaceship based on the user selected position
{
if (pos==1)
display.drawBitmap(2, 32, ship, 15, 15, BLACK);
if (pos==2)
display.drawBitmap(18, 32, ship, 15, 15, BLACK);
if (pos==3)
display.drawBitmap(34, 32, ship, 15, 15, BLACK);
}
-
lcd
+关注
关注
34文章
4278浏览量
164146 -
Arduino
+关注
关注
184文章
6428浏览量
184852
发布评论请先 登录
相关推荐
请问怎么实现arduino的图形界面编程?
图形LCD在嵌入式应用程序有什么应用?
使用arduino pro micro制作一个游戏控制器

如何使用Arduino制作Buzz Wire游戏
为Arduino Esplora LCD屏幕实施的生命游戏交互式实施

与Arduino微控制器使用而创建的Connect 4游戏


 工商网监
工商网监
评论