 从零开始学习制作、以及使用Tina的Docker编译镜像

### 前言
菜鸡玩家第一次接触Linux的buildroot环境,还在熟悉中。对于长期使用Linux命令行的、熟悉OpenHarmony构建系统的人来说,更清楚编译环境对小白来说有多蛋疼。作为一个重度的docker环境使用者,以及小白折腾编译环境的劝退佬来说,有一句话特别想对想学Linux的小白说。
本次制作镜像所需的文件已打包放在附件,想直接使用的,可以直接从**第2节** **创建docker镜像**开始。不想自己制作的,可以从**第3节** **创建docker容器**开始。
---
**你有空去折腾Linux的编译环境,还不如来学学Docker镜像的制作**
---
#### 用docker制作编译环境的好处
1. docker镜像的制作脚本,可以添加注释,作为学习过程记录和知识积累。
2. 学习docker镜像制作,能更好的理解Linux权限
3. 加深对系统目录的理解
4. 重装系统时,不需要浪费大量时间回忆环境搭建过程
5. docker容器玩坏了没关系,重新用镜像创建一个新的就行
6. 工具链更新时,可以通过快速调整制作脚本快速升级环境
7. 启动快速,培养命令行使用习惯
---
#### docker的缺点
1. win下不能调用USB设备(无法直接烧录)
2. docker需要学习和理解(基本上花2小时在B站看一下入门教程即可)
3. 重度命令行工具(使用命令行完成几乎所有操作)
---
#### 开始学习制作docker镜像
准备工作:安装docker(百度很多教程,没啥好说,不废话),然后将附件里的压缩包解压缩到任意目录,在命令行中进入该目录下。
1. 编制制作脚本文件tina_env.dockfile。
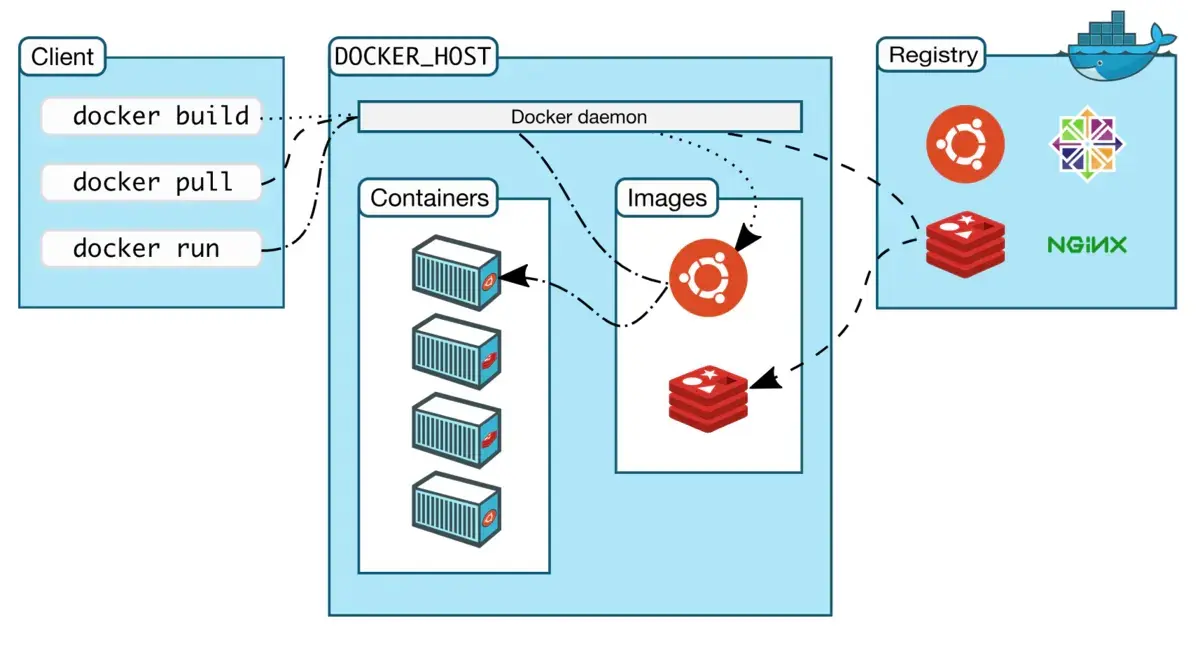
这里我已经制作好了,实际上脚本也没什么复杂的东西。简单来说,也就是FROM命令指定镜像的基础包。ENV命令设置镜像的环境变量。WORKDIR命令设置进入容器的默认路径(本镜像默认把源码挂载在/mnt目录,所以工作区也设置为该路径)。COPY命令将主机目录的内容复制到镜像内。RUN命令会在构建镜像时进入镜像环境中执行相关的Linux指令(比方说给镜像安装指定的软件包,文件的处理等)。
我们看一下本次制作tina_env的脚本文件。文件开头可以看到以下内容(均有注释,就不一一解释了):
```
# 使用python2.7的精简版debian镜像作为基础
FROM python:2.7-slim-buster
# 调整时区
ENV TZ "Asia/Shanghai"
# 设置默认工作路径
WORKDIR /mnt
# 拷贝主机的目录内容(.bashrc以及可执行的repo程序)到镜像内
COPY Docker/vuser/* /root/
# 添加普通用户组
RUN groupadd -g 1000 tina && \
# 添加普通用户
useradd vuser -r -m --uid 1000 -g tina --shell /bin/bash && \
# 复制Powerline至/usr/bin目录,并调整权限
mv /root/powerline-go /usr/bin/powerline-go && chmod 755 /usr/bin/powerline-go && \
# 为root用户添加python国内源
mkdir ~/.pip && \
echo '[global]' >> ~/.pip/pip.conf && \
echo 'index-url = https://pypi.tuna.tsinghua.edu.cn/simple' >> ~/.pip/pip.conf && \
echo '[install]' >> ~/.pip/pip.conf && \
echo 'trusted-host = https://pypi.tuna.tsinghua.edu.cn' >> ~/.pip/pip.conf && \
# 复制pip国内源配置至普通用户
cp -rv ~/.pip /home/vuser/ && chown -R vuser:tina /home/vuser/.pip && \
# 修改系统软件包国内源
sed -i 's/deb.debian.org/mirrors.aliyun.com/g' /etc/apt/sources.list && \
sed -i 's/security.debian.org/mirrors.aliyun.com/g' /etc/apt/sources.list && \
# 添加 i386 环境支持
dpkg --add-architecture i386 && \
apt-get update && apt-get install apt-utils -y && \
# 安装常见软件库
apt-get install curl wget pv git lbzip2 libncurses5 libncursesw5 nano -y && \
# 安装buildroot 必须依赖的软件库
apt-get install sed gawk make binutils diffutils gcc g++ bash patch gzip bzip2 perl \
tar cpio unzip rsync bc gawk libncurses-dev libssl-dev zlib1g-dev xz-utils file -y && \
# 安装 i386环境支持库
apt-get install libc6:i386 libncurses5:i386 libstdc++6:i386 busybox rsync lzma -y && \
# 清理缓存,减少镜像体积
apt-get clean && \
# 复制bashrc配置文件到vuser用户
cd /root && cp .bashrc .bash_aliases /home/vuser/ && chown -R vuser:tina /home/vuser && \
# 创建工具链目录
mkdir /opt/toolchains && chmod 666 /opt/toolchains
# 容器创建后,默认登陆以bash作为登陆环境
CMD ["/bin/bash"]
```
2. 创建docker镜像
在磁盘的任意位置创建一个任意目录(比如docker_build), 然后把附件的压缩包解压缩到这个目录里,然后用命令行进入这个目录(docker_build)。在命令行中执行以下命令(需要将walker2048替换成你自己的dockerhub用户名):
```
docker build -t walker2048/tina_env -f Docker/tina_env.dockerfile --network host .
```
命令解析:
build参数:告诉docker要执行创建镜像的工作
-t walker2048/tina_env 参数: 告诉docker这个镜像的tag标签(walker2048/tina_env)。可以理解成镜像的标识符(类似地址和姓名),这个tag标签是可以修改的,把镜像上传到dockerhub上也需要指定正确的标签。
-f Docker/tina_env.dockerfile 参数: 告诉docker使用哪一个构建脚本(可以使用绝对路径和相对路径)
--network host参数: 告诉docker使用主机的网络配置
最后的. 参数:将当前目录的所有内容传递给docker作为临时输入内容(COPY命令需要使用)。
---
正确执行命令后,网络正常的情况下,大概只需要5分钟左右,就顺利完成镜像构建了。命令行输出输出类似下图:
```
Sending build context to Docker daemon 95.64MB
Step 1/7 : FROM python:2.7-slim-buster
---> eeb27ee6b893
Step 2/7 : ENV TZ "Asia/Shanghai"
---> Using cache
---> 0c0e432b82be
Step 3/7 : WORKDIR /mnt
---> Using cache
---> 0d54e5487ee3
Step 4/7 : COPY Docker/vuser/* /root/
---> Using cache
---> 3e1598cc56a3
Step 5/7 : COPY Docker/bin/* /usr/bin/
---> Using cache
---> 40895711f1dc
Step 6/7 : RUN groupadd -g 1000 tina && useradd vuser -r -m --uid 1000 -g tina --shell /bin/bash && mv /root/powerline-go /usr/bin/powerline-go && chmod 755 /usr/bin/powerline-go && mkdir ~/.pip && echo '[global]'
>> ~/.pip/pip.conf && echo 'index-url = https://pypi.tuna.tsinghua.edu.cn/simple' >> ~/.pip/pip.conf && echo '[install]' >> ~/.pip/pip.conf && echo 'trusted-host = https://pypi.tuna.tsinghua.edu.cn' >> ~/.pip/pip.conf
&& cp -rv ~/.pip /home/vuser/ && chown -R vuser:tina /home/vuser/.pip && sed -i 's/deb.debian.org/mirrors.aliyun.com/g' /etc/apt/sources.list && sed -i 's/security.debian.org/mirrors.aliyun.com/g' /etc/apt/sources.list && dpkg --add-architecture i386 && apt-get update && apt-get install apt-utils -y && apt-get install curl wget patch pv git zip lbzip2 libncurses5 libncursesw5 nano -y && apt-get install libc6:i386 libncurses5:i386 libstdc++6:i386 busybox rsync lzma -y && apt-get clean && cd /root && cp .bashrc .bash_aliases /home/vuser/ && chown -R vuser:tina /home/vuser && mkdir /opt/toolchains && chmod 666 /opt/toolchains
##
篇幅原因,中间省略各种软件源更新和软件包安装的内容
##
---> Using cache
---> 3a44cb328437
Step 7/7 : CMD ["/bin/bash"]
---> Using cache
---> 6b65b7402ecd
Successfully built 6b65b7402ecd
Successfully tagged walker2048/tina_env:latest
```
当我们看到所有的步骤(Step)都正确执行了,最后也成功生成了镜像的时候,就可以开始下一步创建docker容器了。
3. 创建docker容器
创建容器前,需要先理解一下创建容器的一些基础知识。
3.1 容器类似独立的虚拟机,除了挂载上去的目录,文件系统和寄主机是不相通的。
3.2 可以创建名称不同的、但是使用的镜像相同的容器。容器间是独立的关系。
3.3 容器网络使用方式需要指定,一般编译服务器无特殊要求的,可以直接指定使用host网络。
3.4 如果是Linux系统,想让docker容器访问USB设备,可以使用--privileged参数开启。
3.5 创建容器(虚拟机)后,下次使用不需要重新创建。
Linux或者Bash环境使用以下命令
```
docker run -it --name tina_build \
--net=host \
--privileged \
-v /mnt/IoT:/mnt \
walker2048/tina_env
```
Windows环境使用以下命令
```
docker run -it --name tina_build --net=host -v /mnt/IoT:/mnt walker2048/tina_env
```
参数解析:
run 参数: 告诉docker需要创建容器
-it 参数: 创建完毕后自动运行容器时,使用命令行交互方式运行(开启这个参数才能使用命令行交互)
--name tina_build 参数: 告诉docker把这个容器命名为tina_build(后期运行容器需要使用这个)
--net=host 参数:指定容器的网络模式为host模式(和主机同一个网络)
--privileged 参数:特权模式,Linux环境下才有用,开启后可以访问USB设备
-v /mnt/IoT:/mnt 参数:挂载寄主机的/mnt/IoT目录到容器的/mnt目录(都需要使用绝对路径,文件双方共享,可读写)
walker2048/tina_env 参数: 告诉docker使用哪个镜像来创建容器。
进入容器后,命令行提示内容如下(容器默认使用了powerline-go,简单美化了一下):

repo程序需要配置用户信息,所以只能自行配置和安装 #docker# 。
此时需要给vuser用户添加密码(只需要执行一次,没有密码不能使用login命令切换用户),在容器的命令行输入
```
```
> passwd vuser
然后就可以用login命令切换到vuser用户了。切换用户后就可以按Tina SDK的说明下载和编译源码了(为什么要切换用户,因为和寄主机子共享了目录,如果寄主机子是Linux环境,用root用户操作会影响寄主机对目录的读写)。保持良好的用户习惯是个好事儿。一般情况下,Linux环境的常规用户ID是1000开始的。
4. 退出容器和重新运行环境的方法。
4.1 退出容器。
在容器命令行输入exit(如果之前用root用户进入容器,然后使用login命令切换用户的,需要退出至少两次)。或者直接关闭命令行。
4.2 容器未停止时进入容器的方式(-u 参数指定用户为root或者vuser):
> docker exec -it -u root tina_build bash
若命令行提示容器为停止状态(或者寄主机重启过),需要先使用以下命令开启容器。
> docker start tina_build
也可以通过-d参数,告诉docker以守护形式长时间开启容器(直到使用命令行关闭或者寄主机关机)
#### 本次分享的内容就是这些,希望能帮助到有需要的朋友。
因为这边不能上传附件,.bashrc内容附在最后
# ~/.bashrc: executed by bash(1) for non-login shells.
# see /usr/share/doc/bash/examples/startup-files (in the package bash-doc)
# for examples

# If not running interactively, don't do anything
case $- in
    *i*) ;;
      *) return;;
esac

# don't put duplicate lines or lines starting with space in the history.
# See bash(1) for more options
HISTCONTROL=ignoreboth

# append to the history file, don't overwrite it
shopt -s histappend

# for setting history length see HISTSIZE and HISTFILESIZE in bash(1)
HISTSIZE=1000
HISTFILESIZE=2000

# check the window size after each command and, if necessary,
# update the values of LINES and COLUMNS.
shopt -s checkwinsize

# If set, the pattern "**" used in a pathname expansion context will
# match all files and zero or more directories and subdirectories.
#shopt -s globstar

# make less more friendly for non-text input files, see lesspipe(1)
#[ -x /usr/bin/lesspipe ] && eval "$(SHELL=/bin/sh lesspipe)"

# set variable identifying the chroot you work in (used in the prompt below)
if [ -z "${debian_chroot:-}" ] && [ -r /etc/debian_chroot ]; then
    debian_chroot=$(cat /etc/debian_chroot)
fi

# set a fancy prompt (non-color, unless we know we "want" color)
case "$TERM" in
    xterm-color|*-256color) color_prompt=yes;;
esac

# uncomment for a colored prompt, if the terminal has the capability; turned
# off by default to not distract the user: the focus in a terminal window
# should be on the output of commands, not on the prompt
#force_color_prompt=yes

if [ -n "$force_color_prompt" ]; then
    if [ -x /usr/bin/tput ] && tput setaf 1 >&/dev/null; then
	# We have color support; assume it's compliant with Ecma-48
	# (ISO/IEC-6429). (Lack of such support is extremely rare, and such
	# a case would tend to support setf rather than setaf.)
	color_prompt=yes
    else
	color_prompt=
    fi
fi

if [ "$color_prompt" = yes ]; then
    PS1='${debian_chroot:+($debian_chroot)}\[\033[01;32m\]\u@\h\[\033[00m\]:\[\033[01;34m\]\w\[\033[00m\]\$ '
else
    PS1='${debian_chroot:+($debian_chroot)}\u@\h:\w\$ '
fi
unset color_prompt force_color_prompt

# If this is an xterm set the title to user@host:dir
case "$TERM" in
xterm*|rxvt*)
    PS1="\[\e]0;${debian_chroot:+($debian_chroot)}\u@\h: \w\a\]$PS1"
    ;;
*)
    ;;
esac

# enable color support of ls and also add handy aliases
if [ -x /usr/bin/dircolors ]; then
    test -r ~/.dircolors && eval "$(dircolors -b ~/.dircolors)" || eval "$(dircolors -b)"
    alias ls='ls --color=auto'
    #alias dir='dir --color=auto'
    #alias vdir='vdir --color=auto'

    #alias grep='grep --color=auto'
    #alias fgrep='fgrep --color=auto'
    #alias egrep='egrep --color=auto'
fi

# colored GCC warnings and errors
#export GCC_COLORS='error=01;31:warning=01;35:note=01;36:caret=01;32:locus=01:quote=01'

# some more ls aliases
#alias ll='ls -l'
#alias la='ls -A'
#alias l='ls -CF'

# Alias definitions.
# You may want to put all your additions into a separate file like
# ~/.bash_aliases, instead of adding them here directly.
# See /usr/share/doc/bash-doc/examples in the bash-doc package.

if [ -f ~/.bash_aliases ]; then
    . ~/.bash_aliases
fi

# enable programmable completion features (you don't need to enable
# this, if it's already enabled in /etc/bash.bashrc and /etc/profile
# sources /etc/bash.bashrc).
if ! shopt -oq posix; then
  if [ -f /usr/share/bash-completion/bash_completion ]; then
    . /usr/share/bash-completion/bash_completion
  elif [ -f /etc/bash_completion ]; then
    . /etc/bash_completion
  fi
fi

export PATH=/home/vuser/.bin:$PATH
export PATH=/opt/toolchains:$PATH

function _update_ps1() {
    PS1="$(powerline-go -error $? -cwd-mode semifancy -trim-ad-domain -newline -jobs $(jobs -p | wc -l))"

    # Uncomment the following line to automatically clear errors after showing
    # them once. This not only clears the error for powerline-go, but also for
    # everything else you run in that shell. Don't enable this if you're not
    # sure this is what you want.

    #set "?"
}

if [ "$TERM" != "linux" ] && [ -f "/usr/bin/powerline-go" ]; then
    PROMPT_COMMAND="_update_ps1; $PROMPT_COMMAND"
fi
-
编译
+关注
关注
0文章
698浏览量
35365 -
Tina
+关注
关注
2文章
45浏览量
17779 -
RISC-V
+关注
关注
49文章
2997浏览量
53809 -
Docker
+关注
关注
0文章
540浏览量
14505
发布评论请先 登录
RK3576单板机Docker镜像构建与容器运行手册

Linux 下交叉编译实战:跑起来你的第一个 STM32 程序

直播预约 |开源芯片系列讲座第30期:“一生一芯”计划——从零开始设计自己的RISC-V处理器芯片

从零开始了解智慧教室(一):智慧教室核心设备

创龙 瑞芯微 RK3588 国产2.4GHz八核 工业开发板—Docker容器部署方法说明
【嘉楠堪智K230开发板试用体验】 使用非 docker 环境构建系统镜像
Docker镜像构建与管理指南
深入剖析Docker全链路安全防护策略
【GM-3568JHF开发板免费体验】开发环境安装
【创龙TL3562-MiniEVM开发板试用体验】1、从系统启动卡制作开始
电商API集成入门:从零开始搭建高效接口

创龙 瑞芯微 RK3562 国产 2GHz 四核A53 工业开发板—Docker容器部署方法说明
干货分享 | RK3588 Ubuntu系统Docker容器使用指南
以太网入门:从零开始,掌握以太网基础知识!
电子硬件工程师如何从零开始学习?(文末免费分享从零开始学习资料)


评论