 Linux小项目-倒车影像功能设计

1. 前言
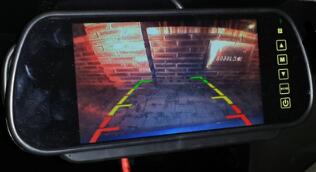
倒车影像已经是现在汽车的标配功能了,基本很多车出厂都是360全景影像,倒车影像又称泊车辅助系统,这篇文章就采用Linux开发板完成一个倒车影像的功能。
要完成倒车影像整个项目,需要准备一个LCD屏,一个摄像头,一个超声波测距模块,一个蜂鸣器;摄像头采集车尾的实时画面,在LCD屏上完成显示,超声波测距模块用于测量车尾距离障碍物的距离,根据设置的距离跳转PWM操作蜂鸣器实现报警提示。
当前Linux开发板采用友善之臂的Tiny4412开发板,CPU是三星的EXYNOS4412,板子上带有8G的EMMC,2G的DRR,运行的Linux版本是3.5,根文件系统采用busybox制作,这个系统是精简的最小系统。
摄像头采用USB免驱是摄像头,所有不需要编写驱动,LCD屏是友善之臂自己的7寸电容触摸屏,驱动是官方内核自带的,也不需要编写;剩下的超声波模块,蜂鸣器,需要自己填写驱动。
2. 案例代码
下面就将倒车影像项目的整个项目核心代码依次展示出来。
2.1 声波测距模块
采用的超声波模块在淘宝上很容易买到,它的实物图和测距原理如下:
整个模块只需要接4根线,两根电源线,一个输出触发脚,一个回波输出脚。输出脚是高电平有效,为了方便计算时间,驱动代码里需要将这个引脚注册为中断,设置为上升沿触发,当收到回波时,直接进中断调用工作队列,在工作函数里阻塞等待引脚电平变低,然后高电平持续的计算时间,最后进行换算就得到了距离。
驱动代码如下:
#include
#include
#include
#include
#include
#include
#include
#include
#include
#include
#include
#include
#include
#include
#include
#include
#include
#include
#include

static unsigned int distance_irq; /*存放中断号*/
static u32 *GPB_DAT=NULL;
static u32 *GPB_CON=NULL;

static u32 distance_time_us=0; /*表示距离的时间*/
static u8 distance_flag=0;

/*声明等待队列头*/
static DECLARE_WAIT_QUEUE_HEAD(distance_wait_queue);

/*
工作队列处理函数:
*/
static void distance_work_func(struct work_struct *work)
{
	u32 time1,time2;
	time1=ktime_to_us(ktime_get()); /*获取当前时间,再转换为 us 单位*/

	/*等待高电平时间结束*/
	while(gpio_get_value(EXYNOS4_GPX1(0))){}

	time2=ktime_to_us(ktime_get()); /*获取当前时间,再转换为 us 单位*/

	distance_flag=1;
	distance_time_us=time2-time1;

	/*唤醒休眠的进程*/
	wake_up(&distance_wait_queue);

	//printk("us=%d\n",time2-time1);   /*us/58=厘米*/
}

/*静态方式初始化工作队列*/
static DECLARE_WORK(distance_work,distance_work_func);

/*
中断处理函数: 用于检测超声波测距的回波
*/
static irqreturn_t distance_handler(int irq, void *dev)
{
	/*调度工作队列*/
	schedule_work(&distance_work);
	return IRQ_HANDLED;
}

static void distance_function(unsigned long data);
/*静态方式定义内核定时器*/
static DEFINE_TIMER(distance_timer,distance_function,0,0);

/*内核定时器超时处理函数: 触发超声波发送方波*/
static void distance_function(unsigned long data)
{
	static u8 state=0;
	state=!state;

	/*更改GPIO口电平*/
	if(state)
	{
		*GPB_DAT|=1<<7;
	}
	else
	{
		*GPB_DAT&=~(1<<7);
	}

	/*修改定时器的超时时间*/
	mod_timer(&distance_timer,jiffies+msecs_to_jiffies(100));
}

static int distance_open(struct inode *inode, struct file *file)
{
	return 0;
}

#define GET_US_TIME 0x45612
static long distance_unlocked_ioctl(struct file *file, unsigned int cmd, unsigned long argv)
{
	u32 *us_data=(u32*)argv;
	int err;
	u32 time_us=distance_time_us;
	switch(cmd)
	{
		case GET_US_TIME:
			err=copy_to_user(us_data,&time_us,4);
			if(err!=0)printk("拷贝失败!\n");
			break;
	}
	return 0;
}

static unsigned int distance_poll(struct file *file, struct poll_table_struct *table)
{
	unsigned int mask = 0;
	poll_wait(file,&distance_wait_queue,table);

	if(distance_flag)
	{
		distance_flag=0;
		mask|=POLL_IN;
	}
	return mask;
}

static int distance_release(struct inode *inode, struct file *file)
{
	return 0;
}

/*定义文件操作集合*/
static struct file_operations distance_fops=
{
	.open=distance_open,
	.unlocked_ioctl=distance_unlocked_ioctl,
	.poll=distance_poll,
	.release=distance_release
};


/*定义杂项设备结构体*/
static struct miscdevice distance_misc=
{
	.minor=MISC_DYNAMIC_MINOR,
	.name="tiny4412_distance",
	.fops=&distance_fops
};

static int __init tiny4412_distance_dev_init(void)
{
	int err;
	/*1. 映射GPIO口地址*/
	GPB_DAT=ioremap(0x11400044,4);
	GPB_CON=ioremap(0x11400040,4);

	*GPB_CON&=~(0xF<<4*7);
	*GPB_CON|=0x1<<4*7; /*配置输出模式*/

	/*2. 根据GPIO口编号,获取中断号*/
	distance_irq=gpio_to_irq(EXYNOS4_GPX1(0));

	/*3. 注册中断*/
	err=request_irq(distance_irq,distance_handler,IRQ_TYPE_EDGE_RISING,"distance_device",NULL);
	if(err!=0)printk("中断注册失败!\n");
	else printk("中断:超声波测距驱动安装成功!\n");

	/*4. 修改定时器超时时间*/
	mod_timer(&distance_timer,jiffies+msecs_to_jiffies(100));

	/*杂项设备注册*/
	misc_register(&distance_misc);
	return 0;
}

static void __exit tiny4412_distance_dev_exit(void)
{
	/*5. 注销中断*/
	free_irq(distance_irq,NULL);

	/*6. 停止定时器*/
	del_timer(&distance_timer);

	/*7. 取消IO映射*/
	iounmap(GPB_DAT);
	iounmap(GPB_CON);

	/*注销杂项设备*/
	misc_deregister(&distance_misc);

	printk("中断:超声波测距驱动卸载成功!\n");
}

module_init(tiny4412_distance_dev_init);
module_exit(tiny4412_distance_dev_exit);
MODULE_LICENSE("GPL");
MODULE_AUTHOR("tiny4412 wbyq");
复制代码
2.2 蜂鸣器驱动代码
蜂鸣器需要根据测量的距离调整不同的频率,以告诉驾驶员,后方障碍物的距离。
static int s3c_pwm_suspend(struct platform_device *pdev, pm_message_t state)
{
struct pwm_device *pwm = platform_get_drvdata(pdev);
pwm->period_ns = 0;
pwm->duty_ns = 0;
return 0;
}
static int s3c_pwm_resume(struct platform_device *pdev)
{
struct pwm_device *pwm = platform_get_drvdata(pdev);
unsigned long tcon;
/* Restore invertion */
tcon = __raw_readl(S3C2410_TCON);
tcon |= pwm_tcon_invert(pwm);
__raw_writel(tcon, S3C2410_TCON);
return 0;
}
static struct platform_driver s3c_pwm_driver = {
.driver = {
.name = "s3c24xx-pwm",
.owner = THIS_MODULE,
},
.probe = s3c_pwm_probe,
.remove = __devexit_p(s3c_pwm_remove),
.suspend = s3c_pwm_suspend,
.resume = s3c_pwm_resume,
};
static int __init pwm_init(void)
{
int ret;
clk_scaler[0] = clk_get(NULL, "pwm-scaler0");
clk_scaler[1] = clk_get(NULL, "pwm-scaler1");
if (IS_ERR(clk_scaler[0]) || IS_ERR(clk_scaler[1])) {
printk(KERN_ERR "%s: failed to get scaler clocks\n", __func__);
return -EINVAL;
}
ret = platform_driver_register(&s3c_pwm_driver);
if (ret)
printk(KERN_ERR "%s: failed to add pwm driver\n", __func__);
return ret;
}
复制代码
2.3 应用层框架代码
应用层使用了两个线程:
线程1实时读取USB摄像头的图像,在LCD屏上实时显示,免驱摄像头框架V4L2有一套标准的ioctl指令,可以对摄像头进行配置,比如:输出分辨率、帧率、格式等。然后再通过mmap映射摄像头采集缓冲区到应用层,最后通过poll函数监听摄像头的数据,读取实时显示。
线程2采集超声波测量的距离距离,根据测量的距离调整PWM占空比,控制蜂鸣器的频率。
#include
#include
#include
#include
#include
#include
#include
#include
#include
#include
#include
#include
#include
#include
#include
#include
#include "framebuffer.h"

#define PWM_DEVICE "/dev/pwm"  /*PWM方波设备文件*/
#define DISTANCE_DEVICE "/dev/tiny4412_distance" /*超声波测距设备文件*/
#define UVC_VIDEO_DEVICE "/dev/video15"  /*UVC摄像头设备节点*/

#define GET_US_TIME 0x45612     /*获取超声波测量的距离: ioctl命令*/
#define PWM_IOCTL_SET_FREQ		1 /*控制PWM方波频率: ioctl命令*/
#define PWM_IOCTL_STOP			0 /*停止PWM方波输出: ioctl命令*/

int distance_fd;  /*超声波设备的文件描述符*/
int pwm_fd;       /*PWM方波设备的文件描述符*/
int uvc_video_fd; /*UVC摄像头设备文件描述符*/
int Image_Width;  /*图像的宽度*/
int Image_Height; /*图像的高度*/


unsigned char *video_memaddr_buffer[4]; /*存放摄像头映射到进程空间的缓冲区地址*/

/*
函数功能: 用户终止了进程调用
*/
void exit_sighandler(int sig)
{
	//停止PWM波形输出,关闭蜂鸣器
	ioctl(pwm_fd,PWM_IOCTL_STOP,0);
	close(pwm_fd);
	close(distance_fd);
	exit(1);
}

/*
函数功能: 读取超声波数据的线程
*/
void *distance_Getpthread_func(void *dev)
{
	/*1. 打开PWM方波驱动*/
	pwm_fd=open(PWM_DEVICE,O_RDWR);
	if(pwm_fd<0) //0 1 2
	{
		printf("%s 设备文件打开失败\n",PWM_DEVICE);
		/*退出线程*/
		pthread_exit(NULL);
	}

	/*2. 打开超声波测距设备*/
	distance_fd=open(DISTANCE_DEVICE,O_RDWR);
	if(distance_fd<0) //0 1 2
	{
		printf("%s 设备文件打开失败\n",DISTANCE_DEVICE);
		/*退出线程*/
		pthread_exit(NULL);
	}

	/*3. 循环读取超声波测量的距离*/
	struct pollfd fds;
	fds.fd=distance_fd;
	fds.events=POLLIN;
	int data;
	while(1)
	{
		poll(&fds,1,-1);
		ioctl(distance_fd,GET_US_TIME,&data);
		printf("距离(cm):%0.2f\n",data/58.0);
		data=data/58;
		if(data>200) /*200厘米: 安全区域*/
		{
			//停止PWM波形输出,关闭蜂鸣器
			ioctl(pwm_fd,PWM_IOCTL_STOP,0);
		}
		else if(data>100) /*100厘米: 警告区域*/
		{
			printf("警告区域!\n");
			ioctl(pwm_fd,PWM_IOCTL_SET_FREQ,2);
		}
		else /*小于<100厘米: 危险区域*/
		{
			printf(" 危险区域!\n");
			ioctl(pwm_fd,PWM_IOCTL_SET_FREQ,10);
		}

		//ioctl(pwm_fd,PWM_IOCTL_SET_FREQ,pwm_data);
		/*倒车影像: 测距有3个档位*/
	}
}


/*
函数功能: UVC摄像头初始化
返回值: 0表示成功
*/
int UVCvideoInit(void)
{
	/*1. 打开摄像头设备*/
	uvc_video_fd=open(UVC_VIDEO_DEVICE,O_RDWR);
	if(uvc_video_fd<0)
	{
		printf("%s 摄像头设备打开失败!\n",UVC_VIDEO_DEVICE);
		return -1;
	}

	/*2. 设置摄像头的属性*/
	struct v4l2_format format;
	memset(&format,0,sizeof(struct v4l2_format));
	format.type=V4L2_BUF_TYPE_VIDEO_CAPTURE; /*表示视频捕获设备*/
	format.fmt.pix.width=800;  /*预设的宽度*/
	format.fmt.pix.height=480; /*预设的高度*/
	format.fmt.pix.pixelformat=V4L2_PIX_FMT_YUYV; /*预设的格式*/
	format.fmt.pix.field=V4L2_FIELD_ANY; /*系统自动设置: 帧属性*/
	if(ioctl(uvc_video_fd,VIDIOC_S_FMT,&format)) /*设置摄像头的属性*/
	{
		printf("摄像头格式设置失败!\n");
		return -2;
	}

	Image_Width=format.fmt.pix.width;
	Image_Height=format.fmt.pix.height;

	printf("摄像头实际输出的图像尺寸:x=%d,y=%d\n",format.fmt.pix.width,format.fmt.pix.height);
	if(format.fmt.pix.pixelformat==V4L2_PIX_FMT_YUYV)
	{
		printf("当前摄像头支持YUV格式图像输出!\n");
	}
	else
	{
		printf("当前摄像头不支持YUV格式图像输出!\n");
		return -3;
	}

	/*3. 请求缓冲区: 申请摄像头数据采集的缓冲区*/
	struct v4l2_requestbuffers req_buff;
	memset(&req_buff,0,sizeof(struct v4l2_requestbuffers));
	req_buff.count=4; /*预设要申请4个缓冲区*/
	req_buff.type=V4L2_BUF_TYPE_VIDEO_CAPTURE; /*视频捕获设备*/
	req_buff.memory=V4L2_MEMORY_MMAP; /*支持mmap内存映射*/
	if(ioctl(uvc_video_fd,VIDIOC_REQBUFS,&req_buff)) /*申请缓冲区*/
	{
		printf("申请摄像头数据采集的缓冲区失败!\n");
		return -4;
	}
	printf("摄像头缓冲区申请的数量: %d\n",req_buff.count);

	/*4. 获取缓冲区的详细信息: 地址,编号*/
	struct v4l2_buffer buff_info;
	memset(&buff_info,0,sizeof(struct v4l2_buffer));
	int i;
	for(i=0;i> 8;
		g = (y - (88 * u) - (183 * v)) >> 8;
		b = (y + (454 * u)) >> 8;

		*(ptr++) = (r > 255) ? 255 : ((r < 0) ? 0 : r);
		*(ptr++) = (g > 255) ? 255 : ((g < 0) ? 0 : g);
		*(ptr++) = (b > 255) ? 255 : ((b < 0) ? 0 : b);

		if(z++)
		{
			z = 0;
			yuyv += 4;
		}
	}
}


int main(int argc,char **argv)
{
	int data;

	/*1. 注册将要捕获的信号*/
	signal(SIGINT,exit_sighandler);

	/*2. 创建线程: 采集超声波测量的距离*/
	pthread_t threadID;
	pthread_create(&threadID,NULL,distance_Getpthread_func,NULL);
	pthread_detach(threadID); //设置分离属性

	/*3. 初始化摄像头*/
	UVCvideoInit();

	/*4. 初始化LCD屏*/
	framebuffer_Device_init();

	/*5. 循环采集摄像头的数据*/
	struct pollfd fds;
	fds.fd=uvc_video_fd;
	fds.events=POLLIN;

	struct v4l2_buffer buff_info;
	memset(&buff_info,0,sizeof(struct v4l2_buffer));
	int index=0; /*表示当前缓冲区的编号*/
	unsigned char *rgb_buffer=NULL;

	/*申请空间:存放转换之后的RGB数据*/
	rgb_buffer=malloc(Image_Width*Image_Height*3);
	if(rgb_buffer==NULL)
	{
		printf("RGB转换的缓冲区申请失败!\n");
		exit(0);
	}

	while(1)
	{
		/*1. 等待摄像头采集数据*/
		poll(&fds,1,-1);

		/*2. 取出一帧数据: 从采集队列里面取出一个缓冲区*/
		buff_info.type=V4L2_BUF_TYPE_VIDEO_CAPTURE;   /*视频捕获设备*/
		ioctl(uvc_video_fd,VIDIOC_DQBUF,&buff_info); /*从采集队列取出缓冲区*/
		index=buff_info.index;
		//printf("采集数据的缓冲区的编号:%d\n",index);

		/*3. 处理数据: YUV转RGB\显示到LCD屏*/
		//video_memaddr_buffer[index]; /*当前存放数据的缓冲区地址*/

		/*3.1 将YUV数据转为RGB格式*/
		yuv_to_rgb(video_memaddr_buffer[index],rgb_buffer,Image_Width,Image_Height);

		/*3.2 将RGB数据实时刷新到LCD屏幕上*/
		framebuffer_DisplayImages((800-Image_Width)/2,0,Image_Width,Image_Height,rgb_buffer);

		/*4. 将缓冲区再次放入采集队列*/
		buff_info.memory=V4L2_MEMORY_MMAP; 	/*支持mmap内存映射*/
		buff_info.type=V4L2_BUF_TYPE_VIDEO_CAPTURE; /*视频捕获设备*/
		buff_info.index=index; /*缓冲区的节点编号*/
		ioctl(uvc_video_fd,VIDIOC_QBUF,&buff_info); /*根据节点编号将缓冲区放入队列*/
	}
	return 0;
};i++)>
审核编辑:汤梓红
-
lcd
+关注
关注
36文章
4642浏览量
178703 -
Linux
+关注
关注
88文章
11893浏览量
220211 -
倒车影像
+关注
关注
1文章
42浏览量
6253
发布评论请先 登录
Linux应用开发_倒车影像项目介绍


【倒车影像专题制作】倒车影像安装教程_倒车影像工作原理和设计
倒车影像安装教程_倒车影像工作原理和设计


评论