 【GCC编译优化系列】使用GCC如何把C文件编译成可执行文件

1 前言
自参加RTT论坛的【问答有奖】活动以来,回答了300+问题,期间我特意去检索过【编译】相关的问题,从下图可以看得出,编译问题真的是很常见的问题类型,不管你是新手还是老手,多多少少都遇到过奇奇怪怪的编译问题。

而我平时非常喜欢研究跟编译相关的问题,期间也挑了好一些编译相关的问题,给出了我的答案,我也会尽力在解答问题的过程中,把我解决编译问题用到的方法论也一并分享出来,希望能帮助到大家。
但是由于回答单个编译问题,毕竟篇幅有限,只能就特定的场景下,如何解决问题而展开,而不能系统地介绍一些代码编译相关的基础知识,所以我才萌生了通过自己写一些通识性比较强的技术文章来补充这一部分的知识空白。
本系列的文章,计划安排两篇文章,第一篇结合gcc编译器介绍编译相关的基础知识,第二篇结合实际的代码案例分析如何解决各种编译相关的问题。当然如果大家想了解编译相关的其他内容,也欢迎在评论席告知。
本文作为分享的第一篇,主要介绍了C代码是如何被编译生成二进制文件的详细步骤,期间用到了gcc编译器,希望能提升大家对C代码编译的基础认知以及gcc编译器的使用技巧。
2 C代码的编译步骤
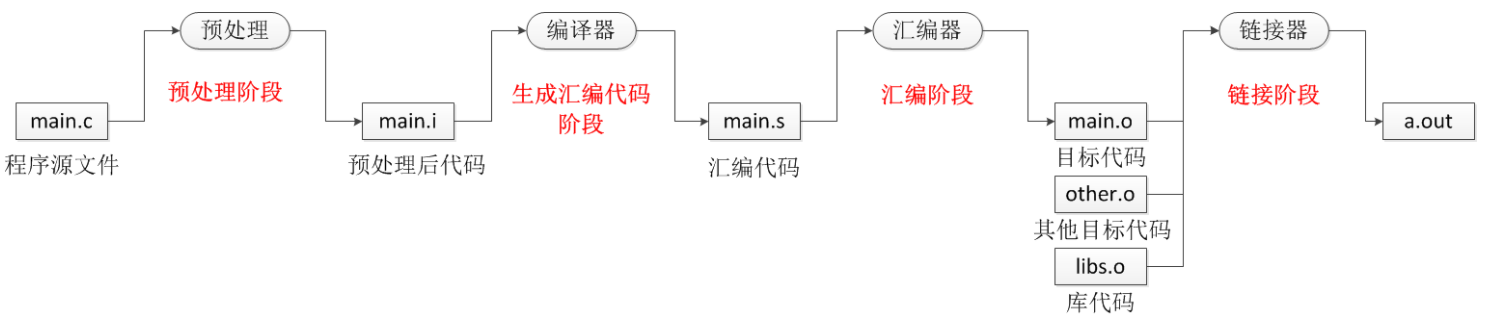
C代码编译的步骤,需要经历预编译、编译、汇编、链接等几个关键步骤,最后才能生成二进制文件,而这个二进制文件就是能被CPU识别并正确执行指令的唯一凭证。
整个过程有预编译、编译器、汇编器、链接器在工作,正如这张图所展示的这样:
下面简要介绍下,各个步骤的主要工作。
2.1 预处理(Preprocessing)
预编译,主要体现在这个预字,它的处理是在编译的前面。
在C语言里,以“#”号开头的预处理指令,如文件包含#include、宏定义制定#define、条件编译#if等。 在源程序中,这些指令都放在函数体的外面,可以放在源文件(.c文件)中,也可以放在头文件(.h)中。 预编译这一步要做到事情,就是把预处理的指令进行展开,这里主要介绍上面提到的三类预处理指令。
#include:这个就是把后面的文件直接拷贝到预处理指令的位置,当然这里也会处理依赖include的问题,比如A文件 include B文件,而B文件又include了C文件,那么在A里面是看到C文件的内容的。还有有个盲区就是,include是可以include xxx.c的,这个在C语言的语法上是没有任何问题的,大家千万别以为只能C文件 include 头文件。#define:这个就是处理宏定义的展开,注意宏定义是原封不动的展开、替换,它是不考虑语法规则的,这一点在写宏定义的时候尤其需要注意,有的时候多写一些包括可以减少因展开带来的不必要麻烦。#if:这个就是处理条件编译,类似的预处理指令有好几个:#ifdef #ifndef #else #elif #endif等,这些预处理指令后面接一个条件,常常用于控制部分代码参不参与编译,这也就是我们常说的代码裁剪,绝大多数的支持裁剪的软件代码,都是通过这种#if条件编译的形式来实现的。
2.2 编译(Compilation)
这一步是C代码编译的真正开始,主要是把预处理之后的C代码,编译成汇编代码;即由高级语言代码翻译成低级语言代码。 在编译过程中,编译器主要作语法检查和词法分析。在确认所有指令都符合语法规则之后,将其翻译成等价的汇编代码。
2.3 汇编(Assemble)
这一步是将上一步生成的汇编代码,通过汇编器,将其转成二进制目标代码,这个就是我们常说的obj文件。 经过这一步,单个.c文件就编译完了;换句话说,每一个.c文件编译到obj文件,都要经过预编译、编译、汇编这三步。
2.4 链接(Linking)
这一步是通过链接器,将上一步生成的所有二进制目标文件、启动代码、依赖的库文件,一并链接成一个可执行文件,这个可执行文件可被加载或拷贝到存储器去执行的。
这里需要注意的是,不同的操作系统下这个可执行文件的格式是不同的:
Windows系统是exe后缀名的可执行文件; Linux系统下是elf文件(没有后缀名的说法),也是可执行文件; MacOS系统下是Mach-O文件,也是可执行文件。
各种类型的可执行文件的详细分析,可参见我转载的一篇博文。
2.5 生成二进制文件(Objcopy)
如果是在嵌入式设备上,使用类似RTOS(Real-Time Operating System)的操作系统,因内存、存储等资源受限,他们不具备像PC环境下的Linux这种高级操作系统那样可以解析可执行文件,然后把二进制的指令代码搬到CPU上去运行,所以在这样的背景下,我们需要在编译结束后,就把可执行文件转换成二进制代码文件,也就是我们常说的.bin文件。
一般来说,在嵌入式设备中,这种.bin文件是直接烧录在Flash中的,如果存储bin文件的Flash支持XIP(eXecute In Place,即芯片内执行)的话,那么指令代码是可以直接在Flash内执行,而不需要搬到内存中去,这也是最大化地利用嵌入式有限的资源条件。
在生成二进制文件这一步中,不同的编译器及不同的操作系统下,可能使用的方法是不一样的,在Linux平台下使用的是objcopy命令来完成这一操作,具体的用法下文会详细介绍。
3 gcc如何编译C代码
下面以gcc编译器为例,介绍下在Linux平台下,一个C代码工程是如何编译生成最终的bin文件的。
3.1 gcc命令参数介绍
在介绍如何使用gcc编译之前,我们需要先了解下gcc的几个重要的命令行参数,这种命令行参数问题,如果不懂就让命令行自己告诉你吧:
gcc/gcc_helloworld$ gcc --help
Usage: gcc [options] file...
Options:
  -pass-exit-codes         Exit with highest error code from a phase.
  --help                   Display this information.
  --target-help            Display target specific command line options.
  --help={common|optimizers|params|target|warnings|[^]{joined|separate|undocumented}}[,...].
                           Display specific types of command line options.
  (Use '-v --help' to display command line options of sub-processes).
  --version                Display compiler version information.
  -dumpspecs               Display all of the built in spec strings.
  -dumpversion             Display the version of the compiler.
  -dumpmachine             Display the compiler's target processor.
  -print-search-dirs       Display the directories in the compiler's search path.
  -print-libgcc-file-name  Display the name of the compiler's companion library.
  -print-file-name=   Display the full path to library .
  -print-prog-name=  Display the full path to compiler component .
  -print-multiarch         Display the target's normalized GNU triplet, used as
                           a component in the library path.
  -print-multi-directory   Display the root directory for versions of libgcc.
  -print-multi-lib         Display the mapping between command line options and
                           multiple library search directories.
  -print-multi-os-directory Display the relative path to OS libraries.
  -print-sysroot           Display the target libraries directory.
  -print-sysroot-headers-suffix Display the sysroot suffix used to find headers.
  -Wa,            Pass comma-separated  on to the assembler.
  -Wp,            Pass comma-separated  on to the preprocessor.
  -Wl,            Pass comma-separated  on to the linker.
  -Xassembler         Pass  on to the assembler.
  -Xpreprocessor      Pass  on to the preprocessor.
  -Xlinker            Pass  on to the linker.
  -save-temps              Do not delete intermediate files.
  -save-temps=        Do not delete intermediate files.
  -no-canonical-prefixes   Do not canonicalize paths when building relative
                           prefixes to other gcc components.
  -pipe                    Use pipes rather than intermediate files.
  -time                    Time the execution of each subprocess.
  -specs=            Override built-in specs with the contents of .
  -std=          Assume that the input sources are for .
  --sysroot=    Use  as the root directory for headers
                           and libraries.
  -B            Add  to the compiler's search paths.
  -v                       Display the programs invoked by the compiler.
  -###                     Like -v but options quoted and commands not executed.
  -E                       Preprocess only; do not compile, assemble or link.
  -S                       Compile only; do not assemble or link.
  -c                       Compile and assemble, but do not link.
  -o                 Place the output into .
  -pie                     Create a dynamically linked position independent
                           executable.
  -shared                  Create a shared library.
  -x             Specify the language of the following input files.
                           Permissible languages include: c c++ assembler none
                           'none' means revert to the default behavior of
                           guessing the language based on the file's extension.

Options starting with -g, -f, -m, -O, -W, or --param are automatically
 passed on to the various sub-processes invoked by gcc.  In order to pass
 other options on to these processes the -W options must be used.

For bug reporting instructions, please see:
.
我们重点要关注-E-S-c-o选项,下面的步骤中分别会使用到这些选项,再详细介绍下对应的选项。
  -E                       Preprocess only; do not compile, assemble or link.
  -S                       Compile only; do not assemble or link.
  -c                       Compile and assemble, but do not link.
  -o                 Place the output into .
3.2 helloworld工程的示例C代码
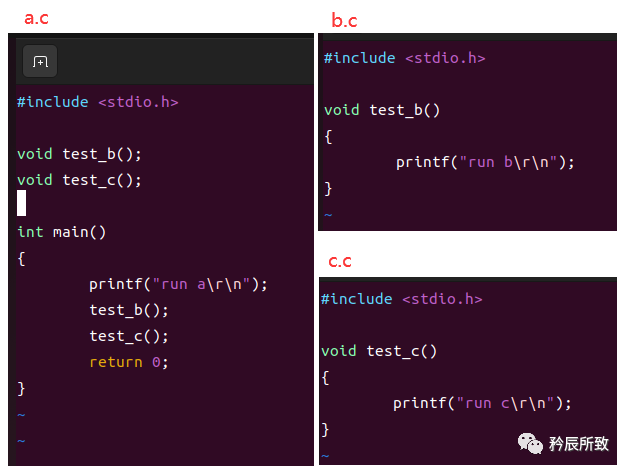
这个小工程由3个文件组成,1个.H头文件,2个.C源文件:
/* sub.h */
#ifndef __SUB_H__
#define __SUB_H__

#define TEST_NUM 1024

extern int sub_func(int a);

#endif /* __SUB_H__ */
/* sub.c */
#include

#include "sub.h"

int sub_func(int a)
{
    return a + 1;
}
/* main.c */
#include

#include "sub.h"

#ifdef USED_FUNC
void used_func(void)
{
    printf("This is a used function !\n");
}
#endif

int main(int argc, const char *argv[])
{
    printf("Hello world !\n");
    printf("TEST_NUM = %d\n", TEST_NUM);
    printf("sub_func() = %d\n", sub_func(1));

#ifdef USED_FUNC
    used_func();
#endif

    return 0;
}
代码逻辑很简单,sub模块定义了一个函数sub_func和一个宏定义的整型数,提供给main函数调用;main函数里面分别打印hello world,获取宏定义整型数的值,调用sub_func接口,以及根据USED_FUNC是否被定义再决定是否调用used_func函数。
这个小小工程中,包含了#include头文件包含、#define宏定义、#ifdef条件编译等几个重要的预处理指令,我认为,稍微有一点点C语言基础的朋友都应该可以毫无障碍地看懂这几行代码。
3.3 预编译生成.i文件
预编译是编译流程的第一步,这里最重点就是预处理指令的处理。
使用gcc编译器执行预编译操作,需要用到的主要命令行参数是-E,具体如下:
gcc -E main.c -o main.i
gcc -E sub.c -o sub.i
注意:这里是每一个.c源文件都需要预编译,-o表示指定生成预编译后的文件名称,一般这个文件我们使用.i后缀。
为了了解预编译究竟干了啥?我们可以打开这些.i文件,一瞧究竟。这里以main.i为例,我们来看看:
# 1 "main.c"
# 1 ""
# 1 ""
# 31 ""
# 1 "/usr/include/stdc-predef.h" 1 3 4
# 32 "" 2
# 1 "main.c"

# 1 "/usr/include/stdio.h" 1 3 4
# 27 "/usr/include/stdio.h" 3 4
# 1 "/usr/include/x86_64-linux-gnu/bits/libc-header-start.h" 1 3 4
# 33 "/usr/include/x86_64-linux-gnu/bits/libc-header-start.h" 3 4
# 1 "/usr/include/features.h" 1 3 4
# 461 "/usr/include/features.h" 3 4
# 1 "/usr/include/x86_64-linux-gnu/sys/cdefs.h" 1 3 4
# 452 "/usr/include/x86_64-linux-gnu/sys/cdefs.h" 3 4
# 1 "/usr/include/x86_64-linux-gnu/bits/wordsize.h" 1 3 4
# 453 "/usr/include/x86_64-linux-gnu/sys/cdefs.h" 2 3 4
# 1 "/usr/include/x86_64-linux-gnu/bits/long-double.h" 1 3 4
# 454 "/usr/include/x86_64-linux-gnu/sys/cdefs.h" 2 3 4
# 462 "/usr/include/features.h" 2 3 4
# 485 "/usr/include/features.h" 3 4
# 1 "/usr/include/x86_64-linux-gnu/gnu/stubs.h" 1 3 4
# 10 "/usr/include/x86_64-linux-gnu/gnu/stubs.h" 3 4
# 1 "/usr/include/x86_64-linux-gnu/gnu/stubs-64.h" 1 3 4
# 11 "/usr/include/x86_64-linux-gnu/gnu/stubs.h" 2 3 4
# 486 "/usr/include/features.h" 2 3 4
# 34 "/usr/include/x86_64-linux-gnu/bits/libc-header-start.h" 2 3 4
# 28 "/usr/include/stdio.h" 2 3 4


/* 篇幅有限,中间省略了内容 */


extern char *ctermid (char *__s) __attribute__ ((__nothrow__ , __leaf__));
# 840 "/usr/include/stdio.h" 3 4
extern void flockfile (FILE *__stream) __attribute__ ((__nothrow__ , __leaf__));


extern int ftrylockfile (FILE *__stream) __attribute__ ((__nothrow__ , __leaf__)) ;


extern void funlockfile (FILE *__stream) __attribute__ ((__nothrow__ , __leaf__));
# 858 "/usr/include/stdio.h" 3 4
extern int __uflow (FILE *);
extern int __overflow (FILE *, int);
# 873 "/usr/include/stdio.h" 3 4

# 3 "main.c" 2

# 1 "sub.h" 1


# 7 "sub.h"
extern int sub_func(int a);
# 5 "main.c" 2
# 13 "main.c"
int main(int argc, const char *argv[])
{
 printf("Hello world !\n");
 printf("TEST_NUM = %d\n", 1024);
 printf("sub_func() = %d\n", sub_func(1));


 return 0;
}
就算在不了解预编译原理的情况下,我们也可以清晰地发现,一个20来行的.c源文件,被生成了一个700多行的.i预编译处理文件。
为何会多了那么行呢?仔细对比你会发现,其实main.i就是把stdio.h和sub.h这两个头文件中除去#开头的预处理之后的那些内容给搬过来了,这就是#include的作用。
值得提一点的就是,这个.i文件中还是有# xxx这种信息存在,其实这个信息是有作用的,下篇讲解决编译问题的实战时,再重点介绍下它的作用。
这里,我再介绍一个gcc的参数,可以去掉这些信息,让.i文件看起来清爽一些。
这个参数就是-P(注意:大写字母P),这个参数在gcc--help里面没有介绍,需要问一下男人man:
gcc/gcc_helloworld$ man gcc | grep -w '\-P'
           file -M  -MD  -MF  -MG  -MM  -MMD  -MP  -MQ  -MT -no-integrated-cpp  -P  -pthread  -remap -traditional
           inhibited with the negated form -fno-working-directory.  If the -P flag is present in the command line, this option
       -P  Inhibit generation of linemarkers in the output from the preprocessor.  This might be useful when running the
troff: :17361: warning [p 110, 20.7i]: can't break line
加上-P参数之后,预编译出来的main.i文件就清爽多了,一下子就减少到200多行了。
typedef long unsigned int size_t;
typedef __builtin_va_list __gnuc_va_list;
typedef unsigned char __u_char;
typedef unsigned short int __u_short;
typedef unsigned int __u_int;
typedef unsigned long int __u_long;
typedef signed char __int8_t;
typedef unsigned char __uint8_t;
typedef signed short int __int16_t;
typedef unsigned short int __uint16_t;
typedef signed int __int32_t;
typedef unsigned int __uint32_t;
typedef signed long int __int64_t;
typedef unsigned long int __uint64_t;
typedef __int8_t __int_least8_t;
typedef __uint8_t __uint_least8_t;
typedef __int16_t __int_least16_t;
typedef __uint16_t __uint_least16_t;
typedef __int32_t __int_least32_t;
typedef __uint32_t __uint_least32_t;
typedef __int64_t __int_least64_t;
typedef __uint64_t __uint_least64_t;
typedef long int __quad_t;
typedef long int __blksize_t;
typedef long int __blkcnt_t;
typedef long int __blkcnt64_t;
typedef __off64_t __loff_t;
typedef char *__caddr_t;
typedef long int __intptr_t;
typedef unsigned int __socklen_t;
typedef int __sig_atomic_t;

/* 篇幅有限,中间省略了内容 */

extern int pclose (FILE *__stream);
extern char *ctermid (char *__s) __attribute__ ((__nothrow__ , __leaf__));
extern void flockfile (FILE *__stream) __attribute__ ((__nothrow__ , __leaf__));
extern int ftrylockfile (FILE *__stream) __attribute__ ((__nothrow__ , __leaf__)) ;
extern void funlockfile (FILE *__stream) __attribute__ ((__nothrow__ , __leaf__));
extern int __uflow (FILE *);
extern int __overflow (FILE *, int);

extern int sub_func(int a);
int main(int argc, const char *argv[])
{
 printf("Hello world !\n");
 printf("TEST_NUM = %d\n", 1024);
 printf("sub_func() = %d\n", sub_func(1));
 return 0;
}
3.4 编译生成.s文件
预编译处理完了之后,进入到编译阶段,这里需要做到就是语法检查和词法分析,最终是会生成汇编代码,我们一般以.s后缀表示此类文件。
以gcc编译器为例,执行这一步编译用到的命令行参数是-S(大写字母S),具体如下:
gcc -S main.i -o main.s
gcc -S sub.i -o sub.s
像.i文件一样,以main.s为例,我们也可以打开它,看下它里面长啥样?
    .file   "main.c"
    .text
    .section    .rodata
.LC0:
    .string "Hello world !"
.LC1:
    .string "TEST_NUM = %d\n"
.LC2:
    .string "sub_func() = %d\n"
    .text
    .globl  main
    .type   main, @function
main:
.LFB0:
    .cfi_startproc
    endbr64
    pushq   %rbp
    .cfi_def_cfa_offset 16
    .cfi_offset 6, -16
    movq    %rsp, %rbp
    .cfi_def_cfa_register 6
    subq    $16, %rsp
    movl    %edi, -4(%rbp)
    movq    %rsi, -16(%rbp)
    leaq    .LC0(%rip), %rdi
    call    puts@PLT
    movl    $1024, %esi
    leaq    .LC1(%rip), %rdi
    movl    $0, %eax
    call    printf@PLT
    movl    $1, %edi
    call    sub_func@PLT
    movl    %eax, %esi
    leaq    .LC2(%rip), %rdi
    movl    $0, %eax
    call    printf@PLT
    movl    $0, %eax
    leave
    .cfi_def_cfa 7, 8
    ret
    .cfi_endproc
.LFE0:
    .size   main, .-main
    .ident  "GCC: (Ubuntu 9.3.0-17ubuntu1~20.04) 9.3.0"
    .section    .note.GNU-stack,"",@progbits
    .section    .note.gnu.property,"a"
    .align 8
    .long    1f - 0f
    .long    4f - 1f
    .long    5
0:
    .string  "GNU"
1:
    .align 8
    .long    0xc0000002
    .long    3f - 2f
2:
    .long    0x3
3:
    .align 8
4:
有过汇编语言基础的朋友,一定不会陌生:“咦,这不就是我们在汇编语言编程课堂上手把手码出来的汇编代码吗?”
是的,这个就是纯汇编代码,它的可读性比C语言确实差了很多,这也从侧面证实了gcc这类C编译器的厉害之处,它可以把高级语言编写的C代码编译成面向机器的低级语言的汇编代码。
3.5 汇编生成.o文件
生成汇编代码之后,接下来的步骤就是使用汇编器生成二进制目标文件,这里使用gcc汇编的命令行如下:
-
gcc -c main.s -o main.o -
gcc -c sub.s -o sub.o
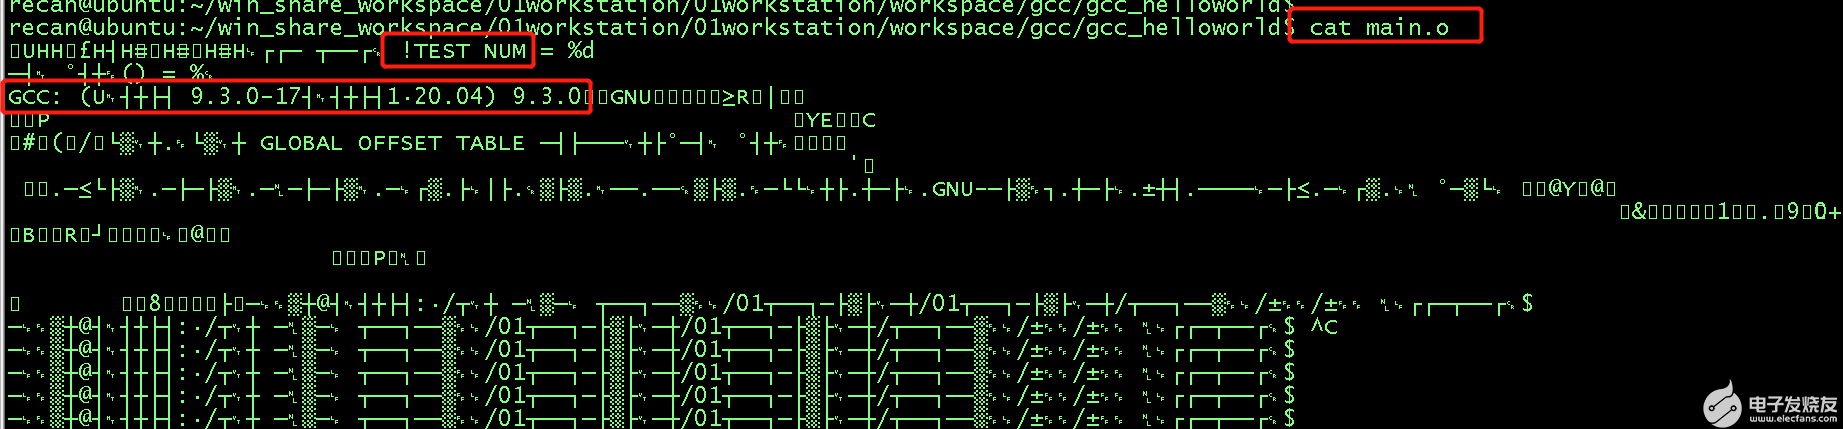
同样的,你是否也好奇,.o这种目标文件究竟长啥样?以main.o,我们来看一看?
额,忘了再特别交代下,这货是二进制文件,它并不像.c、.i、.s文件那样是可读的,我一使用cat指令去读,直接把我的控制台输出都给整乱码了。(< - . - >)
看来,这玩意真不是我们普通肉眼所能看得懂的。
但是,Linux这么多强大的命令行,cat不能解析它,自然有人能敲开它的大门,这次我们用下面这两个命令简单看看这个目标文件。
使用file命令先查看下,文件的类型:
gcc/gcc_helloworld$ file main.c
main.c: C source, ASCII text
gcc/gcc_helloworld$
gcc/gcc_helloworld$ file main.i
main.i: C source, ASCII text
gcc/gcc_helloworld$
gcc/gcc_helloworld$ file main.s
main.s: assembler source, ASCII text
gcc/gcc_helloworld$
gcc/gcc_helloworld$ file main.o
main.o: ELF 64-bit LSB relocatable, x86-64, version 1 (SYSV), not stripped
我们可以清晰地对比到不同的文件类型,以及obj文件在Linux平台上其实是一个ELF文件。
再使用nm命令查看下目标文件的符号列表:
gcc/gcc_helloworld$ nm -a main.o
0000000000000000 b .bss
0000000000000000 n .comment
0000000000000000 d .data
0000000000000000 r .eh_frame
                 U _GLOBAL_OFFSET_TABLE_
0000000000000000 T main
0000000000000000 a main.c
0000000000000000 r .note.gnu.property
0000000000000000 n .note.GNU-stack
                 U printf
                 U puts
0000000000000000 r .rodata
                 U sub_func
0000000000000000 t .text
这里补充一下:
T或t : 表示该符号是在本C文件中实现的函数(符号);U: 表示该符号是外部符号,也就是在其他C文件中实现的;
nm更为详细的含义列表,感兴趣的可以自行man nm。
从nm的输出,可以看出符号列表跟我们的C代码实现是吻合的。
3.6 预编译生成.elf文件
所有的目标文件生成后,编译流程进入到链接阶段。
这一步需要做的就是所有生成的二进制目标文件、启动代码、依赖的库文件,一并链接成一个可执行文件,这个可执行文件可被加载或拷贝到存储器中去执行。
在Linux下,可执行文件的本质是一个elf文件,全称是:Executable and Linkable Format,中文含义就是:可执行、可链接的格式文件。
我们来看下,使用gcc命令行如何生成.elf文件的,如下:
gcc main.o sub.o -o test
由于gcc强大的默认选项,我们在输入的时候,只需要输入我们的目标文件列表,以及使用-o指定输出的可执行文件名称即可。
其实它真正在链接的时候是会加入很多其他文件(启动文件、库文件等等)和选项的,针对这个问题,下文我特意留了一个疑问。
总之,经过这一步之后,一个elf可执行文件就生成了,在Linux平台上,通过./test就可以运行我们编写的C代码了。
gcc/gcc_helloworld$ ./test
Hello world !
TEST_NUM = 1024
sub_func() = 2
执行的输出,与我们之前设计的代码逻辑也是保持一致的。
同样的,我们也使用file和nm命令查看下这个test可执行文件:
gcc/gcc_helloworld$ file test
test: ELF 64-bit LSB shared object, x86-64, version 1 (SYSV), dynamically linked, interpreter /lib64/ld-linux-x86-64.so.2, BuildID[sha1]=2b10713c6b777b4201108c59c41547baffeb9abc, for GNU/Linux 3.2.0, not stripped
gcc/gcc_helloworld$
gcc/gcc_helloworld$ nm -a test
0000000000000000 a
0000000000004010 b .bss
0000000000004010 B __bss_start
0000000000000000 n .comment
0000000000004010 b completed.8060
0000000000000000 a crtstuff.c
0000000000000000 a crtstuff.c
                 w __cxa_finalize@@GLIBC_2.2.5
0000000000004000 d .data
0000000000004000 D __data_start
0000000000004000 W data_start
00000000000010b0 t deregister_tm_clones
0000000000001120 t __do_global_dtors_aux
0000000000003db8 d __do_global_dtors_aux_fini_array_entry
0000000000004008 D __dso_handle
0000000000003dc0 d .dynamic
0000000000003dc0 d _DYNAMIC
0000000000000488 r .dynstr
00000000000003c8 r .dynsym
0000000000004010 D _edata
0000000000002080 r .eh_frame
0000000000002034 r .eh_frame_hdr
0000000000004018 B _end
0000000000001258 t .fini
0000000000001258 T _fini
0000000000003db8 d .fini_array
0000000000001160 t frame_dummy
0000000000003db0 d __frame_dummy_init_array_entry
00000000000021a4 r __FRAME_END__
0000000000003fb0 d _GLOBAL_OFFSET_TABLE_
                 w __gmon_start__
0000000000002034 r __GNU_EH_FRAME_HDR
00000000000003a0 r .gnu.hash
0000000000000512 r .gnu.version
0000000000000528 r .gnu.version_r
0000000000003fb0 d .got
0000000000001000 t .init
0000000000001000 t _init
0000000000003db0 d .init_array
0000000000003db8 d __init_array_end
0000000000003db0 d __init_array_start
0000000000000318 r .interp
0000000000002000 R _IO_stdin_used
                 w _ITM_deregisterTMCloneTable
                 w _ITM_registerTMCloneTable
0000000000001250 T __libc_csu_fini
00000000000011e0 T __libc_csu_init
                 U __libc_start_main@@GLIBC_2.2.5
0000000000001169 T main
0000000000000000 a main.c
000000000000037c r .note.ABI-tag
0000000000000358 r .note.gnu.build-id
0000000000000338 r .note.gnu.property
0000000000001020 t .plt
0000000000001050 t .plt.got
0000000000001060 t .plt.sec
                 U printf@@GLIBC_2.2.5
                 U puts@@GLIBC_2.2.5
00000000000010e0 t register_tm_clones
0000000000000548 r .rela.dyn
0000000000000608 r .rela.plt
0000000000002000 r .rodata
0000000000001080 T _start
0000000000000000 a sub.c
00000000000011c2 T sub_func
0000000000001080 t .text
0000000000004010 D __TMC_END__
对比之前的main.o,它的文件类型描述中多了一些信息,查看的符号列表中也多了很多没见过的符号,这些符号是因为依赖的系统库和启动文件而导进来的。
3.7 转换生成.bin文件
如上面章节提及的那样,资源紧张的嵌入式设备,如果跑到不是嵌入式Linux系统,那么是不可能直接跑.elf这种可执行文件的。
大部分内存只有百来KB的嵌入式设备,是无法支持可执行文件的解析的,所以我们就需要在编译生成elf文件之后,将elf文件转换成bin文件,再把bin文件烧录到Flash中运行代码。
这一步,在Linux平台,我们使用的是objcopy命令,使用如下:
-
objcopy -O binary test test.bin
这里-O(大写字母O)是用于指定输出二进制内容,它还可以支持ihex等参数,具体可以man objcopy。
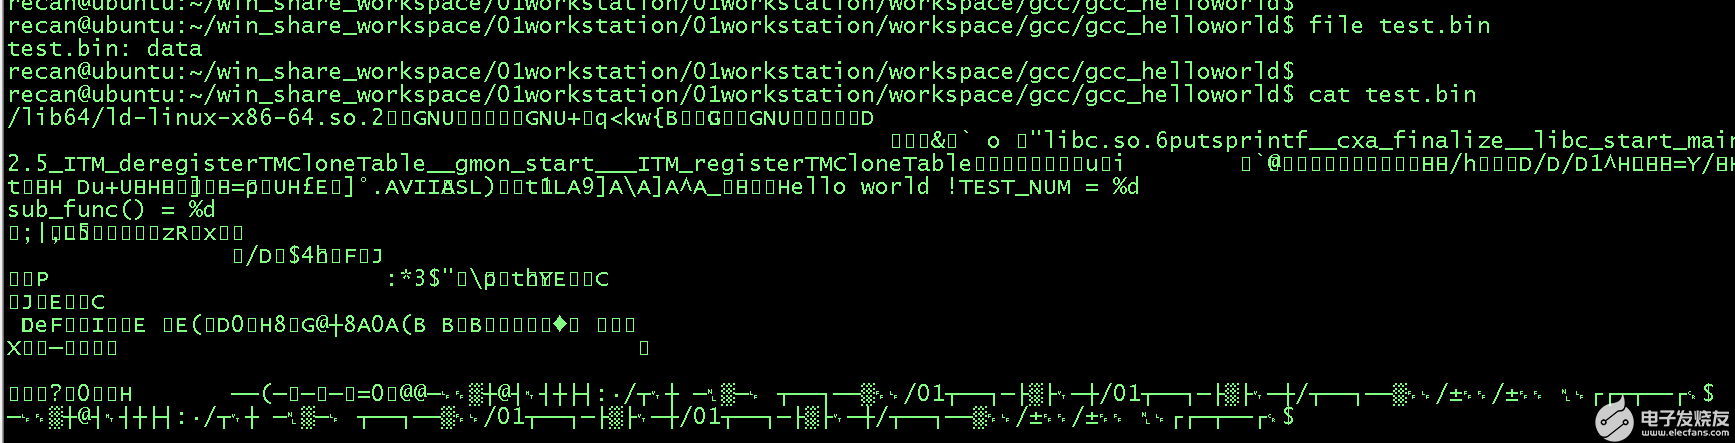
这个test.bin的文件类型以及显示的内容如下所示,毫无疑问,它也是二进制的不可读。
3.8 all-in-one
有了上面的各个步骤的基础,从预编译、编译、汇编,再到链接,每次都需要给gcc输入不同的参数,有点麻烦呀?
那么有没有参数可以输入一次就可以获取到这些步骤的所有输出文件啊?
巧了,gcc还真有!这个参数就是-save-temps=obj,我们来实践下:
gcc/gcc_helloworld$ ./build.sh clean
Clean build done !
gcc/gcc_helloworld$
gcc/gcc_helloworld$ ls
build.sh  main.c  README.md  sub.c  sub.h
gcc/gcc_helloworld$
gcc/gcc_helloworld$ ./build.sh allinone
gcc -c main.c -o main.o -save-temps=obj
gcc -c sub.c -o sub.o -save-temps=obj
gcc main.o sub.o -o test
gcc/gcc_helloworld$
gcc/gcc_helloworld$ ls
build.sh  main.c  main.i  main.o  main.s  README.md  sub.c  sub.h  sub.i  sub.o  sub.s  test
就这样,.i文件、.s文件、以及.o文件都同时输出来了。
如果工程中,只有一个main.c的源文件的话,还可以这样就一步搞定。
gcc main.c -o test -save-temps=obj
这些.i文件、.s文件、以及.o文件,我们称之为中间临时文件,下篇介绍如何解决一些编译相关的问题,还得好好利用这些中间临时文件呢。
4 经验总结
- C代码编译要经过预编译、编译、汇编、链接这几步,每一步做的事情是不一样的;
- 要深入了解C代码的编译流程,建议摒弃Windows下的IDE编译器,那玩意除了提高你的编码速度,对你理解编译流程和编译原理,帮助并不大;
- gcc是一个开源的C编译器,它博大精深,支持一大堆的命令行参数,了解一些基础、常用的参数,对你理解问题帮助很大;
- 资源受限的嵌入式设备往往跑的是RTOS,这样的执行环境下,往往只能烧录bin文件到Flash中,而不支持像高级操作系统那样,直接加载可执行文件到内存中运行。
5 留个疑问
gcc怎么这么牛逼?
好像啥事都能干?
从命令行上看,gcc既能预处理,也能编译C代码,又可以执行汇编ASM代码,还能链接OBJ目标文件生成可执行文件,这里面的操作真的只是gcc在干活吗?
感兴趣的朋友,可以关注下这个疑问,后面有时间把gcc相关的内幕补上。
6 更多分享
本项目的所有测试代码和编译脚本,均可以在我的github仓库01workstation中找到。
欢迎关注我的github仓库01workstation,日常分享一些开发笔记和项目实战,欢迎指正问题。
同时也非常欢迎关注我的CSDN主页和专栏:
【CSDN主页:架构师李肯】
【RT-Thread主页:架构师李肯】
【C/C++语言编程专栏】
【GCC专栏】
【信息安全专栏】
【RT-Thread开发笔记】
【freeRTOS开发笔记】
有问题的话,可以跟我讨论,知无不答,谢谢大家。
审核编辑:汤梓红
-
GCC
+关注
关注
0文章
112浏览量
26070 -
C代码
+关注
关注
1文章
90浏览量
15094 -
C文件
+关注
关注
0文章
12浏览量
3217
发布评论请先 登录
Linux 下GCC的编译
嵌入式学习-常用编辑器之GCC编译器
飞凌嵌入式ElfBoard-Vim编辑器之GCC的基本使用
gcc编译通过但是arm-linux-gcc不能编译,以及如何下载文件到arm
请问运行在RK3588板上编译的可执行文件出现的问题该怎么解决?
用MDK生成bin格式的可执行文件
Linux下可执行文件格式
GCC编译C语言程序的过程是怎么样的
【gcc编译优化系列】如何获取gcc默认的链接脚本
单独下载可执行文件到MM32F5微控制器
单独下载可执行文件到MM32F5微控制器


 工商网监
工商网监
评论