 微雪电子ROC-RK3308主板CC-Amazon Alexa简介

Amazon Alexa
参考固件
固件:ROC-RK3308-CC Alexa
Amazon授权
使用 Alexa Voice Service,首先你需要注册一个Amazon账号,向 Amazon 注册你的产品,并对你的 alexa client 进行授权。
第一步,按照官方指导,仔细的按照步骤,注册你的产品,并创建安全配置文件。
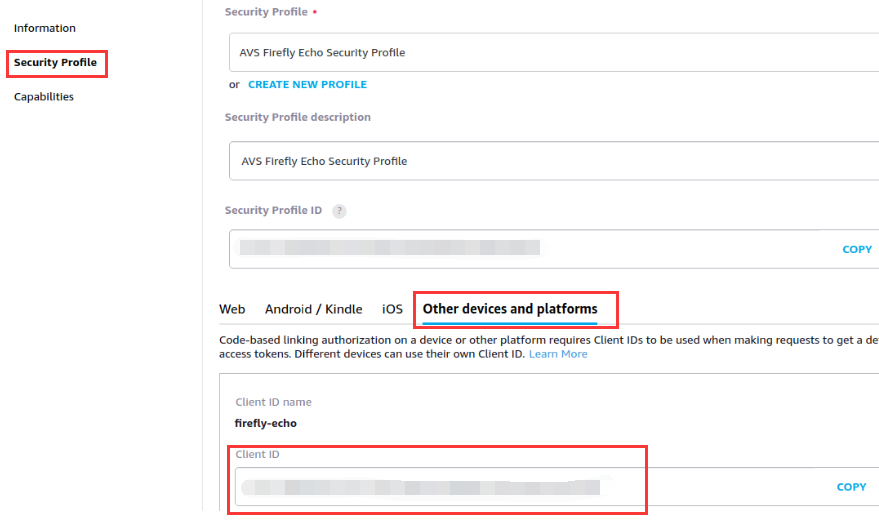
第二步,得到你的 Client ID 和 Product ID
获取 Product ID:

获取 Client ID:
使用流程
注意:Alexa Voice Service 不支持中文。
● 上电开机,如果没有配置网络,先进行配网。
● 将上面获得的Client ID 和 Product ID填入 /oem/AlexaClientSDKConfig.json的deviceInfo属性:
"deviceInfo":{ // Unique device serial number. e.g. 123456 "deviceSerialNumber":"123456", // The Client ID of the Product from developer.amazon.com "clientId":"YOUR_CLIENT_ID", // Product ID from developer.amazon.com "productId":"YOUR_PRODUCT_ID" },
● 执行下面命令启动 Alexa
SampleApp /oem/AlexaClientSDKConfig.json /oem/resources/
● 第一次启动需要进行认证授权,按提示打开对应网页,输入验证码进行认证即可
################################## # NOT YET AUTHORIZED # ################################## ################################################################################################ # To authorize, browse to: 'https://amazon.com/us/code' and enter the code: AT4HLU # ################################################################################################ ################################################# # Checking for authorization (1)... # #################################################
● 认证过程中,稍等几分钟后,就可以与 Alexa 进行对话,可通过呼叫“alexa”唤醒,不过大部分交互体验都要通过命令行引导。
+----------------------------------------------------------------------------+ | Options: | | Wake word: | | Simply say Alexa and begin your query. | | Tap to talk: | | Press 't' and Enter followed by your query (no need for the 'Alexa').| | Hold to talk: | | Press 'h' followed by Enter to simulate holding a button. | | Then say your query (no need for the 'Alexa'). | | Press 'h' followed by Enter to simulate releasing a button. | | Stop an interaction: | | Press 's' and Enter to stop an ongoing interaction. | | Privacy mode (microphone off): | | Press 'm' and Enter to turn on and off the microphone. | | Echo Spatial Perception (ESP): This is for testing purpose only! | | Press 'e' followed by Enter at any time to adjust ESP settings. | | Playback Controls: | | Press '1' for a 'PLAY' button press. | | Press '2' for a 'PAUSE' button press. | | Press '3' for a 'NEXT' button press. | | Press '4' for a 'PREVIOUS' button press. | | Settings: | | Press 'c' followed by Enter at any time to see the settings screen. | | Speaker Control: | | Press 'p' followed by Enter at any time to adjust speaker settings. | | Firmware Version: | | Press 'f' followed by Enter at any time to report a different | | firmware version. | | Info: | | Press 'i' followed by Enter at any time to see the help screen. | | Reset device: | | Press 'k' followed by Enter at any time to reset your device. This | | will erase any data stored in the device and you will have to | | re-register your device. | | This option will also exit the application. | | Reauthorize device: | | Press 'z' followed by Enter at any time to re-authorize your device. | | This will erase any data stored in the device and initiate | | re-authorization. | | Quit: | | Press 'q' followed by Enter at any time to quit the application. | +----------------------------------------------------------------------------+
资源
Alexa 源码目录:
SDK/external/alexaClientSDK/
Buildroot 的 Alexa package 目录:
SDK/buildroot/package/rockchip/alexaClientSDK/
Alexa 没有自启动入口,需要进入系统后自己手动启动Alexa,方法如上一节。如果需要自启动,则可以参考DuerOS。
编译方法
● 编译之前,亦可将上面获得的Client ID 和 Product ID填入SDK/device/rockchip/rk3308/alexa/AlexaClientSDKConfig.json的deviceInfo属性,这样固件就默认的带有了Client ID 和 Product ID信息。
"deviceInfo":{ // Unique device serial number. e.g. 123456 "deviceSerialNumber":"123456", // The Client ID of the Product from developer.amazon.com "clientId":"YOUR_CLIENT_ID", // Product ID from developer.amazon.com "productId":"YOUR_PRODUCT_ID" },
● 甚至可以从已经认证过的设备中,拷贝/oem/application-necessities/cblAuthDelegate.db到SDK中device/rockchip/rk3308/alexa/application-necessities/cblAuthDelegate.db,这样Alexa就会跳过认证,直接开始对话。
● 编辑 device/rockchip/rk3308/BoardConfig.mk 文件,将 OEM_PATH=oem 修改为 OEM_PATH=alexa,保存退出
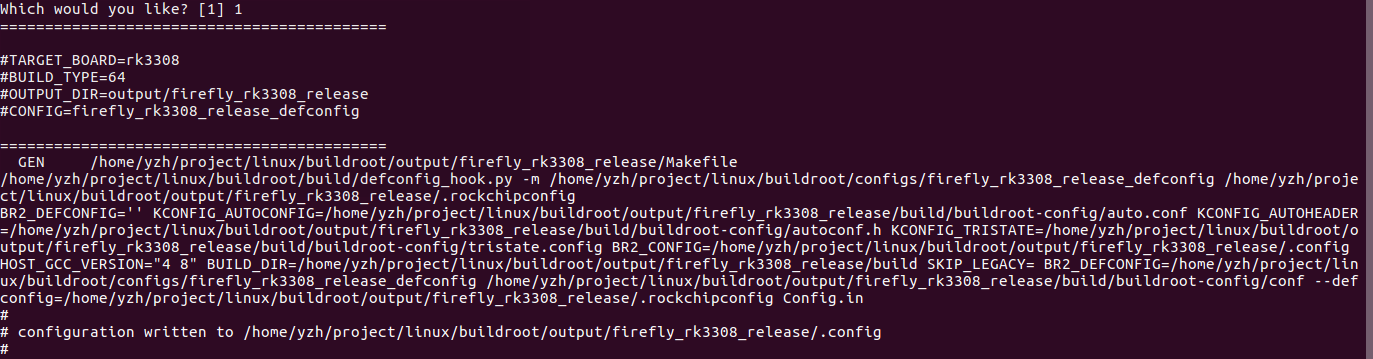
● 配置 firefly_rk3308_release
source buildroot/build/envsetup.sh
选择[1],按回车,配置成功后如下
● Buildroot配置:BR2_PACKAGE_ALEXACLIENTSDK
make menuconfig
进入图形选择界面,输入 /,跳出搜索界面如下,输入BR2_PACKAGE_ALEXACLIENTSDK,按回车进行搜索

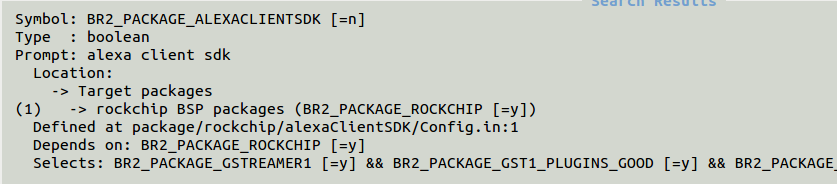
选择[1],然后按空格选择上 alexa client sdk

前面有 [ * ] 号,表示已经选上,然后< Save >保存,并< Exit >退出图形界面,输入配置保存命令:
make savedefconfig
保存配置,不保存的话,会在一键编译脚本中被重置
● 在编译前,如果当前仓库不是第一次编译,需要执行:
make gst1-plugins-good-reconfigure && make gst1-plugins-good-rebuild
● 最后全部编译
./build.sh
-
嵌入式主板
+关注
关注
7文章
6107浏览量
37152 -
Firefly
+关注
关注
2文章
549浏览量
9156 -
RK3308
+关注
关注
1文章
42浏览量
2768
发布评论请先 登录
ROC-RK3308-CC板子Amazon授权使用流程
ROC-RK3308-CC开发板使用Alexa Voice Service步骤

fireflyROC-RK3308B-CC--启动模式说明
微雪电子RK3308主板CC启动模式介绍
Core 3308Y固件ROC RK3308B CC PLUS Buildroot MiniGUI

Core 3308Y固件ROC RK3308B CC PLUS支持Docker固件
Core 3308Y固件ROC RK3308B CC Buildroot NoUI固件
ROC RK3308B CC Buildroot Qt Desktop固件
IoT四核64位开源主板ROC RK3308B CC规格书
四核64位开源主板ROC RK3308B CC Plus规格书


评论