 如何设置带有Arduino IDE的NodeMCU 1.0

步骤1:您需要什么
要遵循本教程,您需要以下组件:
Micro USB电缆
NodeMCU 1.0(ESP-12E模块)
LEDstrip
此外,您将需要:
Adafruit IO帐户
Google日历
Zapier帐户
Arduino IDE 1.8.2
步骤2:Google日历
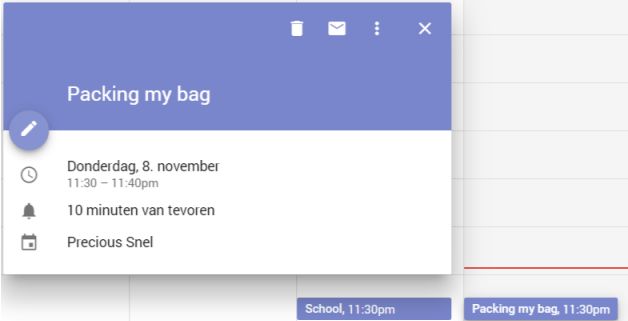
因为您提醒您,您应该在Google Calender中进行活动。
转到以下网站并进行活动:
https://www.google.com/calendar
步骤3:连接带有Zapier的Google日历

创建一个Zapier帐户(如果尚未执行此操作)。单击“制作一个zap”(右上角的橙色按钮),然后将您的Google Calender与Zapier连接。为此,您需要在搜索字段中输入Google Calender并单击它。这样,您可以将压延机与Zapier连接。
步骤4:触发器

选择事件开始作为触发器并选择您的Google帐户。接下来,在“编辑选项”部分中,您应该写出要触发事件的距离。您将根据自己的回答在LED灯条上收到通知。最后,您需要编写与您在Google日历中命名活动的方式完全匹配的搜索词。立即保存您的Zap。
第5步:将Zapier与Adafruit IO连接

触发触发器之后,执行此操作。要将Adafruit IO与Zapier连接,您需要转到以下链接:https://zapier.com/developer/invite/25310/e5b57f6e084ed73db02db095986ead31/不要创建新的Zap,请进一步处理已经制作的Zap 。现在选择Adafruit作为动作。
步骤6:Adafruit数据和值
添加您的Adafruit帐户并粘贴您的AIO密钥。设置为值“ 1”。我们需要它来触发事件。稍后,您还将在代码中看到该值。转到Adafruit并进行一个名为“测试”的提要。在Zapier中输入此内容。您可以测试Zap是否有效。您应该在Adafruit Feed中看到该值。
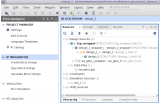
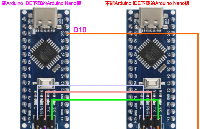
步骤7:添加代码以连接到Adafruit
使用MicroUSB电缆将NodeMCU连接到PC。您还应该将LED灯带也连接到NodeMCU的D5,G和3V中。确保以这种方式连接LED灯条。现在将以下代码添加到Arduino草图中。
// Adafruit IO Digital Output Example
// Tutorial Link: https://learn.adafruit.com/adafruit-io-basics-digital-output
//
// Adafruit invests time and resources providing this open source code.
// Please support Adafruit and open source hardware by purchasing
// products from Adafruit!
//
// Written by Todd Treece for Adafruit Industries
// Copyright (c) 2016 Adafruit Industries
// Licensed under the MIT license.
//
// All text above must be included in any redistribution.
/************************** Configuration ***********************************
/ edit the config.h tab and enter your Adafruit IO credentials
// and any additional configuration needed for WiFi, cellular,
// or ethernet clients.
#include “config.h”
#include “Adafruit_NeoPixel.h”
/************************ Example Starts Here *******************************
/ digital pin 5
#define PIXEL_PIN D5
#define PIXEL_COUNT 24
#define PIXEL_TYPE NEO_GRB + NEO_KHZ800
Adafruit_NeoPixel pixels = Adafruit_NeoPixel(PIXEL_COUNT, PIXEL_PIN, PIXEL_TYPE);
// set up the ‘digital’ feed
AdafruitIO_Feed *Test = io.feed(“Test”);
void setup() {
// start the serial connection
Serial.begin(115200);
// wait for serial monitor to open
while(! Serial);
// connect to io.adafruit.com
Serial.print(“Connecting to Adafruit IO”);
io.connect();
// set up a message handler for the ‘digital’ feed.
// the handleMessage function (defined below)
// will be called whenever a message is
// received from adafruit io.
Test-》onMessage(handleMessage);
// wait for a connection
while(io.status() 《 AIO_CONNECTED) {
Serial.print(“。”);
delay(500);
}
// we are connected
Serial.println();
Serial.println(io.statusText());
pinMode(D5, OUTPUT);
}
void loop() {
// io.run(); is required for all sketches.
// it should always be present at the top of your loop
// function. it keeps the client connected to
// io.adafruit.com, and processes any incoming data.
io.run();
}
步骤8:Arduino中的新标签页
新建一个标签页并将其命名“config.h中”。您实际上需要包含config.h(请参见前面的代码)。在以下代码中,您需要编写您自己的Adafruit用户名和您自己的密钥。如果您还不知道密钥,请转到Adafruit IO,然后单击“查看AIO密钥”。将其粘贴到Arduino中。确保已安装Arduino Neopixel库,否则代码将无法正常工作。
/************************ Adafruit IO Config *******************************/
// visit io.adafruit.com if you need to create an account,
// or if you need your Adafruit IO key.
#define IO_USERNAME “Your AIO username”
#define IO_KEY “Your AIO key”
/******************************* WIFI **************************************
/ the AdafruitIO_WiFi client will work with the following boards:
// - HUZZAH ESP8266 Breakout -》 https://www.adafruit.com/products/2471
// - Feather HUZZAH ESP8266 -》 https://www.adafruit.com/products/2821
// - Feather M0 WiFi -》 https://www.adafruit.com/products/3010
// - Feather WICED -》 https://www.adafruit.com/products/3056
#define WIFI_SSID “Your wifi or hotspot name”
#define WIFI_PASS “Your wifi or hotspot password”
// comment out the following two lines if you are using fona or ethernet
#include “AdafruitIO_WiFi.h”
AdafruitIO_WiFi io(IO_USERNAME, IO_KEY, WIFI_SSID, WIFI_PASS);
/******************************* FONA **************************************
/ the AdafruitIO_FONA client will work with the following boards:
// - Feather 32u4 FONA -》 https://www.adafruit.com/product/3027
// uncomment the following two lines for 32u4 FONA,
// and comment out the AdafruitIO_WiFi client in the WIFI section
// #include “AdafruitIO_FONA.h”
// AdafruitIO_FONA io(IO_USERNAME, IO_KEY);
/**************************** ETHERNET ************************************
/ the AdafruitIO_Ethernet client will work with the following boards:
// - Ethernet FeatherWing -》 https://www.adafruit.com/products/3201
// uncomment the following two lines for ethernet,
// and comment out the AdafruitIO_WiFi client in the WIFI section
// #include “AdafruitIO_Ethernet.h”
// AdafruitIO_Ethernet io(IO_USERNAME, IO_KEY);
步骤9:测试是否已连接到Adafruit
如果复制正确,则在串行监视器中上传后应该会看到以下内容:
Connecting to Adafruit IO.。..
Adafruit IO connected.
步骤10:更新代码以接收数据
在初始选项卡中添加以下代码,以在LED灯条上接收颜色。如果您的活动即将开始,您将获得这些颜色。
if (data-》toPinLevel() == 1) {
for(int i=0; i
pixels.setPixelColor(i, 0, 255, 0);
pixels.show();
}
Serial.println(“Event is about to start!”);
}
digitalWrite(PIXEL_PIN, data-》toPinLevel());
}
}
步骤11:最终通知
如果执行了以下步骤正确并且您的事件即将开始,您将在串行监视器上收到通知。您将看到以下内容:
Connecting to Adafruit IO.。.
Adafruit IO connected.
received 《- Event is about to start!
责任编辑:wv
-
Arduino
+关注
关注
191文章
6535浏览量
197691 -
NODEMCU
+关注
关注
13文章
289浏览量
23568
发布评论请先 登录
Java 开发者指南:全面对比传统 IDE AI 插件与 Cursor、Windsurf 等 AI 原生 IDE

乾芯DSP开发环境之IDE安装使用入门

大神们,想知道你们都用什么ide编程调试器? Arduino IDE?还是 e2studio ?还有其他吗?哪个好用呢
开源鸿蒙技术大会2025丨IDE分论坛:聚焦AI驱动的开发工具革新,探索下一代IDE前沿技术

如何在AMD Vitis Unified IDE中使用系统设备树
如何在 NuMaker-IoT-M467 板上使用 Arduino IDE 控制 Wi-Fi 模块?
请问是否可以将 Nu-Link2-Me V1.0 的固件升级到 V2.0?
如何用Arduino Nano/UNO R3开发板给另一个Arduino IDE不能下载的Arduino Nano/UNO R3开发板重新烧录引导程序bootlaoder
1.0 至 6.0 GHz SPDT 开关 skyworksinc

【Milk-V Duo S 开发板免费体验】Milk-V DuoS之使用Arduino开发小核
如何在Unified IDE中创建视觉库HLS组件

使用AMD Vitis Unified IDE创建HLS组件


评论