 用于HC-05蓝牙模块的交互式向导
步骤1:硬件:
HC-05 SMD模块(我从aliexpress获得)
Arduino Nano(同样来自aliexpress)
3x7cm双面原型板(同样来自aliexpress)
两个LED
单芯线的耦合
2.54厘米标头
步骤2:HC-05模块:
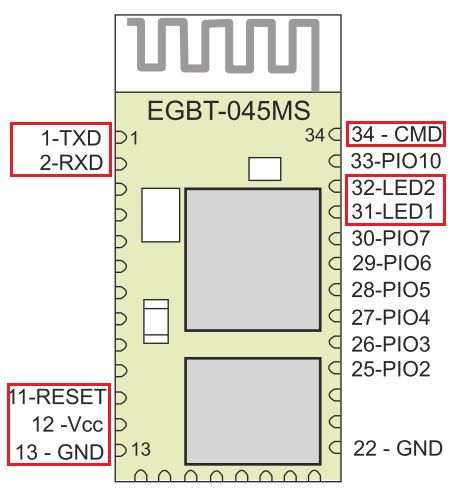
实际上,我使用的参考手册是关于具有不同产品编号的模块的,但是实际上,它是与HC-05相同的模块(我发现它写得很好并且带有漂亮的图形)。该模块的名称为 EGBT-045MS ,您可以在此处找到该手册。
特别是,我们对以下8个引脚感兴趣:
引脚1,2 :TX,RX:将发送/接收引脚连接到Arduino上的串行(或软件串行)引脚。
引脚12,13 :Vcc,GND:为模块加电。
引脚31,32 :指示LED,特别是“状态” LED和“以数据模式连接” LED
pin 11 》:重置引脚,用于重置模块以切换操作模式(AT/DATA)
引脚34 :命令模式引脚,用于
步骤3:连接:
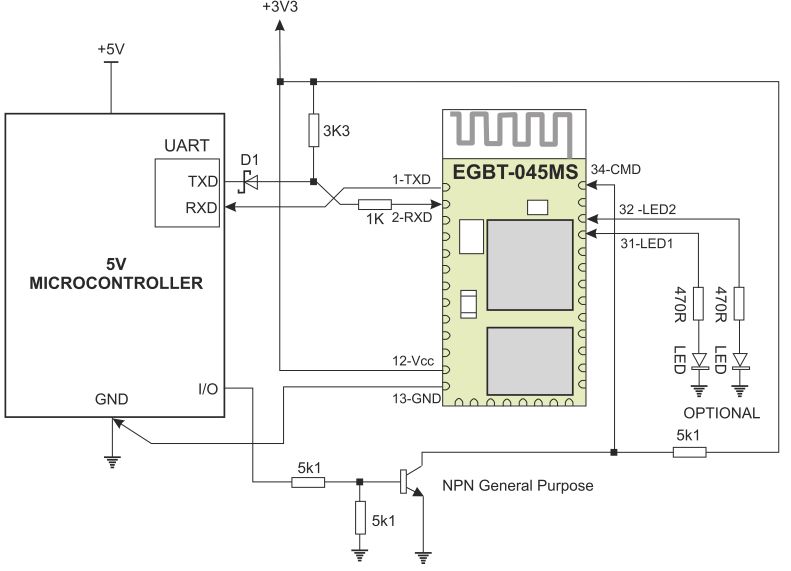
要连接5v主机,您需要在HC-05 RX引脚上使用分压器(电阻器对),而不必在Vcc上使用因为它是5v容忍的(这就是手册至少说了。)
现在,说实话,我为3.3v Arduino pro mini进行了连接,但是后来我使用了5v Arduino Nano,并且我没有遵循指南向其添加电阻器RX线。但是,猜猜是什么,它可以正常工作,所以我将其保持不变;)
注意:我并不是说它将与您一起使用还是这种方式是正确的,我认为它只是偶然地与我合作。请按照接线图进行正确连接。
现在,将HC-05正确放置在原型板上(注意,HC-05是间距为1.5毫米,而面包板的间距为2.45毫米。因此,孔没有对齐,但只有很少的相邻电缆,您可以设法将其穿过)
接下来,放置Arduino Nano和HC-05引脚,两个用于LED的电阻器,LED本身(从另一端连接到GND),我还为I2C显示设置了连接(将在附近的另一条说明中添加和解释)
注意: 我没有将HC-05连接线连接到特定的Arduino引脚,我现在通过跳线进行此操作,以使其与其他组件(如果有)保持模块化。
步骤4:AT模式和HC-05重置。
在大多数参考文献中,要求您手动断开/重新连接HC-05的电源,以便将其放入AT模式(引脚34置于高电平)或返回数据模式(同一引脚为低电平状态)。如果您的应用程序需要按顺序从/向AT命令模式来回切换,则没有任何意义。
诀窍是允许Arduino控制Reset引脚(11号引脚)来重置模块。该过程如下
进入AT命令模式:
digitalWrite(pinEn,HIGH); // Set the Enable pin (no.34) to HIGH, and keep it during the AT command
digitalWrite(pinRe,LOW); // Set the Reset pin (no.11) to LOW, this postpones the module in preparation to reset
delay(100); // A short delay (should be more that 10 ms) to simulate a negative pulse on the reset pin
digitalWrite(pinRe,HIGH); // Set the Reset pin back to HIGH, and with Enable pin set to HIGH, the module restarts in AT Command mode.
进入数据传输模式:
digitalWrite(pinEn,LOW); // Set the Enable pin (no.34) to LOW, and keep it during the data transmission mode
digitalWrite(pinRe,LOW); // Set the Reset pin (no.11) to LOW, this postpones the module in preparation to reset
delay(100); // A short delay (should be more that 10 ms) to simulate a negative pulse on the reset pin
digitalWrite(pinRe,HIGH); // Set the Reset pin back to HIGH, and with Enable pin set to LOW, the module restarts in Data transmission mode.
第5步:交互使用用户输入
在我们的程序中,用户可以在三种模式之一中操作模块
AT命令模式: :您可以通过在串行终端中键入‘#start’来启用它,您需要在其中键入每个命令,并从中读取确切的响应
数据传输模式: :您可以通过在序列号中键入‘#end’来启用它终端,其中与模块的所有无线通讯都将列在串行监视器中,并且无法控制模块参数。
操作菜单模式: ,您可以通过在串行终端中键入‘#op’来启用它,这会将模块放入AT命令模式,但不是由用户直接提供命令,而是通过具有预定义操作的交互式菜单来发出命令。
操作菜单允许进行以下操作:
显示模块设置
名称,波特率,角色,连接模式,密码
修改当前设置
修改模块名称
修改UART设置
修改配对代码/密码
切换角色(主/从)
更改连接模式
后退。..
重置为原始设置
仅限主机操作
发现附近的设备
与设备配对
连接到设备
从配对列表中删除设备
绑定设备
返回。..
第6步:代码:
下面是Arduino代码(您也可以下载文件本身)
请注意该程序中密集的字符串用法。我遇到了很多问题,因为如果这样做,我可以通过以下说明解决其中的几个问题:
使用‘String.reserve()’函数为字符串实例预先保留动态内存,这样可以更好地处理堆中的内存分配。但这还不够,因为它不能保证任何事情。
使用‘F()’宏:它允许将字符串存储在闪存而不是RAM中。它仅适用于print/println操作中的静态字符串。这非常有用,但还不够用(对动态字符串无济于事)
减少保留的字符串数:如果这不是您真正想要的,不要询问最多10个设备。例如3个就足够了。
在任何情况下该程序都将执行并上载的问题,但是它将以意外的方式运行,响应的查询与您键入的查询不同,并且
解决该问题的方法是使用char数组(或char *)代替字符串。这是我的下一步,但现在我没有时间去做;)
/*
* AT_AT_mode.ino - a wizard for HC-05 bluetooth modules
* Copyright (c) 2016 Rami Baddour. All right reserved.
* http://ramibaddour.com/ https://ch.linkedin.com/in/ramibaddour
*
* A program to view, set, modify and use the HC-05 bluetooth with an interactive textural menus
* over serial monitore
*
* You can include parts of the code that does specific functionality (e.g. search for devices)
* to your own program
*
* Note that this code uses intensively the String class, which has some unpredictable behaviour
* when virtual memory is not possible to researve. IT is tested to work perfectly when restricting
* number of recorded searched devices to 3. above this can have some problems with displyed strings.
*
* Newer version will use char arrays instead, hopefully with better stability.
*
*
*/
#include
SoftwareSerial mySerial(5, 4);// RX, TX where the HC-05 is connected
#define pinRe 3 // the Reset pin, connected to HC-05 pin No. 11
#define pinEn 6 // the Enable pin, connected to HC-05 pin No. 34
#define INQ1 1 // Inquire Acces mode: 0-standard 1-RSSI(default)
#define INQ2 100 // Maximum number of devices responce: 0-to-32000
#define INQ3 30 // Inquire timeout: 1-to-48 sec
#define MAXDEV 1 // Maximum number of devices to record.
#define PAIRTO “25” // Pairing timout in seconds
#define MAXSTRLEN 50 // maximum buffer researved for string variables.
#define ATSTART “#start” // The token string to start AT command input
#define ATEND “#end” // The token string to end AT command or Operational menu input
#define ATOP “#op” // The token string to start the operation menu.
// column widths in character count for the discovred BT devices‘ list
#define colW1 6
#define colW2 45
#define colW3 20
#define colW4 7
int8_t currIn = -1; // The current input, records the user selection and used within the program state machine
int8_t currSt = -1; // the current state, defines the current status in regards to the menu selections
int8_t deviceCount = 0; // the Reset pin, connected to HC-05 pin No. 13
int devCount = 0; // how many devices in total have been discovered in the last device inquiry
int devLoc = 0; // the location of the selected device within the list of discovered devices.
String serialStr, tmpName, tmpRes; //some string variables to be used later
//define a data structure for each descovered device. It inlcudes basic information like the name, address, RRSI and Service class
typedef struct inqDevices{
String Name;
String Address;
String RSSI;
String Class;
inqDevices(int defSize=MAXSTRLEN){
Name.reserve(defSize);
Name = “”;
Address.reserve(20);
Address = “”;
RSSI.reserve(20);
RSSI = “”;
Class.reserve(40);
Class = “”;
}
}inqDevice;
inqDevice lstDevices[MAXDEV]; // This function takes a string of any length ’strIn‘ and outputs a the same string but with fixed length ’strLen‘
// which is a substring of the input if length(strIn)》strLen, is the same as ’strIn‘ with the remaining characters
// filled with ’strFillChar‘ character.
// if ’strFill‘ is set to true, the input string is appended to the end of the result string as well.
String strFixed (String strIn, int strLen, boolean strFill = false, String strFillChar = “ ”){
String tmpStr1 = strIn.substring(0,strLen);
int tmpLen = tmpStr1.length();
for (int i=0; i《 (strLen - tmpLen); i++)
tmpStr1 = tmpStr1 + strFillChar;
if (strFill)
tmpStr1 = tmpStr1 + strIn;
return (tmpStr1);
}
// A function to clear the contents of the Device List array strings.
void clearDeviceList(){
for (int i = 0; i // Use the ’discardOK‘ setting if you want the function to discard the ’OK‘ result on the AT command return.
// Use the ’charsToCutFrom‘ and ’charsToCutTo‘ if you want to get only a substring of the AT command return. e.g. if you want to discard
// the ’+INQ:‘ initial part in the ’AT+INQ‘ command responce and get directly the address and signal information of the descovered device.
String getFromMySerial(String strToWrite = “”, bool discardOK=true, int charsToCutFrom = 0, int charsToCutTo = 150){
if (strToWrite != “”)
{
mySerial.println(strToWrite);
delay(50); // these delays may be not necessary, it just to accomodate slow responding HC-05 modules.
}
String tmpStr = (mySerial.readStringUntil(’ ‘));
tmpStr.trim();
delay(50);
if (discardOK)
mySerial.readStringUntil(’ ‘);
return tmpStr.substring(charsToCutFrom, charsToCutTo);
}
// This function is similar to the previous ’getFromMySerial‘。 But this one is used when the answer
// is not guarenteed after a fixed delay. e.g. if you wait to get remote BT device address or name in
// discovery process. also, it is used if you are not expecting a return value at all.
String getFromMySerialSimple(String strToWrite = “”, int charsToCutFrom = 0, int charsToCutTo = 150){
if (strToWrite != “”)
{
mySerial.println(strToWrite);
delay(100);
return “”;
}
else
{
while (!mySerial.available()){delay(10);}
String tmpStr = (mySerial.readStringUntil(’ ‘));
return tmpStr.substring(charsToCutFrom, charsToCutTo);
}
} void setup() {
Serial.begin(57600);
mySerial.begin(38400); // default HC-05 baud rate at AT-mode
Serial.print(F(“to enter AT mode please type ’”));
Serial.print(ATSTART);
Serial.print(F(“‘, to exist type ”));
Serial.print(ATEND);
Serial.print(F(“, or type ’”));
Serial.print(ATOP);
Serial.println(F(“ for the menu”));
pinMode(pinRe, OUTPUT);
pinMode(pinEn, OUTPUT);
serialStr = “”;
serialStr.reserve(MAXSTRLEN);
tmpName.reserve(MAXSTRLEN);
tmpRes.reserve(MAXSTRLEN);
} void loop(){
if (Serial.available()) {
serialStr = (Serial.readStringUntil(‘ ’));
serialStr.trim();
// Entering AT mode, you set EN pin to HIGH, and generate a 100ms negative pulse on the reset pin
if (serialStr.equalsIgnoreCase(ATSTART)) {
Serial.println(F(ATSTART));
Serial.println(F(“You are now in AT mode, Enter AT commands:”));
currIn = -1;
currSt = -5;
digitalWrite(pinEn,HIGH); // Set the Enable pin (no.34) to HIGH, and keep it during the AT command operation
digitalWrite(pinRe,LOW); // Set the Reset pin (no.11) to LOW, this postpones the module in preparation to reset
delay(100); // A short delay (should be more that 10 ms) to simulate a negative pulse on the reset pin
digitalWrite(pinRe,HIGH); // Set the Reset pin back to HIGH, and with Enable pin set to HIGH, the module restarts in AT Command mode.
serialStr = “”;
}
// Exiting AT mode into data transmission mode, you set EN pin to LOW, and generate a 100ms negative pulse on the reset pin
else if (serialStr.equalsIgnoreCase(ATEND)){
currIn = -1;
currSt = -1;
Serial.println(F(ATEND));
Serial.println(F(“You have quit AT mode.”));
digitalWrite(pinEn,LOW); // Set the Enable pin (no.34) to LOW, and keep it during the data transmission mode
digitalWrite(pinRe,LOW); // Set the Reset pin (no.11) to LOW, this postpones the module in preparation to reset
delay(100); // A short delay (should be more that 10 ms) to simulate a negative pulse on the reset pin
digitalWrite(pinRe,HIGH); // Set the Reset pin back to HIGH, and with Enable pin set to LOW, the module restarts in Data transmission mode.
}
// To enter the operational menu mode, you do the same as initiating AT mode, but with the state variablle state to 0 so you enable the menu state machine
else if (serialStr.equalsIgnoreCase(ATOP)){
currIn = 0;
currSt = 0;
Serial.println(F(ATOP));
digitalWrite(pinEn,HIGH);
digitalWrite(pinRe,LOW);
delay(100);
digitalWrite(pinRe,HIGH);
}
// For any other input, this is basically a selection of an item in the menu, or a command in AT mode.
else{
Serial.println(serialStr);
currIn = serialStr.toInt(); //any non-numerical input results in ‘0’
}
// This is when we start the AT mode , all inputs are sent to the bluetooth module.
if (currSt == -5){
mySerial.println(serialStr);
}
}
// In case of responce or input from the bluetooth module itself
if (mySerial.available()){
while (mySerial.available()){
tmpName = (mySerial.readStringUntil(‘ ’));
tmpName.trim();
Serial.println(tmpName);
delay(50);
} }
if (currIn 》= 0){ // enter the state machine only if we get a valid input
switch (currSt){ // the menu display selection
case 0:{ // this is the main menu
switch (currIn){ // based on the user input, selects the corresponding operation and therefore the next state
case 0:
Serial.println(F(“----------------------------------------------------------”));
Serial.println(F(“Please select from the following operations:”));
Serial.println(F(“ 1- Display the module settings”));
Serial.println(F(“ 2- Modify current settings”));
Serial.println(F(“ 3- Reset to original settings”));
Serial.println(F(“ 4- Master-only operations”));
Serial.println(F(“ 5 -”));
Serial.print(F(“(Option No.) ”));
currIn = -1; // we set to -1 to avoid entering into the state machine indefinately.
break;
case 1:
currSt = 1;
break;
case 2:
currSt = 2;
currIn = 0;
break;
case 3:
currSt = 3;
break;
case 4:
currSt = 4;
currIn = 0;
break;
default:
Serial.println (F(“not a valid input, please select from the list”));
currSt = 0;
currIn = 0;
}
break;
}
case 1:{ // display the module main settings. for each, send the command and wait for the result and display it
Serial.println(F(“----------------------------------------------------------”));
Serial.println(F(“The current module settings are:”));
Serial.print(F(“ -- Name : ”));
Serial.println(getFromMySerial(“AT+NAME”, true, 6));
Serial.print(F(“ -- Baudrate : ”));
Serial.println(getFromMySerial(“AT+UART”, true, 6));
Serial.print(F(“ -- Role : ”));
if (getFromMySerial(“AT+ROLE”, true, 6) == “1”)
Serial.println(F(“Master”));
else
Serial.println(F(“Slave”));
Serial.print(F(“ -- Conn. Mode : ”));
tmpRes = getFromMySerial(“AT+CMODE”, true, 6);
if ( tmpRes == “0”)
Serial.println(F(“Single remote connection”));
else if ( tmpRes == “1”)
Serial.println(F(“Any remote connection”));
else
Serial.println(F(“Test mode”));
Serial.print(F(“ -- Passowrd : ”));
Serial.println(getFromMySerial(“AT+PSWD”, true, 6));
currSt = 0;
currIn = 0;
break;
}
case 2:{ // The menu to modify the BT module settings
switch (currIn){
case 0:
Serial.println(F(“----------------------------------------------------------”));
Serial.println(F(“Please select from the following operations:”));
Serial.println(F(“ 1- Modify the module name”));
Serial.println(F(“ 2- Modify UART settings”));
Serial.println(F(“ 3- Modify the pairing code/PW”));
Serial.println(F(“ 4- Switch the role (Master/Slave)”));
Serial.println(F(“ 5- Change connection mode”));
Serial.println(F(“ 6- Back.。.”));
Serial.print(F(“(Option No.) ”));
currIn = -1;
break;
case 1:
currSt = 21;
currIn = 0;
break;
case 2:
currSt = 22;
currIn = 0;
break;
case 3:
currSt = 23;
currIn = 0;
break;
case 4:
currSt = 24;
currIn = 0;
break;
case 5:
currSt = 25;
currIn = 0;
break;
case 6:
currSt = 0;
currIn = 0;
break;
default:
Serial.println (F(“not a valid input, please select from the list”));
currSt = 2; // stay in the same menu if wrong input is entered
currIn = 0;
break;
}
break;
}
case 21:{ // Modify the module‘s name
Serial.println(F(“----------------------------------------------------------”));
Serial.print(F(“The curent module name is : ”));
Serial.println(getFromMySerial(“AT+NAME”, true, 6));
Serial.println(F(“Please enter a new name, or leave blank to keep the current setting.”));
while (!Serial.available());
tmpName = (Serial.readStringUntil(’ ‘));
tmpName.trim();
if (tmpName == “”)
Serial.println(F(“Name is left unchanged”));
else{
tmpName = “AT+NAME=” + tmpName;
tmpRes = getFromMySerial(tmpName, true);
if (tmpRes == “OK”)
Serial.println (F(“Name change successful”));
else
Serial.println (F(“Faild to change the name, please check the name and try again”));
}
currSt = 2;
currIn = 0;
break;
}
case 22:{ // Modify the serial UART port settings (Baudrate, Stop bit and Parity bits)
Serial.println(F(“----------------------------------------------------------”));
Serial.print(F(“The curent UART (Baudrate) settings are : ”));
tmpName = getFromMySerial(“AT+UART”, true, 6);
String tmpBR = tmpName.substring(0,tmpName.indexOf(’,‘)); // Baud rate
String tmpSB = tmpName.substring(tmpName.indexOf(’,‘)+1,tmpName.indexOf(’,‘)+2);// Stop Bit
String tmpPB = tmpName.substring(tmpName.indexOf(’,‘)+3,tmpName.indexOf(’,‘)+4);// Parity bit
Serial.println(tmpName);
Serial.println(F(“Choose new Baudrate, or leave it blank to keep unchanged. Possible options:”));
Serial.println(F(“(1) 4800 (2) 9600 (3) 19200 (4) 38400 (5) 57600”));
Serial.println(F(“(6) 115200 (7) 234000 (8) 460800 (9) 921600 (10) 1382400”));
while (!Serial.available());
tmpName = (Serial.readStringUntil(’ ‘));
tmpName.trim();
if (tmpName == “”)
{
Serial.print(F(“Baudrate is left unchanged: ”));
Serial.println(tmpBR);
}
else
{
int tmpInt = tmpName.toInt(); //Baudrate
if ((tmpInt 》 0)&&(tmpInt 《 11))
Serial.print(F(“Baudrate channged successfully, the new baudrate is: ”));
switch (tmpInt) {
case 1: case 2: case 3: case 4:
tmpBR = String(2400 * pow(2,tmpInt),0);
Serial.println(tmpBR);
break;
case 5: case 6: case 7: case 8: case 9:
tmpBR = String(1800 * pow(2,tmpInt),0);
Serial.println(tmpBR);
break;
case 10:
tmpBR = “1382400”;
Serial.println(tmpBR);
break;
default:
Serial.println(F(“Incorrect input, baudrate is left unchanged”));
}
}
Serial.println(); // Stop Bits
Serial.println(F(“Choose the number of Stop bits, or leave it blank to keep unchanged. Possible options:”));
Serial.println(F(“(a) 0:1 bit (b) 1:2 bits”));
while (!Serial.available());
tmpName = (Serial.readStringUntil(’ ‘));
tmpName.trim();
if (tmpName == “”)
{
Serial.print(F(“Stop bit number is left unchanged: ”));
Serial.println(tmpSB);
}
else if ((tmpName == “a”)||(tmpName == “A”))
{
tmpSB = “0”;
Serial.print(F(“Stop bit number is channged successfully, the new setting is: ”));
Serial.println(tmpSB);
}
else if ((tmpName == “b”)||(tmpName == “B”))
{
tmpSB = “1”;
Serial.print(F(“Stop bit number is channged successfully, the new setting is: ”));
Serial.println(tmpSB);
}
else
Serial.println(F(“Incorrect input, Stop bit number is left unchanged”));
Serial.println(); //Parity bits
Serial.println(F(“Choose parity bits setting, or leave it blank to keep unchanged. Possible options:”));
Serial.println(F(“(1) no parity (2) odd parity (3) even parity”));
while (!Serial.available());
tmpName = (Serial.readStringUntil(’ ‘));
tmpName.trim();
int tmpInt = tmpName.toInt();
if (tmpName == “”)
{
Serial.print(F(“Parity bits setting is left unchanged: ”));
Serial.println(tmpPB);
}
else if ((tmpInt 》0)&&(tmpInt 《4))
{
tmpPB = tmpName;
Serial.print(F(“Parity bits setting is channged successfully, the new setting is: ”));
Serial.println(tmpPB);
}
else
Serial.println(F(“Incorrect input, Parity bits setting is left unchanged”));
tmpName = “AT+UART=” + tmpBR + “,” + tmpSB + “,” + tmpPB; // The overal UART settings command
String tmpRes = getFromMySerial(tmpName, true);
if (tmpRes == “OK”)
Serial.println (F(“UART settings change successful”));
else
Serial.println (F(“Faild to change the UART settings, please try again”));
currSt = 2;
currIn = 0;
break;
}
case 23:{ // Modify the password (Pairing code)
Serial.println(F(“----------------------------------------------------------”));
Serial.print(F(“The curent pairing code is : ”));
Serial.println(getFromMySerial(“AT+PSWD”, true, 6));
Serial.println(F(“Please enter a new pairing passkey, or leave blank to keep the current code.”));
while (!Serial.available());
tmpName = (Serial.readStringUntil(’ ‘));
tmpName.trim();
if (tmpName == “”)
Serial.println(F(“Pairing passkey is left unchanged”));
else
{
tmpName = “AT+PSWD=” + tmpName;
String tmpRes = getFromMySerial(tmpName, true);
if (tmpRes == “OK”)
Serial.println (F(“Pairing passkey change successful”));
else
Serial.println (F(“Faild to change the Pairing passkey , please check the code and try again”));
}
currSt = 2;
currIn = 0;
break;
}
case 24:{ // Modify the role (Master/Slave/Slave-loop)
Serial.println(F(“----------------------------------------------------------”));
Serial.print(F(“The curent role setting is : ”));
tmpName = getFromMySerial(“AT+ROLE”, true, 6);
tmpName.trim();
Serial.print(tmpName);
if (tmpName == “0”)
Serial.println(F(“ [Slave]”));
else if (tmpName == “1”)
Serial.println(F(“ [Master]”));
else if (tmpName == “2”)
Serial.println(F(“ [Slave-loop]”));
Serial.println(F(“Choose a new role, or leave it blank to keep unchanged. Possible options:”));
Serial.println(F(“(0) 0:Slave (1) 1:Master (2) 2:Slave-loop”));
while (!Serial.available());
tmpName = (Serial.readStringUntil(’ ‘));
tmpName.trim();
if (tmpName == “”)
{
Serial.print(F(“Role is left unchanged: ”));
}
else
{
int tmpInt = tmpName.toInt();
switch (tmpInt)
{
case 0: case 1: case 2:
tmpName = “AT+ROLE=” + tmpName;
tmpRes = getFromMySerial(tmpName, true);
if (tmpRes == “OK”)
Serial.println (F(“Role change successful”));
else
Serial.println (F(“Faild to change the role, please try again”));
break;
default:
Serial.println(F(“Incorrect input, role is left unchanged”));
break;
}
}
currSt = 2;
currIn = 0;
break;
}
case 25:{ // Change the connection mode
Serial.println(F(“----------------------------------------------------------”));
Serial.print(F(“The curent connection mode is : ”));
tmpName = getFromMySerial(“AT+CMODE”, true, 6);
tmpName.trim();
Serial.print(tmpName);
if (tmpName == “0”)
Serial.println(F(“ [Single remote connection]”));
else if (tmpName == “1”)
Serial.println(F(“ [Any remote connection]”));
else if (tmpName == “2”)
Serial.println(F(“ [Test mode]”));
Serial.println(F(“Choose a new connection mode, or leave it blank to keep unchanged. Possible options:”));
Serial.println(F(“(0) 0:Single remote connection (1) 1:Any remote connection (2) 2:Test mode”));
while (!Serial.available());
tmpName = (Serial.readStringUntil(’ ‘));
tmpName.trim();
if (tmpName == “”)
{
Serial.print(F(“Connection mode is left unchanged: ”));
}
else
{
int tmpInt = tmpName.toInt();
switch (tmpInt)
{
case 0: case 1: case 2:
tmpName = “AT+CMODE=” + tmpName;
tmpRes = getFromMySerial(tmpName, true);
if (tmpRes == “OK”)
Serial.println (F(“Connection mode change successful”));
else
Serial.println (F(“Faild to change the connection mode, please try again”));
break;
default:
Serial.println(F(“Incorrect input, connection mode is left unchanged”));
break;
}
}
currSt = 2;
currIn = 0;
break;
}
case 3:{ // Reset the module to the original settings
Serial.println(F(“----------------------------------------------------------”));
Serial.println(F(“The module settings are reset to original”));
getFromMySerial(“AT+ORGL”, false, 6);
Serial.print(F(“ -- Name : ”));
Serial.println(getFromMySerial(“AT+NAME”, true, 6));
Serial.print(F(“ -- Baudrate : ”));
Serial.println(getFromMySerial(“AT+UART”, true, 6));
Serial.print(F(“ -- Role : ”));
if (getFromMySerial(“AT+ROLE”, true, 6) == “1”)
Serial.println(F(“Master”));
else
Serial.println(F(“Slave”));
Serial.print(F(“ -- Passowrd : ”));
Serial.println(getFromMySerial(“AT+PSWD”, true, 6));
currSt = 0;
currIn = 0;
break;
}
case 4:{ // The menu to perform the Master module operations.
if (getFromMySerial(“AT+ROLE”, true, 6) != “1”) { // Check if the module role=1 which mean the module is master.
Serial.println(F(“The module should be in Master role to perform these operations, please change the role.”));
currSt = 2;
currIn = 0;
}
else{
switch (currIn){
case 0:
Serial.println(F(“----------------------------------------------------------”));
Serial.println(F(“Please select from the following operations:”));
Serial.println(F(“ 1- Discover nearby devices”));
Serial.println(F(“ 2- Pair with a device”));
Serial.println(F(“ 3- Connect to a device”));
Serial.println(F(“ 4- Remove devices from pairing list”));
Serial.println(F(“ 5- Bind with a device”));
Serial.println(F(“ 6- Back.。.”));
Serial.print(F(“(Option No.) ”));
currIn = -1;
break;
case 1:
currSt = 41; currIn = 0; break;
case 2:
currSt = 42; currIn = 0; break;
case 3:
currSt = 43; currIn = 0; break;
case 4:
currSt = 44; currIn = 0; break;
case 5:
currSt = 45; currIn = 0; break;
case 6:
currSt = 0; currIn = 0; break;
default:
Serial.println (F(“not a valid input, please select from the list”));
currSt = 4; currIn = 0; break;
}
}
break;
}
case 41:{ // Inquire nearby devices (addresses + names)
Serial.println(F(“----------------------------------------------------------”));
Serial.println(F(“List of nearby devices:”));
getFromMySerial(“AT+INIT”, true); // Discard the result, it may result in error if the SPP profile is already opened
tmpName = String(“AT+INQM=” + String(INQ1) + “,” + String(INQ2) + “,” + String(INQ3));
tmpRes = getFromMySerial(tmpName, true);
if (tmpRes != “OK”)
Serial.println (F(“Inquire mode setting failed”));
else
{
getFromMySerialSimple(“AT+INQ”); // As multiple devices might be discovered, only execute the command then wait on serial for each new line until “OK” is received
clearDeviceList();
tmpName = getFromMySerialSimple(“”, 5); // at least, we have on result even if no devices were discovered, which is the “OK” output at the end of the inquire process
while ((tmpName !=“”)) // As “OK” is less than 5 characters long, the result will be empty string when OK is received.
{
int ind1st = tmpName.indexOf(’,‘); // the index of the first comma
int ind2nd = tmpName.indexOf(’,‘,ind1st + 1); // the index of the second comma
String devAddr = tmpName.substring(0,ind1st); // The device’s address
String devClas = tmpName.substring(ind1st+1,ind2nd); // The device‘s service class
String devRSSI = tmpName.substring(ind2nd+1); // The device’s RSSI
devLoc = searchDeviceList(devAddr); // check ifthe device address is already discovered, As in most cases the same deie can be discovered multiple times with different RSSI and/or different service classes
if ((devLoc 《 0)&& devCount 《 MAXDEV) // a new device, not found in the list, but there is still empty slot in the list (did not exceed the maximum number of stored devices)
{
lstDevices[devCount].Address = devAddr; // we store the new device data
lstDevices[devCount].Class = devClas;
lstDevices[devCount].RSSI = devRSSI;
devCount++;
}
delay(10);
tmpName = getFromMySerialSimple(“”, 5); // get the next input from MySerial (i.e. BT device)
}
Serial.println (strFixed(“+”,colW1 + colW2 + colW3 + colW4 + 3,true,“-”)); // draw a table with the results
Serial.println (“| ” + strFixed(“Ind.”,colW1)+ strFixed(“BT Device Name:”,colW2) + strFixed(“BT Device Address”,colW3) + strFixed(“Paired”,colW4)+ “ |”);
Serial.println (“| ” + strFixed(“-----”,colW1)+ strFixed(“----------------”,colW2) + strFixed(“------------------”,colW3) + strFixed(“-------”,colW4)+ “ |”);
for (int i=0; i devCount){ // if a numerical input exceeds the number of stored/discovered devices
Serial.println(F(“----------------------------------------------------------”));
Serial.println(F(“The selected index is out of bounds, please select within the list of available devices”));
Serial.print(F(“(Option No.) ”));
currIn = -3; // stay in the same menu, until a correct index is entered or ‘q’ for exitting to previous menu
}
else{
devLoc = currIn - 1; // the index starts with 0
tmpName = lstDevices[devLoc].Address;
tmpName.replace(“:”,“,”);
tmpName = String(“AT+PAIR=” + tmpName+“,”+PAIRTO);
tmpRes = getFromMySerialSimple(tmpName);
tmpRes = getFromMySerialSimple(“”); // we do this as the pairing process can take longer, so we cannot rely on the timeout in the readstringuntil()
tmpRes.trim();
if (tmpRes == “OK”)
{
Serial.println ((“You are now paired with the device ” + lstDevices[devLoc].Name +“ [” + lstDevices[devLoc].Address + “]”));
}
else
{
Serial.println (tmpName);
Serial.println (tmpRes);
Serial.println (F(“Could not pair with the device, try again or initiat another search for devices”));
}
currSt = 4;
currIn = 0;
}
break;
}
case 43:{ // Connect with one of the discovered devices
if (currIn == 0){
if (serialStr.equalsIgnoreCase(“q”)){ //‘q’ to quite to previous menu
currSt = 4;
currIn = 0;
}
else{
Serial.println(F(“----------------------------------------------------------”));
Serial.println(F(“Select the device index that you want to connect to, q to abort ”));
Serial.print(F(“(Option No.) ”));
currIn = -3;
}
}
else if (currIn 》 devCount){ // if a numerical input exceeds the number of stored/discovered devices
Serial.println(F(“----------------------------------------------------------”));
Serial.println(F(“The selected index is out of bounds, please select within the list of available devices”));
Serial.print(F(“(Option No.) ”));
currIn = -3;
}
else{
devLoc = currIn - 1; // the index starts with 0
tmpName = lstDevices[devLoc].Address;
tmpName.replace(“:”,“,”);
tmpName = String(“AT+LINK=” + tmpName);
tmpRes = getFromMySerialSimple(tmpName);
tmpRes = getFromMySerialSimple(“”); // we do this as the linking/connecting process can take longer, so we cannot rely on the timeout in the readstringuntil()
tmpRes.trim();
if (tmpRes == “OK”){
Serial.println ((“You are now connected with the device ” + lstDevices[devLoc].Name +“ [” + lstDevices[devLoc].Address + “], type ‘#end’ to disconnect and reset.”));
currSt = 6;
currIn = 0;
}
else{
Serial.println (tmpName);
Serial.println (tmpRes);
Serial.println (F(“Could not connect with the device, try again or initiat another search for devices”));
}
currSt = 4;
currIn = 0;
}
break;
serialStr = “”;
}
case 44:{
if (currIn == 0)
{
if (serialStr.equalsIgnoreCase(“q”))
{
currSt = 4;
currIn = 0;
}
else if (serialStr.equalsIgnoreCase(“a”))
{
tmpRes = getFromMySerial(String(“AT+ADCN”), true, 6);
tmpRes.trim();
int tmpCount = tmpRes.toInt();
for (int i=0; i devCount)
{
Serial.println(F(“----------------------------------------------------------”));
Serial.println(F(“The selected index is out of bounds, please select within the list of available devices”));
Serial.print(F(“(Option No.) ”));
currIn = -4;
}
else
{
devLoc = currIn - 1;
tmpName = lstDevices[devLoc].Address;
tmpName.replace(“:”,“,”);
tmpRes = getFromMySerial(String(“AT+FSAD=”)+ tmpName, true);
tmpRes.trim();
if (tmpRes == “OK”)
{
tmpRes = getFromMySerial(String(“AT+RMSAD=”)+ tmpName, true);
tmpRes.trim();
if (tmpRes == “OK”)
{
Serial.println((“The device ” + lstDevices[devLoc].Name +“ [” + lstDevices[devLoc].Address + “] is removed from the paired devices list”));
}
}
else
{
Serial.println (F(“The device is not within the paired devices list.”));
}
currIn = 0;
}
break;
}
case 45:{
if (currIn == 0)
{
if (serialStr.equalsIgnoreCase(“q”))
{
currSt = 4;
currIn = 0;
}
else
{
Serial.println(F(“----------------------------------------------------------”));
Serial.println(F(“Select the device index that you want to bind with, q to abort ”));
Serial.print(F(“(Option No.) ”));
currIn = -3;
}
}
else if (currIn 》 devCount)
{
Serial.println(F(“----------------------------------------------------------”));
Serial.println(F(“The selected index is out of bounds, please select within the list of available devices”));
Serial.print(F(“(Option No.) ”));
currIn = -3;
}
else
{
devLoc = currIn - 1;
tmpName = lstDevices[devLoc].Address;
tmpName.replace(“:”,“,”);
tmpName = String(“AT+BIND=” + tmpName);
tmpRes = getFromMySerialSimple(tmpName);
tmpRes = getFromMySerialSimple(“”);
tmpRes.trim();
if (tmpRes == “OK”)
{
Serial.println ((“You are now binded with the device ” + lstDevices[devLoc].Name +“ [” + lstDevices[devLoc].Address + “], type ‘#end’ to disconnect and reset.”));
}
else
{
Serial.println (F(“Could not bind with the device, try again or initiat another search for devices”));
}
currSt = 4;
currIn = 0;
}
break;
}
case 6:{
for (int i=0; i《 serialStr.length(); i++)
mySerial.write(serialStr[i]);
break;
}
}
}
serialStr = “”;
}
责任编辑:wv
-
蓝牙模块
+关注
关注
30文章
454浏览量
55111 -
HC-05
+关注
关注
0文章
34浏览量
16853
发布评论请先 登录
相关推荐


 工商网监
工商网监
评论