 如何制作最简单的GUI来控制您的arduino

第1步:需要什么
硬件
LattePanda/Arduino UNO
软件
Viusal Studio
Arduino IDE
步骤2:C#代码
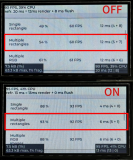
创建一个新的Windows Form项目。在左侧的工具箱中,从工具箱中拖出2个按钮组件。重命名它们,一个为“ ON”,一个为“ OFF”。
public partial class Form1 : Form
{
SerialPort port;
public Form1()
{
InitializeComponent();
this.FormClosed += new FormClosedEventHandler(Form1_FormClosed);
if (port == null)
{
//Change the portname according to your computer
port = new SerialPort(“COM4”, 9600);
port.Open();
}
}
void Form1_FormClosed(object sender, FormClosedEventArgs e)
{
if (port != null && port.IsOpen)
{
port.Close();
}
}
private void button1_Click(object sender, EventArgs e)
{
PortWrite(“1”);
}
private void button2_Click(object sender, EventArgs e)
{
PortWrite(“0”);
}
private void PortWrite(string message)
{
if (port != null && port.IsOpen)
{
port.Write(message);
}
}
}
第3步:Arduino Sketch
打开Arduino IDE,将以下代码上传到您的电路板上。
const int LedPin = 3;int ledState = 0;
void setup()
{
pinMode(LedPin, OUTPUT);
Serial.begin(9600);
}
void loop()
{
char receiveVal;
if(Serial.available() 》 0)
{
receiveVal = Serial.read();
if(receiveVal == ‘1’)
ledState = 1;
else
ledState = 0;
}
digitalWrite(LedPin, ledState);
delay(50);
}
步骤4:Showtime
当您单击“打开”时‘按钮,LED灯将点亮。
到目前为止还好吗?
如果您用其他东西代替LED,那么您可以使用鼠标来控制一切!这是一个非常有用的功能。
-
GUI
+关注
关注
3文章
699浏览量
44003 -
Arduino
+关注
关注
191文章
6534浏览量
197663
发布评论请先 登录
GUI Guider 如何控制字体生成的范围?
迈来芯邀您共赴2026上海国际汽车灯具展览会
探索用于Arduino的TLE94112ES直流电机控制盾牌
恩智浦GUI Guider 1.10.0正式上线
使用恩智浦FRDM-MCXN947开发板GUI控制电机
如何在 NuMaker-IoT-M467 板上使用 Arduino IDE 控制 Wi-Fi 模块?
宏集方案 | 如何选择适合您的过程控制器?

Texas Instruments TPS26750 USB Type-C™和PD控制器数据手册
【Milk-V Duo S 开发板免费体验】Milk-V DuoS之使用Arduino开发小核
GUI Guider全新优化方案GUI xTurbo-VeloRender初体验:基于i.MX RT平台的LVGL渲染能力突破
【PCA9958HN-ARD】GUI工具的使用
10分钟上手睿擎平台GUI开发:第一个LVGL图形应用


评论