 如何通过Canvas组件实现涂鸦功能
ArkUI是一套UI开发框架,提供了开发者进行应用UI开发时所需具备的能力。随着OpenAtom OpenHarmony(以下简称“OpenHarmony”)不断更新迭代,ArkUI也提供了很多新的组件,例如Canvas、OffscreenCanvas、XComponent组件等。
新增的功能可以帮助开发者开发出更流畅、更美观的应用。本篇文章将为大家分享如何通过Canvas组件实现涂鸦功能,用户可以选择空白画布或者简笔图进行自由绘画。效果展示
以下为效果图: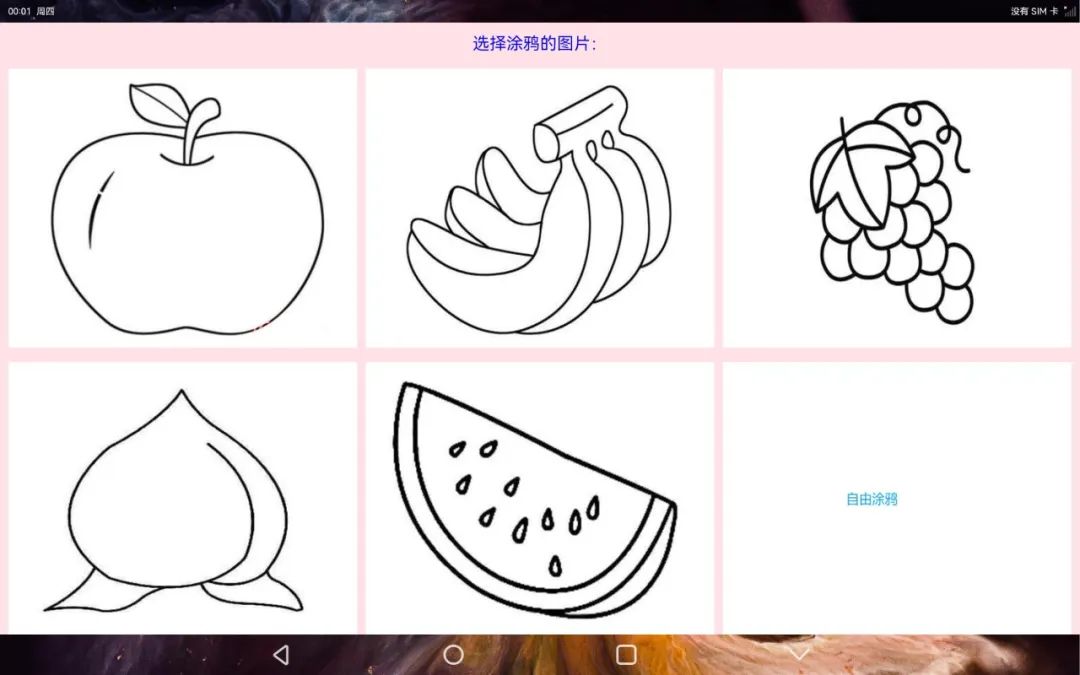
 详细效果请看下方视频:
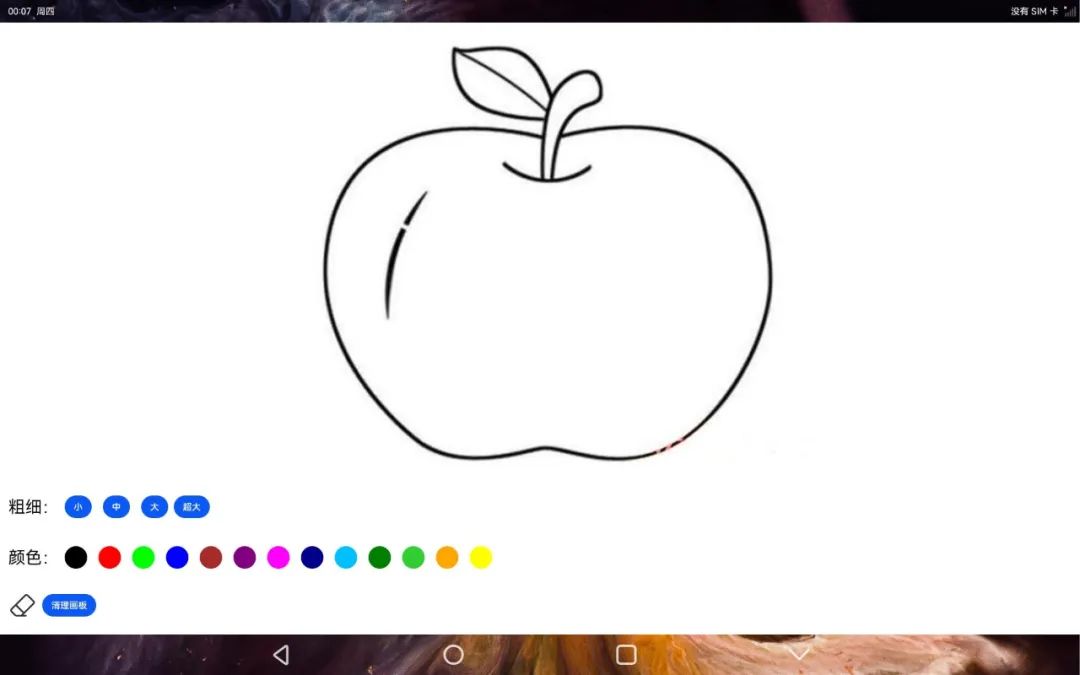
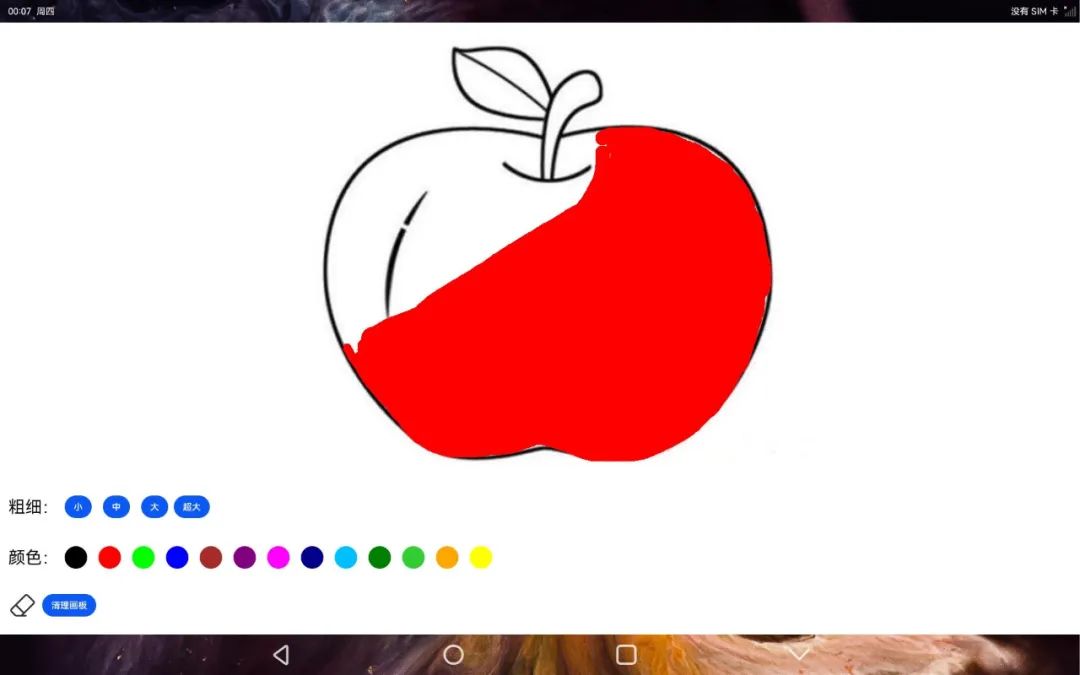
从视频中可见,首页显示了涂鸦的图片以及最后一张空白图片,在点击图片进入涂鸦页面后,可以对画笔的颜色、粗细进行设置。如果涂鸦过程中有错误,可以用橡皮擦将画面擦除,也可点击清除按钮,清空涂鸦的内容,重新进行涂鸦操作。
详细效果请看下方视频:
从视频中可见,首页显示了涂鸦的图片以及最后一张空白图片,在点击图片进入涂鸦页面后,可以对画笔的颜色、粗细进行设置。如果涂鸦过程中有错误,可以用橡皮擦将画面擦除,也可点击清除按钮,清空涂鸦的内容,重新进行涂鸦操作。
相关代码已经上传至SIG仓库,链接如下:
https://gitee.com/openharmony-sig/knowledge_demo_entainment/tree/master/FA/FreeDraw
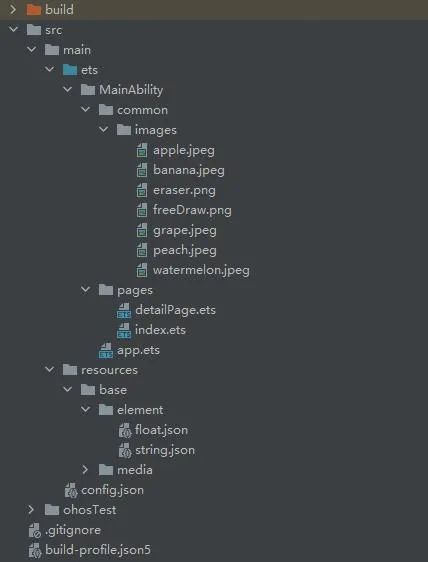
目录结构
源码分析
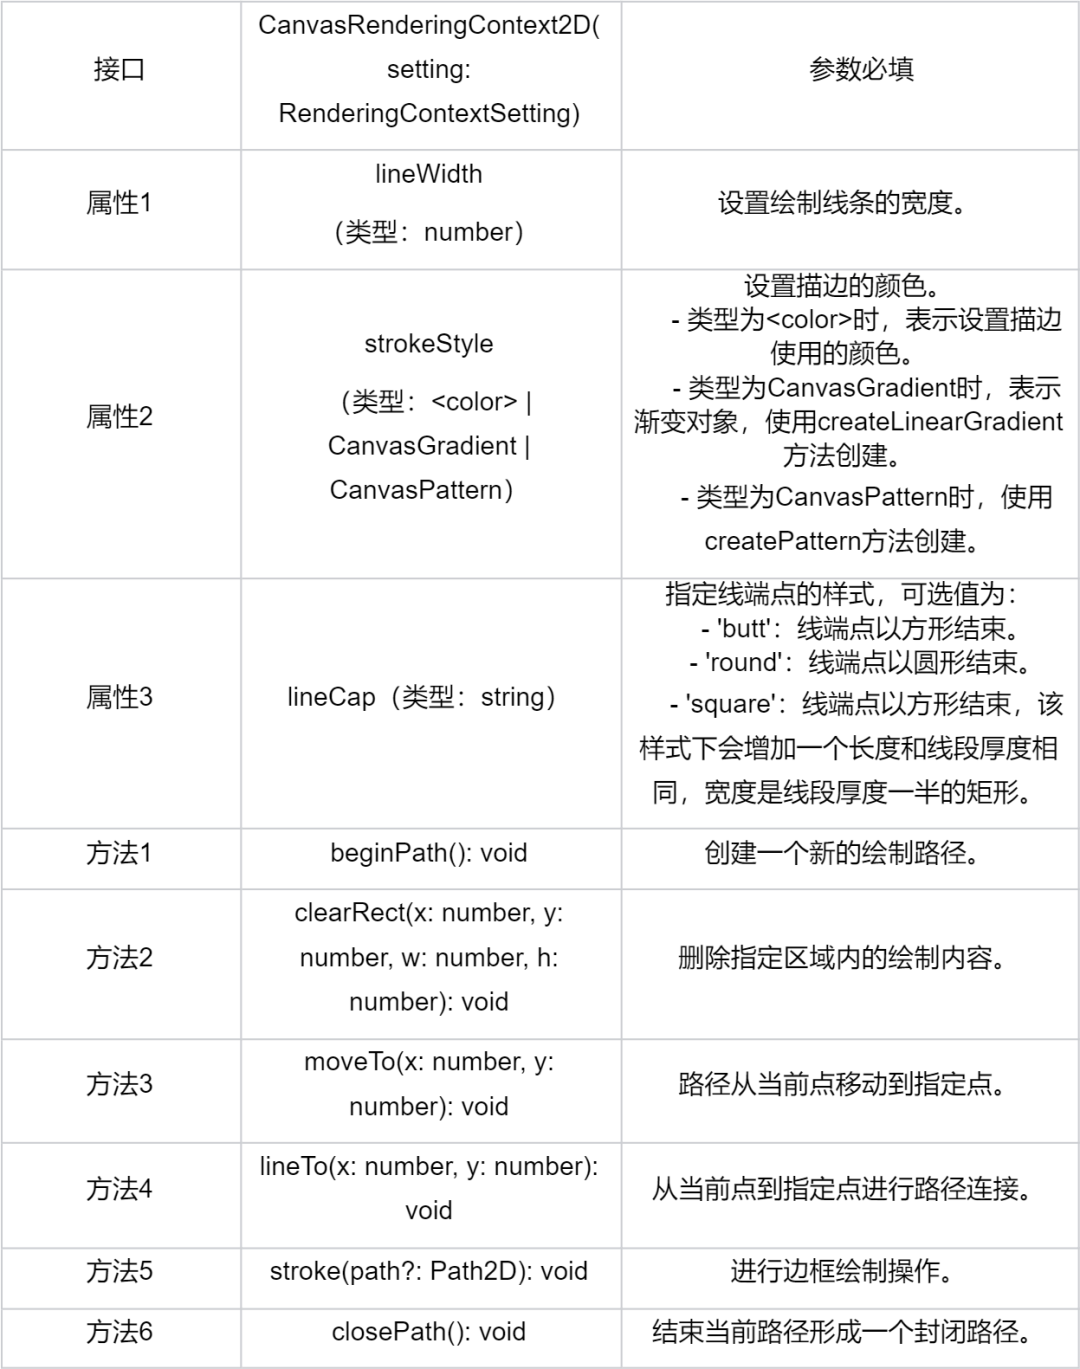
一、Canvas组件介绍 本篇样例主要利用ArkUI的Canvas组件实现涂鸦的功能,首先介绍一下Canvas组件。 Canvas组件主要包含了Canvas和CanvasRenderingContext2D,Canvas提供了画布功能,CanvasRenderingContext2D提供了绘画的属性和方法。通过CanvasRenderingContext2D可以修改画笔的样色、粗细等属性,从而画出各式各样的图形。 以下是Canvas和CanvasRenderingContext2D在样例开发中使用的相关接口信息。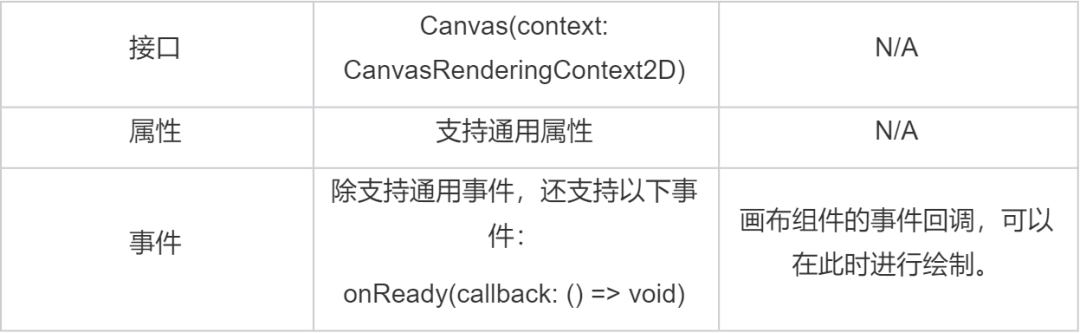 CanvasRenderingContext2D
 二、分析源码页面布局
第一个模块是首页布局,首页显示所有涂鸦包含的图片,点击图片可以进入页面;第二个模块是涂鸦模块,可以设置画笔的颜色、边条宽度等。
1. 首页布局
二、分析源码页面布局
第一个模块是首页布局,首页显示所有涂鸦包含的图片,点击图片可以进入页面;第二个模块是涂鸦模块,可以设置画笔的颜色、边条宽度等。
1. 首页布局Column() { Text('选择涂鸦的图片:').margin('10vp').fontSize('30fp').fontColor(Color.Blue).height('5%') Grid() { ForEach(this.images, (item, index) => { GridItem() { Image(this.images[index]) .onClick((event) => { router.push( { url: "pages/detailPage", params: { imgSrc: this.images[index], }, } ) }) .width('100%') .height('100%') .objectFit(ImageFit.Contain) } }) } .padding({left: this.columnSpace, right: this.columnSpace}) .columnsTemplate("1fr 1fr 1fr") // Grid宽度均分成3份 .rowsTemplate("1fr 1fr") // Grid高度均分成2份 .rowsGap(this.rowSpace) // 设置行间距 .columnsGap(this.columnSpace) // 设置列间距 .width('100%') .height('95%') }.backgroundColor(Color.Pink)
2. 涂鸦页面 - 画布Canvas的布局
通过Stack组件进行包裹,并将Canvas画布覆盖在选择的背景图片之上,这些背景图片主要是水果简笔画。Stack() { Image(this.imgSrc).width('100%').height('100%').objectFit(ImageFit.Contain) Canvas(this.context) .width('100%') .height('100%')// .backgroundColor('#00ffff00') .onReady(() => { }) .onTouch((event) => { if (event.type === TouchType.Down) { this.eventType = 'Down'; this.drawing = true; [this.x, this.y] = [event.touches[0].x, event.touches[0].y]; this.context.beginPath(); this.context.lineCap = 'round'; if (this.isEraserMode) { //橡皮擦模式 this.context.clearRect(this.x, this.y, 20, 20); } console.log('gyf Down'); } if (event.type === TouchType.Up) { this.eventType = 'Up'; this.drawing = false; console.log('gyf Up!'); this.context.closePath(); } if (event.type === TouchType.Move) { if (!this.drawing) return; this.eventType = 'Move'; console.log('gyf Move'); if (this.isEraserMode) { //橡皮擦模式 this.context.clearRect(event.touches[0].x, event.touches[0].y, 20, 20); } else { this.context.lineWidth = this.lineWidth; this.context.strokeStyle = this.color; this.context.moveTo(this.x, this.y); this.x = event.touches[0].x; this.y = event.touches[0].y; this.context.lineTo(this.x, this.y); this.context.stroke(); } } }) }.width('100%').height('75%')
3.涂鸦页面 - 画笔设置区域的布局Column() { Row() { Text('粗细:') Button('小').onClick(() => { //设置画笔的宽度 this.lineWidth = 5; this.context.lineWidth = this.lineWidth; this.isEraserMode = false; console.log('gyf small button'); }).margin($r('app.float.wh_value_10')) Button('中').onClick(() => { //设置画笔的宽度 this.lineWidth = 15; this.context.lineWidth = this.lineWidth; this.isEraserMode = false; console.log('gyf middle button'); }).margin($r('app.float.wh_value_10')) Button('大').onClick(() => { //设置画笔的宽度 this.lineWidth = 25; this.context.lineWidth = this.lineWidth; this.isEraserMode = false; console.log('gyf big button'); }).margin($r('app.float.wh_value_10')) Button('超大').onClick(() => { //设置画笔的宽度 this.lineWidth = 40; this.context.lineWidth = this.lineWidth; this.isEraserMode = false; console.log('gyf super big button'); }) }.padding($r('app.float.wh_value_10')).margin($r('app.float.wh_value_5')) //画笔颜色 Scroll() { Row() { Text('颜色:') Button(' ', { type: ButtonType.Circle }) .onClick(() => { //黑色 this.color = '#000000'; this.context.strokeStyle = this.color; this.isEraserMode = false; console.log('gyf black button'); }) .backgroundColor('#000000') .width('40vp') .width('40vp') .margin($r('app.float.wh_value_10')) Button(' ', { type: ButtonType.Circle }) .onClick(() => { //红色 this.color = '#FF0000'; this.context.strokeStyle = this.color; this.isEraserMode = false; console.log('gyf red button'); }) .backgroundColor('#FF0000') .width('40vp') .width('40vp') .margin($r('app.float.wh_value_10')) Button(' ', { type: ButtonType.Circle }) .onClick(() => { //绿色 this.color = '#00FF00'; this.context.strokeStyle = this.color; this.isEraserMode = false; console.log('gyf green button'); }) .backgroundColor('#00FF00') .width('40vp') .width('40vp') .margin($r('app.float.wh_value_10')) Button(' ', { type: ButtonType.Circle }) .onClick(() => { //蓝色 this.color = '#0000FF'; this.context.strokeStyle = this.color; this.isEraserMode = false; }) .backgroundColor('#0000FF') .width('40vp') .width('40vp') .margin($r('app.float.wh_value_10')) Button(' ', { type: ButtonType.Circle }) .onClick(() => { //棕色 this.color = '#A52A2A'; this.context.strokeStyle = this.color; this.isEraserMode = false; }) .backgroundColor('#A52A2A') .width('40vp') .width('40vp') .margin($r('app.float.wh_value_10')) Button(' ', { type: ButtonType.Circle }) .onClick(() => { //紫色 this.color = '#800080'; this.context.strokeStyle = this.color; this.isEraserMode = false; }) .backgroundColor('#800080') .width('40vp') .width('40vp') .margin($r('app.float.wh_value_10')) Button(' ', { type: ButtonType.Circle }) .onClick(() => { //紫红色 this.color = '#FF00FF'; this.context.strokeStyle = this.color; this.isEraserMode = false; }) .backgroundColor('#FF00FF') .width('40vp') .width('40vp') .margin($r('app.float.wh_value_10')) Button(' ', { type: ButtonType.Circle }) .onClick(() => { //深蓝色 this.color = '#00008B'; this.context.strokeStyle = this.color; this.isEraserMode = false; }) .backgroundColor('#00008B') .width('40vp') .width('40vp') .margin($r('app.float.wh_value_10')) Button(' ', { type: ButtonType.Circle }) .onClick(() => { //深天蓝 this.color = '#00BFFF'; this.context.strokeStyle = this.color; this.isEraserMode = false; }) .backgroundColor('#00BFFF') .width('40vp') .width('40vp') .margin($r('app.float.wh_value_10')) Button(' ', { type: ButtonType.Circle }) .onClick(() => { //绿色 this.color = '#008000'; this.context.strokeStyle = this.color; this.isEraserMode = false; }) .backgroundColor('#008000') .width('40vp') .width('40vp') .margin($r('app.float.wh_value_10')) Button(' ', { type: ButtonType.Circle }) .onClick(() => { //青绿色 this.color = '#32CD32'; this.context.strokeStyle = this.color; this.isEraserMode = false; }) .backgroundColor('#32CD32') .width('40vp') .width('40vp') .margin($r('app.float.wh_value_10')) Button(' ', { type: ButtonType.Circle }) .onClick(() => { //橙色 this.color = '#FFA500'; this.context.strokeStyle = this.color; this.isEraserMode = false; }) .backgroundColor('#FFA500') .width('40vp') .width('40vp') .margin($r('app.float.wh_value_10')) Button(' ', { type: ButtonType.Circle }) .onClick(() => { //黄色 this.color = '#FFFF00'; this.context.strokeStyle = this.color; this.isEraserMode = false; }) .backgroundColor('#FFFF00') .width('40vp') .width('40vp') .margin($r('app.float.wh_value_10')) }.padding('10vp') } .scrollable(ScrollDirection.Horizontal) // 设置滚动条水平方向滚动 .margin($r('app.float.wh_value_5')) Row() { Image('/common/images/eraser.png') .onClick(() => { //橡皮擦模式 this.isEraserMode = true; console.log('gyf eraser button'); }) .width('50vp') .height('50vp') .margin('10vp') Button('清理画板').onClick(() => { this.context.clearRect(0, 0, 1000, 1000); }) } .margin($r('app.float.wh_value_5')) } .width('100%') .height('25%').alignItems(HorizontalAlign.Start)
三、逻辑代码
逻辑代码存在于Canvas的onTouch事件中,通过TouchType的Down、Up、Move来判断开始、移动和结束的动作。一笔完整的绘制包含一次Down和Up,其中有若干次的Move。橡皮擦模式通过clearRect接口实现擦除的功能。.onTouch((event) => { if (event.type === TouchType.Down) { this.eventType = 'Down'; this.drawing = true; [this.x, this.y] = [event.touches[0].x, event.touches[0].y]; this.context.beginPath(); this.context.lineCap = 'round'; if (this.isEraserMode) { //橡皮擦模式 this.context.clearRect(this.x, this.y, 20, 20); } console.log('gyf Down'); } if (event.type === TouchType.Up) { this.eventType = 'Up'; this.drawing = false; console.log('gyf Up!'); this.context.closePath(); } if (event.type === TouchType.Move) { if (!this.drawing) return; this.eventType = 'Move'; console.log('gyf Move'); if (this.isEraserMode) { //橡皮擦模式 this.context.clearRect(event.touches[0].x, event.touches[0].y, 20, 20); } else { this.context.lineWidth = this.lineWidth; this.context.strokeStyle = this.color; this.context.moveTo(this.x, this.y); this.x = event.touches[0].x; this.y = event.touches[0].y; this.context.lineTo(this.x, this.y); this.context.stroke(); } }})
总结
本文介绍了如何使用ArkUI框架提供的Canvas组件实现涂鸦功能。首先,通过Canvas的onTouch事件来跟踪Down、Move和Up的事件,再设置CanvasRenderingContext2D的相关属性并调用相关的方法,最终实现涂鸦的功能。除了文中分享的涂鸦样例,开发者还可以通过拓展其他相关的属性和方法,实现更多好玩的、高性能的样例。
审核编辑:彭静
声明:本文内容及配图由入驻作者撰写或者入驻合作网站授权转载。文章观点仅代表作者本人,不代表电子发烧友网立场。文章及其配图仅供工程师学习之用,如有内容侵权或者其他违规问题,请联系本站处理。
举报投诉
-
Canvas
+关注
关注
0文章
15浏览量
10952 -
涂鸦
+关注
关注
0文章
9浏览量
4094 -
OpenHarmony
+关注
关注
24文章
3425浏览量
15228
原文标题:如何利用OpenHarmony ArkUI的Canvas组件实现涂鸦功能?
文章出处:【微信号:gh_e4f28cfa3159,微信公众号:OpenAtom OpenHarmony】欢迎添加关注!文章转载请注明出处。
发布评论请先 登录
相关推荐
鸿蒙ArkTS开始实例:【canvas实现签名板功能】
使用ArkTS中的canvas实现签名板的功能,canvas画布大家都很熟悉,我们会用它经常实现一些画板或者图表、表格之类的
涂鸦标准模组MCU SDK开发流程 精选资料推荐
的对接成本,MCU SDK 已搭建通讯及协议解析架构。将 MCU SDK 添加至自己的工程并配置相关信息后,既可以快速的完成 MCU 程序开发。在涂鸦 IoT 平台通过自定义产品功能自动生成MCU
发表于 07-20 06:28
通过一个圆形抽奖转盘演示HarmonyOS自定义组件的实现
实现Component.EstimateSizeListener接口需要HarmonyOS SDK版本在2.1.0.13或以上。本教程将通过以下内容为您展示如何使用自定义组件实现圆形抽
发表于 09-22 14:41
canvas绘制“飞机大战”小游戏,真香!
行声明式UI语法扩展,从组件、动效和状态管理三个维度提供了UI绘制能力。目前,eTS语言已经提供了canvas组件绘制能力,但功能仍在完善中。下面我们将
发表于 02-09 17:26
如何用canvas组件实现在JS UI上画出连续的线条?
在使用框架的过程中,我想使用canvas这个画布组件来实现【笔】的功能,可以在JS UI上画出连续的线条,如下图:仔细查看文档中很多JS UI中关于
发表于 04-02 10:47
OpenHarmony 3.1 Beta 版本关键特性解析——ArkUI canvas组件
布局搭建、CSS 文件进行样式描述,并通过 JS 语言进行逻辑处理。目前,JS 语言的 canvas 绘图功能已经基本上完善,下面我们将通过两个示例,展示基于 JS 语言的
发表于 04-12 10:34
如何利用OpenHarmony ArkUI的Canvas组件实现涂鸦功能?
新的组件,例如Canvas、OffscreenCanvas、XComponent组件等。新增的功能可以帮助开发者开发出更流畅、更美观的应用。本篇文章将为大家分享如何
发表于 09-17 16:41
如何利用OpenHarmony ArkUI的Canvas组件实现涂鸦功能?
、更美观的应用。本篇文章将为大家分享如何通过Canvas组件实现涂鸦功能,用户可以选择空白画布或
发表于 09-20 11:31
本周四晚19:00知识赋能第八期第3课丨涂鸦小游戏的实现
了ArkUI自定义组件流程和实践操作自定义组件,开发者们纷纷留言参与互动,营造了积极的学习氛围。而本节直播将继续由巴延兴老师讲解《涂鸦小游戏的实现》——本次分享将主要介绍三方面内容,包
发表于 09-28 11:56
【直播回顾】OpenHarmony知识赋能第八期:手把手教你实现涂鸦小游戏
的实现链接:https://bbs.elecfans.com/jishu_2308126_1_1.html内容介绍:本次分享将主要介绍三方面内容,包括OpenHarmony新增组件的介绍、新增组件的实际应用以及使用
发表于 10-10 15:58
HarmonyOS/OpenHarmony应用开发-ArkTS画布组件Canvas
提供画布组件,用于自定义绘制图形。该组件从API Version 8开始支持。后续版本如有新增内容,则采用上角标单独标记该内容的起始版本。子组件,不支持。接口: Canvas(cont
发表于 02-27 09:49
手把手教你使用ArkTS中的canvas实现签名板功能
问题,接下来实现签名功能。因为在之前就已经开发过,只要将对应的语法转成 ArkTS 的语法就好。以下是代码解析:2.1 按照官方文档使用 canvas 组件
@Entry@Compon
发表于 12-20 10:33
canvas基础绘制方法介绍
canvas是ArkUI开发框架里的画布组件,常用于自定义绘制图形。因为其轻量、灵活、高效等优点,被广泛应用于UI界面开发中。本期,我们将为大家介绍canvas组件的使用。
canvas组件的使用介绍
canvas是ArkUI开发框架里的画布组件,常用于自定义绘制图形。因为其轻量、灵活、高效等优点,被广泛应用于UI界面开发中。本期,我们将为大家介绍canvas组件的使用。


 工商网监
工商网监
评论