 B站添加鸿蒙服务卡片教程
6 月 2 日鸿蒙发布,今年的六月已经被鸿蒙刷屏了。从安卓到鸿蒙,最直观的变化应该就是服务卡片了。我也是在学习鸿蒙的同时,实际体验一下服务卡片的开发。
接下来分享下我的制作过程,我使用的开发环境是:
IDE:DevEco Studio 2.1 Release
软件安装和项目建立的部分就跳过了,相信大家都比较熟悉了。直奔主题服务卡片的制作。
服务卡片设计
首先要先了解服务卡片,都有哪些尺寸,支持哪些组件,使用什么语言。然后规划好要实现哪些功能。
①尺寸规格
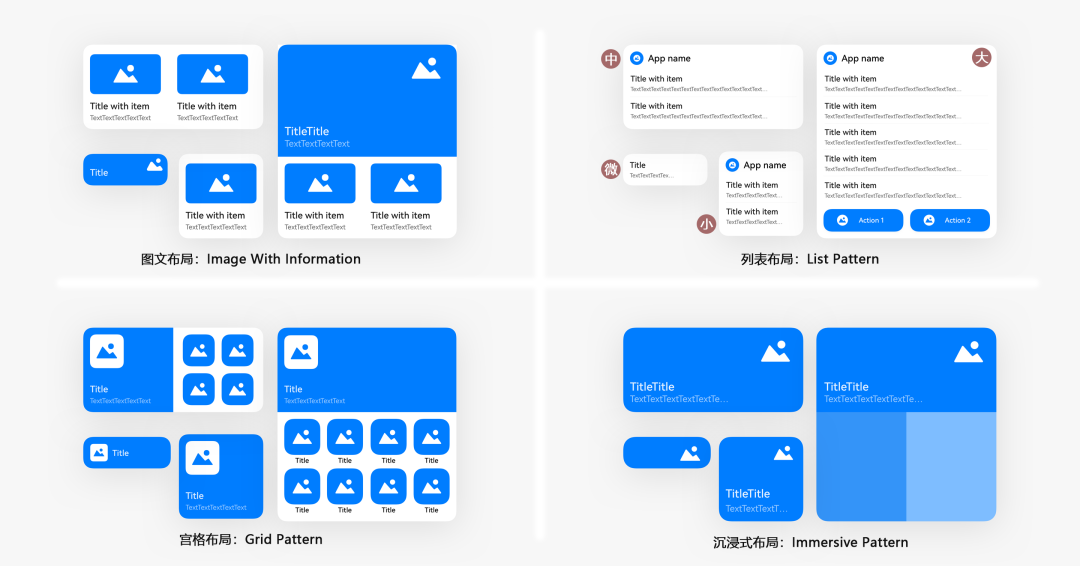
服务卡片有 4 种尺寸,分别是微卡片、小卡片、中卡片、大卡片。官方提供了 4 种基础模板,12 种高级模板可以选择。
基础模板如下图:
②功能设计
服务卡片设计的初衷就是信息显示、服务直达。依照这个原则,我找了几个 Bilibili 中我比较常用的功能,来制作服务卡片,比如追番列表。
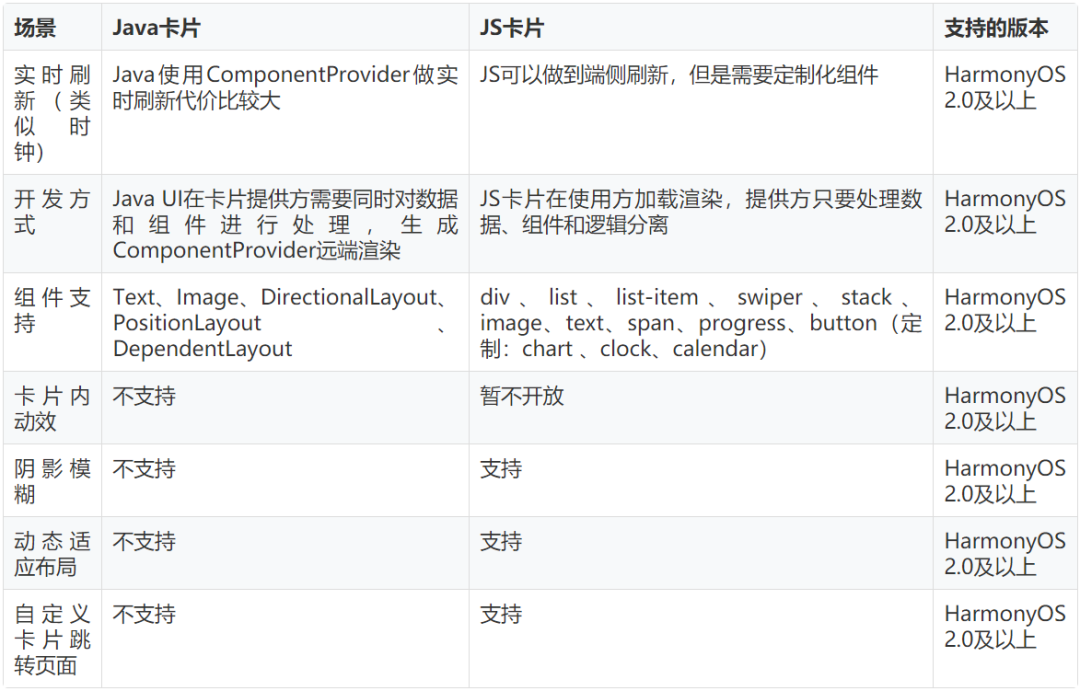
③开发语言
看下表就一目了然了,就是推荐 JS。表格来源:
界面实现
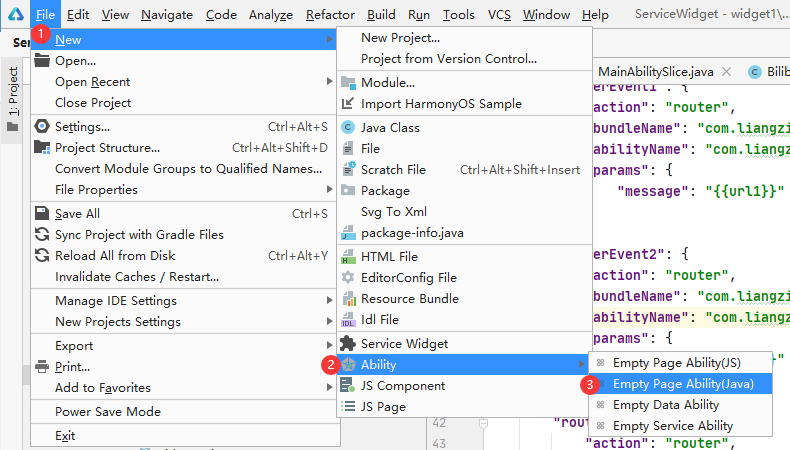
本着学习的目的,卡片界面就不使用模板了。不过我们还是要通过 IDE→File→New→Service Widget 来添加服务卡片,这样添加 IDE 会自动添加配置和管理相关文件。
然后服务卡片的界面重新编写。服务卡片常用的的容器组件有 div、list、stack、swiper 等。
我使用了 4 种尺寸的卡片,并尽可能的使用到所有的容器组件。
①div:基础容器组件
就是用来划分区域的。比较常用。比如追番服务卡片。
代码如下:
《div class=“div_root” 》《!--在服务卡片设置一个 根div 横向布局--》
《div class=“div_container”》《!--在根div 横向放置4个div,每个div内部从上往下排列--》
《image class=“item_image” src=“{{ src1 }}” onclick=“routerEvent1”》《/image》
《text class=“item_title”》{{ itemTitle1 }}《/text》
《text class=“item_content”》{{ itemContent1 }}《/text》
《/div》
《div class=“div_container”》《!--第二列--》
《image class=“item_image” src=“{{ src2 }}” onclick=“routerEvent2”》《/image》
《text class=“item_title”》{{ itemTitle2 }}《/text》
《text class=“item_content”》{{ itemContent2 }}《/text》
《/div》
《div class=“div_container”》《!--第三列--》
《image class=“item_image” src=“{{ src3 }}” onclick=“routerEvent3”》《/image》
《text class=“item_title”》{{ itemTitle3 }}《/text》
《text class=“item_content”》{{ itemContent3 }}《/text》
《/div》
《div class=“div_container”》《!--第四列--》
《image class=“item_image” src=“{{ src4 }}” onclick=“routerEvent4”》《/image》
《text class=“item_title”》{{ itemTitle4 }}《/text》
《text class=“item_content”》{{ itemContent4 }}《/text》
《/div》
《/div》
.div_root {
flex-direction: row; /*flex容器主轴方向,row:水平方向从左到右。*/
justify-content: center; /*flex容器当前行的主轴对齐格式,center:项目位于容器的中心。*/
margin:6px; /*外边距属性:只有一个值时,这个值会被指定给全部的四个边。*/
border-radius: 10px; /*设置元素的外边框圆角半径。*/
}
.div_container {
flex-direction: column; /*flex容器主轴方向,column:垂直方向从上到下。*/
justify-content: flex-start; /*flex容器当前行的主轴对齐格式,flex-start:项目位于容器的开头。*/
margin:6px;
}
.item_image {
height: 60%; /*卡片在不同设备,尺寸会发生变化,所以最好使用百分比进行标注。*/
border-radius: 10px;
background-color: #F1F3F5; /*设置背景颜色。*/
}
@media (dark-mode: true) { /*当前系统为深色模式时,使用这里的配置,如果没有颜色设置,可以不设置*/
.item_image {
height: 60%;
border-radius: 10px;
background-color: #202224;
}
}
.item_title {
margin-top: 10px; /*设置上边距。*/
font-size: 12px; /*设置文本的尺寸。*/
font-weight: bold; /*设置文本的字体粗细。取值[100, 900],默认为400。*/
max-lines:1; /*设置文本的最大行数。*/
text-overflow: ellipsis; /*根据父容器大小显示,显示不下的文本用省略号代替。需配合max-lines使用。*/
color: #e5000000; /*设置文本的颜色。*/
}
.item_content {
margin-top: 5px;
font-size: 9px;
font-weight: bold;
text-overflow: ellipsis;
max-lines:1;
color: #99000000;
}
Note:其实这个服务卡片的布局,每一列的内容都是相同的,是应该使用 list 组件的。
②list:列表容器组件
就如上面所说的连续相同的部分,可以使用这个组件,List 不但可以显示更多的内容,而且代码更少。
代码如下:
《list class=“list”》
《list-item for=“{{cards}}” class=“list-item”》
《div class=“div” onclick=“sendRouteEvent”》
《image class=“item_image” src=“{{ $item.pic }}”》《/image》
《text class=“item_name”》{{ $item.name }}《/text》
《text class=“item_title”》{{ $item.title }}《/text》
《/div》
《/list-item》
《/list》
.list{
align-items:center; /*list每一列交叉轴上的对齐格式:元素在交叉轴居中*/
}
.list-item{
border-radius: 15px;
background-color: #f2f2f2;
margin-bottom: 5px;
}
.div{
flex-direction: column;
}
.item_image {
border-top-right-radius: 15px;
border-top-left-radius: 15px;
}
.item_name {
margin:5px 8px 0px;
font-size: 12px;
color: #262626;
}
.item_title{
margin:3px 8px 8px;
font-size: 10px;
color: #AAAAAA;
max-lines: 2;
text-overflow: ellipsis; /* 省略号 */
}
③stack:堆叠容器组件
简单来说就是可以在一张图片上堆叠显示另一张图片,例如下图蓝框的图片覆盖在红框图片的上面。
④swiper:滑动容器组件
正常情况下 swiper 是可以实现上下、左右滑动操作的。但是放置在桌面上的服务卡片,在左右滑动操作的时候,会使系统分不清楚用户是要左右滑动屏幕,还是左右滑动卡片。
所以目前服务卡片的 swiper 容器是不支持手势滑动切换子组件的。下图是通过点击图片侧面的控制条实现上下滑动的。
但是我个人觉得上下滑动其实还是挺好用的,毕竟在 list 组件上是可以上下滑动的,只可惜目前还不支持。
总结:服务卡片的设计比较简单,零基础也没关系,官方还贴心的准备了模板。只要挑选模板,设置变量也能快速构建。
API 数据请求
卡片设计好之后,就需要通过 Bilibili 的 API 来获取数据了。主要就是给权限添加依赖,然后发送网络请求,通过 API 获取 JSON 的返回值,然后解析 JSON 得到我们需要的数据。
①添加联网权限
要在 config.json 配置文件的 module 中添加:“reqPermissions”: [{“name”:“ohos.permission.INTERNET”}]。
{
。。。 。。。
“module”: {
。。。 。。。
“reqPermissions”: [{“name”:“ohos.permission.INTERNET”}]
}
}
②添加依赖包
找到 entry/build.gradle 文件,在 dependencies 下添加:
dependencies {
implementation fileTree(dir: ‘libs’, include: [‘*.jar’, ‘*.har’])
testImplementation ‘junit4.13’
ohosTestImplementation ‘com.huawei.ohos.testkit1.0.0.100’
// ZZRHttp 可以单独一个进程进行http请求
implementation ‘com.zzrv5.zzrhttp1.0.1’
// fastjson 可以解析JSON格式
implementation group: ‘com.alibaba’, name: ‘fastjson’, version: ‘1.2.75’
}
③http 请求
以获取粉丝数为例,如果在浏览器中输入 https://api.bilibili.com/x/relation/stat?vmid=383565952。

其中 vmid:是要查询的用户 ID,follower 的值就是粉丝数。
网络访问我们可以使用 HttpURLConnection,或者 okhttp 等依赖包,但是需要开启子线程、处理异常等操作,所以这里使用的是 ZZR 老师封装好的 ZZRHttp。
代码实现:
//获取Bilibili粉丝数,这里就要用到第二步我们添加的ZZRHttp
String url = “https://api.bilibili.com/x/relation/stat?vmid=383565952”;
ZZRHttp.get(url, new ZZRCallBack.CallBackString() {
@Override
public void onFailure(int i, String s) {
HiLog.info(TAG, “API返回失败”);
}
@Override
public void onResponse(String s) {
HiLog.info(TAG, “API返回成功”);
// 如果返回成功,返回的结果就会保存在 String s 中。
// s = {“code”:0,“message”:“0”,“ttl”:1,“data”:{“mid”:383565952,“following”:70,“whisper”:0,“black”:0,“follower”:5384}}
}
});
④解析 JSON
得到的是 JSON 格式的返回值,要得到 follower 的值,还需要对 JSON 进行数据解析。
先按照 JSON 的内容,生成 JAVA 类。可以自己写,也可以百度搜 ”JSON 生成 Java 实体类“,可直接生成。
代码如下:
public class BilibiliFollower {
public static class Data{
private int follower;
public int getFollower() {
return follower;
}
public void setFollower(int follower) {
this.follower = follower;
}
}
private BilibiliFollower.Data data;
public BilibiliFollower.Data getData() {
return data;
}
public void setData(BilibiliFollower.Data data) {
this.data = data;
}
}
//解析JSON,使用第二步我们添加的fastjson包try {
//1.调用fastjson解析,结果保存在JSON对应的类
BilibiliFollower bilibiliFollower = JSON.parseObject(s,BilibiliFollower.class);
//2.get方法获取解析内容
BilibiliFollower.Data data= bilibiliFollower.getData();
System.out.println(“解析成功”+data.getFollower());
} catch (Exception e) {
HiLog.info(TAG, “解析失败”);
}
总结:一定要添加联网权限不然是获取不到数据的。添加了 2 个依赖包,可以很方便的提取数据。
获取其他的卡片数据的方式同理,不过代码比较多,就不一一展示了,感兴趣可以下载全量代码看。
数据更新
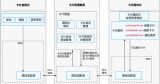
要想将数据更新到服务卡片,得先了解服务卡片的运作机制。如果是通过 IDE→File→New→Service Widget 添加的服务卡片,那么在 MainAbility 中会添加卡片的生命周期回调方法。
参考下面的代码:
public class MainAbility extends Ability {
。。。 。。。
protected ProviderFormInfo onCreateForm(Intent intent) {。。。}//在服务卡片上右击》》服务卡片(或上滑)时,通知接口
protected void onUpdateForm(long formId) {。。。}//在服务卡片请求更新,定时更新时,通知接口
protected void onDeleteForm(long formId) {。。}//在服务卡片被删除时,通知接口
protected void onTriggerFormEvent(long formId, String message) {。。。}//JS服务卡片click时,通知接口
}
①定时更新
按照上述分析,我们只需要在 config.json 中开启服务卡片的周期性更新,在 onUpdateForm(long formId) 方法下执行数据获取更新。
config.json 文件“abilities”的 forms 模块配置细节如下:
“forms”: [
{
“jsComponentName”: “widget2”,
“isDefault”: true,
“scheduledUpdateTime”: “10:30”,//定点刷新的时刻,采用24小时制,精确到分钟。“updateDuration”: 0时,才会生效。
“defaultDimension”: “1*2”,
“name”: “widget2”,
“description”: “This is a service widget”,
“colorMode”: “auto”,
“type”: “JS”,
“supportDimensions”: [
“1*2”
],
“updateEnabled”: true, //表示卡片是否支持周期性刷新
“updateDuration”: 1 //卡片定时刷新的更新周期,1为30分钟,2为60分钟,N为30*N分钟
}
]
这样结合我们在上一步获取 API 数据,解析 JSON,开启服务卡片的周期性更新,就可以在 updateFormData() 实现服务卡片的数据更新了。
截取 follower 数据更新的部分代码如下:
public void updateFormData(long formId, Object.。。 vars) {
HiLog.info(TAG, “update form data: formId” + formId);
//这部分用来获取粉丝数
String url = “https://api.bilibili.com/x/relation/stat?vmid=383565952”;
ZZRHttp.get(url, new ZZRCallBack.CallBackString() {
@Override
public void onFailure(int i, String s) {HiLog.info(TAG, “API返回失败”);}
@Override
public void onResponse(String s) {
HiLog.info(TAG, “API返回成功”);
try {
//1.调用fastjson解析,结果保存在JSON对应的类
BilibiliFollower bilibiliFollower = JSON.parseObject(s,BilibiliFollower.class);
//2.get方法获取解析内容
BilibiliFollower.Data data= bilibiliFollower.getData();
System.out.println(“解析成功”+data.getFollower());
//这部分用来更新卡片信息
ZSONObject zsonObject = new ZSONObject(); //1.将要刷新的数据存放在一个ZSONObject实例中
zsonObject.put(“follower”,data.getFollower()); //2.更新数据,data.getFollower()就是在API数据请求中获取的粉丝数。
FormBindingData formBindingData = new FormBindingData(zsonObject); //3.将其封装在一个FormBindingData的实例中
try {
((MainAbility)context).updateForm(formId,formBindingData); //4.调用MainAbility的方法updateForm(),并将formBindingData作为第二个实参
} catch (FormException e) {
e.printStackTrace();
HiLog.info(TAG, “更新卡片失败”);
}
} catch (Exception e) {
HiLog.info(TAG, “解析失败”);
}
}
});
}
②手动更新
正常来说这样就可以正常更新数据了,但是会有个问题。就是在服务卡片首次创建添加到桌面的时候,在添加完的至少 30 分钟里,数据是不会更新的。
此时如果在 index.json 中设置初始信息,那么在添加完成的前 30 分钟数据都是写死在 data 中的。如果不设置初始信息那么卡片就是空白的。
所以按照前面服务卡片的运作机制的分析,我们还需要在卡片初始化 onCreateForm() 的时候进行一次更新。
这个非常简单用 onCreateForm() 调用 onUpdateForm(formId) 即可。
@Overrideprotected ProviderFormInfo onCreateForm(Intent intent) {
。。。 。。。
//初始化时先在线更新一下卡片
onUpdateForm(formId);
return formController.bindFormData();
}
总结:这里的 onUpdateForm(formId) 中 API 的网络请求一定要新开一个子线程,不然会影响页面加载。
这也是前面说的用 ZZRhttp 的原因。不过现在也遇到一个问题,当卡片数量变多时,同时在线更新这么多的卡片会变得非常缓慢,这个问题还有待解决。
功能直达
目前服务卡片仅支持 click 通用事件,事件类型:跳转事件(router)和消息事件(message)。
详细说明参考官方文档:
https://developer.harmonyos.com/cn/docs/documentation/doc-references/js-service-widget-syntax-hml-0000001152828575
①跳转事件
接下来实现与服务卡片的交互,当点击服务卡片时,会跳转到相应的页面,所以这里使用跳转事件。
以番剧更新的卡片为例:
首先我们要先添加一个要跳转的页面。如下图所示添加一个 Page Ability,比如:VideoSlice。
新建完成之后会增加 VideoSlice 和 slice/VideoSliceSlice 两个文件,和 base/layout/ability_bilibili_page.xml 页面文件。
@Overridepublic void onStart(Intent intent) {
super.onStart(intent);
super.setUIContent(ResourceTable.Layout_ability_video);
Text text = (Text) findComponentById(ResourceTable.Id_text);
text.setText(“页面跳转中”);
// 随机图片数组
int[] resource = {ResourceTable.Media_36e,ResourceTable.Media_36g,ResourceTable.Media_36h,ResourceTable.Media_38p};
Component component = findComponentById(ResourceTable.Id_image);
if (component instanceof Image) {
Image image = (Image) component;
image.setPixelMap(resource[(int)(Math.random()*3)]);//随机显示一张图片
}
String url = “https://m.bilibili.com”;
String param = intent.getStringParam(“params”);//从intent中获取 跳转事件定义的params字段的值
if(param !=null){
ZSONObject data = ZSONObject.stringToZSON(param);
url = data.getString(“url”);
}
webview(url);
}
//启动webviewpublic void webview(String url){
WebView webView = (WebView) findComponentById(ResourceTable.Id_webview);
webView.getWebConfig().setJavaScriptPermit(true); // 如果网页需要使用JavaScript,增加此行;如何使用JavaScript下文有详细介绍
webView.load(url);
}
增加 webview,将页面默认的 Text 控件修改为 webview。
《?xml version=“1.0” encoding=“utf-8”?》《DirectionalLayout
xmlns:ohos=“http://schemas.huawei.com/res/ohos”
ohos:height=“match_parent”
ohos:width=“match_parent”
ohos:alignment=“center”
ohos:orientation=“vertical”》
《ohos.agp.components.webengine.WebView
ohos:id=“$+id:webview”
ohos:height=“match_parent”
ohos:width=“match_parent”》
《/ohos.agp.components.webengine.WebView》《/DirectionalLayout》
在 index.hml 中给要触发的控件上添加 onclick,比如:onclick=“routerEvent1”。
《div class=“div_root” 》《!--在服务卡片设置一个 根div 横向布局--》
《div class=“div_container”》《!--在根div 横向放置4个div,每个div内部从上往下排列--》
《image class=“item_image” src=“{{ src1 }}” onclick=“routerEvent1”》《/image》
《text class=“item_title”》{{ itemTitle1 }}《/text》
《text class=“item_content”》{{ itemContent1 }}《/text》
《/div》
。。。 。。。
《/div》
在 index.json 中,添加对应的 actions,跳转事件要多加一个参数“abilityName”,指定要跳转的页面,并且携带参数 url。
{
“data”: {
},
“actions”: {
“routerEvent1”: {
“action”: “router”,
“bundleName”: “com.liangzili.servicewidget”,
“abilityName”: “com.liangzili.servicewidget.VideoSlice”,
“params”: {
“url”: “{{url1}}”
}
},
“routerEvent2”: {
。。。 。。。
}
②消息事件
这里使用视频动态服务卡片,做一个消息事件的测试,效果如下图,点击左右边,实现服务卡片的滑动。
在小卡片上这样的操作体验不好。所以消息事件中的例子,只是为了测试,并没有加到项目里。
在 index.hml 中给要触发的控件上添加 onclick,比如:onclick=“sendMessageEvent”。
《-- 为了方便测试,直接将onclick添加在左右两侧的div组件上 --》《div class=“div” onclick=“sendMessageEvent0”》
《image class=“item_image” src=“{{ src0 }}”》《/image》
《text class=“item_title”》{{ itemTitle0 }}《/text》
《text class=“item_content”》{{ itemContent0 }}《/text》《/div》《div class=“div” onclick=“sendMessageEvent1”》
《image class=“item_image” src=“{{ src1 }}”》《/image》
《text class=“item_title”》{{ itemTitle1 }}《/text》
《text class=“item_content”》{{ itemContent1 }}《/text》《/div》
在 index.json 中,添加对应的 actions。
{
“data”: {
},
“actions”: {
“sendMessageEvent0”: {
“action”: “message”,
“params”: {
“p1”: “left”,
“index”: “{{index}}”
}
},
“sendMessageEvent1”: {
“action”: “message”,
“params”: {
“p1”: “right”,
“index”: “{{index}}”
}
}
}
}
如果是消息事件(message)当点击带有 onclick 的控件时,会触发 MainAbility 下的这个函数。
@Overrideprotected void onTriggerFormEvent(long formId, String message) {
HiLog.info(TAG, “onTriggerFormEvent: ” + message); //params的内容就通过message传递过来
super.onTriggerFormEvent(formId, message);
FormControllerManager formControllerManager = FormControllerManager.getInstance(this);
FormController formController = formControllerManager.getController(formId);//通过formId得到卡片控制器
formController.onTriggerFormEvent(formId, message);//接着再调用,对应的控制器 WidgetImpl
}
最后调用卡片控制器 WidgetImpl 中的 onTriggerFormEvent()。
public void onTriggerFormEvent(long formId, String message) {
HiLog.info(TAG, “onTriggerFormEvent.”+message);
//先获取message中的参数
ZSONObject data = ZSONObject.stringToZSON(message);
String p1 = data.getString(“p1”);
Integer index = data.getIntValue(“index”);
ZSONObject zsonObject = new ZSONObject(); //将要刷新的数据存放在一个ZSONObject实例中
Integer indexMax = 2; //有N个滑块组件就设置N-1
if(p1.equals(“right”)){ //判断点击方向,如果是右侧
if(index == indexMax){index = -1;} //实现循环滚动
index = index+1;
zsonObject.put(“index”,index);
}else { //判断点击方向,如果是左侧
if(index == 0){index = indexMax+1;} //实现循环滚动
index = index-1;
zsonObject.put(“index”,index);
}
FormBindingData formBindingData = new FormBindingData(zsonObject);
try {
((MainAbility)context).updateForm(formId,formBindingData);
} catch (FormException e) {
e.printStackTrace();
HiLog.info(TAG, “更新卡片失败”);
}
}
③list 跳转事件
list 组件只能添加一个 onclick,而且在点击的同时还需要获取点击的是list列表中的哪一项,这个比较特殊。
《list class=“list” else》
《list-item for=“{{list}}” class=“list-item”》
《div class=“div” onclick=“sendRouteEvent”》
。。。 。。。
《/div》
《/list-item》
《/list》
这个坑折磨了我好久,最终我发现在 index.json 中,可以使用 item,item,idx 获取到 hml 页面 list 的元素变量和索引。
但是在官方文档并没有找到相关的内容,尝试了很久才解决这个问题。之后的部分就和跳转事件一样了,使用 Video 页面解析 url 进行播放就可以了。
“actions”: {
“sendRouteEvent”: {
“action”: “router”,
“bundleName”: “com.liangzili.demos”,
“abilityName”: “com.liangzili.demos.Video”,
“params”: {
“url”: “{{$item.short_url}}”,
“index”: “{{$idx}}”
}
}
}
总结:解决了 list 的点击事件之后,才发现这歌控件真是好用。能用 list 还是 list 方便。
加载页面,保存 Cookie
启动之后的页面主要是为了登录账号,因为大部分的 API 是需要登录之后才可以获取到的。
①webview 加载页面
在 base/layout/ability_main.xml 中添加 webview 组件,代码如下:
《ohos.agp.components.webengine.WebView
ohos:id=“$+id:webview”
ohos:height=“match_parent”
ohos:width=“match_parent”》
《/ohos.agp.components.webengine.WebView》
然后在启动页面执行加载操作。但其实加载前需要先从数据库中提取 cookie 信息,这个接下来说。
String url = “https://m.bilibili.com”;
WebView webView = (WebView) findComponentById(ResourceTable.Id_webview);
webView.getWebConfig().setJavaScriptPermit(true); // 如果网页需要使用JavaScript,增加此行;如何使用JavaScript下文有详细介绍
webView.load(url);
②Cookie 的读取和保存类
com/liangzili/demos/utils/CookieUtils.java:
public class CookieUtils {
private static final HiLogLabel TAG = new HiLogLabel(HiLog.DEBUG,0x0,CookieUtils.class.getName());
/**
* 使用关系型数据库[读取]Cookie
* @param preferences
* @param url
*/
public static void ExtarctCookie(Preferences preferences, String url){
Map《String, ?》 map = new HashMap《》();
//先从数据库中取出cookie
map = PreferenceDataBase.GetCookieMap(preferences);
//然后写入到cookieStore
CookieStore cookieStore = CookieStore.getInstance();//1.获取一个CookieStore的示例
for (Map.Entry《String, ?》 entry : map.entrySet()) {
HiLog.info(TAG,entry.getKey()+“=”+entry.getValue().toString());
cookieStore.setCookie(url,entry.getKey()+“=”+entry.getValue().toString());//2.写入数据,只能一条一条写
}
}
/**
* 使用关系型数据库[保存]Cookie
* @param preferences 数据库的Preferences实例
* @param url 指定Cookie对应的域名
*/
public static void SaveCookie(Preferences preferences,String url){
//先取出要保存的cookie
CookieStore cookieStore = CookieStore.getInstance();
String cookieStr = cookieStore.getCookie(url);
HiLog.info(TAG,“saveCookie(String url)”+url+cookieStr);
//然后将cooke转成map
Map《String,String》 cookieMap = cookieToMap(cookieStr);
//最后将map写入数据库
PreferenceDataBase.SaveMap(preferences,cookieMap);
}
// cookieToMap
public static Map《String,String》 cookieToMap(String value) {
Map《String, String》 map = new HashMap《String, String》();
value = value.replace(“ ”, “”);
if (value.contains(“;”)) {
String values[] = value.split(“;”);
for (String val : values) {
String vals[] = val.split(“=”);
map.put(vals[0], vals[1]);
}
} else {
String values[] = value.split(“=”);
map.put(values[0], values[1]);
}
return map;
}
}
偏好型数据库
数据库的操作主要是 com/liangzili/demos/database/PreferenceDataBase.java 这个类。使用轻量级偏好型数据库,更符合我们这里的需求。
①获取 Preferences 实例
public class PreferenceDataBase {
private static final HiLogLabel TAG = new HiLogLabel(HiLog.DEBUG,0x0,PreferenceDataBase.class.getName());
/**
* 获取Preferences实例
* @param context 数据库文件将存储在由context上下文指定的目录里。
* @param name fileName表示文件名,其取值不能为空,也不能包含路径
* @return //返回对应数据库的Preferences实例
*/
public static Preferences register(Context context,String name) {
DatabaseHelper databaseHelper = new DatabaseHelper(context);
Preferences preferences = databaseHelper.getPreferences(name);
return preferences;
}
。。。 。。。
}
②从数据库中保存和读取 Map
/**
* Map[保存]到偏好型数据库
* @param preferences 数据库的Preferences实例
* @param map 要保存的map
*/
public static void SaveMap(Preferences preferences,Map《String,String》 map){
// 遍历map
for (Map.Entry《String, String》 entry : map.entrySet()) {
HiLog.info(TAG,entry.getKey() + “=” + entry.getValue());
preferences.putString(entry.getKey(),entry.getValue());//3.将数据写入Preferences实例,
}
preferences.flushSync();//4.通过flush()或者flushSync()将Preferences实例持久化。
}
/**
* 从偏好型数据库[读取]Map
* @param preferences 数据库的Preferences实例
* @return 要读取的map
*/
public static Map《String,?》 GetCookieMap(Preferences preferences){
Map《String, ?》 map = new HashMap《》();
map = preferences.getAll();//3.读取数据
return map;
}
③提取某些 Cookie 的值
/**
* 获取Cookie中的SESSDATA值
* @param context 上下文用来指定数据文件存储路径
* @return Cookie中的SESSDATA值
*/
public static String getSessData(Context context){
// 开启数据库
DatabaseHelper databaseHelper = new DatabaseHelper(context);//1.创建数据库使用数据库操作的辅助类
Preferences preferences = databaseHelper.getPreferences(“bilibili”);//2.获取到对应文件名的Preferences实例,filename是String类型
String SESSDATA = preferences.getString(“SESSDATA”,“”); //3.读取数据
return SESSDATA;
}
/**
* 获取Cookie中的Vmid值
* @param context
* @return Cookie中的Vmid值
*/
public static String getVmid(Context context){
// 开启数据库
DatabaseHelper databaseHelper = new DatabaseHelper(context);//1.创建数据库使用数据库操作的辅助类
Preferences preferences = databaseHelper.getPreferences(“bilibili”);//2.获取到对应文件名的Preferences实例,filename是String类型
String DedeUserID = preferences.getString(“DedeUserID”,“”); //3.读取数据
return DedeUserID;
}
编辑:jq
-
数据
+关注
关注
8文章
6511浏览量
87592 -
代码
+关注
关注
30文章
4555浏览量
66747 -
鸿蒙
+关注
关注
55文章
1620浏览量
42118
原文标题:我为B站添加鸿蒙服务卡片!
文章出处:【微信号:Huawei_Kirin,微信公众号:华为麒麟】欢迎添加关注!文章转载请注明出处。
发布评论请先 登录
相关推荐
鸿蒙OS实战开发:【多设备自适应服务卡片】
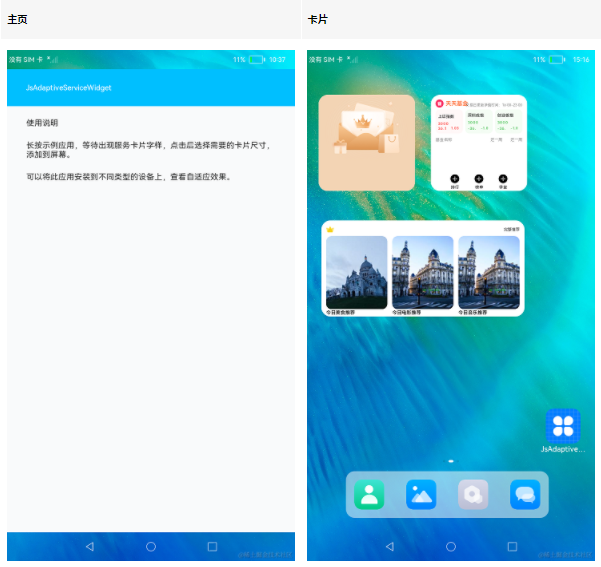
鸿蒙OS开发实例:【手撸服务卡片】

鸿蒙实战项目开发:【短信服务】
鸿蒙HarmonyOS元服务-“文学素养”说明
一张服务卡片,三个设计原则,让HarmonyOS元服务卡片获得更多用户触点
鸿蒙原生应用开发-折叠屏、平板设备服务卡片适配
爆款元服务!教你如何设计高使用率卡片
鸿蒙原生应用开发-元服务分发方式的调整及趋势
诚迈科技成为华为终端云服务“元服务服务商”
HarmonyOS元服务开发实践:桌面卡片字典
HarmonyOS/OpenHarmony元服务开发-配置卡片的配置文件
OpenHarmony上使用服务卡片


 工商网监
工商网监
评论