 如何使用Adafruit的CircuitPython创建动画精灵
概述
马里奥云与烤面包机
在此项目中,我们正在制作复古风格的可穿戴设备!
吊坠具有IPS显示屏和动画图形。它使用Adafruit的CircuitPython创建动画精灵,看起来像是在飞行的烤面包机和滚动的云。
我们最初是在Pro Trinket项目中完成这两个任务的,分别是用于烤面包机的单色OLED和用于云的彩色OLED。为了跟上现代和新的高可见度IPS显示屏的需要,我们在这里将两个项目都升级为使用CircuitPython代替Arduino,以简化自定义。显示屏看起来也好很多,但是价格和构造都差不多!
3D打印复古吊坠
使用CircuitPython,您可以使用DisplayIO库生成自定义图形和界面。
您可以使用位图图像创建子图形表和调色板以生成彩色像素。
该项目中的代码随机生成可在屏幕上连续滚动的飞行烤面包机。我们认为这是一个很好的例子,让人们开始使用DisplayIO和CircuitPython。
我们制作了两个版本,每个显示器一个版本,因此您可以使用1.3英寸或1.54英寸IPS显示器。
换出图形并修改代码以制作自己的动画也很容易。
零件
选择您想要的显示尺寸:
带MicroSD的Adafruit 1.3“ 240x240广角TFT LCD显示屏
或
Adafruit 1.54“ 240x240广角TFT LCD显示屏使用MicroSD
然后添加以下内容:
Adafruit ItsyBitsy M4 Express,具有ATSAMD51
Adafruit LiIon/LiPoly背包附加件(用于Pro Trinket/ItsyBitsy)
对面包板友好SPDT滑动开关
锂离子聚合物电池-3.7v 150mAh
带MicroSD的Adafruit 1.3“ 240x240广角TFT LCD显示屏
产品ID:4313
我们一直在寻找这样的显示器-它的对角线很小,只有1.3英寸,但具有260 ppi的高密度,240x240像素的显示器。 。.
缺货
缺货
带MicroSD的Adafruit 1.54“ 240x240广角TFT LCD显示屏
产品ID:3787
我们一直在寻找这样的显示器g时间-它只有1.5英寸的对角线,但具有220 ppi的高密度,240x240像素的显示屏以及全视角。它。..
缺货
缺货
具有ATSAMD51的Adafruit ItsyBitsy M4 Express
产品ID:3800
比羽毛小但比小饰品大的东西?这是一款具有Microchip ATSAMD51的Adafruit ItsyBitsy M4 Express!小,。..
$ 14.95
进货
添加到购物车
Adafruit LiIon/LiPoly背包附件(适用于Pro Trinket/ItsyBitsy)
产品ID:2124
如果您有ItsyBitsy或Pro Trinket,您可能知道它是便携式项目的理想选择。这款LiPoly背包非常容易做到!代替接线2 。..
$ 4.95
进货
添加到购物车
适用于面包板的SPDT滑动开关
产品ID:805
这些漂亮的开关非常适合与面包板和穿孔板项目一起使用。它们的间距为0.1英寸,可以很好地插入无焊面包板中。它们易于切换。..
$ 0.95
现货
添加到购物车
锂离子聚合物电池-3.7v 150mAh
产品ID:1317
锂离子聚合物电池(也称为“ lipo”或“ lipoly”)电池很薄,轻巧而功能强大;完全充电后的输出范围为4.2V至3.7V。这款电池。..
$ 5.95
IN STOCK
添加到购物车
硅树脂套绞线带状电缆-10线长1米
产品ID:3890
对于那些喜欢使用我们的有机硅包覆电线的人,但始终寻找他们的接线游戏。现在我们有硅胶盖带状电缆!这些可能看起来。..
$ 3.95
库存中
添加到购物车
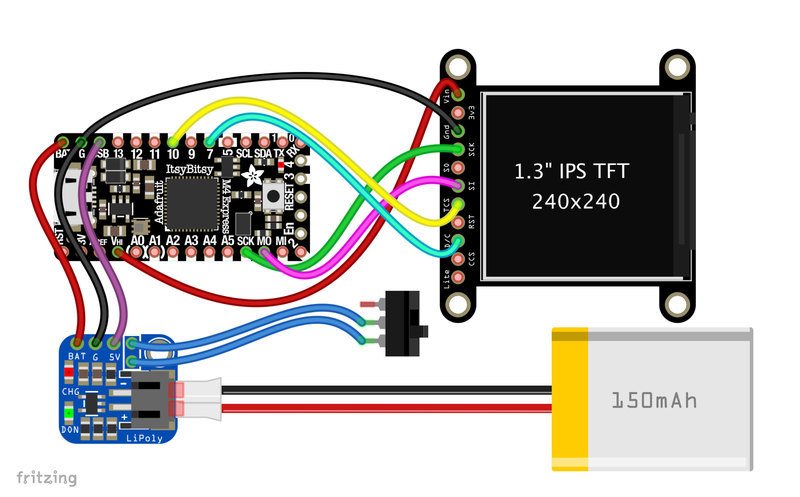
电路图
CircuitDiagram 》
下图为组件的布线提供了直观的参考。此图是使用Fritzing软件创建的。
用于Fritzing的Adafruit库
使用Adafruit的Fritzing零件库为您的项目创建电路图。下载库或仅抓取各个部分。从GitHub Adafruit Fritzing部件获取库和部件。
circuit_diagram.fzz
ItsyBItsy M4到Lipo背包
BAT 从Lipo背包上的ItsyBitsy M4到 BAT
G 从Lipo背包上的ItsyBitsy M4到 G
USB ,从Lisy背包上的ItsyBitsy M4到 5V
显示
从
VIN 从显示更改为 Vhi (从显示至 G)
GND (从显示)到ItyBItsy M4上的 SCK
SI 》从显示到ItsyBItsy M4上的 MO
D/C 从显示到ItsyBItsy M4上的 7
切换
从切换到Lipo背包
从切换到Lipo背包的左/右
150mAh的锂电池连接到Lipo背包上的2针JST端口。可以通过ItsyBitsy M4上的microUSB端口为电池充电。
软件
使用CircuitPython设置ItsyBitsy M4
我们需要进行板卡设置,以便我们可以运行CircuitPython代码。让我们逐步完成这些步骤,以将最新版本的CircuitPython安装到板上。
Mu Python编辑器
Mu是一个简单的Python编辑器,可与Adafruit CircuitPython硬件一起使用。它是用Python编写的,可在Windows,MacOS,Linux和Raspberry Pi上运行。串行控制台是内置的,因此您可以立即从板子的串行输出中获得反馈!虽然您可以在代码中使用任何文本编辑器,但Mu使其超级简单。
安装和使用Mu编辑器
安装或升级CircuitPython
您应确保ItsyBitsy M4上具有CircuitPython 4.0或更高版本。使用已知的优质数据+电源线(而不是USB电源包随附的俗气的USB电缆,它们仅是电源)插入板子。您应该会看到一个弹出的新闪存驱动器。
如果驱动器为 CIRCUITPY ,请打开 boot_out.txt 文件以确保版本号为4.0或更高版本。
下载:文件
复制代码
Adafruit CircuitPython 5.0.0-alpha.4 on 2019-09-15; Adafruit ItsyBitsy M4 Express with samd51j19 Adafruit CircuitPython 5.0.0-alpha.4 on 2019-09-15; Adafruit ItsyBitsy M4 Express with samd51j19
如果版本小于4,或者-您仅获得名为 ITSYM4BOOT 的驱动器,请按照以下步骤操作要更新电路板CircuitPython软件,请执行以下操作:
通过下面的绿色按钮下载ItsyBitsy M4的CircuitPython UF2。
通过USB将ItsyBitsy M4连接到计算机,然后按Reset(重置)按钮。
将CircuitPython UF2 拖放到 ITSYM4BOOT 驱动器上-该驱动器将消失,并出现一个新的 CIRCUITPY 驱动器应该会出现。
下载itsyBItsy M4的CircuitPython
下载Adafruit CircuitPython库捆绑
要运行代码,我们需要下载一些库。库中包含的代码有助于我们更轻松地与硬件连接。
下面的绿色按钮链接到一个文件,其中包含CircuitPython可用的所有库。要运行该项目的代码,我们需要下面“必需的库”列表中的两个库。解压缩库捆绑包并搜索库。将文件拖放到 CIRCUITPY 驱动器上的名为 lib 的文件夹中(如果该文件夹不在ItsyBitsy M4上,则创建该文件夹)。
下载Circuit Python库捆绑包
必需的库
adafruit_st7789
adafruit_imageload
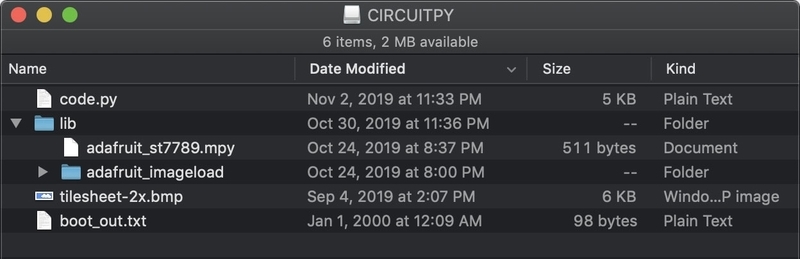
有了所有需要的文件后,目录列表在文件和目录上看起来类似于下面。
上传代码
该项目提供了两个不同的 code.py 草图。这两个程序都可以在任何一个显示器上使用。
单击下面的下载链接以直接从GitHub获取主要代码。将文件重命名为 code.py 并将其拖放到 CIRCUITPY 主(根)目录中。上载所有文件(包括库)后,该代码即可正常运行。
使用任何文本编辑器或常用的IDE修改代码。我们建议如上所述使用Mu。
上载位图
下载以下位图图像并将其保存到 CIRCUITPY 驱动器的根目录。
tilesheet-2x.bmp 用于Mario Clouds代码。
spritesheet-2x.bmp 用于Flying Toasters代码。
位图图像的命名不同,因此两个文件都可以驻留在 CIRCUITPY 驱动器中。
滚动云
下载:项目Zip 或 code.py | 在Github上查看
复制代码
“”“
Continuously scroll randomly generated Mario style clouds.
Designed fr an ItsyBitsy M4 Express and a 1.3” 240x240 TFT
Adafruit invests time and resources providing this open source code.
Please support Adafruit and open source hardware by purchasing
products from Adafruit!
Written by Dave Astels for Adafruit Industries
Copyright (c) 2019 Adafruit Industries
Licensed under the MIT license.
All text above must be included in any redistribution.
“”“
import time
from random import seed, randint
import board
import displayio
from adafruit_st7789 import ST7789
import adafruit_imageload
# Sprite cell values
EMPTY = 0
LEFT = 1
MIDDLE = 2
RIGHT = 3
# These constants determine what happens when tiles are shifted.
# if randint(1, 10) 》 the value, the thing happens
# The chance a new cloud will enter
CHANCE_OF_NEW_CLOUD = 4
# The chance an existing cloud gets extended
CHANCE_OF_EXTENDING_A_CLOUD = 5
# Global variables
display = None
tilegrid = None
seed(int(time.monotonic()))
def make_display():
”“”Set up the display support.
Return the Display object.
“”“
spi = board.SPI()
while not spi.try_lock():
pass
spi.configure(baudrate=24000000) # Configure SPI for 24MHz
spi.unlock()
displayio.release_displays()
display_bus = displayio.FourWire(spi, command=board.D7, chip_select=board.D10, reset=board.D9)
return ST7789(display_bus, width=240, height=240, rowstart=80, auto_refresh=True)
def make_tilegrid():
”“”Construct and return the tilegrid.“”“
group = displayio.Group(max_size=10)
sprite_sheet, palette = adafruit_imageload.load(”/tilesheet-2x.bmp“,
bitmap=displayio.Bitmap,
palette=displayio.Palette)
grid = displayio.TileGrid(sprite_sheet, pixel_shader=palette,
width=9, height=5,
tile_height=48, tile_width=32,
default_tile=EMPTY)
group.append(grid)
display.show(group)
return grid
def evaluate_position(row, col):
”“”Return how long of a cloud is placable at the given location.
:param row: the tile row (0-4)
:param col: the tile column (0-8)
“”“
if tilegrid[col, row] != EMPTY or tilegrid[col + 1, row] != EMPTY:
return 0
end_col = col + 1
while end_col 《 9 and tilegrid[end_col, row] == EMPTY:
end_col += 1
return min([4, end_col - col])
def seed_clouds(number_of_clouds):
”“”Create the initial clouds so it doesn‘t start empty“”“
for _ in range(number_of_clouds):
while True:
row = randint(0, 4)
col = randint(0, 7)
cloud_length = evaluate_position(row, col)
if cloud_length 》 0:
break
l = randint(1, cloud_length)
tilegrid[col, row] = LEFT
for _ in range(l - 2):
col += 1
tilegrid[col, row] = MIDDLE
tilegrid[col + 1, row] = RIGHT
def slide_tiles():
”“”Move the tilegrid to the left, one pixel at a time, a full time width“”“
for _ in range(32):
tilegrid.x -= 1
display.refresh(target_frames_per_second=60)
def shift_tiles():
”“”Move tiles one spot to the left, and reset the tilegrid’s position“”“
for row in range(5):
for col in range(8):
tilegrid[col, row] = tilegrid[col + 1, row]
tilegrid[8, row] = EMPTY
tilegrid.x = 0
def extend_clouds():
”“”Extend any clouds on the right edge, either finishing them with a right
end or continuing them with a middle piece
“”“
for row in range(5):
if tilegrid[7, row] == LEFT or tilegrid[7, row] == MIDDLE:
if randint(1, 10) 》 CHANCE_OF_EXTENDING_A_CLOUD:
tilegrid[8, row] = MIDDLE
else:
tilegrid[8, row] = RIGHT
def add_cloud():
”“”Maybe add a new cloud on the right at a randon open row“”“
if randint(1, 10) 》 CHANCE_OF_NEW_CLOUD:
count = 0
while True:
count += 1
if count == 50:
return
row = randint(0, 4)
if tilegrid[7, row] == EMPTY and tilegrid[8, row] == EMPTY:
break
tilegrid[8, row] = LEFT
display = make_display()
tilegrid = make_tilegrid()
seed_clouds(5)
while True:
slide_tiles()
shift_tiles()
extend_clouds()
add_cloud()
”“”
Continuously scroll randomly generated Mario style clouds.
Designed fr an ItsyBitsy M4 Express and a 1.3“ 240x240 TFT
Adafruit invests time and resources providing this open source code.
Please support Adafruit and open source hardware by purchasing
products from Adafruit!
Written by Dave Astels for Adafruit Industries
Copyright (c) 2019 Adafruit Industries
Licensed under the MIT license.
All text above must be included in any redistribution.
”“”
import time
from random import seed, randint
import board
import displayio
from adafruit_st7789 import ST7789
import adafruit_imageload
# Sprite cell values
EMPTY = 0
LEFT = 1
MIDDLE = 2
RIGHT = 3
# These constants determine what happens when tiles are shifted.
# if randint(1, 10) 》 the value, the thing happens
# The chance a new cloud will enter
CHANCE_OF_NEW_CLOUD = 4
# The chance an existing cloud gets extended
CHANCE_OF_EXTENDING_A_CLOUD = 5
# Global variables
display = None
tilegrid = None
seed(int(time.monotonic()))
def make_display():
“”“Set up the display support.
Return the Display object.
”“”
spi = board.SPI()
while not spi.try_lock():
pass
spi.configure(baudrate=24000000) # Configure SPI for 24MHz
spi.unlock()
displayio.release_displays()
display_bus = displayio.FourWire(spi, command=board.D7, chip_select=board.D10, reset=board.D9)
return ST7789(display_bus, width=240, height=240, rowstart=80, auto_refresh=True)
def make_tilegrid():
“”“Construct and return the tilegrid.”“”
group = displayio.Group(max_size=10)
sprite_sheet, palette = adafruit_imageload.load(“/tilesheet-2x.bmp”,
bitmap=displayio.Bitmap,
palette=displayio.Palette)
grid = displayio.TileGrid(sprite_sheet, pixel_shader=palette,
width=9, height=5,
tile_height=48, tile_width=32,
default_tile=EMPTY)
group.append(grid)
display.show(group)
return grid
def evaluate_position(row, col):
“”“Return how long of a cloud is placable at the given location.
:param row: the tile row (0-4)
:param col: the tile column (0-8)
”“”
if tilegrid[col, row] != EMPTY or tilegrid[col + 1, row] != EMPTY:
return 0
end_col = col + 1
while end_col 《 9 and tilegrid[end_col, row] == EMPTY:
end_col += 1
return min([4, end_col - col])
def seed_clouds(number_of_clouds):
“”“Create the initial clouds so it doesn‘t start empty”“”
for _ in range(number_of_clouds):
while True:
row = randint(0, 4)
col = randint(0, 7)
cloud_length = evaluate_position(row, col)
if cloud_length 》 0:
break
l = randint(1, cloud_length)
tilegrid[col, row] = LEFT
for _ in range(l - 2):
col += 1
tilegrid[col, row] = MIDDLE
tilegrid[col + 1, row] = RIGHT
def slide_tiles():
“”“Move the tilegrid to the left, one pixel at a time, a full time width”“”
for _ in range(32):
tilegrid.x -= 1
display.refresh(target_frames_per_second=60)
def shift_tiles():
“”“Move tiles one spot to the left, and reset the tilegrid’s position”“”
for row in range(5):
for col in range(8):
tilegrid[col, row] = tilegrid[col + 1, row]
tilegrid[8, row] = EMPTY
tilegrid.x = 0
def extend_clouds():
“”“Extend any clouds on the right edge, either finishing them with a right
end or continuing them with a middle piece
”“”
for row in range(5):
if tilegrid[7, row] == LEFT or tilegrid[7, row] == MIDDLE:
if randint(1, 10) 》 CHANCE_OF_EXTENDING_A_CLOUD:
tilegrid[8, row] = MIDDLE
else:
tilegrid[8, row] = RIGHT
def add_cloud():
“”“Maybe add a new cloud on the right at a randon open row”“”
if randint(1, 10) 》 CHANCE_OF_NEW_CLOUD:
count = 0
while True:
count += 1
if count == 50:
return
row = randint(0, 4)
if tilegrid[7, row] == EMPTY and tilegrid[8, row] == EMPTY:
break
tilegrid[8, row] = LEFT
display = make_display()
tilegrid = make_tilegrid()
seed_clouds(5)
while True:
slide_tiles()
shift_tiles()
extend_clouds()
add_cloud()
飞行烤面包机
下载:Project Zip 或 code.py | 在Github上查看
复制代码
“”“
Continuously scroll randomly generated After Dark style toasters.
Designed for an ItsyBitsy M4 Express and a 1.3” 240x240 TFT
Adafruit invests time and resources providing this open source code.
Please support Adafruit and open source hardware by purchasing
products from Adafruit!
Written by Dave Astels for Adafruit Industries
Copyright (c) 2019 Adafruit Industries
Licensed under the MIT license.
All text above must be included in any redistribution.
Requires CircuitPython 5.0 or later.
“”“
import time
from random import seed, randint
import board
import displayio
from adafruit_st7789 import ST7789
import adafruit_imageload
# Sprite cell values
EMPTY = 0
CELL_1 = EMPTY + 1
CELL_2 = CELL_1 + 1
CELL_3 = CELL_2 + 1
CELL_4 = CELL_3 + 1
TOAST = CELL_4 + 1
NUMBER_OF_SPRITES = TOAST + 1
# Animation support
FIRST_CELL = CELL_1
LAST_CELL = CELL_4
NUMBER_OF_CELLS = (LAST_CELL - FIRST_CELL) + 1
# A boolean array corresponding to the sprites, True if it‘s part of the animation sequence.
ANIMATED = [_sprite 》= FIRST_CELL and _sprite 《= LAST_CELL for _sprite in range(NUMBER_OF_SPRITES)]
# The chance (out of 10) that toast will enter
CHANCE_OF_NEW_TOAST = 2
# How many sprites to styart with
INITIAL_NUMBER_OF_SPRITES = 4
# Global variables
display = None
tilegrid = None
seed(int(time.monotonic()))
def make_display():
”“”Set up the display support.
Return the Display object.
“”“
spi = board.SPI()
while not spi.try_lock():
pass
spi.configure(baudrate=24000000) # Configure SPI for 24MHz
spi.unlock()
displayio.release_displays()
display_bus = displayio.FourWire(spi, command=board.D7, chip_select=board.D10, reset=board.D9)
return ST7789(display_bus, width=240, height=240, rowstart=80, auto_refresh=True)
def make_tilegrid():
”“”Construct and return the tilegrid.“”“
group = displayio.Group(max_size=10)
sprite_sheet, palette = adafruit_imageload.load(”/spritesheet-2x.bmp“,
bitmap=displayio.Bitmap,
palette=displayio.Palette)
grid = displayio.TileGrid(sprite_sheet, pixel_shader=palette,
width=5, height=5,
tile_height=64, tile_width=64,
x=0, y=-64,
default_tile=EMPTY)
group.append(grid)
display.show(group)
return grid
def random_cell():
return randint(FIRST_CELL, LAST_CELL)
def evaluate_position(row, col):
”“”Return whether how long of aa toaster is placable at the given location.
:param row: the tile row (0-9)
:param col: the tile column (0-9)
“”“
return tilegrid[col, row] == EMPTY
def seed_toasters(number_of_toasters):
”“”Create the initial toasters so it doesn’t start empty“”“
for _ in range(number_of_toasters):
while True:
row = randint(0, 4)
col = randint(0, 4)
if evaluate_position(row, col):
break
tilegrid[col, row] = random_cell()
def next_sprite(sprite):
if ANIMATED[sprite]:
return (((sprite - FIRST_CELL) + 1) % NUMBER_OF_CELLS) + FIRST_CELL
return sprite
def advance_animation():
”“”Cycle through animation cells each time.“”“
for tile_number in range(25):
tilegrid[tile_number] = next_sprite(tilegrid[tile_number])
def slide_tiles():
”“”Move the tilegrid one pixel to the bottom-left.“”“
tilegrid.x -= 1
tilegrid.y += 1
def shift_tiles():
”“”Move tiles one spot to the left, and reset the tilegrid‘s position“”“
for row in range(4, 0, -1):
for col in range(4):
tilegrid[col, row] = tilegrid[col + 1, row - 1]
tilegrid[4, row] = EMPTY
for col in range(5):
tilegrid[col, 0] = EMPTY
tilegrid.x = 0
tilegrid.y = -64
def get_entry_row():
while True:
row = randint(0, 4)
if tilegrid[4, row] == EMPTY and tilegrid[3, row] == EMPTY:
return row
def get_entry_column():
while True:
col = randint(0, 3)
if tilegrid[col, 0] == EMPTY and tilegrid[col, 1] == EMPTY:
return col
def add_toaster_or_toast():
”“”Maybe add a new toaster or toast on the right and/or top at a randon open location“”“
if randint(1, 10) 《= CHANCE_OF_NEW_TOAST:
tile = TOAST
else:
tile = random_cell()
tilegrid[4, get_entry_row()] = tile
if randint(1, 10) 《= CHANCE_OF_NEW_TOAST:
tile = TOAST
else:
tile = random_cell()
tilegrid[get_entry_column(), 0] = tile
display = make_display()
tilegrid = make_tilegrid()
seed_toasters(INITIAL_NUMBER_OF_SPRITES)
display.refresh()
while True:
for _ in range(64):
display.refresh(target_frames_per_second=80)
advance_animation()
slide_tiles()
shift_tiles()
add_toaster_or_toast()
display.refresh(target_frames_per_second=120)
”“”
Continuously scroll randomly generated After Dark style toasters.
Designed for an ItsyBitsy M4 Express and a 1.3“ 240x240 TFT
Adafruit invests time and resources providing this open source code.
Please support Adafruit and open source hardware by purchasing
products from Adafruit!
Written by Dave Astels for Adafruit Industries
Copyright (c) 2019 Adafruit Industries
Licensed under the MIT license.
All text above must be included in any redistribution.
Requires CircuitPython 5.0 or later.
”“”
import time
from random import seed, randint
import board
import displayio
from adafruit_st7789 import ST7789
import adafruit_imageload
# Sprite cell values
EMPTY = 0
CELL_1 = EMPTY + 1
CELL_2 = CELL_1 + 1
CELL_3 = CELL_2 + 1
CELL_4 = CELL_3 + 1
TOAST = CELL_4 + 1
NUMBER_OF_SPRITES = TOAST + 1
# Animation support
FIRST_CELL = CELL_1
LAST_CELL = CELL_4
NUMBER_OF_CELLS = (LAST_CELL - FIRST_CELL) + 1
# A boolean array corresponding to the sprites, True if it’s part of the animation sequence.
ANIMATED = [_sprite 》= FIRST_CELL and _sprite 《= LAST_CELL for _sprite in range(NUMBER_OF_SPRITES)]
# The chance (out of 10) that toast will enter
CHANCE_OF_NEW_TOAST = 2
# How many sprites to styart with
INITIAL_NUMBER_OF_SPRITES = 4
# Global variables
display = None
tilegrid = None
seed(int(time.monotonic()))
def make_display():
“”“Set up the display support.
Return the Display object.
”“”
spi = board.SPI()
while not spi.try_lock():
pass
spi.configure(baudrate=24000000) # Configure SPI for 24MHz
spi.unlock()
displayio.release_displays()
display_bus = displayio.FourWire(spi, command=board.D7, chip_select=board.D10, reset=board.D9)
return ST7789(display_bus, width=240, height=240, rowstart=80, auto_refresh=True)
def make_tilegrid():
“”“Construct and return the tilegrid.”“”
group = displayio.Group(max_size=10)
sprite_sheet, palette = adafruit_imageload.load(“/spritesheet-2x.bmp”,
bitmap=displayio.Bitmap,
palette=displayio.Palette)
grid = displayio.TileGrid(sprite_sheet, pixel_shader=palette,
width=5, height=5,
tile_height=64, tile_width=64,
x=0, y=-64,
default_tile=EMPTY)
group.append(grid)
display.show(group)
return grid
def random_cell():
return randint(FIRST_CELL, LAST_CELL)
def evaluate_position(row, col):
“”“Return whether how long of aa toaster is placable at the given location.
:param row: the tile row (0-9)
:param col: the tile column (0-9)
”“”
return tilegrid[col, row] == EMPTY
def seed_toasters(number_of_toasters):
“”“Create the initial toasters so it doesn‘t start empty”“”
for _ in range(number_of_toasters):
while True:
row = randint(0, 4)
col = randint(0, 4)
if evaluate_position(row, col):
break
tilegrid[col, row] = random_cell()
def next_sprite(sprite):
if ANIMATED[sprite]:
return (((sprite - FIRST_CELL) + 1) % NUMBER_OF_CELLS) + FIRST_CELL
return sprite
def advance_animation():
“”“Cycle through animation cells each time.”“”
for tile_number in range(25):
tilegrid[tile_number] = next_sprite(tilegrid[tile_number])
def slide_tiles():
“”“Move the tilegrid one pixel to the bottom-left.”“”
tilegrid.x -= 1
tilegrid.y += 1
def shift_tiles():
“”“Move tiles one spot to the left, and reset the tilegrid’s position”“”
for row in range(4, 0, -1):
for col in range(4):
tilegrid[col, row] = tilegrid[col + 1, row - 1]
tilegrid[4, row] = EMPTY
for col in range(5):
tilegrid[col, 0] = EMPTY
tilegrid.x = 0
tilegrid.y = -64
def get_entry_row():
while True:
row = randint(0, 4)
if tilegrid[4, row] == EMPTY and tilegrid[3, row] == EMPTY:
return row
def get_entry_column():
while True:
col = randint(0, 3)
if tilegrid[col, 0] == EMPTY and tilegrid[col, 1] == EMPTY:
return col
def add_toaster_or_toast():
“”“Maybe add a new toaster or toast on the right and/or top at a randon open location”“”
if randint(1, 10) 《= CHANCE_OF_NEW_TOAST:
tile = TOAST
else:
tile = random_cell()
tilegrid[4, get_entry_row()] = tile
if randint(1, 10) 《= CHANCE_OF_NEW_TOAST:
tile = TOAST
else:
tile = random_cell()
tilegrid[get_entry_column(), 0] = tile
display = make_display()
tilegrid = make_tilegrid()
seed_toasters(INITIAL_NUMBER_OF_SPRITES)
display.refresh()
while True:
for _ in range(64):
display.refresh(target_frames_per_second=80)
advance_animation()
slide_tiles()
shift_tiles()
add_toaster_or_toast()
display.refresh(target_frames_per_second=120)
仔细检查
查看上面列出的目录,并仔细检查是否列出了所有文件以使该项目起作用。如果缺少任何内容或在不正确的目录中,请将它们移到正确的位置。
3D打印
该项目的零件被设计为用基于FDM的机器进行3D打印。 STL文件旨在按“原样”打印。零件需要严格的公差,可能需要调整切片设置。请参考下面的建议设置。
CAD文件
可以将零件进一步分成小块,以适合较小的打印机建立卷。注意:STEP文件包含在其他3D表面建模程序中,例如Onshape,Solidworks和Rhino。
用于1.3 Display的编辑工况
用于1.5 Display的编辑工况
下载按钮STL
下载案例STL
设置
使用这些设置作为参考。列出的值在Cura切片软件中使用。
0.2mm层高/0.4mm喷嘴
0.4mm线宽(内部和外部宽度)
50mm/s打印速度
10% infill
支持:否
裙子:3
组装

Tin显示器连接
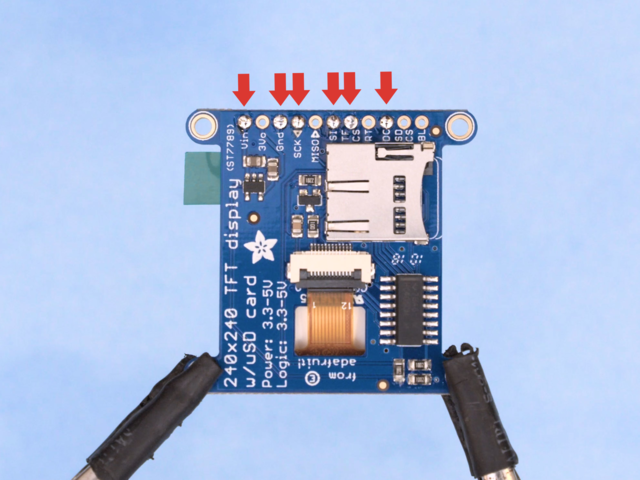
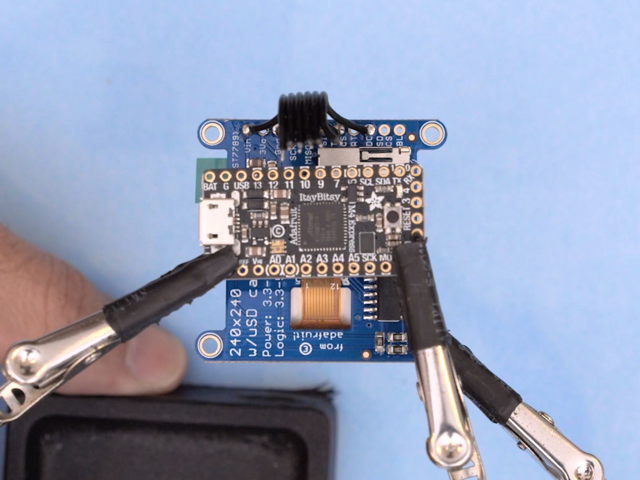
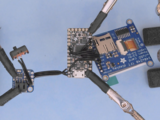
我用了第三只帮助手来稳定显示器。根据电路图镀锡连接。
焊锡丝
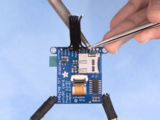
我剪断了导线,使其足够长,可以到达ItsyBitsy。硅胶带状电缆非常好,因此我们可以将电线束保持在机箱内整洁。
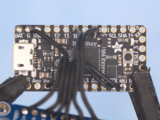
Tin ItsyBitsy
我用了第二对帮助手将ItsyBitsy固定在显示屏上方。参照电路图,并在ItsyBitsy上进行连接。
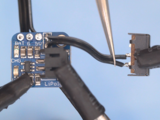
焊接ItsyBitsy以显示
轻轻地拉开每根电线,使每根电线都能到达ItsyBitsy上的连接。请参考电路图,并将ItsyBitsy焊接到显示器上。


Prep Lipo充电器背包
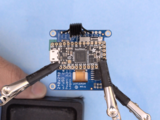
现在,我们可以准备LiPoly充电器背包。电池输出线是两个0.1“孔,周围有一个框,它们是电池输出线。用一把小刀小心地切开它们之间的走线,并将两根导线焊接到滑动开关上。
脂背包,为了更好地安装机箱内的板,我们可以从底部焊接电线。


将Lipo背包装到ItsyBitsy
然后用带状电缆将lipo背包焊接到ItsyBitsy。绝缘板
我们需要对板进行绝缘,以免它们一次接触到外壳内。我用一条胶带将ItyBitsy和lipo的底部覆盖
将面板插入机箱中
将显示板插入机箱中,使带有连接的一面朝向面板的切口
布置ItsyBitsy,使USB端口与外壳上的USB切口对齐。
将脂质背包布置在JST端口面向滑动开关切口的情况下。
将脂电池连接到背包上的JST,并缠绕电池导线,并将导线插入机箱上滑动开关切口的壁下。
按入配合盖子
对准盖子,使切口适合外壳上的滑动开关壁。以一定角度插入盖子,使电池位于中央,然后将盖子轻轻按入外壳。
胶水按钮
测试外壳上按钮的布局,然后使用一小撮超级胶水将其粘附在适当的位置。
裂环和项链
开口环套在盖子的环上。然后,项链或挂绳可以穿过开口环,准备戴上!
就可以了!这样便可以创建自己的复古风格可穿戴设备!
如果您要共享项目,请查看Adafruit的Show and Tell live流。
所有参与者都将获得免费的乙烯基贴纸。
您还可以检出Adafruit Discord服务器,以便与社区聊天!
责任编辑:wv
-
显示屏
+关注
关注
28文章
4228浏览量
72670 -
microSD
+关注
关注
1文章
45浏览量
15784
发布评论请先 登录
相关推荐
鸿蒙开发之发动画篇
如何让Adafruit 320x240 IPS TFT显示屏在PSoC上运行?
【核桃派1B 开发板试用体验】车窗智能防结冰结霜
【核桃派1B 开发板试用体验】激光声纳双雷达对比测试
Tech Talks最新蓝牙专题回放,以xG24和CircuitPython加速低功耗蓝牙开发!

xG24开发板新增支持CircuitPython,加速物联网原型设计和开发过程
如何在OpenHarmony上实现逐帧动画?
Ghost frame:使用Adafruit PyPortal显示Ghost

适用于Arduino的Adafruit NeoPixel Shield
在适用Arduino的Adafruit NeoPixel Shield上显示文本


 工商网监
工商网监
评论