 如何使用ArduinoIDE设置ESP32
材料清单
AmbiMate MS4多传感器模块
面包板和跳线
Arduino IDE(软件)
什么是AmbiMate MS4?
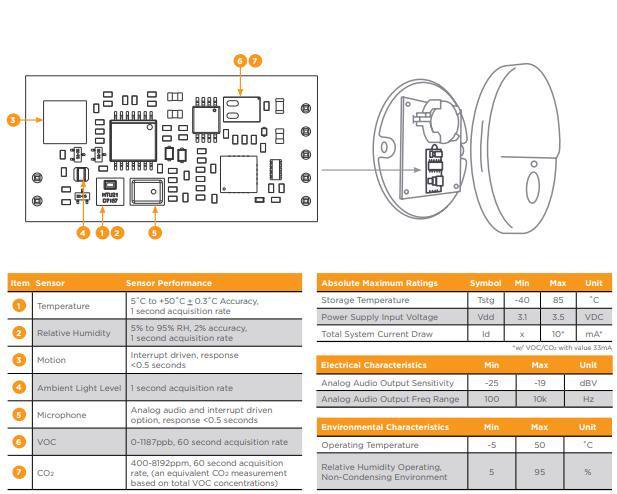
AmbiMate传感器模块MS4系列集成了一套传感器,用于楼宇自动化和连接家庭应用到PCB组件上。它在即用型PCB组件上提供了一组专用传感器,可轻松集成到主机产品中。
传感器包括运动,光线,温度,湿度,VSO(挥发性有机化合物),CO2和声音检测。通过捕获VOC浓度来增加监测空气质量的能力。有许多MS4系列传感器可用 - 我建议您选择带有嵌入式麦克风的传感器来增强运动检测或者能够收听声音事件。
所有MS4系列传感器模块都可以灵活地共享一个通用的七位连接。这使得设计人员可以布置单个PCB封装,以适应生产中所有可用的传感器配置。
MS4应用
室内照明
能源管理
楼宇自动化
工作空间舒适度
区域环境控制
自动化
空气质量测量系统
MS4规范
在MS4版本1中-2314291-2有九个传感器用于:
运动(PIR)
温度
湿度
光
运动(PIR)
温度
声音(麦克风)
VOC
CO2
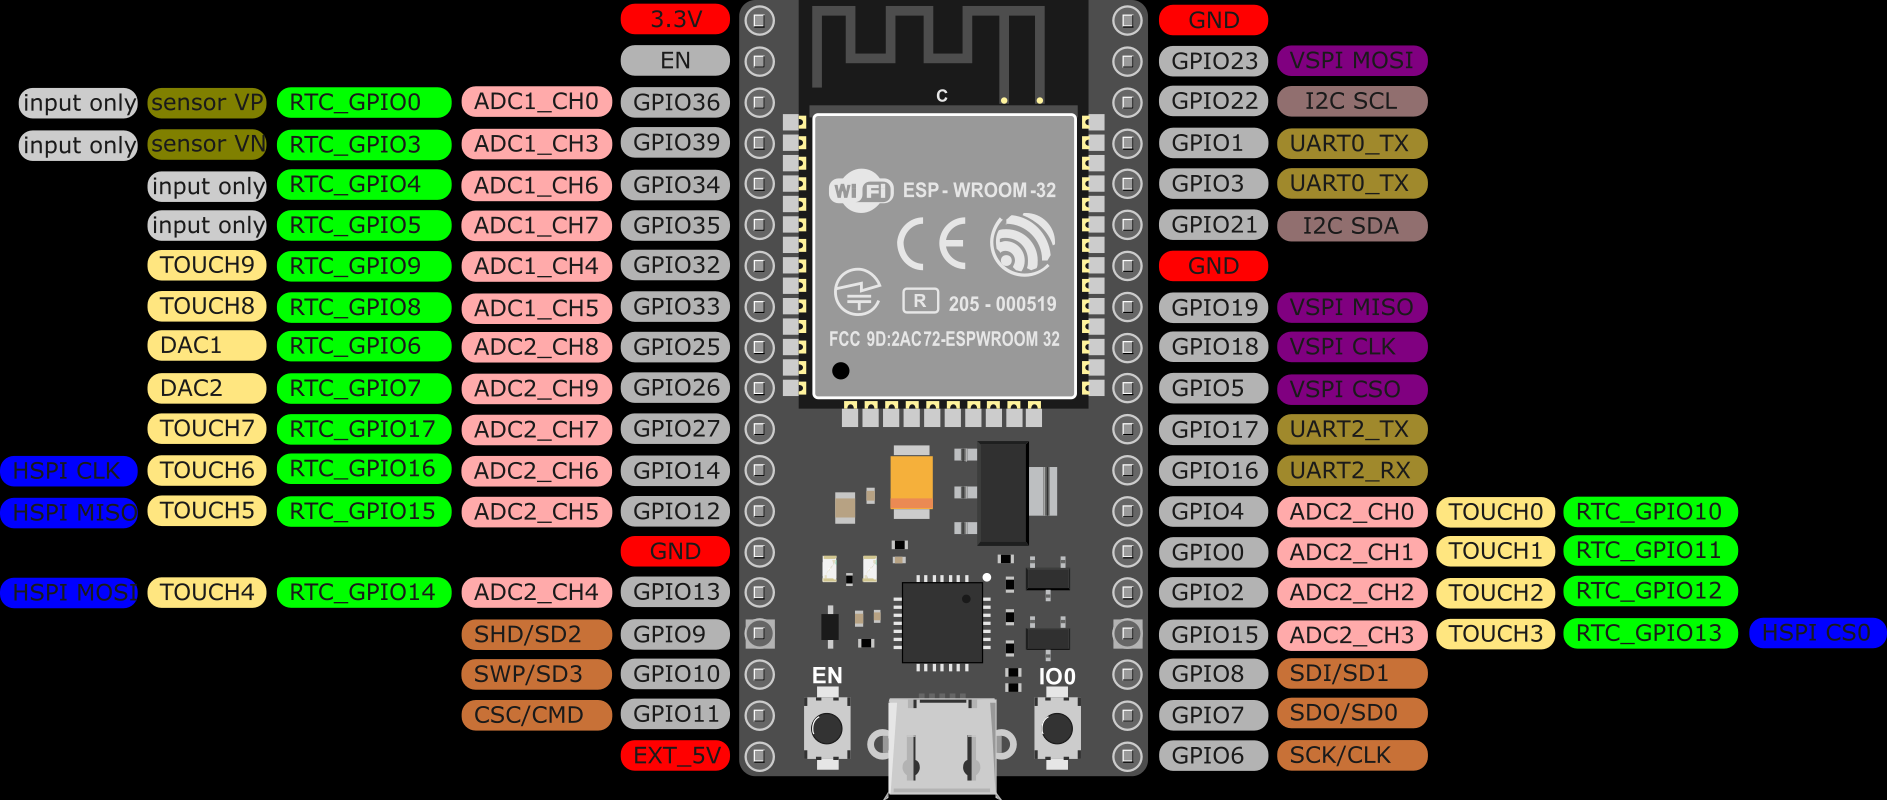
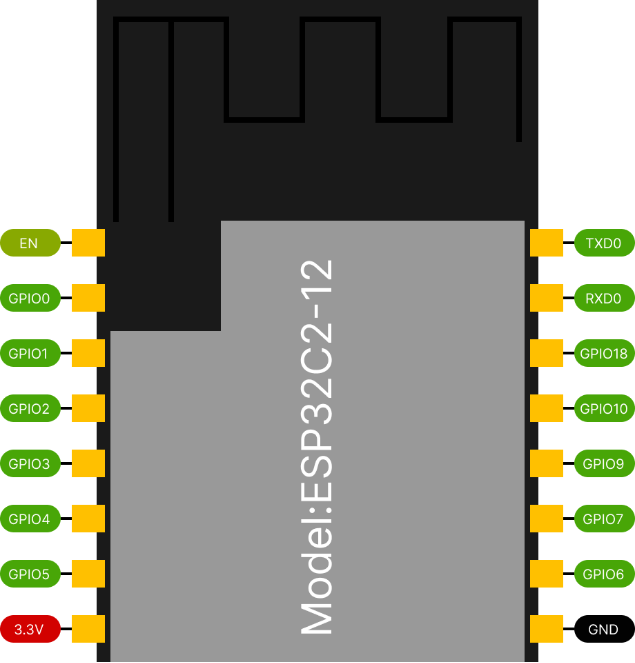
MS4 Pinout
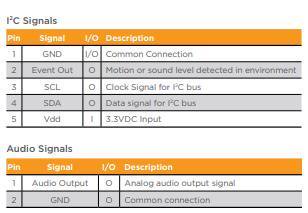
将ESP32连接到MS4
按如下方式将MS4连接到ESP32:
使用Arduino IDE设置ESP32
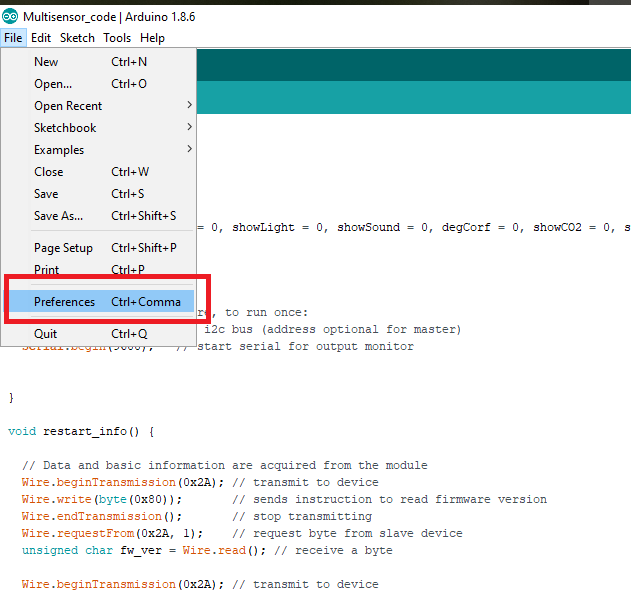
按照下面的屏幕截图所示的步骤使用Arduino IDE对ESP32进行编程。
单击文件》首选项
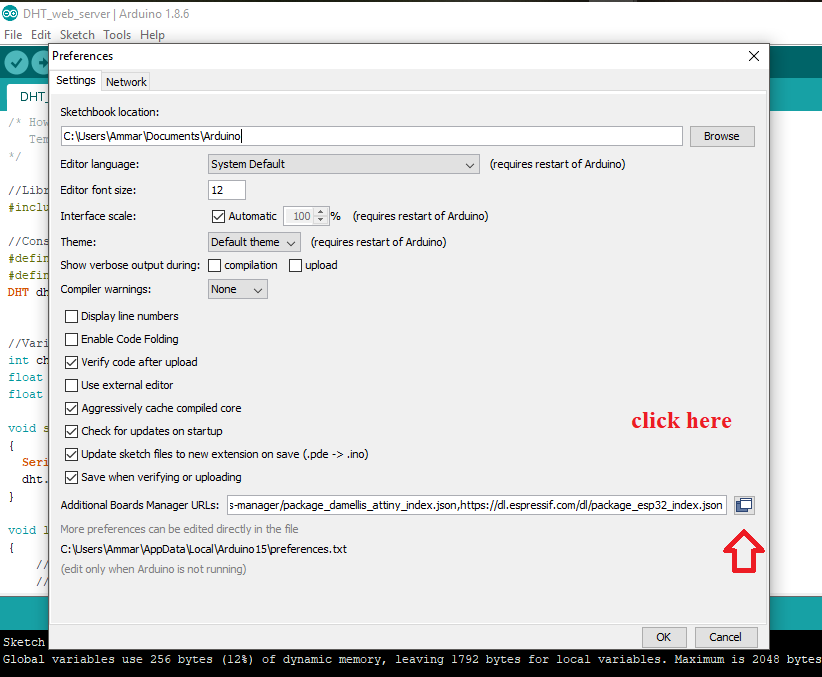

添加URL链接。您可以通过逗号分隔其他链接。
https://dl.espressif.com/dl/package_esp32_index.json
单击 确定 。
单击工具》板》板管理器
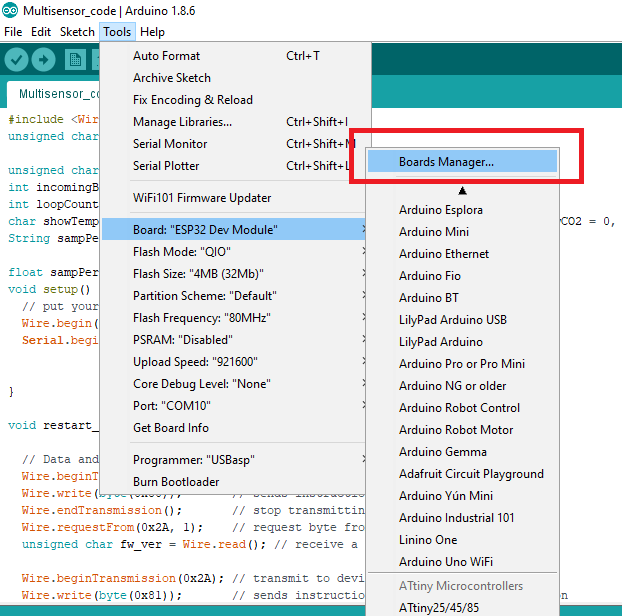
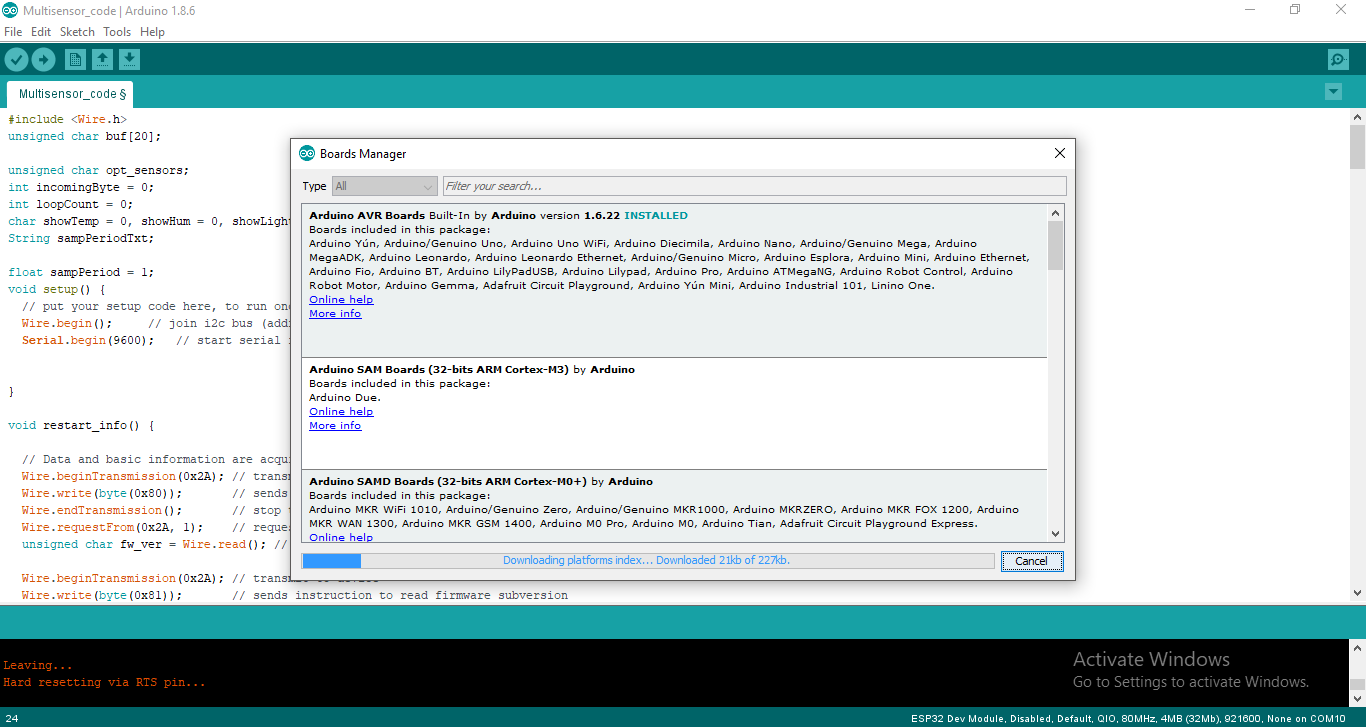
搜索 ESP32 并安装包。

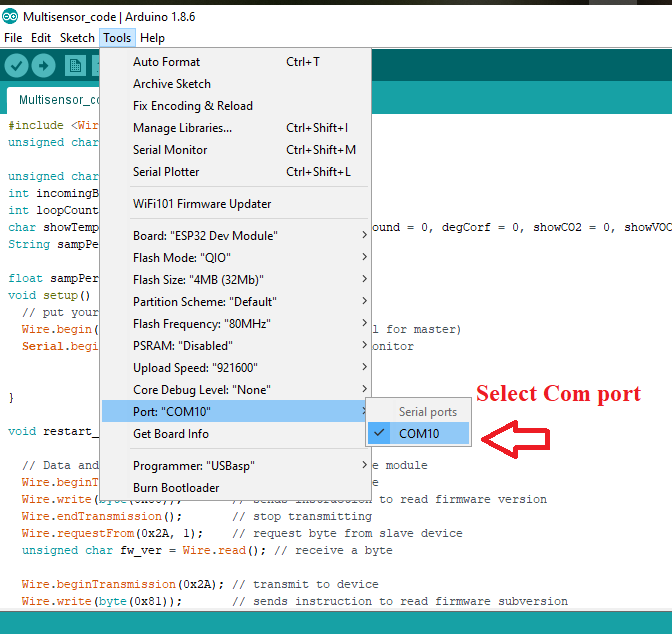
再次转到 工具 并选择 ESP32板 和 COM端口。

上传源代码
复制下面的源代码,将其粘贴到Arduino IDE中,然后上传。您可能需要在上传过程中长按ESP32板上的启动按钮。
#include
unsigned char buf[20];
unsigned char opt_sensors;
int incomingByte = 0;
int loopCount = 0;
char showTemp = 0, showHum = 0, showLight = 0, showSound = 0, degCorf = 0, showCO2 = 0, showVOC = 0, showPwr = 0, showEvents = 0;
String sampPeriodTxt;
float sampPeriod = 1;
void setup() {
// put your setup code here, to run once:
Wire.begin(); // join i2c bus (address optional for master)
Serial.begin(9600); // start serial for output monitor
}
void restart_info() {
// Data and basic information are acquired from the module
Wire.beginTransmission(0x2A); // transmit to device
Wire.write(byte(0x80)); // sends instruction to read firmware version
Wire.endTransmission(); // stop transmitting
Wire.requestFrom(0x2A, 1); // request byte from slave device
unsigned char fw_ver = Wire.read(); // receive a byte
Wire.beginTransmission(0x2A); // transmit to device
Wire.write(byte(0x81)); // sends instruction to read firmware subversion
Wire.endTransmission(); // stop transmitting
Wire.requestFrom(0x2A, 1); // request byte from slave device
unsigned char fw_sub_ver = Wire.read(); // receive a byte
Wire.beginTransmission(0x2A); // transmit to device
Wire.write(byte(0x82)); // sends instruction to read optional sensors byte
Wire.endTransmission(); // stop transmitting
Wire.requestFrom(0x2A, 1); // request byte from slave device
opt_sensors = Wire.read(); // receive a byte
delay(1000);
//If device contains additional CO2 and audio sensor, it is indicated here
Serial.print(“AmbiMate sensors: 4 core”);
if (opt_sensors & 0x01)
Serial.print(“ + CO2”);
if (opt_sensors & 0x04)
Serial.print(“ + Audio”);
Serial.println(“ ”);
Serial.print(“AmbiMate Firmware version ”);
Serial.print(fw_ver);
Serial.print(“。”);
Serial.println(fw_sub_ver);
Serial.print(“Select which sensors to receive data from: ”);
Serial.print(“Temperature [Y/N]: ”);
while (Serial.available() == 0);
showTemp = Serial.read();
Serial.println(showTemp);
Serial.print(“deg C or F [C/F]: ”);
while (Serial.available() == 0);
degCorf = Serial.read();
Serial.println(degCorf);
Serial.print(“Humidity [Y/N]: ”);
while (Serial.available() == 0);
showHum = Serial.read();
Serial.println(showHum);
Serial.print(“Ambient Light [Y/N]: ”);
while (Serial.available() == 0);
showLight = Serial.read();
Serial.println(showLight);
if (opt_sensors & 0x04)
{
Serial.print(“Audio [Y/N]: ”);
while (Serial.available() == 0);
showSound = Serial.read();
Serial.println(showSound);
}
if (opt_sensors & 0x01)
{
Serial.print(“eCO2 [Y/N]: ”);
while (Serial.available() == 0);
showCO2 = Serial.read();
Serial.println(showCO2);
Serial.print(“VOC [Y/N]: ”);
while (Serial.available() == 0);
showVOC = Serial.read();
Serial.println(showVOC);
}
Serial.print(“Power [Y/N]: ”);
while (Serial.available() == 0);
showPwr = Serial.read();
Serial.println(showPwr);
Serial.print(“PIR and Motion Events [Y/N]: ”);
while (Serial.available() == 0);
showEvents = Serial.read();
Serial.println(showEvents);
Serial.print(“ ”);
Serial.print(“Sample Interval[Secs]: ”);
while (Serial.available() == 0);
sampPeriodTxt = “”;
while (Serial.available() 》 0)
{
int inChar = Serial.read();
sampPeriodTxt += (char)inChar;
}
Serial.println(sampPeriodTxt);
sampPeriod = sampPeriodTxt.toFloat();
if (sampPeriod 《 0.5)
{
sampPeriod = 0.5;
Serial.print(“Input exceeds limits, Sample period set to minimum, 0.5 seconds ”);
}
sampPeriod = sampPeriod * 1000; // convert to mSecs
}
//Top line of headings are printed using the following
void printLabels(void) {
Serial.println(“ ”);
Serial.println(“ ”);
// Construct the first line of the headings
if ((showTemp == ‘Y’) || (showTemp == ‘y’))
Serial.print(“Temperature ”);
if ((showHum == ‘Y’) || (showHum == ‘y’))
Serial.print(“Humidity ”);
if ((showLight == ‘Y’) || (showLight == ‘y’))
Serial.print(“Light ”);
if (opt_sensors & 0x04)
{
if ((showSound == ‘Y’) || (showSound == ‘y’))
Serial.print(“Audio ”);
}
if (opt_sensors & 0x01)
{
if ((showCO2 == ‘Y’) || (showCO2 == ‘y’))
Serial.print(“eCO2 ”);
if ((showVOC == ‘Y’) || (showVOC == ‘y’))
Serial.print(“VOC ”);
}
if ((showPwr == ‘Y’) || (showPwr == ‘y’))
Serial.print(“Power ”);
if ((showEvents == ‘Y’) || (showEvents == ‘y’))
Serial.print(“Event ”);
else
Serial.print(“ ”);
// Construct the second line of the headings
if ((showTemp == ‘Y’) || (showTemp == ‘y’))
{
if ((degCorf == ‘F’) || (degCorf == ‘f’))
Serial.print(“deg F ”);
else
Serial.print(“deg C ”);
}
if ((showHum == ‘Y’) || (showHum == ‘y’))
Serial.print(“% ”);
if ((showLight == ‘Y’) || (showLight == ‘y’))
Serial.print(“Lux ”);
if (opt_sensors & 0x04)
{
if ((showSound == ‘Y’) || (showSound == ‘y’))
Serial.print(“dB ”);
}
if (opt_sensors & 0x01)
{
if ((showCO2 == ‘Y’) || (showCO2 == ‘y’))
Serial.print(“PPM ”);
if ((showVOC == ‘Y’) || (showVOC == ‘y’))
Serial.print(“PPB ”);
}
if ((showPwr == ‘Y’) || (showPwr == ‘y’))
Serial.print(“volts”);
Serial.print(“ ”);
}
//Loop starts here
void loop() {
if (loopCount == 0)
{
restart_info();
loopCount = 1;
}
if (loopCount == 1)
{
printLabels();
loopCount = 2;
}
// All sensors except the CO2 sensor are scanned in response to this command
Wire.beginTransmission(0x2A); // transmit to device
// Device address is specified in datasheet
Wire.write(byte(0xC0)); // sends instruction to read sensors in next byte
Wire.write(0xFF); // 0xFF indicates to read all connected sensors
Wire.endTransmission(); // stop transmitting
// Delay to make sure all sensors are scanned by the AmbiMate
delay(100);
Wire.beginTransmission(0x2A); // transmit to device
Wire.write(byte(0x00)); // sends instruction to read sensors in next byte
Wire.endTransmission(); // stop transmitting
Wire.requestFrom(0x2A, 15); // request 6 bytes from slave device
// Acquire the Raw Data
unsigned int i = 0;
while (Wire.available()) { // slave may send less than requested
buf[i] = Wire.read(); // receive a byte as character and store in buffer
i++;
}
// convert the raw data to engineering units, see application spec for more information
unsigned int status = buf[0];
float temperatureC = (buf[1] * 256.0 + buf[2]) / 10.0;
float temperatureF = ((temperatureC * 9.0) / 5.0) + 32.0;
float Humidity = (buf[3] * 256.0 + buf[4]) / 10.0;
unsigned int light = (buf[5] * 256.0 + buf[6]);
unsigned int audio = (buf[7] * 256.0 + buf[8]);
float batVolts = ((buf[9] * 256.0 + buf[10]) / 1024.0) * (3.3 / 0.330);
unsigned int co2_ppm = (buf[11] * 256.0 + buf[12]);
unsigned int voc_ppm = (buf[13] * 256.0 + buf[14]);
if ((showTemp == ‘Y’) || (showTemp == ‘y’))
{
if ((degCorf == ‘F’) || (degCorf == ‘f’))
Serial.print(temperatureF, 1);
else
Serial.print(temperatureC, 1);
Serial.print(“ ”);
}
if ((showHum == ‘Y’) || (showHum == ‘y’))
{
Serial.print(Humidity, 1);
Serial.print(“ ”);
}
if ((showLight == ‘Y’) || (showLight == ‘y’))
{
Serial.print(light);
Serial.print(“ ”);
}
if (opt_sensors & 0x04)
{
if ((showSound == ‘Y’) || (showSound == ‘y’))
{
Serial.print(audio);
Serial.print(“ ”);
}
}
if (opt_sensors & 0x01)
{
if ((showCO2 == ‘Y’) || (showCO2 == ‘y’))
{
Serial.print(co2_ppm);
Serial.print(“ ”);
}
if ((showVOC == ‘Y’) || (showVOC == ‘y’))
{
Serial.print(voc_ppm);
Serial.print(“ ”);
}
}
if ((showPwr == ‘Y’) || (showPwr == ‘y’))
{
Serial.print(batVolts);
Serial.print(“ ”);
}
if ((showEvents == ‘Y’) || (showEvents == ‘y’))
{
if (status & 0x80)
Serial.print(“ PIR_EVENT”);
if (status & 0x02)
Serial.print(“ AUDIO_EVENT”);
if (status & 0x01)
Serial.print(“ MOTION_EVENT”);
}
Serial.print(“ ”);
// all sensors except the CO2VOC sensor are scanned at this rate.
// CO2/VOC sensor is only updated in AmbiMate every 60 seconds
delay(sampPeriod - 100);
incomingByte = Serial.read();
if ((incomingByte == ‘R’) || (incomingByte == ‘r’))
{
//Serial.print(“Got R ”);
loopCount = 0;
}
}

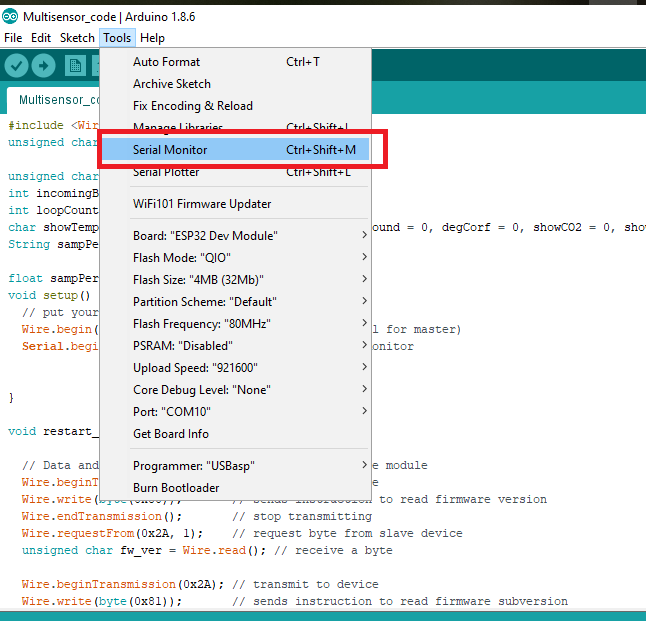
上传代码后,点击串行监视器。
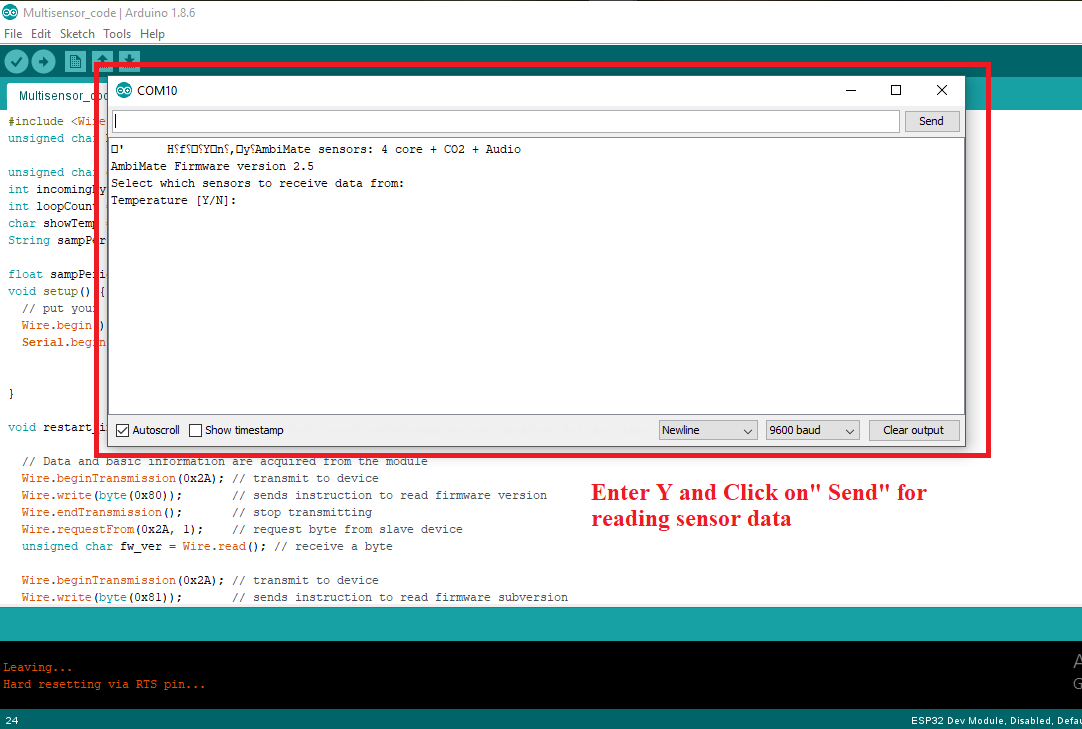
选择你想要的传感器喜欢通过输入‘ Y ’来选择它。

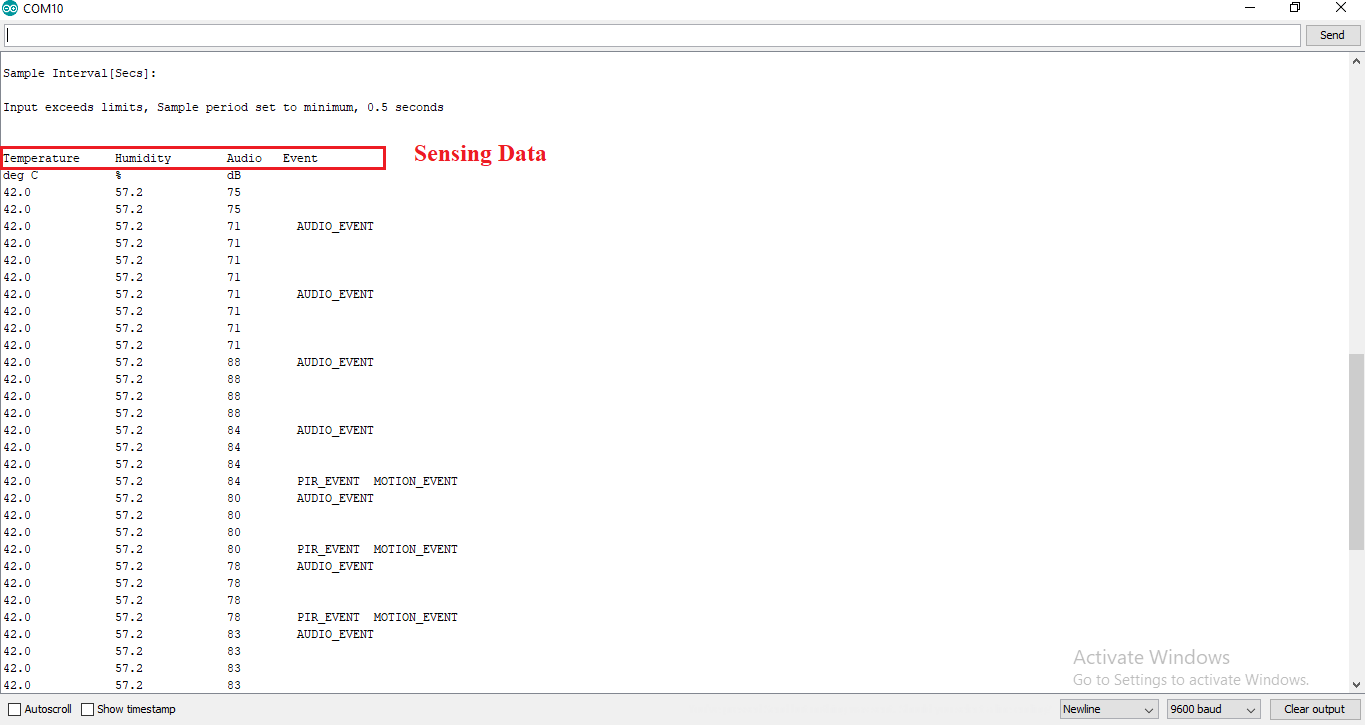
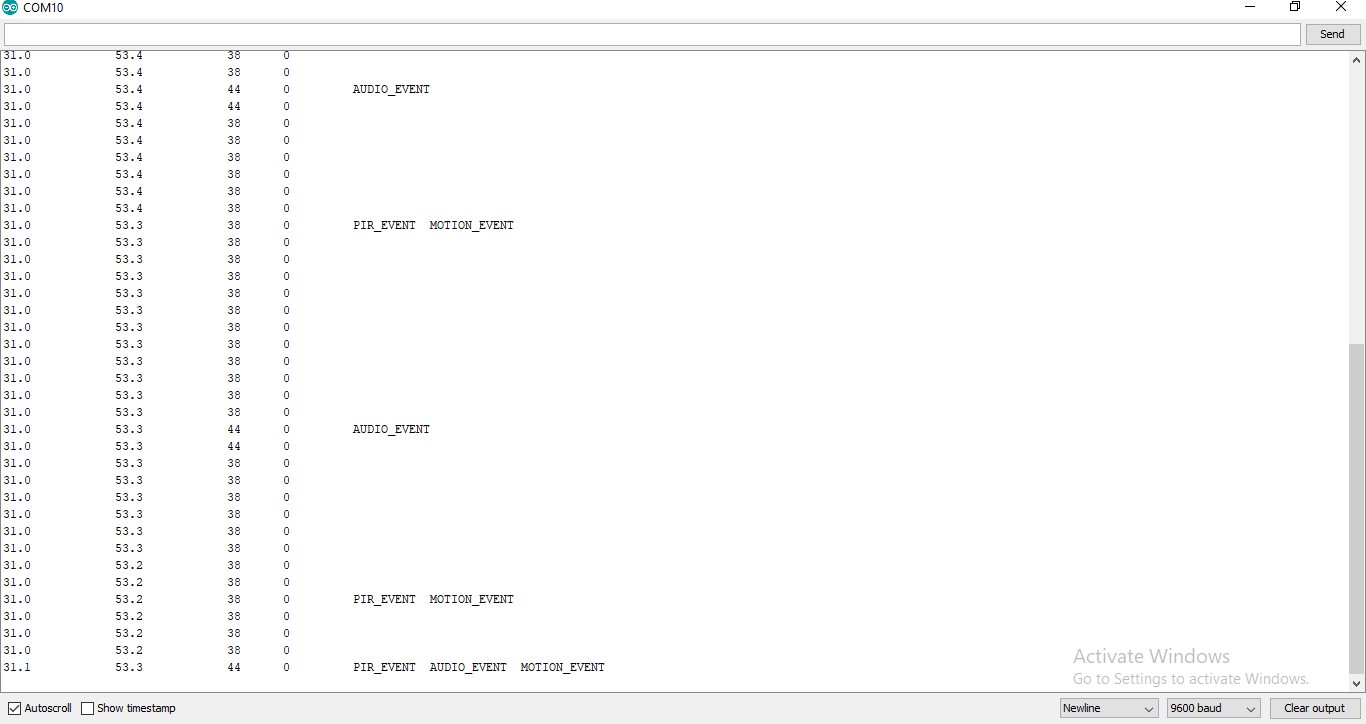
您现在可以看到传感器数据进来。
我希望这个超级传感器模块能够为您未来的项目提供便利!
-
Arduino
+关注
关注
184文章
6427浏览量
184828 -
ESP32
+关注
关注
13文章
896浏览量
15806
发布评论请先 登录
相关推荐
ESP32-C2在小魔方遥控器的应用

ESP32-PICO系列技术规格书

esp32s3使用多串口
ESP8266或ESP32上的WiFi Webradio
![[<b class='flag-5'>esp32</b>教程] 5、UART使用](https://file1.elecfans.com/web2/M00/89/8A/wKgZomSHL9WAMOvpAADoQjNqhTg036.png)
![[<b class='flag-5'>esp32</b>教程] 4、LEDC使用](https://file1.elecfans.com/web2/M00/88/C2/wKgaomRwrEGAdyEQAAAvfpAfL6k315.png)
![[<b class='flag-5'>esp32</b>教程]2、按键中断](https://file1.elecfans.com/web2/M00/82/75/wKgaomRTtwiAdatUAAAuERpZh60777.png)
![[<b class='flag-5'>esp32</b>教程]1、点灯之术](https://file1.elecfans.com/web2/M00/82/67/wKgaomRNHPiAZRZcAAAXIfrDybI889.png)


 工商网监
工商网监
评论