PIC'ing the MAX3100: Adding USB to a PIC Microcontroller Using the MAX3100 UART
Abstract: USB has just become easy to implement. This application note eases equipment designers into USB by allowing them to continue to transmit and receive data using the familiar UART frames of the MAX3100 UART. A UART-to-USB converter IC and operating system driver will take care of all of the USB complexity. The application note describes all of the software and hardware you need in order to transmit and receive data using the MAX3100 over USB.
Background
The UART (universal asynchronous receiver transmitter) has been the standard serial port framer ever since IBM's original PC motherboard used the Intel 8250 UART. Decades later, the UART continues to be widely used due to its reliability and simplicity.
The universal serial bus (USB) has largely replaced the standard serial port as the way to connect devices to a PC because it is simpler, more foolproof, and faster. But while USB makes connection easier for the user, it presents the designer with additional challenges. Many designers continue to use the UART with the standard serial port, waiting for products that make USB easier to implement. Happily, that day has arrived. A USB interface can now be achieved using the MAX3100 and a UART-to-USB converter. The designer works with the familiar UART frames of the MAX3100 UART and the UART-to-USB converter IC and an operating system driver take care of the complexities of USB.
The MAX3100 is the first UART targeted specifically for microcontroller systems. Its SPI™/QSPI™ compatible interface allows the MAX3100 to be used with almost any microcontroller. The SPI/QSPI interface is ideal because it is easy to implement with either an on-chip SPI/QSPI peripheral or just 4 GPIOs. The MAX3100 supports SPI data rates up to 4.2MHz and its UART supports baud rates up to 230kBd.
This application note eases equipment designers into USB by allowing them to continue to transmit and receive data using standard UART data frames.The information below describes all of the software and hardware you need in order to transmit and receive data using the MAX3100 over USB.
A UART-Based USB Design
The application circuit shown in Figure 1 consists of the MAX3100 UART, a FT232BM UART-to-USB converter, a 93C46 serial EEPROM, and a PIC16F84 microcontroller. Since the PIC16F84 does not have any internal USB or UART peripherals, the MAX3100 makes the perfect external UART peripheral. The program, shown in Listing 1, interfaces the PIC16F84 to the MAX3100 via SPI.
Larger Image
Figure 1. MAX3100 application schematic.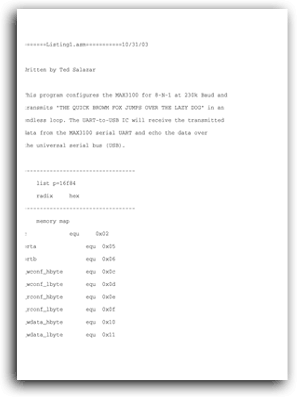
Download
Listing 1 is an example assembly program that interfaces the PIC16F84 to the MAX3100 via SPI.
The example assembly program continuously transmits the message:
"THE QUICK BROWN FOX JUMPS OVER THE LAZY DOG".
The MAX3100 receives this data via SPI and continuously transmits the same message with standard UART frames to the FT232BM at 230kBd. The FT232BM converts the UART frame data to a USB compatible format so that a PC can easily receive the data using a USB virtual COM port.
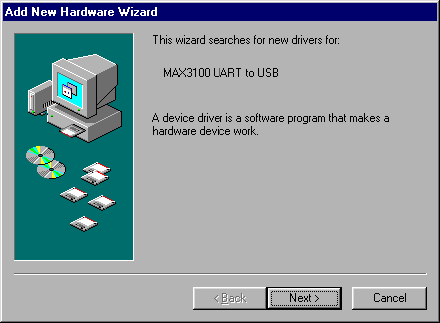
The USB virtual COM port driver must be installed on the PC the very first time an active USB serial cable is plugged into the circuit in Figure 1. No power should be applied to the board since the entire circuit is powered from the USB port. Copy the compressed file listed in Table 1 to your hard drive. I copied the compressed file to a subdirectory on my C drive called C:\3100appnote. Please follow the step by step directions below in order to successfully install the virtual COM port driver.
The following steps require this download:
Table 1. Unzip the file R9012134.ZIP in a subdirectory on your hard drive
| Description | Filename |
| Win98/2000 Virtual COM port driver | R9012134.ZIP |
Step 1: Once the board is plugged into an active USB serial cable you will see the following screen show up. Press the Next > button.
Step 2: When the second screen shows up, press the Next > button to search for the best driver for your device.

Step 3: When the third screen shows up, guide Windows to the location you uncompressed the file R9012134.ZIP by pressing the Browse button. For example C:\3100appnote. Press the Next > button to start the search.

Step 4: When the next screen shows up press the Next > button after the FTDIBUS.INF driver file has been located.

Step 5: When the last screen shows up press the Finish button to complete the installation process.

Step 6: Verify that a USB virtual COM port was installed correctly by viewing the ports section of the Device Manager tab located in System Properties | Device Manager | Ports.

Once the USB virtual COM port driver is installed, all of your favorite standard serial port PC applications will now be able to transmit and receive data over USB using a virtual COM port as opposed to the typical hardware COM port. Many hardware COM ports are limited to 115kBd but the virtual COM port emulates a hardware COM port in software and supports Baud rates up to 921kBd.
QSPI is a trademark of Motorola, Inc.
SPI is a trademark of Motorola, Inc.