 电子发烧友App


 创作
创作 发文章
发文章 发帖
发帖  提问
提问  发资料
发资料 发视频
发视频资料介绍
描述
介绍
在本文的第一部分,我们展示了如何创建所有流程来实现这个项目。您可以访问链接中的第一部分(访问文章的第一部分)
现在,通过第二部分,我们将介绍创建功能以编程时钟和日期以及编程设备激活时间的所有过程。
因此,通过这些功能,我们将了解实时时钟 (RTC) DS1307的几个应用原理和使用方法。
项目的拟议职能
根据第一部分的解释,该项目的目标是在用户设定的时间内激活和停用设备。
因此,根据问题,需要使用CHIP Real-Time Clock 。CHIP 用于计算 7 个变量:秒、分、小时、凌晨、月日、月和年。因此,为此,需要实施一个小时制,以便用户调整小时、日期、激活和停用时间。
为此,将根据第一部分所示的图表实现几个功能来解决这个问题。因此,我们将开发配置实时时钟的实际时间和日期以及小时以激活设备的功能连接在继电器中。
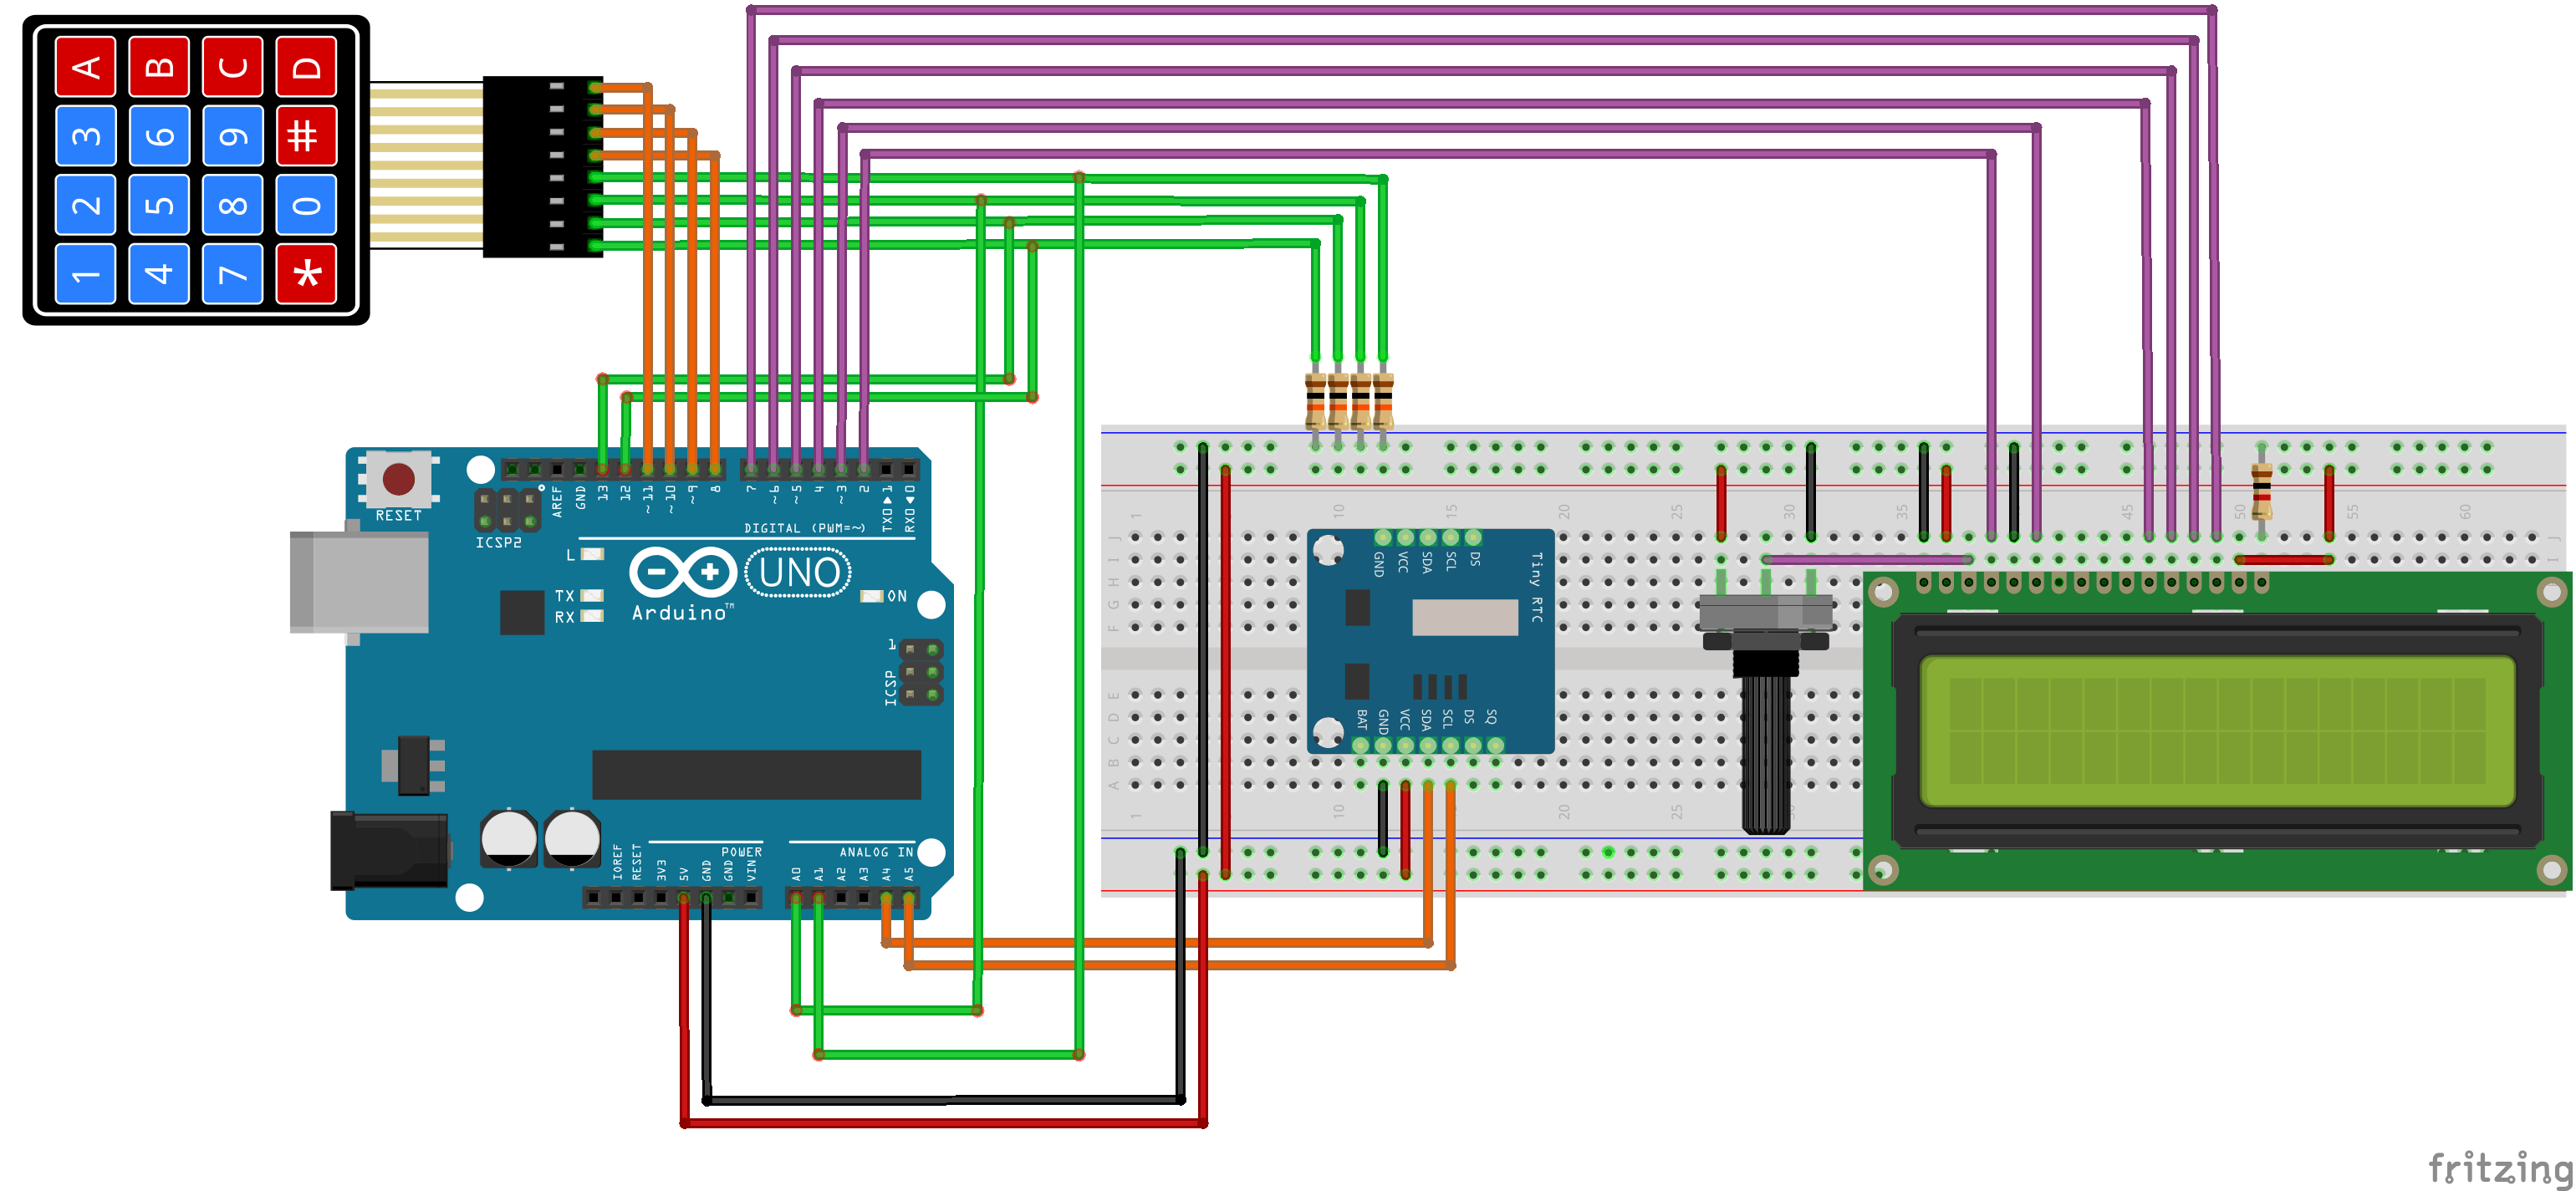
下文将介绍图 2 中的电路原理图和为项目第二部分开发的代码。
项目开发
首先,我们将通过变量创建和设备初始化来介绍配置过程。
因此,在进入 void setup() 之前,包含所有库、变量和函数原型。因此,请参见实现了三个功能:ReadKeypad、AdjustHour 和 ActivationHour。
此后每个函数指定如下:
- ReadKeyPad() :执行键盘按钮的读取,并通过此键盘使用数字及其字母。“A”字母用于调整小时,“C”用于清除小时信息,“D”作为完成参数配置的按键。
- AdjustTime() :负责调整DS1307的内部日期和时间;
- ActivationHour() :用于调整小时以激活连接在继电器中的设备。
#include <DS1307.h>
#include <Wire.h>
#include <EEPROM.h>
#include <LiquidCrystal.h>

#define MEMORY 100

const int rs = 2, en = 3, d4 = 4, d5 = 5, d6 = 6, d7 = 7;

LiquidCrystal lcd(rs, en, d4, d5, d6, d7);
char tempo[9] = "";
char data[9] = "";
int DataTime[7];
byte SegAnt = 0, SegAtual = 0;

byte ReadKeyPad(void);
void AdjustTime(void);
void ActivationHour(void);

void setup()
{
     Serial.begin(9600);
     DS1307.begin();

     //Config pins to control columns of the matrix keyboard
     for(int key = 8; key < 12; key++)
     {
       pinMode(key, OUTPUT);
     }

     //Config pins to read lines of the matrix keyboard
     for(int key = 12; key < 16; key++)
     {
       pinMode(key, INPUT);
     }

     for(int key = 8; key < 12; key++)
     {
       digitalWrite(key, LOW);
     }

     lcd.begin(16,2);
}
在原型声明之后,初始化设备RTC DS1307和LCD 16x2并配置Arduino的所有引脚。
现在,我们将通过函数 void loop() 了解该系统的逻辑编程是如何工作的。
项目主要逻辑
首先,当系统在循环函数开始时执行初始化过程的验证。该验证由如下所示的第一个条件表示。
if(EEPROM.read(MEMORY) != 73)
这样,系统就验证了用户是第一次进入系统。如果 EEPROM(位置 100)的读取数与 73 不同,则需要配置系统的时间和日期。
因此,在配置好时间和日期后,系统将 73 值写入 EEPROM。
EEPROM.write(MEMORIA, 73);
此数字用于向用户发出信号,表明时间和日期已配置。
void loop()
{
   if(EEPROM.read(MEMORIA) != 73)
   {
     AjustarHora();
     EEPROM.write(MEMORIA, 73);
     lcd.clear();
     ActivationHour();
   }

   DS1307.getDate(DataTime);
   SegAtual = DataTime[6];

   if(LerTeclado() == 10)
   {
     AjustarHora();
     lcd.clear();
     ActivationHour();
     lcd.clear();
   }

   if(abs(SegAtual - SegAnt) >= 1)
   {

   sprintf(tempo, "%02d:%02d:%02d", DataTime[4], DataTime[5], DataTime[6]);
   sprintf(data, "%02d/%02d/%02d", DataTime[2], DataTime[1], DataTime[0]);

   lcd.setCursor(4,1);
   lcd.print(tempo);
   lcd.setCursor(4,0);
   lcd.print(data);
   SegAnt = SegAtual;

   }
}
此后,日期和时间的所有 7 个参数都被获取并存储在 DataTime 向量中。
获取后,秒的值存储在变量 SegAtual 中。此变量用于存储秒的值。命令如下所示。
DS1307.getDate(DataTime);
SegAtual = DataTime[6];
现在,将执行条件以了解用户是否按下“A”键来调整时钟时间和设备的激活时间。
按键“A”用10表示,是按下“A”时函数的返回值,如下所示。
if(LerTeclado() == 10)
{
   AjustarHora();
   lcd.clear();
   ActivationHour();
   lcd.clear();
}
最后,小时和数据显示在LCD 显示屏上。为了显示小时和日期,执行以下条件。
if(abs(SegAtual - SegAnt) >= 1)
{
   sprintf(tempo, "%02d:%02d:%02d", DataTime[4], DataTime[5], DataTime[6]);
   sprintf(data, "%02d/%02d/%02d", DataTime[2], DataTime[1], DataTime[0]);
   lcd.setCursor(4,1);
   lcd.print(tempo);
   lcd.setCursor(4,0);
   lcd.print(data);
   SegAnt = SegAtual;
}
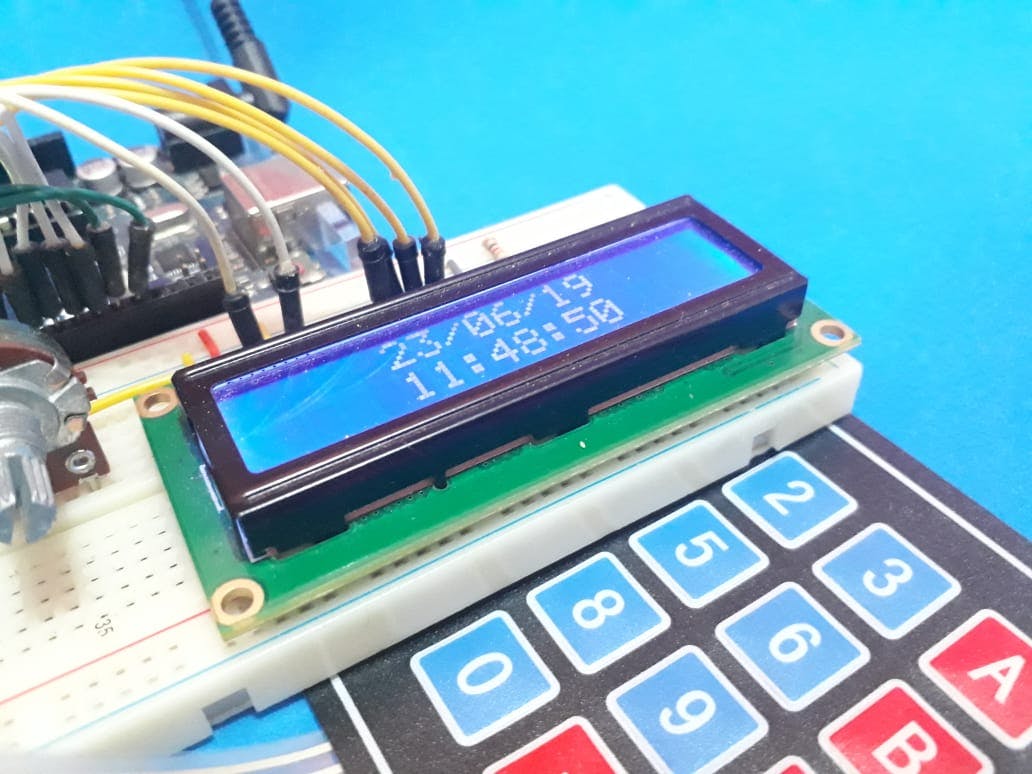
因此,通过这个条件,日期和小时将每隔一秒出现在LCD上,如图 3 所示。
现在,将解释调整时间和调整小时以激活连接在继电器上的设备的功能。
调整设备时钟和激活时间的功能
首先,功能非常相似,现在,您将看到每个功能的工作原理。这样,我们将分析 AdjustTime() 函数。
调整时间功能
现在,使用我们的函数,我们将看到该函数的某些部分在整个函数中重复出现,您将看到该函数分为两部分:
- 插入时钟的小时和分钟,
- 插入月、月、年数据;
首先,我们创建函数中使用的所有变量。
void AdjustTime()
{

  int times[6];
  int  DadosTempo[7];
  bool controle = 0;
  bool EstadoSobe = 0, EstadoDesce = 0;
  byte cont = 0;
  byte number = 0;
  int digitos[6];
  byte PosCursor = 0;
  byte t = 0;
  bool Validate = 0;
  char tempo[7] = "";
  char data[15] = "";

  DS1307.getDate(DadosTempo);

  sprintf(tempo, "%02d:%02dh", DadosTempo[4], DadosTempo[5]);
  sprintf(data, "%02d/%02d/%02d", DadosTempo[2], DadosTempo[1], DadosTempo[0]);

        times[4] = DadosTempo[4];
        times[5] = DadosTempo[5];
        times[3] = DadosTempo[3];
        times[2] = DadosTempo[2];
        times[1] = DadosTempo[1];
        times[0] = DadosTempo[0];
        times[6] = DadosTempo[6];

        digitos[0] = times[4]/10; //Armazena a Dezena das Horas
        digitos[1] = times[4]%10; //Armazena a Unidade das Horas
        digitos[2] = times[5]/10; //Armazena a Dezena dos Minutos
        digitos[3] = times[5]%10; //Armazena a Unidade dos Minutos

        do
        {
            lcd.setCursor(0,0);
            lcd.print("                ");
            lcd.setCursor(2,0);
            lcd.print("Adjust hour:");
            lcd.setCursor(0,1);
            lcd.print("                ");
            lcd.setCursor(5,1);
            lcd.print(tempo);
            PosCursor = 5;

          do
          {
            number = ReadKeyPad();
            delay(100);

            if( (number >= 0 && number <= 9) && (controle == 0) && (cont < 4) )
            {

              digitos[cont] = number;
              cont++;
              controle = 1;
              lcd.setCursor(PosCursor,1);
              lcd.print(number);
              PosCursor++;

              if(cont == 2 || cont == 4)
              {
                PosCursor = PosCursor + 1;
              }

            }

            if(number == 16 && controle == 1)
            {
              controle = 0;
            }

            if(number == 12)
            {
                for(cont = 0; cont < 4; cont++)
                {
                  digitos[cont] = 0;
                }
              lcd.setCursor(0,1);
              lcd.print("                ");
              lcd.setCursor(5,1);
              lcd.print("00:00h");
              PosCursor = 5;
              cont = 0;
              for(int i = 4; i < 6; i++)
              {
                times[i] = 0;
              }
            }

          }while(number != 13);

          times[4] = (digitos[0]*10) + digitos[1];
          times[5] = (digitos[2]*10) + digitos[3];

          if((times[4] < 0 || times[4] > 23) || (times[5] < 0 || times[5] > 59))
          {
            lcd.clear();
            lcd.setCursor(4,0);
            lcd.print("Invalid");
            lcd.setCursor(6,1);
            lcd.print("Hour");
            delay(2000);

            Validate = 1;

            lcd.clear();
            lcd.setCursor(0,0);
            lcd.print("                ");
            lcd.setCursor(1,0);
            lcd.print("Adjust Hours:");
            lcd.setCursor(0,1);
            lcd.print("                ");
            lcd.setCursor(5,1);
            lcd.print("00:00h");

            sprintf(tempo, "%02d:%02dh", 0, 0);

            PosCursor = 5;
            cont = 0;

              for(int i = 0; i < 4; i++)
              {
                times[i] = 0;
              }
          }
        }while(Validate == 1);

            do
            {
              number = ReadKeyPad();
              delay(200);
            }while(number != 16);
/*--------------------------------Date Configuration--------------------------------*/

          PosCursor = 4;

          do
          {
            //Transformacao dos digitos da data para dezenas e unidades
            digitos[0] = times[2]/10; //Armazena a Dezena da Data
            digitos[1] = times[2]%10; //Armazena a Unidade da Data
            digitos[2] = times[1]/10; //Armazena a Dezena do Mes
            digitos[3] = times[1]%10; //Armazena a Unidade do Mes
            digitos[4] = times[0]/10; //Armazena a Dezena do Ano
            digitos[5] = times[0]%10; //Armazena a Unidade do Ano

            sprintf(data, "%02d/%02d/%02d", times[2], times[1], times[0]);

              lcd.setCursor(0,0);
              lcd.print("                ");
              lcd.setCursor(2,0);
              lcd.print("Adjust Date:");
              lcd.setCursor(0,1);
              lcd.print("                ");
              lcd.setCursor(4,1);
              lcd.print(data);

              PosCursor = 4;
              cont = 0;

            do
            {
            number = ReadKeyPad();
            delay(100);

            if( (number >= 0 && number <= 9) && (controle == 0) && (cont < 6) )
            {
              digitos[cont] = number;
              cont++;
              controle = 1;
              lcd.setCursor(PosCursor,1);
              lcd.print(number);
              PosCursor++;
              if(cont == 2 || cont == 4)
              {
                PosCursor = PosCursor + 1;
              }
            }

            if(number == 16 && controle == 1)
            {
              controle = 0;
            }

            if(number == 12)
            {
                for(cont = 0; cont < 6; cont++)
                {
                  digitos[cont] = 0;
                }
              lcd.setCursor(0,1);
              lcd.print("                ");
              lcd.setCursor(4,1);
              lcd.print("00/00/00");
              PosCursor = 4;
              cont = 0;
            }
          }while(number != 13);

          times[2] = (digitos[0]*10) + digitos[1]; //Transformando os numeros lidos para data do mes em dois dígitos
          times[1] = (digitos[2]*10) + digitos[3]; //Transformando os numeros lidos para mes em dois dígitos
          times[0] = (digitos[4]*10) + digitos[5]; //Transformando os numeros lidos para ano em dois dígitos

          if((times[2] <= 0 || times[2] > 31) || (times[1] <= 0 || times[1] > 12) || times[0] <= 0)
          {
              lcd.clear();
              lcd.setCursor(4,0);
              lcd.print("Invalid");
              lcd.setCursor(6,1);
              lcd.print("Date");
              delay(2000);
              Validate = 1;
              lcd.clear();
              lcd.setCursor(0,0);
              lcd.print("                ");
              lcd.setCursor(2,0);
              lcd.print("Adjuste Date:");
              lcd.setCursor(0,1);
              lcd.print("                ");
              lcd.setCursor(3,1);
              lcd.print("00/00/00");
              PosCursor = 5;
              cont = 0;
                for(byte i = 0; i < 3; i++)
                {
                  times[i] = 0;
                }
         }
        }while(Validate == 1);

        do
        {
          number = ReadKeyPad();
          delay(200);
        }while(number != 16);

         lcd.clear();

         DS1307.setDate(times[0],times[1],times[2],times[3],times[4],times[5],00);//year,month,date of month, day of week,hour,minutes,second
}
此后,DS1307的功能是获取数据并存储在DadosTempo 中,然后将值拆分并打印在字符串“tempo”和“data”中。这两个字符串用于在LCD后面打印其信息。
DS1307.getDate(DadosTempo);

sprintf(tempo, "%02d:%02dh", DadosTempo[4], DadosTempo[5]);
sprintf(data, "%02d/%02d/%02d", DadosTempo[2], DadosTempo[1], DadosTempo[0]);
矢量“DadosTempo”的数据被分离并存储在矢量时间中。向量“times”将用于接收副本并操作“DadosTempo”向量的数据。
紧接着,times[4] 和 times[5] 将被分成十位和个位,在时间设置中进行操作。
times[4] = DadosTempo[4];
         times[5] = DadosTempo[5];
         times[3] = DadosTempo[3];
         times[2] = DadosTempo[2];
         times[1] = DadosTempo[1];
         times[0] = DadosTempo[0];
         times[6] = DadosTempo[6];

         digitos[0] = times[4]/10; //Store ten of hours
         digitos[1] = times[4]%10; //Store unit of hours
         digitos[2] = times[5]/10; //Store ten of minutes
         digitos[3] = times[5]%10; //Store unit of minutes
之后,系统会根据下面的代码显示消息“Adjust Hour:”并在第二行显示“tempo”字符串的内容。
lcd.setCursor(0,0);
         lcd.print("                ");
         lcd.setCursor(2,0);
         lcd.print("Adjust hour:");

         lcd.setCursor(0,1);
         lcd.print("                ");
         lcd.setCursor(5,1);
         lcd.print(tempo);

         PosCursor = 5;
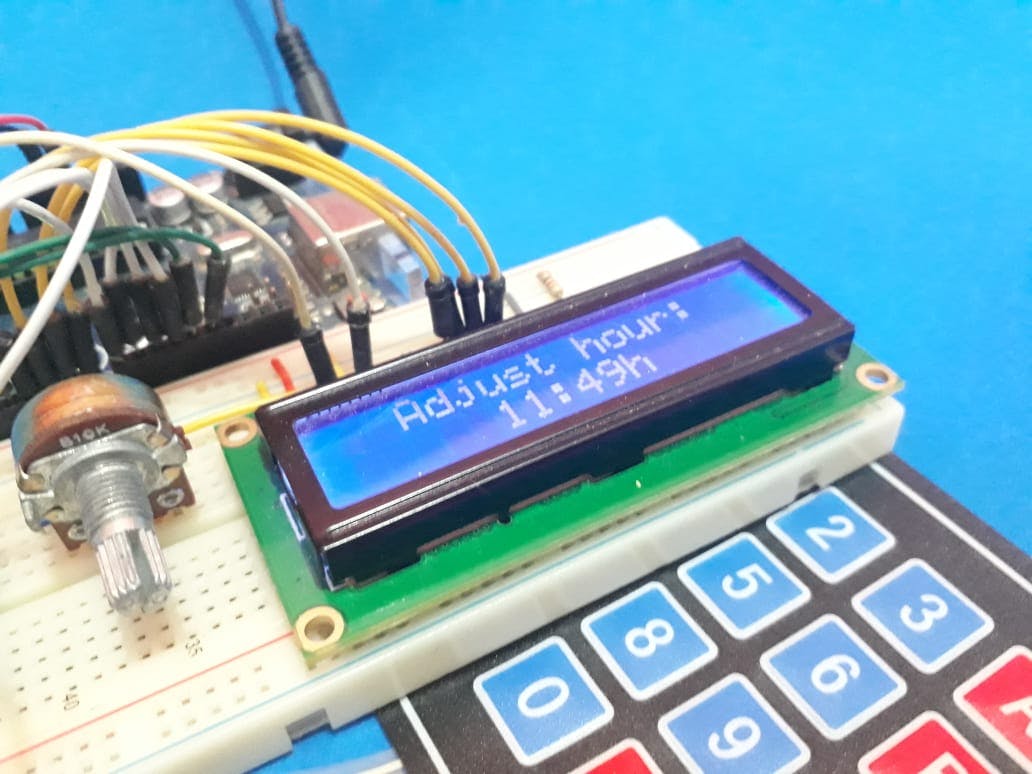
图 4 显示了LCD 显示屏中显示的消息。
一旦消息在LCD中打印,系统就会开始读取过程以验证用户按下的键是什么。这个过程由下面的代码表示。
do
           {

             number = ReadKeyPad();
             delay(100);

             if( (number >= 0 && number <= 9) && (controle == 0) && (cont < 4) )
             {
               digitos[cont] = number;
               cont++;
               controle = 1;

               lcd.setCursor(PosCursor,1);
               lcd.print(number);
               PosCursor++;

               if(cont == 2 || cont == 4)
               {
                 PosCursor = PosCursor + 1;
               }
             }

             if(number == 16 && controle == 1)
             {
               controle = 0;
             }

             if(number == 12)
             {

                 for(cont = 0; cont < 4; cont++)
                 {
                   digitos[cont] = 0;
                 }

               lcd.setCursor(0,1);
               lcd.print("                ");
               lcd.setCursor(5,1);
               lcd.print("00:00h");

               PosCursor = 5;
               cont = 0;

               for(int i = 4; i < 6; i++)
               {
                 times[i] = 0;
               }
             }

           }while(number != 13);
首先,系统读取键盘并将值存储在变量号中,然后验证如下所示的条件。
if( (number >= 0 && number <= 9) && (controle == 0) && (cont < 4) )
根据条件,它验证了三个重要点:
- 验证一个数字是否在 0 到 9之间;
- 验证变量“controle”是否等于 0。该变量用于允许条件仅一次为真,并且仅读取一次该数字。
- 验证变量“cont”是否小于 4。此变量用于允许用户仅输入 4位数字:两位数表示小时,两位数表示分钟。
这样,当条件为真时,数字存储在数字向量中并打印在LCD中。在此之后,变量“PosCursor”被递增到指向单位位置。
如果 cont 变量等于 2 或 cont 等于 4,则光标位置再次增加,因为“:”信号。这样,光标将指向分钟的小数位。
现在,如果上述条件不成立,则将验证以下条件。如果用户按下任何键,函数“LerTeclado()”返回数字 16 表示没有按下任何键。
if(number == 16 && controle == 1)
{
  controle = 0;
}
因此,如果此条件为真,系统将在变量“controle”处归零。此变量用于控制在接收用户按下的 0 到 9 之间的数字的条件下的访问。
最后,我们要检查最后一个条件。如果按下“C”键,则返回值为 13。
因此,通过此键,系统将清除小时的值,以允许用户再次输入新的值。这可以在图 5 中看到。
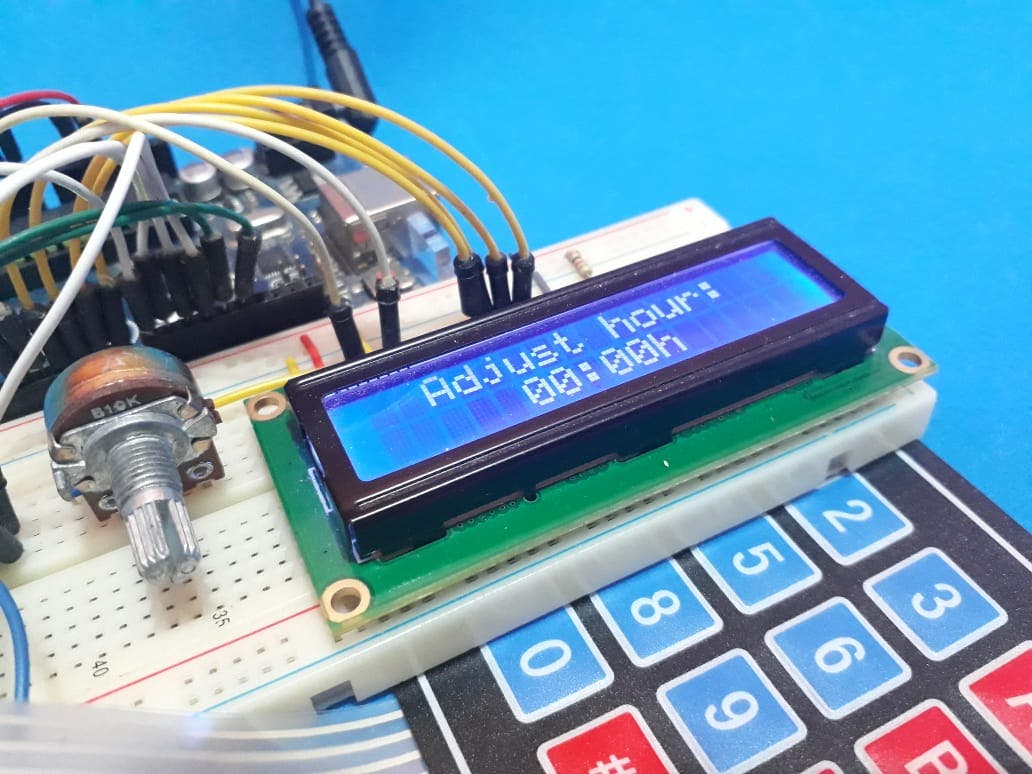
当用户插入错误值并需要输入新值时,这很有用,如图 6 所示。

现在,查看“do while”循环的条件。系统在do-while中运行,直到用户按下“D”键(Done),它由值13表示。
该键用于在系统中通知用户已插入值。
}while(number != 13);
此后,用户输入的数字将以小时和十位为单位,如下面的代码所示。
times[4] = (digitos[0]*10) + digitos[1];
times[5] = (digitos[2]*10) + digitos[3];

 if((times[4] < 0 || times[4] > 23) || (times[5] < 0 || times[5] > 59))
 {
    lcd.clear();
    lcd.setCursor(4,0);
    lcd.print("Invalid");
    lcd.setCursor(6,1);
    lcd.print("Hour");
    delay(2000);

    Validate = 1;

    lcd.clear();
    lcd.setCursor(0,0);
    lcd.print("                ");
    lcd.setCursor(1,0);
    lcd.print("Adjust Hours:");

    lcd.setCursor(0,1);
    lcd.print("                ");
    lcd.setCursor(5,1);
    lcd.print("00:00h");

    sprintf(tempo, "%02d:%02dh", 0, 0);

    PosCursor = 5;
    cont = 0;

    for(byte i = 0; i < 4; i++)
    {
        times[i] = 0;
    }
 }

}while(Validate == 1);
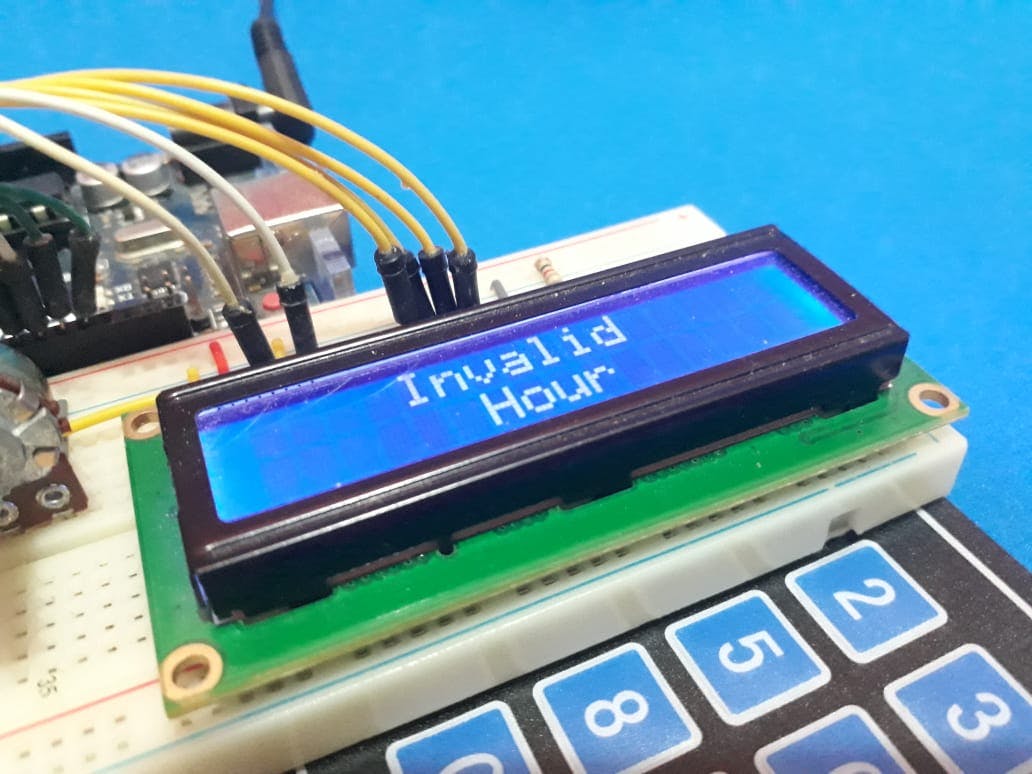
最后,我们有最后一个条件。最后一个条件用于验证用户输入的小时和分钟。
如果用户输入的值错误,布尔变量 Validate 将收到 1。该值将向系统发出信号,表明某些值错误并显示“无效时间”消息,如图 7 所示。
因此,系统将需要接收新的正确值。但是,如果值是正确的,系统不会进入该条件并通过函数的第二部分:接收日期的数据。
设置日期的过程
以同样的形式,当我们配置时钟数据时,我们将设置日期。过程类似。它具有接收号码的过程,数字错误时的擦除功能以及用户输入的号码的验证过程。
最后,配置完所有参数后,就有了实时时钟芯片的参数发送功能,如下图所示。
DS1307.setDate(times[0],times[1],times[2],times[3],times[4],times[5],00);//year,month,date of month, day of week,hour,minutes,second
通过这个函数,RTC 配置了小时和日期的参数。此后,系统返回 void 循环函数。
在您返回 void 循环函数后,LCD 屏幕将被擦除并调用 ActiveHour 函数。
void ActivationHour(void)
{
  int times[6];
  int  DadosTempo[7];
  bool controle = 0;
  bool EstadoSobe = 0, EstadoDesce = 0;
  byte cont = 0;
  byte number = 0;
  int digitos[6];
  byte PosCursor = 0;
  bool Validate = 0;
  lcd.clear();

        for(byte i = 0; i < 6; i++)
        {
          digitos[i] = 0;
        }

        do
        {
            lcd.setCursor(0,0);
            lcd.print("                ");
            lcd.setCursor(0,0);
            lcd.print("Activation Hour:");
            lcd.setCursor(0,1);
            lcd.print("                ");
            lcd.setCursor(5,1);
            lcd.print("00:00h");
            PosCursor = 5;

          do
          {
            number = ReadKeyPad();
            delay(100);

            if( (number >= 0 && number <= 9) && (controle == 0) && (cont < 4) )
            {

              digitos[cont] = number;
              cont++;
              controle = 1;
              lcd.setCursor(PosCursor,1);
              lcd.print(number);
              PosCursor++;

              if(cont == 2 || cont == 4)
              {
                PosCursor = PosCursor + 1;
              }

            }

            if(number == 16 && controle == 1)
            {
              controle = 0;
            }

            if(number == 12)
            {
               for(cont = 0; cont < 4; cont++)
               {
                  digitos[cont] = 0;
               }

               lcd.setCursor(0,1);
               lcd.print("                ");
               lcd.setCursor(5,1);
               lcd.print("00:00h");
               PosCursor = 5;
               cont = 0;

               for(int i = 4; i < 6; i++)
               {
                 times[i] = 0;
               }
           }
          }while(number != 13);

          times[4] = (digitos[0]*10) + digitos[1];
          times[5] = (digitos[2]*10) + digitos[3];

          if((times[4] < 0 || times[4] > 23) || (times[5] < 0 || times[5] > 59))
          {
            lcd.clear();
            lcd.setCursor(3,0);
            lcd.print("Invalid");
            lcd.setCursor(4,1);
            lcd.print("Hour");
            delay(2000);

            Validate = 1;

            lcd.clear();
            lcd.setCursor(0,0);
            lcd.print("                ");
            lcd.setCursor(1,0);
            lcd.print("Activation Hour:");

            lcd.setCursor(0,1);
            lcd.print("                ");
            lcd.setCursor(5,1);
            lcd.print("00:00h");

            sprintf(tempo, "%02d:%02dh", 0, 0);

            PosCursor = 5;
            cont = 0;

            for(cont = 0; cont < 4; cont++)
            {
              digitos[cont] = 0;
            }
          }
        }while(Validate == 1);

        EEPROM.write(1, times[4]);
        EEPROM.write(2, times[5]);

            do
            {
              number = ReadKeyPad();
              delay(200);
            }while(number != 16);
}
HourActivate 函数与设置 RTC 时钟的函数类似。唯一的区别是小时和分钟的值存储在 EEPROM 存储器中,如下所示。
EEPROM.write(1, times[4]);
EEPROM.write(2, times[5]);
这些值存储在 EEPROM 存储器中,以便在初始化系统开始时读取。因此,通过这些值,将有可能与时钟进行比较,并在编程时间启动设备。
函数 HourActivation 完全执行后,系统返回 void 循环函数,并显示文章开头所示的日期和小时。
现在,将在下一篇文章 - 第三部分中解释新功能。
下一个要实现的功能
通过到目前为止已实现的功能,在第三部分中,我们将实现新功能以提高我们的工作质量。下文将介绍新功能:
- 实现 DeactivationHour() 函数;
- 实现一个逻辑系统来比较时钟以激活和停用连接在继电器中的设备;
- 实现信号化以指示按下的键。
- 可编程定时器-HEF4541B 0次下载
- 可编程定时器-HEF4541B_Q100 0次下载
- 用于激活设备的可编程定时器-第三部分 0次下载
- 救世主Ga N来啦!第二部分:测量 0次下载
- 设计一台物联网模块灯——第二部分 0次下载
- 超声波感应器会被用于何处?—— 第二部分 2次下载
- 通用可编程定时器开源设计 0次下载
- 《嵌入式-STM32开发指南》第二部分 基础篇 - 第4章 定时器(HAL库) 15次下载
- MC14541B可编程定时器芯片数据手册 7次下载
- 有时你需要一点收获第二部分 9次下载
- AN-389: 使用Σ-Δ转换器—第二部分[中文版] 0次下载
- 2012年PSoC数模混合设计培训_第二部分 26次下载
- 开关电源设计(第3版)第二部分 0次下载
- 《电子电气产品中多溴联苯和多溴联苯醚的测定 第二部分:气相色 23次下载
- 实现免调整VCO1的IC (第二部分) 46次下载
- 现场可编程门阵列是什么 1518次阅读
- 双极踏脚车(第二部分):微步和衰减模式 301次阅读
- 如何制作一个简单的2步Arduino可编程定时器电路 1290次阅读
- 倍福PLC中定时器的使用 1845次阅读
- 如何制作一个简单的2步Arduino可编程定时器电路 3513次阅读
- 如何使用可编程控制器替代继电器 4519次阅读
- 80C51单片机内部定时器和计数器的结构及原理解析 1.3w次阅读
- STM32系列芯片定时器的主要功能及应用解析 1.1w次阅读
- 如何将单片机的TMR用作定时器和计数器使用 3067次阅读
- 可编程逻辑控制器是什么_可编程逻辑控制器原理 9550次阅读
- 单片机定时器和计数器的类型及工作原理解析 2.8w次阅读
- 详细介绍定时器和定时器中断 1.7w次阅读
- stm32通用定时器 2500次阅读
- 宽范围可编程定时器电路图 1792次阅读
- 可编程定时控制器电路 2997次阅读

 上传资料赚积分
下载排行
本周
- 1山景DSP芯片AP8248A2数据手册
- 1.06 MB | 532次下载 | 免费
- 2RK3399完整板原理图(支持平板,盒子VR)
- 3.28 MB | 339次下载 | 免费
- 3TC358743XBG评估板参考手册
- 1.36 MB | 330次下载 | 免费
- 4DFM软件使用教程
- 0.84 MB | 295次下载 | 免费
- 5元宇宙深度解析—未来的未来-风口还是泡沫
- 6.40 MB | 227次下载 | 免费
- 6迪文DGUS开发指南
- 31.67 MB | 194次下载 | 免费
- 7元宇宙底层硬件系列报告
- 13.42 MB | 182次下载 | 免费
- 8FP5207XR-G1中文应用手册
- 1.09 MB | 178次下载 | 免费
本月
- 1OrCAD10.5下载OrCAD10.5中文版软件
- 0.00 MB | 234315次下载 | 免费
- 2555集成电路应用800例(新编版)
- 0.00 MB | 33566次下载 | 免费
- 3接口电路图大全
- 未知 | 30323次下载 | 免费
- 4开关电源设计实例指南
- 未知 | 21549次下载 | 免费
- 5电气工程师手册免费下载(新编第二版pdf电子书)
- 0.00 MB | 15349次下载 | 免费
- 6数字电路基础pdf(下载)
- 未知 | 13750次下载 | 免费
- 7电子制作实例集锦 下载
- 未知 | 8113次下载 | 免费
- 8《LED驱动电路设计》 温德尔著
- 0.00 MB | 6656次下载 | 免费
总榜
- 1matlab软件下载入口
- 未知 | 935054次下载 | 免费
- 2protel99se软件下载(可英文版转中文版)
- 78.1 MB | 537798次下载 | 免费
- 3MATLAB 7.1 下载 (含软件介绍)
- 未知 | 420027次下载 | 免费
- 4OrCAD10.5下载OrCAD10.5中文版软件
- 0.00 MB | 234315次下载 | 免费
- 5Altium DXP2002下载入口
- 未知 | 233046次下载 | 免费
- 6电路仿真软件multisim 10.0免费下载
- 340992 | 191187次下载 | 免费
- 7十天学会AVR单片机与C语言视频教程 下载
- 158M | 183279次下载 | 免费
- 8proe5.0野火版下载(中文版免费下载)
- 未知 | 138040次下载 | 免费


 工商网监
工商网监
评论