 电子发烧友App


 创作
创作 发文章
发文章 发帖
发帖  提问
提问  发资料
发资料 发视频
发视频资料介绍
描述
系列介绍
本系列文章的重点是基于可在所有机器人中重复使用的服务创建可扩展的面向对象的模块化软件架构,而无需在每次创建新机器人时都从头开始。
也许开始使用机器人技术的最具成本效益的方法是使用您可以在任何电子商务(全球速卖通、banggood 等)上购买的智能机器人汽车。但当然,购买它是最简单的部分……您不需要专门购买它,即使有了Smart Robot Car Yo的描述,您也会发现许多不同的变体。我将为您使用此套件获得的所有最常见模块创建“服务”,因此您可以选择您需要的服务,并将它们一起使用来创建您自己的智能机器人,而无需从头开始对每个机器人进行操作你做。
指数
这是我将要创建的泰博机器人服务系列或文章的索引。
关于 L298N 电机驱动器
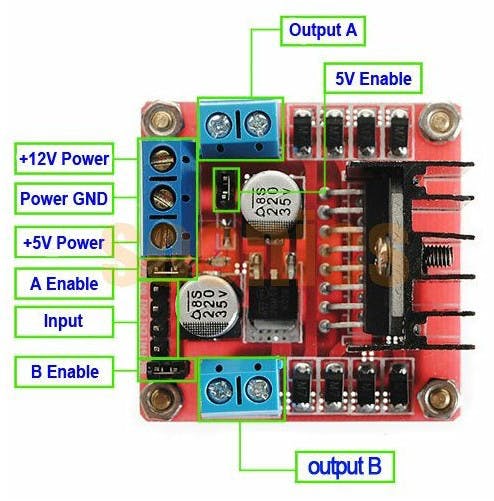
这种双路双向电机驱动器可让您轻松独立地控制两个双向最高 2A 的电机。
它是机器人应用的理想选择,非常适合连接到每个电机只需要几条控制线的任何 Arduino。
还集成了一个板载用户可访问的 5V 稳压器,可用于为需要高达约 1A 的稳压 5V 直流电源的任何其他电路供电。
特征:
- 电机电源:6 至 35 VDC
- 控制逻辑:标准TTL逻辑电平
- 输出功率:每个高达 2 A
- 启用和方向控制引脚
- IC散热片
- 开机 LED 指示灯
- 4方向LED指示灯
创建服务
我们将使用在上一篇文章中创建的基服务类。如果您没有阅读它,请阅读它,以便您了解我们将在这里创建的内容。
MotorService 基类
我们将创建另一个抽象层,它将定义任何 Motor Service 应具有的行为。这样做,允许我们为我们购买的任何硬件创建不同的电机服务,并以相同的方式使用我们拥有的任何电机服务(因此代码几乎没有变化)。
MotorService 类应该允许我们:
- 设置电机的速度
- 获取电机的速度
- 当然,从基服务类继承的功能
MotorService 类头文件 (MotorService.h) 如下所示:
#pragma once
#include "Arduino.h"
#include "Service.h"
namespace Taibot
{
	class MotorService : public Service
	{
	public:
		MotorService(bool isEnabled, bool isVerbose);
		// Sets the speed of the motor
		// speed = 0 then  motor stops
		// speed between -255 and -1 then motor runs backwards
		// speed between 1 and 255 then motor runs forward
		// Method that must be implemented in every MotorService specific implementation inheriting from the MotorService class
		virtual void SetSpeed(int speed) = 0;
		// Returns the current speed of the motor
		// Method that must be implemented in every MotorService specific implementation inheriting from the MotorService class
		virtual int GetSpeed() const = 0;
	};
};
及其实现(MotorService.h):
#include "MotorService.h"
using namespace Taibot;
MotorService::MotorService(bool isEnabled, bool isVerbose) : Service(isEnabled, isVerbose)
{
}
如您所见,MotorService类除了为 MotorServices 实现定义契约外没有做任何其他事情(现在我们将处理L298N 电机驱动模块的实现)。
L298NMotorService类
最后我们得到了真正做某事的代码!
此类是MotorService的实现,它控制L298N 电机驱动模块。它遵循我们在前两个基类中指定的布局。
像往常一样,首先是头文件(L298NMotorService.h):
#pragma once
#include "MotorService.h"
namespace Taibot
{
	class L298NMotorService : public MotorService
	{
	public:
		L298NMotorService(bool isEnabled, bool isVerbose, unsigned int pinEnable, unsigned int pinIn1, unsigned int pinIn2);
		// Implements the method inherited from the base MotorService class
		void SetSpeed(int speed);
		// Implements the method inherited from the base MotorService class
		int GetSpeed() const;
		void Setup();
		void Update();
	private:
		unsigned int _pinEnable;
		unsigned int _pinIn1;
		unsigned int _pinIn2;
		// Keeps track of the current speed of the Motor driver
		unsigned int _currentSpeed = 0;
	};
};
及其实现(L298NMotorService.cpp):
#include "L298NMotorService.h"
using namespace Taibot;
L298NMotorService::L298NMotorService(bool isEnabled, bool isVerbose, unsigned int pinEnable, unsigned int pinIn1, unsigned int pinIn2)
	: MotorService(isEnabled, isVerbose)
{
	_pinEnable = pinEnable;
	_pinIn1 = pinIn1;
	_pinIn2 = pinIn2;
	_currentSpeed = 0;
}
void L298NMotorService::SetSpeed(int speed)
{
	// Save the current speed...
	_currentSpeed = speed;
	if (IsVerbose())
	{
		//If we are logging, print the speed we are giving to the motor
		Serial.print("L298NMotor: speed=");
		Serial.println(speed);
	}
	// Only activate the motors if the driver is enabled
	if (IsEnabled())
	{
		if (speed >= 0)
		{
			// if the speed is positive or 0 then move forward
			analogWrite(_pinEnable, speed);
			digitalWrite(_pinIn1, HIGH);
			digitalWrite(_pinIn2, LOW);
		}
		else
		{
			// if the speed is negative then move backwards
			analogWrite(_pinEnable, -speed);
			digitalWrite(_pinIn1, LOW);
			digitalWrite(_pinIn2, HIGH);
		}
	}
}
int L298NMotorService::GetSpeed() const
{
	return _currentSpeed;
}
void L298NMotorService::Setup()
{
	// We have nothing to set up
}
void L298NMotorService::Update()
{
	// This service doesn't do anythin in background so this method is empty
}
真正的魔法发生在 SetSpeed 方法中。如您所见,在移动电机之前,我们正在检查服务是否已启用。此外,在打印调试信息之前,我们正在检查它是否为 Verbose。
此方法接收 -255 到 255 范围内的 int 值。
- 当值为负(-255 到 -1)时,电机向后移动。
- 当值为正(1 到 255)时,电机向前移动。
- 当然,当速度为 0 时,电机停止
由于 L298N 模块的工作方式,我们应该向 _pinEnable 发送一个 PWM 脉冲,以设置旋转速度。这个脉冲可以在 0 到 255 之间。我们正在使用analogWrite调用来设置 Arduino 上数字引脚的 PWM 输出。(这里有更多详细信息)。
我们还将_pinIn1和_pinIn2设置为 HIGH 或 LOW,具体取决于旋转方向,如 L298N 模块的文档所述。
测试服务
我们现在需要将代码添加到草图以测试此服务。我认为您可能会理解为什么我们一直在处理所有这些代码混乱。
这是 Arduino Sketch 的外观:
/*
Name:		Taibot.ino
Created:	12/13/2016 10:27:53 AM
Author:	Nahuel Taibo  savagemakers.com
*/
#include "L298NMotorService.h"
using namespace Taibot;
// Pin definitions for the L298N Motor driver (Change this defines according to your hardware configuration)
#define PIN_L298N_ENA PIN2
#define PIN_L298N_IN1 PIN3
#define PIN_L298N_IN2 PIN4
#define PIN_L298N_IN3 PIN5
#define PIN_L298N_IN4 PIN6
#define PIN_L298N_ENB PIN7
L298NMotorService rightMotor(true, true, PIN_L298N_ENA, PIN_L298N_IN1, PIN_L298N_IN2);
L298NMotorService leftMotor(true, true, PIN_L298N_ENB, PIN_L298N_IN3, PIN_L298N_IN4);
//We will use this variables to change the robot speed on after some seconds (without using delays)
unsigned long previousTime = millis();
unsigned int updateFreq = 5000;
// the setup function runs once when you press reset or power the board
void setup()
{
	Serial.begin(115200);
	// Call the Setup method of all the services we are using
	rightMotor.Setup();
	leftMotor.Setup();
	Serial.println("Taibot Started.");
}
// the loop function runs over and over again until power down or reset
void loop()
{
	// Call the Update method of all the service we are using...
	rightMotor.Update();
	leftMotor.Update();
	// Do anything else we want to do...
	if ((previousTime + updateFreq) < millis())
	{
		previousTime = millis();
		if (rightMotor.GetSpeed() > 0)
		{
			rightMotor.SetSpeed(0);
			leftMotor.SetSpeed(0);
		}
		else
		{
			rightMotor.SetSpeed(150);
			leftMotor.SetSpeed(150);
		}
	}
}
如果一切正常,构建此代码并将其上传到您的机器人后,您应该会看到它前进 5 秒,停止 5 秒,并重复该行为,直到您将其关闭。
结论
是的,它有很多代码只是为了推动机器人前进,但是一旦我们开始添加越来越多的服务,您就会注意到这些代码比无休止的意大利面条代码更有意义。我希望您能关注本系列,因为我们会在每一篇新文章中不断为您的机器人提供越来越多的智能。
您将找到本文附带的代码存储库。我创建了一个仅包含此服务实现的分支,因此如果您有意的话,您只能获得此服务。
如果您不理解本文的任何部分、无法使此代码工作、发现错误或有任何建议,请告诉我,我愿意改进它并使其成为任何人的干净代码库想要重用它。
- L298N 电机驱动模块--配套程序 1次下载
- CEPARK L298N(带光耦)电机驱动模块原理图 3次下载
- L298N电机驱动模块的使用 2次下载
- Arduino实验17 L298N电机驱动模块 10次下载
- arduino的L298N电机驱动模块 9次下载
- L298N电机驱动模块 199次下载
- L298N电机驱动 77次下载
- L298N电机驱动的使用 72次下载
- 继电器模块和L298N电机驱动模块的使用 19次下载
- L298N的电机驱动模块的方法程序免费下载 27次下载
- L298N电机驱动模块的使用资料说明 8次下载
- L298N电机驱动模块程序 83次下载
- L298N电机驱动模块.(4).PrjPcb 0次下载
- L298N电机驱动模块指导书 54次下载
- L298N电机驱动模块参考程序 16次下载
- L298N引脚定义及功能 8279次阅读
- L298N模块介绍 3809次阅读
- 基于51单片机的全自动洗衣机设计 2711次阅读
- 如何使用L298N和Arduino板控制直流电机 9852次阅读
- 基于L298N芯片对离子渗氮中压强的控制设计方案 2037次阅读
- dfrobotL298N直流电机驱动模块DF-MD介绍 3403次阅读
- L298N直流电机驱动芯片 1.7w次阅读
- 12v直流电机驱动电路图 3.9w次阅读
- TMS320F28027与L298N的悬挂运动控制系统设计 3599次阅读
- L298N是如何控制直流电机正反转的 4.6w次阅读
- 基于L298N芯片对离子渗氮中压强的控制 2781次阅读
- 基于80C196KC和L298N的直流电机PWM控制技术 5727次阅读
- 基于Intel8253与L298N的电机PWM调速方法 6274次阅读
- L298N中文资料汇总_L298N引脚图及功能_工作原理_特性参数及典型驱动电路 56.4w次阅读
- 新手入门超声自平衡小车最佳方案 1.3w次阅读

 上传资料赚积分
下载排行
本周
- 1山景DSP芯片AP8248A2数据手册
- 1.06 MB | 532次下载 | 免费
- 2RK3399完整板原理图(支持平板,盒子VR)
- 3.28 MB | 339次下载 | 免费
- 3TC358743XBG评估板参考手册
- 1.36 MB | 330次下载 | 免费
- 4DFM软件使用教程
- 0.84 MB | 295次下载 | 免费
- 5元宇宙深度解析—未来的未来-风口还是泡沫
- 6.40 MB | 227次下载 | 免费
- 6迪文DGUS开发指南
- 31.67 MB | 194次下载 | 免费
- 7元宇宙底层硬件系列报告
- 13.42 MB | 182次下载 | 免费
- 8FP5207XR-G1中文应用手册
- 1.09 MB | 178次下载 | 免费
本月
- 1OrCAD10.5下载OrCAD10.5中文版软件
- 0.00 MB | 234315次下载 | 免费
- 2555集成电路应用800例(新编版)
- 0.00 MB | 33566次下载 | 免费
- 3接口电路图大全
- 未知 | 30323次下载 | 免费
- 4开关电源设计实例指南
- 未知 | 21549次下载 | 免费
- 5电气工程师手册免费下载(新编第二版pdf电子书)
- 0.00 MB | 15349次下载 | 免费
- 6数字电路基础pdf(下载)
- 未知 | 13750次下载 | 免费
- 7电子制作实例集锦 下载
- 未知 | 8113次下载 | 免费
- 8《LED驱动电路设计》 温德尔著
- 0.00 MB | 6656次下载 | 免费
总榜
- 1matlab软件下载入口
- 未知 | 935054次下载 | 免费
- 2protel99se软件下载(可英文版转中文版)
- 78.1 MB | 537798次下载 | 免费
- 3MATLAB 7.1 下载 (含软件介绍)
- 未知 | 420027次下载 | 免费
- 4OrCAD10.5下载OrCAD10.5中文版软件
- 0.00 MB | 234315次下载 | 免费
- 5Altium DXP2002下载入口
- 未知 | 233046次下载 | 免费
- 6电路仿真软件multisim 10.0免费下载
- 340992 | 191187次下载 | 免费
- 7十天学会AVR单片机与C语言视频教程 下载
- 158M | 183279次下载 | 免费
- 8proe5.0野火版下载(中文版免费下载)
- 未知 | 138040次下载 | 免费


 工商网监
工商网监
评论