电子发烧友App

硬声App

0
  • 聊天消息
  • 系统消息
  • 评论与回复
登录后你可以
  • 下载海量资料
  • 学习在线课程
  • 观看技术视频
  • 写文章/发帖/加入社区
创作中心

完善资料让更多小伙伴认识你,还能领取20积分哦,立即完善>

3天内不再提示
电子发烧友网>电子资料下载>电子资料>Arduino DM控制台开源分享

Arduino DM控制台开源分享

2022-11-07 | zip | 0.13 MB | 次下载 | 免费

资料介绍

描述

对于我的第一个 Arduino 项目,我决定制作一个 DM 控制台作为生日礼物送给一位儿时的挚友。

对于那些希望看到最终产品的人,请点击此链接

它从功能和外观的草图开始:

pYYBAGNkcD-AXRBqAABEgxIaqD0740.png
第一张草图
 

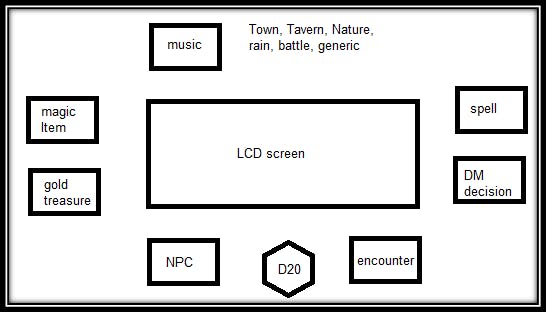
中间有一个 LCD 屏幕,周围有大约 13 个按钮。1 个用于 D20 滚动的按钮,1 个用于随机金宝的按钮,5 个用于从文件中生成随机文本的按钮(魔法物品、怪物、NPC、法术、DM 决定),6 个用于背景音乐的按钮。

我从一个从未开始的项目中获得了我需要的大部分硬件所以首先我下载了​​ Arduino Desktop IDE。我的电脑无法识别 Arduino——中国芯片所需的驱动程序。现在我可以开始了。

很快我就明白我需要一张用于文件的 SD 卡和一张用于音乐的 SD 卡。完毕。

第 1 步:连接 LCD 屏幕并进行打印。

使用此链接很容易。获得更大的屏幕并使用此处步骤 1 中的代码来计算 LCD 的正确地址。我写了以下代码:

//YWROBOT
//Compatible with the Arduino IDE 1.0
//Library version:1.1
#include  
#include 
LiquidCrystal_I2C lcd(0x3F,20,4);  // set the LCD address to 0x3F for a 20 chars and 4 line display
int i=0;
int n=0;
void setup()
{
 Serial.begin(9600);
 lcd.init();                      // initialize the lcd 
 // Print a message to the LCD.
 lcd.backlight();
 lcd.setCursor(1,0);
 lcd.print("Hello, world!");
 lcd.setCursor(0,1);
 lcd.print("Ywrobot Arduino!");
}
void loop()
{
 delay(1000);
 lcd.clear();
 n = i%7;
 if (n < 1)
 {
 lcd.setCursor(1,0);
 lcd.print("BOOOOM!!");
 Serial.println("BOOM!"); 
 }
 else 
 {
   Serial.println(i%7);
   lcd.setCursor(0,1);
   lcd.print(i);
 }
 i++;
} 

第二步:生成随机数。

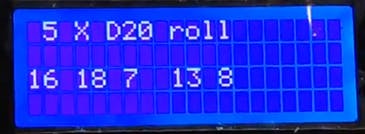
使用Random 函数,我编写了一个测试代码——在屏幕上生成 1 到 20 之间的随机数,上面有文字:

#include  
#include 
LiquidCrystal_I2C lcd(0x3F,20,4);  // set the LCD address to 0x27 for a 16 chars and 2 line display
int i=0;
int n=0;
void setup()
{
 Serial.begin(9600);
 lcd.init();                      // initialize the lcd 
 // Print a message to the LCD.
 lcd.backlight();
 lcd.setCursor(1,0);
 lcd.print("Hello, world!");
 lcd.setCursor(0,1);
 lcd.print("Lets roll some D20s!");
}
void loop()
{
 delay(1000);
 lcd.clear();
 lcd.setCursor(1,0);
 lcd.print("5 X D20 roll");
 lcd.setCursor(0,1);
 lcd.print(random(1, 21));
 lcd.setCursor(3,1);
 lcd.print(random(1, 21));
 lcd.setCursor(6,1);
 lcd.print(random(1, 21));
 lcd.setCursor(9,1);
 lcd.print(random(1, 21));
 lcd.setCursor(12,1);
 lcd.print(random(1, 21));
} 

第 3 步:连接并编码一个按钮以使其工作。

我学会了如何使用这个链接做到这一点。

D20 的代码就是这样诞生的:

pYYBAGNkcEKAB_FpAAAoLN5Gg-M774.png
D20 演示
 
#include  
#include 
LiquidCrystal_I2C lcd(0x3F,20,4);  // set the LCD address to 0x3F for a 20
int i=0;
int n=0;
// constants won't change. They're used here to set pin numbers:
const int BUTTON_PIN_D20 = 7; // the number of the pushbutton pin
// this code shows on LCD 5 random D20 result when pushing a buuton!
// Variables will change:
int currentStateD20;    // the current reading from the input pin
void setup()
{
 // initialize serial communication at 9600 bits per second:
 Serial.begin(9600);
 lcd.init();                      // initialize the lcd 
 // Print a message to the LCD.
 lcd.backlight();
 lcd.setCursor(0,2);
 lcd.print("Hello, DM all mighty");
 // initialize the pushbutton pin as an pull-up input
 // the pull-up input pin will be HIGH when the switch is open and LOW when the switch is closed.
 pinMode(BUTTON_PIN_D20, INPUT_PULLUP);
}
void loop()
{
 // read the state of the switch/button:
 currentStateD20 = digitalRead(BUTTON_PIN_D20);
 if(currentStateD20 == LOW) 
 {
 lcd.clear();
 lcd.setCursor(1,0);
 lcd.print("5 X D20 roll");
 lcd.setCursor(0,2);
 lcd.print(random(1, 21));
 lcd.setCursor(3,2);
 lcd.print(random(1, 21));
 lcd.setCursor(6,2);
 lcd.print(random(1, 21));
 lcd.setCursor(9,2);
 lcd.print(random(1, 21));
 lcd.setCursor(12,2);
 lcd.print(random(1, 21));
  //delay(1000);
 }
}

第 4 步:从 SD 卡中读取特定行。

pYYBAGNkcESAHpicAAAl5Dz23u4109.png
微型 SD 卡模块
 

首先,我学会了读写 SD 卡。但这就是读取整个文件的方法,我只需要一个特定的行!幸运的是,我找到了这篇文章并使用了@septillion代码:

voidprintLineN(unsigned int lineNumer){
 myFile.seek(0);
 char cr;
 for(unsigned int i = 0; i < (lineNumber -1);){
   cr = MyFile.read()
 if(cr == '\n'){
     i++;
   }
 }
 //Now we areat the right line
 while(true){
   cr = myFile.read();
   Serial.write(cr);
 if(cr == '\n'){
 break;
   }
 }
 //a for loopwith a read limit might be a good idea
}

我必须承认,我一开始并不理解代码并且害怕使用它。寻找其他解决方案(甚至考虑构建一个服务器来与 Arduino 与 WIFI 通信),最终有勇气使用这段代码并将其用于我的项目 - 它就像魔术一样工作。

另一位朋友 (Ofir Sofer) 帮助我处理了 TXT 文件的内容,而我正在攻克这一领域。我构建了以下函数,它工作正常,但有一个小错误——一个不需要的整理字符。

pYYBAGNkcEaAc_f0AAA5ir2pJe4988.png
带有不需要的结尾字符的文本
 

经过多次尝试,我通过添加以下代码行找到了此错误的解决方案:

//closing the string without \n\r which adds unwanted char in the end
rnd_string[j-2]= 0;

以及整个功能代码:

// this function finds the needed line (lineNumber) in a txt file from 
//sd card (indecated by filenmber) and shows it on the lcd screen
void printLineN(unsigned int lineNumber, unsigned int filenumber ){
 char rnd_string[LCD_colums+1] = ""; 
 rnd_string[1] = 0; 
 char cr;
 //  SD card initialization
 while (!Serial) {
 ; // wait for serial port to connect. Needed for native USB port only
 }
 Serial.print(F("Initializing SD card..."));
 if (!SD.begin(10)) {
   Serial.println(F("initialization failed!"));
   while (1);
 }
 Serial.println(F("initialization done."));
 // finding the correct file to open
 switch (filenumber) {
   case 1: {myFile = SD.open("monsters.txt");
           break;}
   case 2: {myFile = SD.open("spells.txt");
           break;}
   case 3: {myFile = SD.open("DMD.txt");
           break;}
   case 4: {myFile = SD.open("item.txt");
           break;}
   case 5: {myFile = SD.open("NPCtrait.txt");
           break;}
 }
 myFile.seek(0);
 Serial.println(F("file opened sucssesfuly."));  
 // seeking the right line in the file
 for(unsigned int i = 0; i < (lineNumber -1);){
   cr = myFile.read();
   if(cr == '\n'){
     i++;
   }
 }
 int j=0; //string index
 cr = ' '; // initialization of cr to get inside while loop
 //Now we are at the right line
 while(cr != '\n'){ 
   cr = myFile.read();
   Serial.println(cr);
   rnd_string[j] = cr;
   j++;
   //if string is bigger than LCD max columns than print to LCD 
   //and move one row down
   if (j == LCD_colums) { 
     if (rnd_string[j] == '\n') 
        rnd_string[j-1] = 0;
     else if (rnd_string[j] == '\r') 
        rnd_string[j-1] = 0;
     lcd.setCursor(0,1);
     //print first row
     lcd.print(rnd_string);
     // zero the string and the counter
     rnd_string[0] = 0;
     j=0;
   }
 }
     //closing the string without \n\r which adds unwanted char in the end
     rnd_string[j-2] = 0;
     lcd.setCursor(0,2);
     //printing the string to LCD
     lcd.print(rnd_string);
     // close the file:
     myFile.close();
}

第 5 步:无法连接和使用 MP3 播放器模块
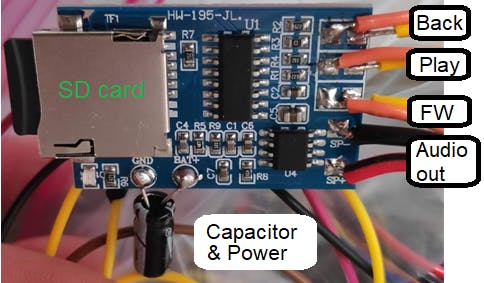
我有这部分“HW-195-JL”:

这是一个有用的部分——有一个非常强大的放大器,作为一个独立的工作——所以我需要弄清楚如何向它发送命令并继续使用 Arduino 代码。但它只有 3 个控件!返回 | 播放 | 固件。我希望它在触发按钮时播放特定文件。我决定尝试使用固件跳过需要的文件并找到我希望播放的文件。编码感觉很容易。与 Arduino 的连接是一个巨大的挑战!

Step5.1:焊接和理解mp3播放器

pYYBAGNkcEuAa_j8AAB0jisQFFQ778.png
 

电源连接处使用电容器以减少静态噪声。

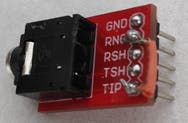
音频输出是单声道的,我将它连接到 3.5 毫米母插孔并将 RNG 连接到 TIP 以获得半立体声输出:

pYYBAGNkcE2AMr8tAAARpBSRiAU638.png
 

Step5.2:通过Arduino推荐控制mp3模块。

这几乎让我崩溃了。触发器仅适用于 3v 信号无论我尝试什么,我都找不到从 Arduino 发送这样一个信号的方法。

然后它击中了我!我需要使用晶体管来控制 mp3 模块。

让我自己 3 个 2n2222晶体管连接到 E 到 GND,B 到 Arduino 引脚,C 到另一个连接,并尝试了一下。没用☹。经过一番谷歌搜索,我知道我需要一个 1KΩ 的电阻器(为了替换 2n2222,我可能会用 5V 烧毁)。最后,它奏效了!

[然后我决定把所有东西都焊接得更好,但它不再起作用了——我放弃了这部分,买了另一个模块]

Step5.3:编写代码。

毕竟,到目前为止,我了解到,这部分的代码感觉非常简单。

因此,我编写了代码,并在循环代码开始运行时听到了可怕的跳过声音。经过一小时的逐个检查代码和硬件连接后,我认为 Arduino 中的 PIN 3 是导致它的原因,并将一个按钮移到另一个引脚。有效!直到它不起作用☹

const int transistor_back = 6;      // back connected to digital pin 6
const int transistor_play = 4;      // back connected to digital pin 4
const int transistor_FW = 5;      // back connected to digital pin 5
const int BUTTON_PIN_city = 7;    // activation city button connected to digital pin 7
const int BUTTON_PIN_tavern = 12;    // activation tavern button connected to digital pin 12
const int BUTTON_PIN_nature = 11;    // activation nature button connected to digital pin 11
const int BUTTON_PIN_rain = 10;    // activation rain button connected to digital pin 10
const int BUTTON_PIN_battle = 9;    // activation battle button connected to digital pin 9
const int BUTTON_PIN_general = 8;    // activation general button connected to digital pin 8
int currentState1 = 0;
int currentState2 = 0;
int currentState3 = 0;
int currentState4 = 0;
int currentState5 = 0;
int currentState6 = 0;
int currentSong = 1;
void setup() {
   // initialize serial communication at 9600 bits per second:
 Serial.begin(9600);
 // initialize the pushbutton pin as an pull-up input
 // the pull-up input pin will be HIGH when the switch is open and LOW when the switch is closed.
 pinMode(BUTTON_PIN_city, INPUT_PULLUP);
 pinMode(BUTTON_PIN_tavern, INPUT_PULLUP);
 pinMode(BUTTON_PIN_nature, INPUT_PULLUP);
 pinMode(BUTTON_PIN_rain, INPUT_PULLUP);
 pinMode(BUTTON_PIN_battle, INPUT_PULLUP);
 pinMode(BUTTON_PIN_general, INPUT_PULLUP);
 pinMode(transistor_back, OUTPUT);  // sets the transistor pin as output
 pinMode(transistor_play, OUTPUT);  // sets the transistor pin as output
 pinMode(transistor_FW, OUTPUT);  // sets the transistor pin as output
 digitalWrite (transistor_back, LOW);
 digitalWrite (transistor_FW, LOW);
 Serial.println("playing the greetings sound");
 delay(19000);
 // at this moment I returned to the point that I'm unable to send the right massage to the MP3 player
 digitalWrite (transistor_play, HIGH);
 delay(100);
 digitalWrite (transistor_play, LOW);
 Serial.println("done play");
 }
void FW(int k) {
 Serial.println("start FW");
 if (k < 0) k = k+7;
 for (int i = 0 ; i < k ; i++){
   digitalWrite (transistor_FW, HIGH);
   delay(100);
   digitalWrite (transistor_FW, LOW);
   delay(100);
 }
}
void back(int k) {
 Serial.println("start back");
 if (k < 0) k = k+7;
 for (int i = 0 ; i < k ; i++){
   digitalWrite (transistor_back, HIGH);
   delay(100);
   digitalWrite (transistor_back, LOW);
   delay(100);
 }
}
void play() {
 digitalWrite (transistor_play, HIGH);
 delay(100);
 digitalWrite (transistor_play, LOW);
}
void loop() {
  Serial.println("start loop");
  //read city button
  currentState1 = digitalRead(BUTTON_PIN_city);
  if(currentState1 == LOW) 
  { 
   if (currentSong == 2) play();
   FW(2 - currentSong);
   currentSong = 2;
  }
  //read tavern button
  currentState2 = digitalRead(BUTTON_PIN_tavern);
  if(currentState2 == LOW) 
  { 
   if (currentSong == 3) play();
   FW(3 - currentSong);
   currentSong = 3;
  }
  //read Nature button
  currentState3 = digitalRead(BUTTON_PIN_nature);
  if(currentState3 == LOW) 
  { 
   if (currentSong == 4) play();
   FW(4 - currentSong);
   currentSong = 4;
  }
  //read Rain button
  currentState4 = digitalRead(BUTTON_PIN_rain);
  if(currentState4 == LOW) 
  { 
   if (currentSong == 5) play();
   FW(5 - currentSong);
   currentSong = 5;
  }
  //read Battle button
  currentState5 = digitalRead(BUTTON_PIN_battle);
  if(currentState5 == LOW) 
  { 
   if (currentSong == 6) play();
   FW(6 - currentSong);
   currentSong = 6;
  }
  //read General button
  currentState6 = digitalRead(BUTTON_PIN_general);
  if(currentState6 == LOW) 
  { 
   if (currentSong == 7) play();
   FW(7 - currentSong);
   currentSong = 7;
  }
}

再次第 5 步 – 从头开始​​ MP3 播放器

我又买了一个模块——YX6300 UART TTL串口MP3音乐播放模块
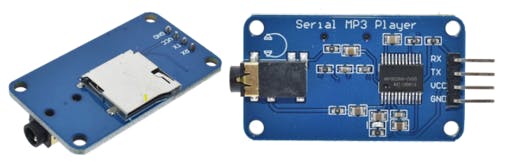
poYBAGNkcE-AGQAJAAAzYh2vlZU114.png
YX6300 UART TTL串口MP3音乐播放模块
 

这个模块要简单得多,但缺少放大器。

发现这篇文章让一切变得简单。我很快就编写了代码,唯一的挑战是弄清楚模块如何对文件进行排序——按创建日期。

该模块能够通过 Arduino 和模块之间的通信来播放特定文件以及更多功能(通信功能在我链接的帖子中的代码中)。

压轴 MP3 代码:

// COPYIED FROM: https://create.arduino.cc/projecthub/moreirarobotics/how-to-use-the-yx5300-mp3-module-catalex-with-arduino-171a23
// Edited by Dror Moshe Aharoni
// pins connection: 7-12 - music buttons, 5 to mp3 TX, 6 to MP3 RX
#include 
#define ARDUINO_RX 5  //should connect to TX of the Serial MP3 Player module
#define ARDUINO_TX 6  //connect to RX of the module
SoftwareSerial mp3(ARDUINO_RX, ARDUINO_TX);
//#define mp3 Serial3    // Connect the MP3 Serial Player to the Arduino MEGA Serial3 (14 TX3 -> RX, 15 RX3 -> TX)
static int8_t Send_buf[8] = {0}; // Buffer for Send commands.  
static uint8_t ansbuf[10] = {0}; // Buffer for the answers.    
String mp3Answer;           // Answer from the MP3.
String sanswer(void);
String sbyte2hex(uint8_t b);
int BUTTON_PIN;
int last_pushed;
int buttonState;
int currentSong = 1;
int pause = 0;
/************ Command byte **************************/
#define CMD_NEXT_SONG     0X01  // Play next song.
#define CMD_PREV_SONG     0X02  // Play previous song.
#define CMD_PLAY_W_INDEX  0X03
#define CMD_VOLUME_UP     0X04
#define CMD_VOLUME_DOWN   0X05
#define CMD_SET_VOLUME    0X06
#define CMD_SNG_CYCL_PLAY 0X08  // Single Cycle Play.
#define CMD_SEL_DEV       0X09
#define CMD_SLEEP_MODE    0X0A
#define CMD_WAKE_UP       0X0B
#define CMD_RESET         0X0C
#define CMD_PLAY          0X0D
#define CMD_PAUSE         0X0E
#define CMD_PLAY_FOLDER_FILE 0X0F
#define CMD_STOP_PLAY     0X16
#define CMD_FOLDER_CYCLE  0X17
#define CMD_SHUFFLE_PLAY  0x18 //
#define CMD_SET_SNGL_CYCL 0X19 // Set single cycle.
#define CMD_SET_DAC 0X1A
#define DAC_ON  0X00
#define DAC_OFF 0X01
#define CMD_PLAY_W_VOL    0X22
#define CMD_PLAYING_N     0x4C
#define CMD_QUERY_STATUS      0x42
#define CMD_QUERY_VOLUME      0x43
#define CMD_QUERY_FLDR_TRACKS 0x4e
#define CMD_QUERY_TOT_TRACKS  0x48
#define CMD_QUERY_FLDR_COUNT  0x4f
/************ Opitons **************************/
#define DEV_TF            0X02
/*********************************************************************/
void setup()
{
 // starting the serial communication through the mp3 object
 // The mp3 module is controlled through commands received by the Arduino serial. In this process, we used the SoftwareSerial library and emulated a serial on the Arduino digital pins.
 // Thus, you will be able to use the Arduino to control the MP3 module through commands sent to it.
 Serial.begin(9600);
 mp3.begin(9600);
 delay(500);
 // initialization of the MP3 Card module
 sendCommand(CMD_SEL_DEV, 0, DEV_TF);
 delay(500);
 // initialize the pushbutton pins as an pull-up input
 // the pull-up input pin will be HIGH when the switch is open and LOW when the switch is closed.
 for (BUTTON_PIN = 7; BUTTON_PIN < 13; BUTTON_PIN++){
   //BUTTON_PIN is the number of the pushbutton pin
   pinMode(BUTTON_PIN, INPUT_PULLUP); 
 }
 sendCommand(0x06, 0 , 30);
 Serial.println("playing the greetings sound");
 sendCommand(0x03, 0 , 1);
 //delay(19000);
 delay(1000);
 last_pushed = 1;
}
//starting loop
void loop() {
 //Serial.println("start loop");
 buttonState = HIGH;
 BUTTON_PIN = 6;
 // read the state of the switch/button:
 while (buttonState == HIGH){
   BUTTON_PIN++;
   if (BUTTON_PIN == 13) BUTTON_PIN = 7;
   buttonState = digitalRead(BUTTON_PIN);
   // print out the button's state
   //Serial.println(BUTTON_PIN);
   //Serial.println(buttonState);
}
//
delay(500); 
//Serial.println("DM pushed button:");
 //Serial.println(BUTTON_PIN);
 if (BUTTON_PIN == last_pushed){
   switch (pause) {
     case 0:
       sendCommand(0x0E);
       last_pushed = BUTTON_PIN;
       pause = 1;
       sanswer();
       break;
     case 1:
       pause = 0;
       sendCommand(0x03, 0, BUTTON_PIN-5);
       if (mp3.available()) Serial.println(decodeMP3Answer());
       break;
   }
 }
 else 
 {
   // saving the last pushed button in order to enable music pause
   last_pushed = BUTTON_PIN;
   // playing the desired music file
   sendCommand(0x03, 0, BUTTON_PIN-5);
   //delay(3000);
   // Check for the answer.
 if (mp3.available()) Serial.println(decodeMP3Answer());
 }
}
/********************************************************************************/
/*Function sendMP3Command: seek for a 'c' command and send it to MP3  */
/*Parameter: c. Code for the MP3 Command, 'h' for help.                                                                                                         */
/*Return:  void                                                                */
void sendMP3Command(char c) {
 switch (c) {
   case '?':
   case 'h':
     Serial.println("HELP  ");
     Serial.println(" p = Play");
     Serial.println(" P = Pause");
     Serial.println(" > = Next");
     Serial.println(" < = Previous");
     Serial.println(" s = Stop Play"); 
     Serial.println(" + = Volume UP");
     Serial.println(" - = Volume DOWN");
     Serial.println(" c = Query current file");
     Serial.println(" q = Query status");
     Serial.println(" v = Query volume");
     Serial.println(" x = Query folder count");
     Serial.println(" t = Query total file count");
     Serial.println(" f = Play folder 1.");
     Serial.println(" S = Sleep");
     Serial.println(" W = Wake up");
     Serial.println(" r = Reset");
     break;
   case 'p':
     Serial.println("Play ");
     sendCommand(CMD_PLAY);
     break;
   case 'P':
     Serial.println("Pause");
     sendCommand(CMD_PAUSE);
     break;
   case '>':
     Serial.println("Next");
     sendCommand(CMD_NEXT_SONG);
     sendCommand(CMD_PLAYING_N); // ask for the number of file is playing
     break;
   case '<':
     Serial.println("Previous");
     sendCommand(CMD_PREV_SONG);
     sendCommand(CMD_PLAYING_N); // ask for the number of file is playing
     break;
   case 's':
     Serial.println("Stop Play");
     sendCommand(CMD_STOP_PLAY);
     break;
   case '+':
     Serial.println("Volume Up");
     sendCommand(CMD_VOLUME_UP);
     break;
   case '-':
     Serial.println("Volume Down");
     sendCommand(CMD_VOLUME_DOWN);
     break;
   case 'c':
     Serial.println("Query current file");
     sendCommand(CMD_PLAYING_N);
     break;
   case 'q':
     Serial.println("Query status");
     sendCommand(CMD_QUERY_STATUS);
     break;
   case 'v':
     Serial.println("Query volume");
     sendCommand(CMD_QUERY_VOLUME);
     break;
   case 'x':
     Serial.println("Query folder count");
     sendCommand(CMD_QUERY_FLDR_COUNT);
     break;
   case 't':
     Serial.println("Query total file count");
     sendCommand(CMD_QUERY_TOT_TRACKS);
     break;
   case 'f':
     Serial.println("Playing folder 1");
     sendCommand(CMD_FOLDER_CYCLE, 1, 0);
     break;
   case 'S':
     Serial.println("Sleep");
     sendCommand(CMD_SLEEP_MODE);
     break;
   case 'W':
     Serial.println("Wake up");
     sendCommand(CMD_WAKE_UP);
     break;
   case 'r':
     Serial.println("Reset");
     sendCommand(CMD_RESET);
     break;
 }
}
/********************************************************************************/
/*Function decodeMP3Answer: Decode MP3 answer.                                  */
/*Parameter:-void                                                               */
/*Return: The                                                  */
String decodeMP3Answer() {
 String decodedMP3Answer = "";
 decodedMP3Answer += sanswer();
 switch (ansbuf[3]) {
   case 0x3A:
     decodedMP3Answer += " -> Memory card inserted.";
     break;
   case 0x3D:
     decodedMP3Answer += " -> Completed play num " + String(ansbuf[6], DEC);
     //sendCommand(CMD_NEXT_SONG);
     //sendCommand(CMD_PLAYING_N); // ask for the number of file is playing
     break;
   case 0x40:
     decodedMP3Answer += " -> Error";
     break;
   case 0x41:
     decodedMP3Answer += " -> Data recived correctly. ";
     break;
   case 0x42:
     decodedMP3Answer += " -> Status playing: " + String(ansbuf[6], DEC);
     break;
   case 0x48:
     decodedMP3Answer += " -> File count: " + String(ansbuf[6], DEC);
     break;
   case 0x4C:
     decodedMP3Answer += " -> Playing: " + String(ansbuf[6], DEC);
     break;
   case 0x4E:
     decodedMP3Answer += " -> Folder file count: " + String(ansbuf[6], DEC);
     break;
   case 0x4F:
     decodedMP3Answer += " -> Folder count: " + String(ansbuf[6], DEC);
     break;
 }
 return decodedMP3Answer;
}
/********************************************************************************/
/*Function: Send command to the MP3                                             */
/*Parameter: byte command                                                       */
/*Parameter: byte dat1 parameter for the command                                */
/*Parameter: byte dat2 parameter for the command                                */
void sendCommand(byte command){
 sendCommand(command, 0, 0);
}
void sendCommand(byte command, byte dat1, byte dat2){
 delay(20);
 Send_buf[0] = 0x7E;    //
 Send_buf[1] = 0xFF;    //
 Send_buf[2] = 0x06;    // Len
 Send_buf[3] = command; //
 Send_buf[4] = 0x01;    // 0x00 NO, 0x01 feedback
 Send_buf[5] = dat1;    // datah
 Send_buf[6] = dat2;    // datal
 Send_buf[7] = 0xEF;    //
 Serial.print("Sending: ");
 for (uint8_t i = 0; i < 8; i++)
 {
   mp3.write(Send_buf[i]) ;
   Serial.print(sbyte2hex(Send_buf[i]));
 }
 Serial.println();
}
/********************************************************************************/
/*Function: sbyte2hex. Returns a byte data in HEX format.                       */
/*Parameter:- uint8_t b. Byte to convert to HEX.                                */
/*Return: String                                                                */
String sbyte2hex(uint8_t b)
{
 String shex;
 shex = "0X";
 if (b < 16) shex += "0";
 shex += String(b, HEX);
 shex += " ";
 return shex;
}
/********************************************************************************/
/*Function: shex2int. Returns a int from an HEX string.                         */
/*Parameter: s. char *s to convert to HEX.                                      */
/*Parameter: n. char *s' length.                                                */
/*Return: int                                                                   */
int shex2int(char *s, int n){
 int r = 0;
 for (int i=0; i    if(s[i]>='0' && s[i]<='9'){
     r *= 16; 
     r +=s[i]-'0';
    }else if(s[i]>='A' && s[i]<='F'){
     r *= 16;
     r += (s[i] - 'A') + 10;
    }
 }
 return r;
}
/********************************************************************************/
/*Function: sanswer. Returns a String answer from mp3 UART module.          */
/*Parameter:- uint8_t b. void.                                                  */
/*Return: String. If the answer is well formated answer.                        */
String sanswer(void)
{
 uint8_t i = 0;
 String mp3answer = "";
 // Get only 10 Bytes
 while (mp3.available() && (i < 10))
 {
   uint8_t b = mp3.read();
   ansbuf[i] = b;
   i++;
   mp3answer += sbyte2hex(b);
 }
 // if the answer format is correct.
 if ((ansbuf[0] == 0x7E) && (ansbuf[9] == 0xEF))
 {
   return mp3answer;
 }
 return "???: " + mp3answer;
} 

第 6 步:电源

我买了一个电源模块,不知道真名是什么“MB-102 MB102”(?)

poYBAGNkcFGAQrpCAAAcKS5Il9E126.png
 

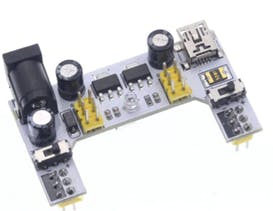
我将两个 Arduino 都连接到该模块,因此 DM 控制台只需要一个电源输入。

完美运行,并最大限度地减少了到控制台的连接插座。

第7步:化妆品=^)

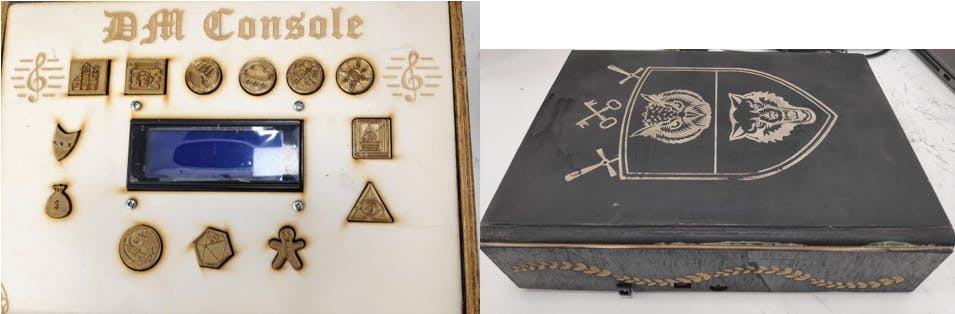
步骤 7.1:前面板。一位好朋友 (Benny Klingman) 使用他的Fusion 360技能获得了很多帮助,并在该项目的其他部分担任顾问。他为我们工作的 FAB-LAB 中碰巧拥有的激光切割机创建了“dxf”文件(我只在角落添加了我的徽标),并为所有按钮创建了“STL”文件(我们使用了 thenounproject.com图标)。这是添加所有电子设备之前的样子:

pYYBAGNkcFSAQW5gAAEGTo9jOR0047.png
 

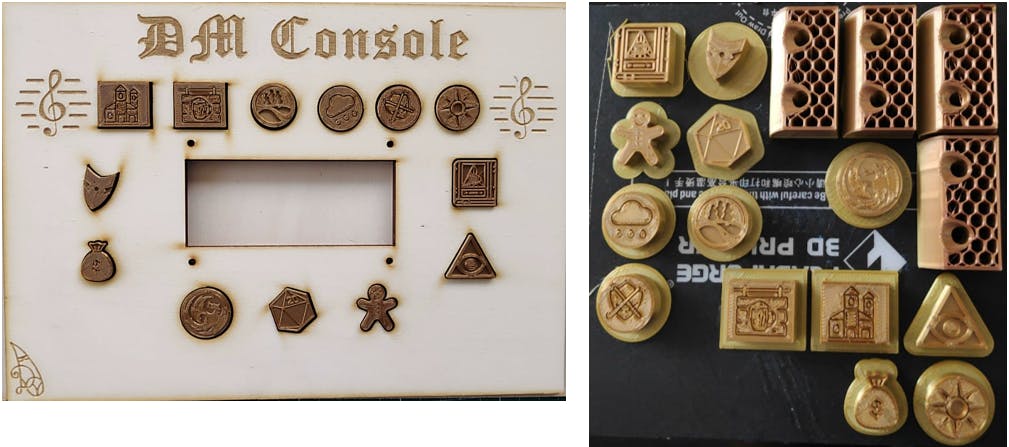
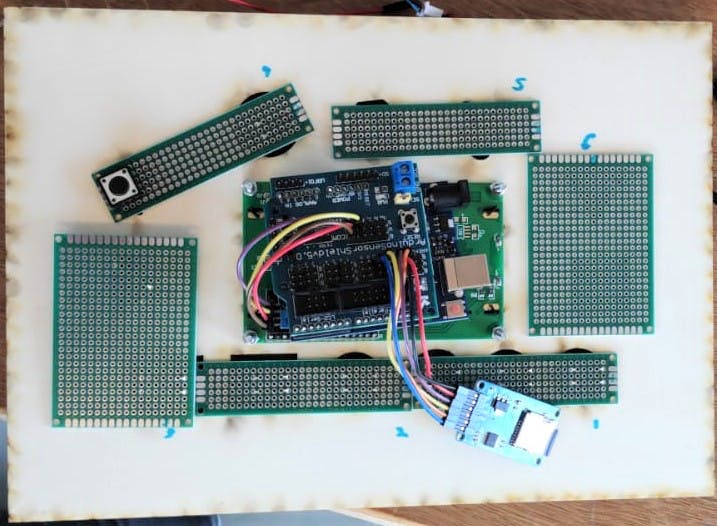
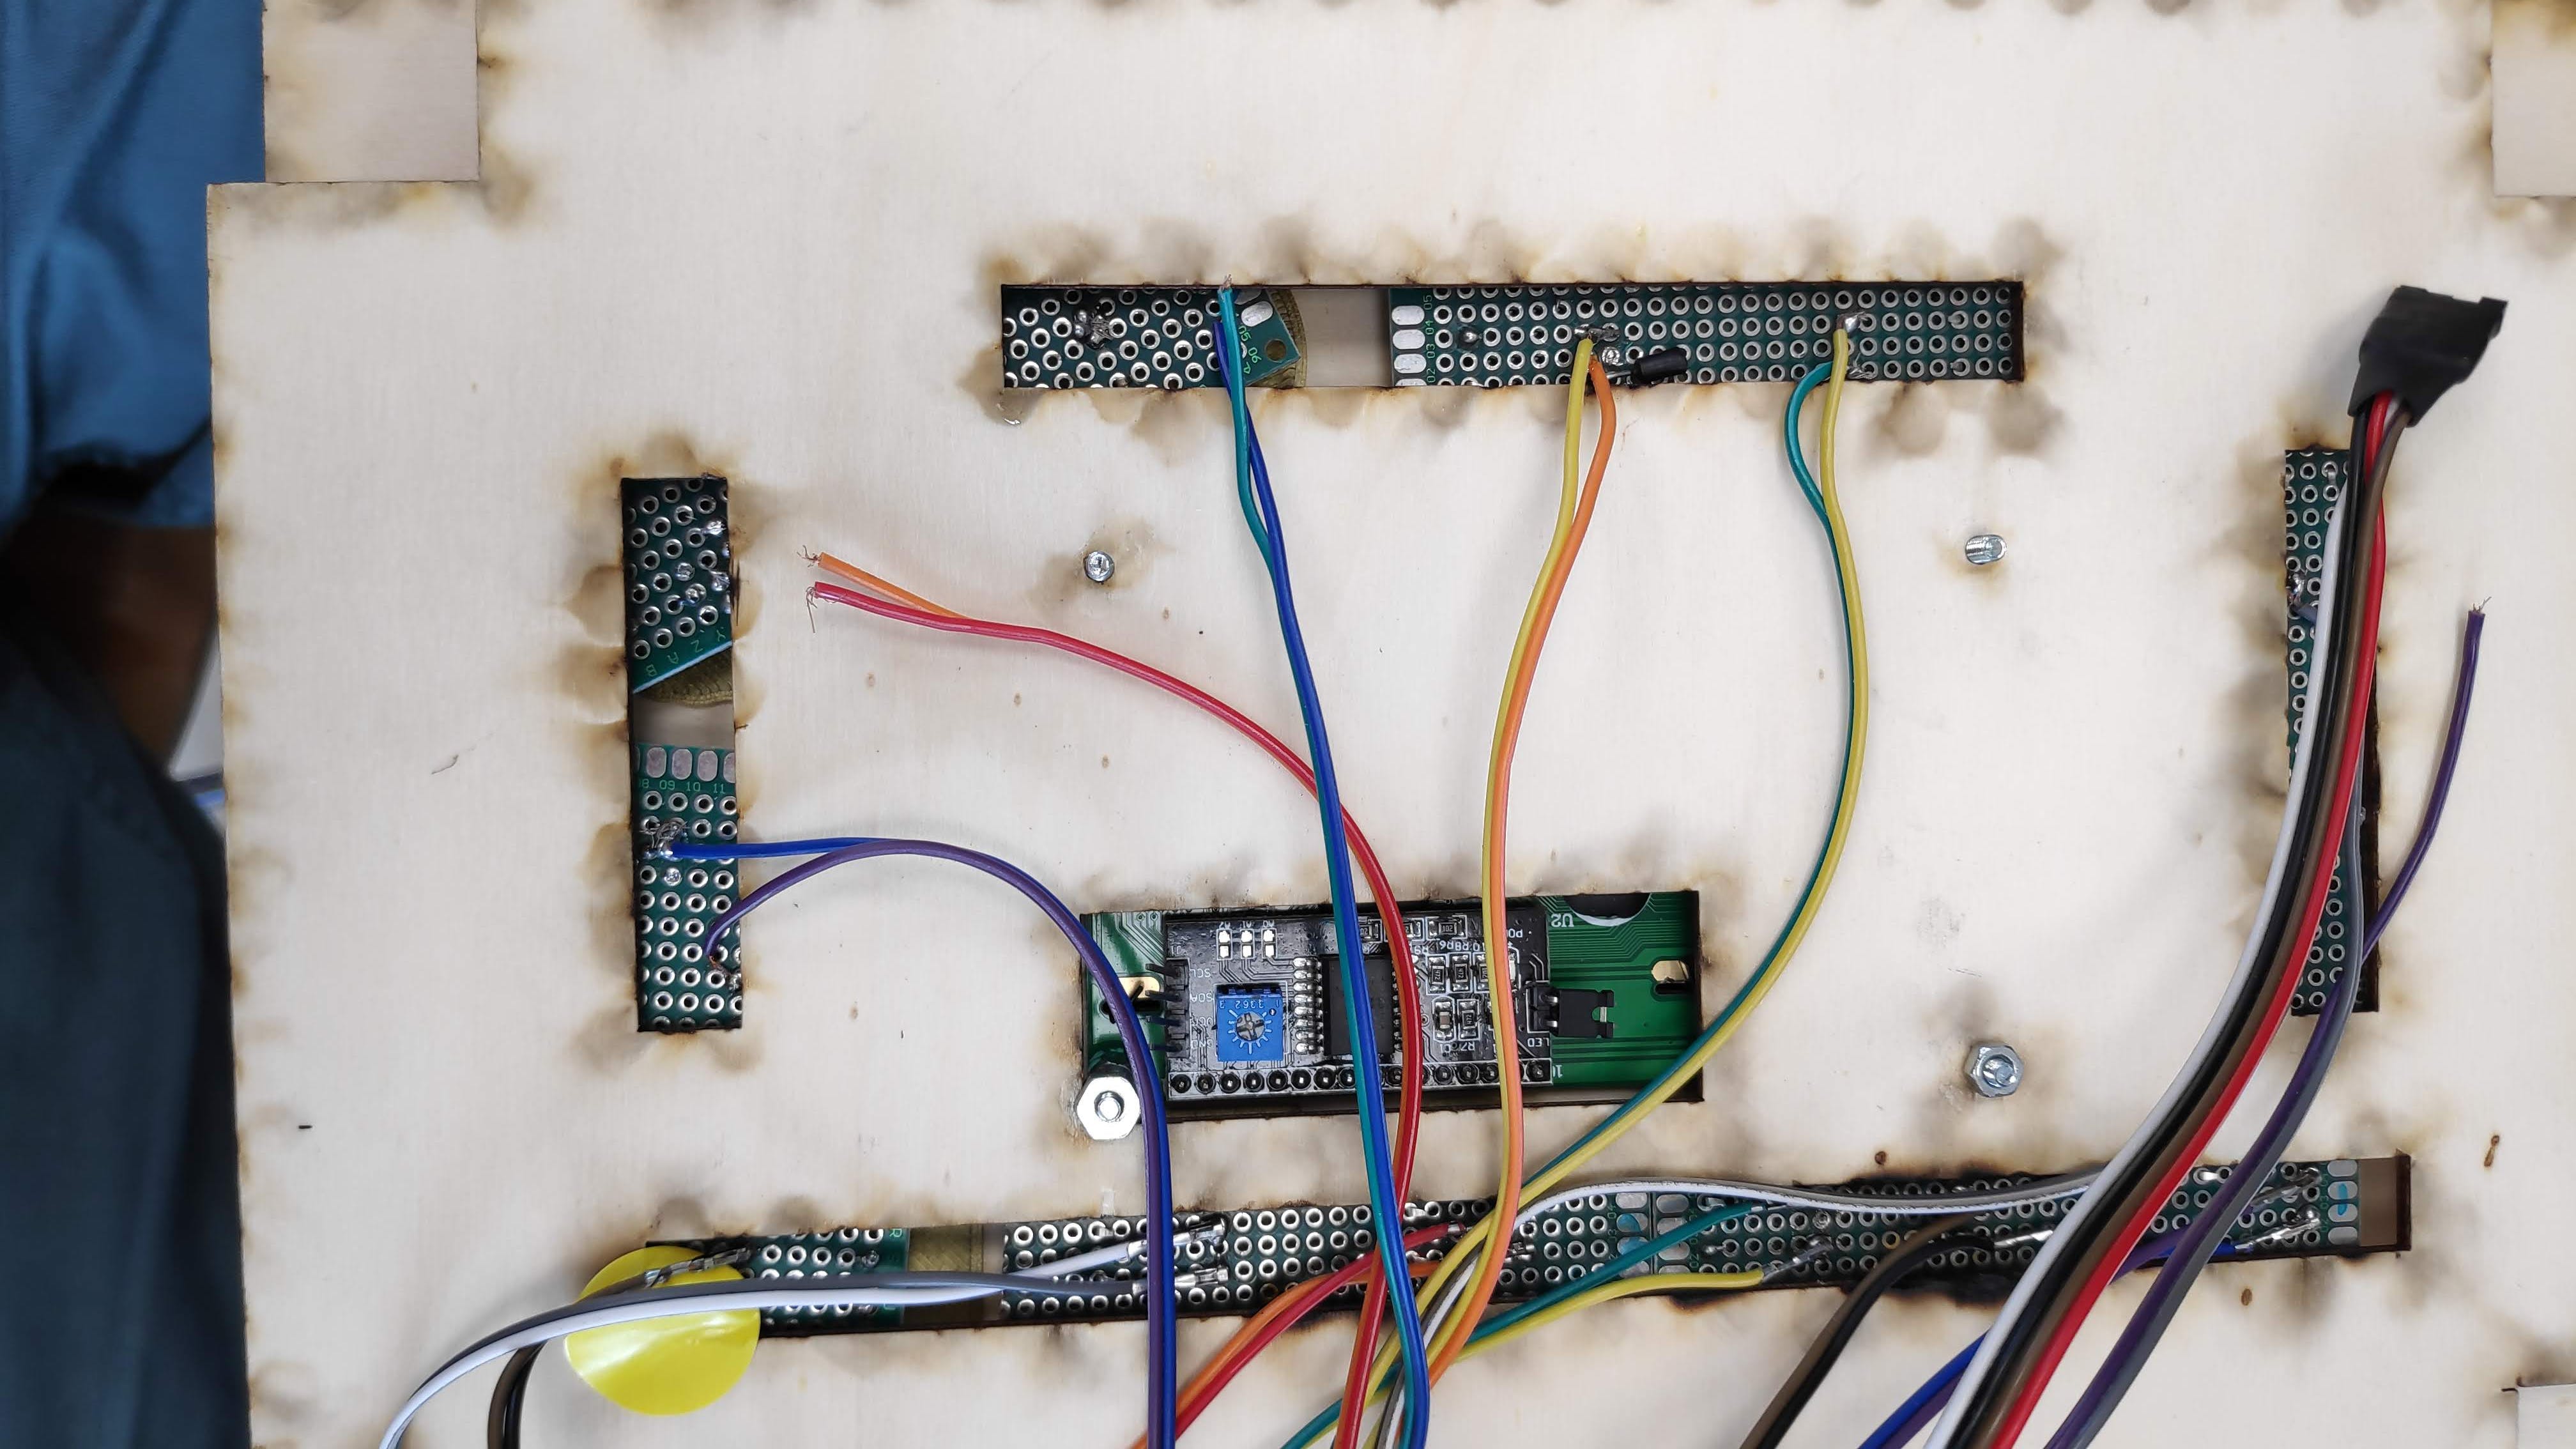
在这里您可以看到按钮布局的计划。我使用焊接面包板来安装按钮并直接从另一侧焊接跳线。在该设备的开发过程中多次重新焊接电线是一个错误的决定——更好的做法是焊接电线连接器我将物理按钮的 3D 打印部分粘合(用快速胶水)到电子按钮上。我用激光切割了一块额外的木板,并将焊接的面包板夹在两块木板之间,这样在按下按钮时就会产生反作用力。侧面需要一些缓冲木部件,以防止不必要的按钮点击。

pYYBAGNkcFaAXVnSAAD3M9S3EKw71.jpeg
焊入面包板布局


poYBAGNkcF2Aee9QAAjYOz_W_ss724.jpg
夹在木板之间的焊接面包板
 

第 7.2 部分:洞穴箱。

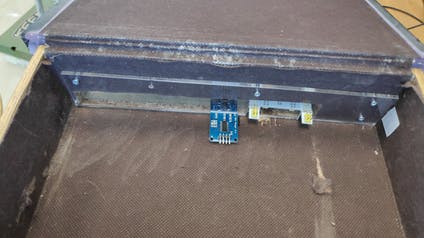
我有一个书本形状的盒子,所以我用黑色喷漆涂了封面,然后用激光雕刻了一些图形。我需要切割和更换后面板的一部分,以便为所有外部连接(电源、音频)安排一个合适的位置。

在确定如何通过外部连接稳定模块时遇到了一些挑战。

最后,我再次使用激光切割机切割了一块有机玻璃,从内部锁定模块,从外部锁定 3 毫米白杨木。

poYBAGNkcF-AGLp5AAA6oJUk-SU873.png
从内部锁定模块的有机玻璃
 

第 8 部分:压轴组装和功能

压轴液晶代码:

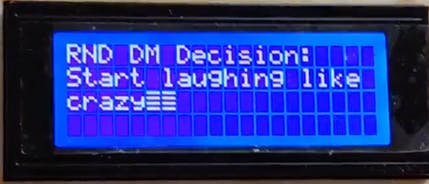
// this code is a DM consul - 1 button shows on LCD 5 random D20 result , 2nd button shows a random speel (from SD card), 3rd button shows a random monster (from SD card).
// 4 - random DM decision, 5 -random magic item, 6 -random NPC (race + trait), 7 - random gold treasure (1-500)
#include  
#include 
#include 
#include 
File myFile;
int LCD_colums = 20;
int LCD_rows = 4;
LiquidCrystal_I2C lcd(0x3F,LCD_colums,LCD_rows);  // set the LCD address to 0x27 for a 16 chars and 2 line display
int n=0;
int rnd=0;
int DLY=0;
// defining string arrays of races
char *race[22] = {"Dwarf", "Elf", "Halfling" , "Human" , "Gnome" ,"Half-orc" , "Dragonborn", "Tiefling", "Aasimar", "Warforged", 
             "Yuan-ti-Pureblood", "Triton", "Goliath", "Tabaxi", "Half-Elf" , "LizardFolk", "Genasi" , "Aarakocra" ,"Bugbear" , "Kenku", "Githyanki", "Tortle"};
// constants won't change. They're used here to set pin numbers:
const int BUTTON_PIN_D20 = 7; // the number of the d20 pushbutton pin
const int BUTTON_PIN_SPELL = 6; // the number of the spell pushbutton pin
const int BUTTON_PIN_MONSTER = 8; // the number of the monster pushbutton pin
const int BUTTON_PIN_DM = 9; // the number of the DM decision pushbutton pin
const int BUTTON_PIN_item = 5; // the number of the Magic items pushbutton pin
const int BUTTON_PIN_NPC = 4; // the number of the NPC characters pushbutton pin
const int BUTTON_PIN_gold = 3; // the number of the NPC characters pushbutton pin
// Variables will change:
int currentStateD20;    // the current reading from the input pin
int currentStateSPELL;    // the current reading from the input pin
int currentStateMONSTER;
int currentStateDM;    // the current reading from the input pin
int currentStateitem;    // the current reading from the input pin
int currentStateNPC;    // the current reading from the input pin
int currentStategold;    // the current reading from the input pin
void setup()
{
 // initialize serial communication at 9600 bits per second:
 Serial.begin(9600);
 lcd.init();                      // initialize the lcd 
 // Print a message to the LCD.
 lcd.backlight();
 lcd.setCursor(0,1);
 lcd.print(F("Hello, DM Yoni Zabow"));
   // initialize the pushbutton pin as an pull-up input
 // the pull-up input pin will be HIGH when the switch is open and LOW when the switch is closed.
 pinMode(BUTTON_PIN_D20, INPUT_PULLUP);
 pinMode(BUTTON_PIN_SPELL, INPUT_PULLUP);
 pinMode(BUTTON_PIN_MONSTER, INPUT_PULLUP);
 pinMode(BUTTON_PIN_DM, INPUT_PULLUP);
 pinMode(BUTTON_PIN_item, INPUT_PULLUP);
 pinMode(BUTTON_PIN_NPC, INPUT_PULLUP);
 pinMode(BUTTON_PIN_gold, INPUT_PULLUP);
}
// this function finds the needed line (lineNumber) in a txt file from sd card (indecated by filenmber) and shows it on the lcd screen
void printLineN(unsigned int lineNumber, unsigned int filenumber ){
 char rnd_string[LCD_colums+1] = ""; 
 rnd_string[1] = 0; 
 char cr;
 //  SD card initialization
 while (!Serial) {
 ; // wait for serial port to connect. Needed for native USB port only
 }
 Serial.print(F("Initializing SD card..."));
 if (!SD.begin(10)) {
   Serial.println(F("initialization failed!"));
   while (1);
 }
 Serial.println(F("initialization done."));
 // finding the correct file to open
 switch (filenumber) {
   case 1: {myFile = SD.open("monsters.txt");
           break;}
   case 2: {myFile = SD.open("spells.txt");
           break;}
   case 3: {myFile = SD.open("DMD.txt");
           break;}
   case 4: {myFile = SD.open("item.txt");
           break;}
   case 5: {myFile = SD.open("NPCtrait.txt");
           break;}
 }
 myFile.seek(0);
 Serial.println(F("file opened sucssesfuly."));  
 // seeking the right line in the file
 for(unsigned int i = 0; i < (lineNumber -1);){
   cr = myFile.read();
   if(cr == '\n'){
     i++;
   }
 }
 int j=0; //string index
 cr = ' '; // initialization of cr to get inside while loop
 //Now we are at the right line
 while(cr != '\n'){ 
   cr = myFile.read();
   Serial.println(cr);
   rnd_string[j] = cr;
   j++;
   //if string is bigger than LCD max columns than print to LCD and move one row down
   if (j == LCD_colums) { 
     if (rnd_string[j] == '\n') 
        rnd_string[j-1] = 0;
     else if (rnd_string[j] == '\r') 
        rnd_string[j-1] = 0;
     lcd.setCursor(0,1);
     //print first row
     lcd.print(rnd_string);
     // zero the string and the counter
     rnd_string[0] = 0;
     j=0;
   }
 }
     //closing the string without \n\r which adds unwanted char in the end
     rnd_string[j-2] = 0;
     lcd.setCursor(0,2);
     //printing the string to LCD
     lcd.print(rnd_string);
     // close the file:
     myFile.close();
}
void loop()
{
 if (DLY == 7000){
   DLY = 0;
   lcd.clear();
   lcd.setCursor(0,1);
   lcd.print(F("Hello, DM Yoni Zabow"));
 }
 // read the state of the switch/button:
 currentStateD20 = digitalRead(BUTTON_PIN_D20);
 if(currentStateD20 == LOW) 
 {
 lcd.clear();
 lcd.setCursor(1,0);
 lcd.print(F("5 X D20 roll"));
 lcd.setCursor(0,2);
 lcd.print(random(1, 21));
 lcd.setCursor(3,2);
 lcd.print(random(1, 21));
 lcd.setCursor(6,2);
 lcd.print(random(1, 21));
 lcd.setCursor(9,2);
 lcd.print(random(1, 21));
 lcd.setCursor(12,2);
 lcd.print(random(1, 21));
 DLY = 0;
 }
 // read the state of the switch/button:
 currentStateSPELL = digitalRead(BUTTON_PIN_SPELL);
 if(currentStateSPELL == LOW)
 {
  lcd.clear();
  lcd.setCursor(0,0); 
  lcd.print(F("RND Spell Name&LVL:"));
  rnd = random(1, 460);
  Serial.println(rnd);
  printLineN(rnd,2);
  DLY = 0;
 }
currentStateMONSTER = digitalRead(BUTTON_PIN_MONSTER);
if(currentStateMONSTER == LOW)
 {
  lcd.clear();
  lcd.setCursor(0,0); 
  lcd.print(F("Monster Name|AC|HP:"));
  rnd = random(1, 507);
  Serial.println(rnd);
  printLineN(rnd,1);
  DLY = 0;
 }
  currentStateDM = digitalRead(BUTTON_PIN_DM);
if(currentStateDM == LOW)
 {
  lcd.clear();
  lcd.setCursor(0,0); 
  lcd.print(F("RND DM Decision:"));
  rnd = random(1, 25);
  Serial.println(rnd);
  printLineN(rnd,3);
  DLY = 0;
 }
  currentStateitem = digitalRead(BUTTON_PIN_item);
if(currentStateitem == LOW)
 {
  lcd.clear();
  lcd.setCursor(0,0); 
  lcd.print(F("RND Magic item:"));
  rnd = random(1, 240);
  Serial.println(rnd);
  printLineN(rnd,4);
  DLY = 0;
 }
    currentStateNPC = digitalRead(BUTTON_PIN_NPC);
if(currentStateNPC == LOW)
 {
  lcd.clear();
  lcd.setCursor(0,0); 
  lcd.print(F("RND NPC Trait:"));
  rnd = random(1, 1389);
  Serial.println(rnd);
  printLineN(rnd,5);
  lcd.setCursor(0,3); 
  lcd.print("Race: ");
  lcd.setCursor(6,3);
  rnd = random(0, 21); 
  lcd.print(race[rnd]);
  DLY = 0;
 }
 currentStategold = digitalRead(BUTTON_PIN_gold);
if(currentStategold == LOW)
 {
  lcd.clear();
  lcd.setCursor(0,0); 
  lcd.print(F("RND Gold treature:"));
  rnd = random(1, 501);
  Serial.println(rnd);
  lcd.setCursor(0,2); 
  lcd.print(rnd);
  DLY = 0;
 }
 DLY++;
 Serial.println(DLY);
} 

看起来:

pYYBAGNkcGaABZqlAACPuV3sp_w745.png
内(左)外(右)
 

演示:


下载该资料的人也在下载 下载该资料的人还在阅读
更多 >

评论

查看更多

下载排行

本周

  1. 1山景DSP芯片AP8248A2数据手册
  2. 1.06 MB  |  532次下载  |  免费
  3. 2RK3399完整板原理图(支持平板,盒子VR)
  4. 3.28 MB  |  339次下载  |  免费
  5. 3TC358743XBG评估板参考手册
  6. 1.36 MB  |  330次下载  |  免费
  7. 4DFM软件使用教程
  8. 0.84 MB  |  295次下载  |  免费
  9. 5元宇宙深度解析—未来的未来-风口还是泡沫
  10. 6.40 MB  |  227次下载  |  免费
  11. 6迪文DGUS开发指南
  12. 31.67 MB  |  194次下载  |  免费
  13. 7元宇宙底层硬件系列报告
  14. 13.42 MB  |  182次下载  |  免费
  15. 8FP5207XR-G1中文应用手册
  16. 1.09 MB  |  178次下载  |  免费

本月

  1. 1OrCAD10.5下载OrCAD10.5中文版软件
  2. 0.00 MB  |  234315次下载  |  免费
  3. 2555集成电路应用800例(新编版)
  4. 0.00 MB  |  33566次下载  |  免费
  5. 3接口电路图大全
  6. 未知  |  30323次下载  |  免费
  7. 4开关电源设计实例指南
  8. 未知  |  21549次下载  |  免费
  9. 5电气工程师手册免费下载(新编第二版pdf电子书)
  10. 0.00 MB  |  15349次下载  |  免费
  11. 6数字电路基础pdf(下载)
  12. 未知  |  13750次下载  |  免费
  13. 7电子制作实例集锦 下载
  14. 未知  |  8113次下载  |  免费
  15. 8《LED驱动电路设计》 温德尔著
  16. 0.00 MB  |  6656次下载  |  免费

总榜

  1. 1matlab软件下载入口
  2. 未知  |  935054次下载  |  免费
  3. 2protel99se软件下载(可英文版转中文版)
  4. 78.1 MB  |  537798次下载  |  免费
  5. 3MATLAB 7.1 下载 (含软件介绍)
  6. 未知  |  420027次下载  |  免费
  7. 4OrCAD10.5下载OrCAD10.5中文版软件
  8. 0.00 MB  |  234315次下载  |  免费
  9. 5Altium DXP2002下载入口
  10. 未知  |  233046次下载  |  免费
  11. 6电路仿真软件multisim 10.0免费下载
  12. 340992  |  191187次下载  |  免费
  13. 7十天学会AVR单片机与C语言视频教程 下载
  14. 158M  |  183279次下载  |  免费
  15. 8proe5.0野火版下载(中文版免费下载)
  16. 未知  |  138040次下载  |  免费