电子发烧友App

硬声App

0
  • 聊天消息
  • 系统消息
  • 评论与回复
登录后你可以
  • 下载海量资料
  • 学习在线课程
  • 观看技术视频
  • 写文章/发帖/加入社区
创作中心

完善资料让更多小伙伴认识你,还能领取20积分哦,立即完善>

3天内不再提示
电子发烧友网>电子资料下载>电子资料>使用Esp32的基于物联网的脉搏血氧仪

使用Esp32的基于物联网的脉搏血氧仪

2022-11-04 | zip | 0.38 MB | 次下载 | 免费

资料介绍

描述

在这个项目中,我将向您展示如何使用 ESP32、MAX30100 和 Blynk 应用程序制作基于物联网的脉搏血氧仪。我们可以使用 Blynk 物联网云平台从世界任何地方监控这些值。

由于有可用的在线数据,因此该项目可用于在线监测患者的健康状况。

市场上的脉搏血氧仪非常昂贵,但有了这个简单且低成本的脉搏血氧仪模块,我们就可以制作自己的设备。因此,让我们学习如何使用 ESP32 制作 MAX30100 脉搏血氧仪。

第 1 步:所需组件。

要制作这款基于物联网的脉搏血氧仪,您需要很少的组件您可以从亚马逊链接 (AFFILIATE LINK)ESP32 X1 _____________________________印度 /Amazon.com购买所有这些组件

OLED 显示屏 X1 ______________________________印度 / Amazon.com脉搏血氧计传感器 X1 _________________________印度 /Amazon.com 3D 打印盒 X1

只需收集上述所有组件。

第 2 步:MAX30100 脉搏血氧计传感器的工作。

该传感器有两个 LED,一个发出红光,另一个发出红外光。脉率需要红外线。但是,测量血液中的 SpO2 水平需要红光和红外光。

当心脏泵血时,氧气水平会增加,因为有更多的血液。但是,当心脏休息时,含氧血液会减少。因此,脉率是通过获得含氧血液上升和下降之间的时间来确定的。

含氧血液吸收更多的红外光并通过更多的红光。但是,脱氧血液会吸收红光并通过更多的红外光。

基本上,MAX30100 传感器读取两个光源的吸收水平并将它们存储在可通过 I2C 引脚读取的缓冲区中。

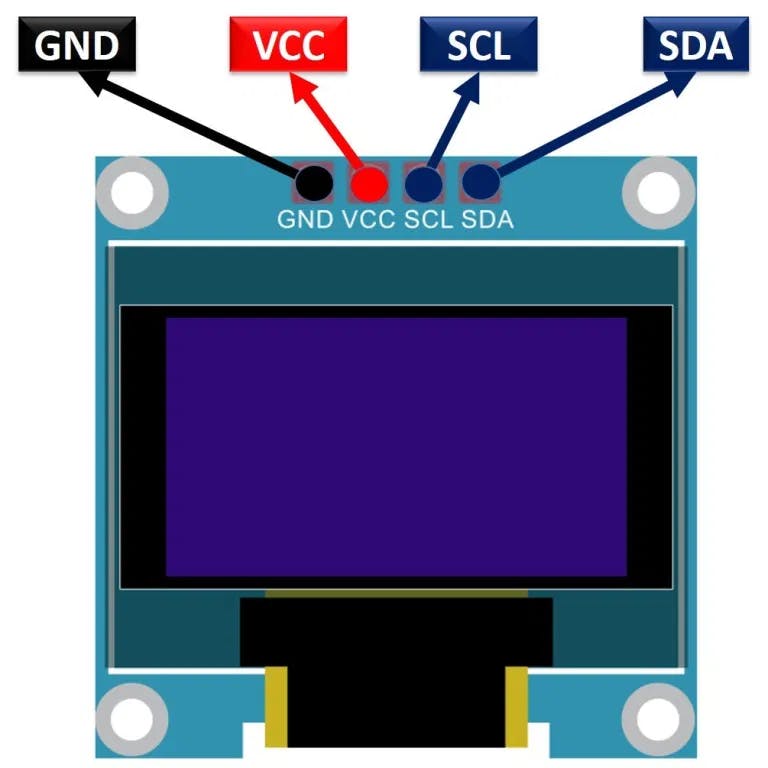
第 3 步:0.96 英寸 I2C OLED 显示屏。

在显示模块中,我们将使用 0.96 英寸蓝色 OLED 显示模块。

我们可以轻松地将该模块与任何使用 SPI/I2C 协议的微控制器连接。

显示器的分辨率为 128×64。

I2C OLED 显示屏


poYBAGNkXX-ARhedAACOybouxKc546.png
 
1 / 2
 

OLED代表有机发光二极管它是一种自发光技术,由放置在阳极和阴极之间的微小多层有机薄膜组成。

与 LCD 技术不同,OLED 不需要背光。

OLED对于所有类型的显示器都具有很高的应用潜力。OLED 也被认为是下一代平板显示器的终极技术

第 4 步:连接 MAX30100 脉搏血氧仪与 ESP32。
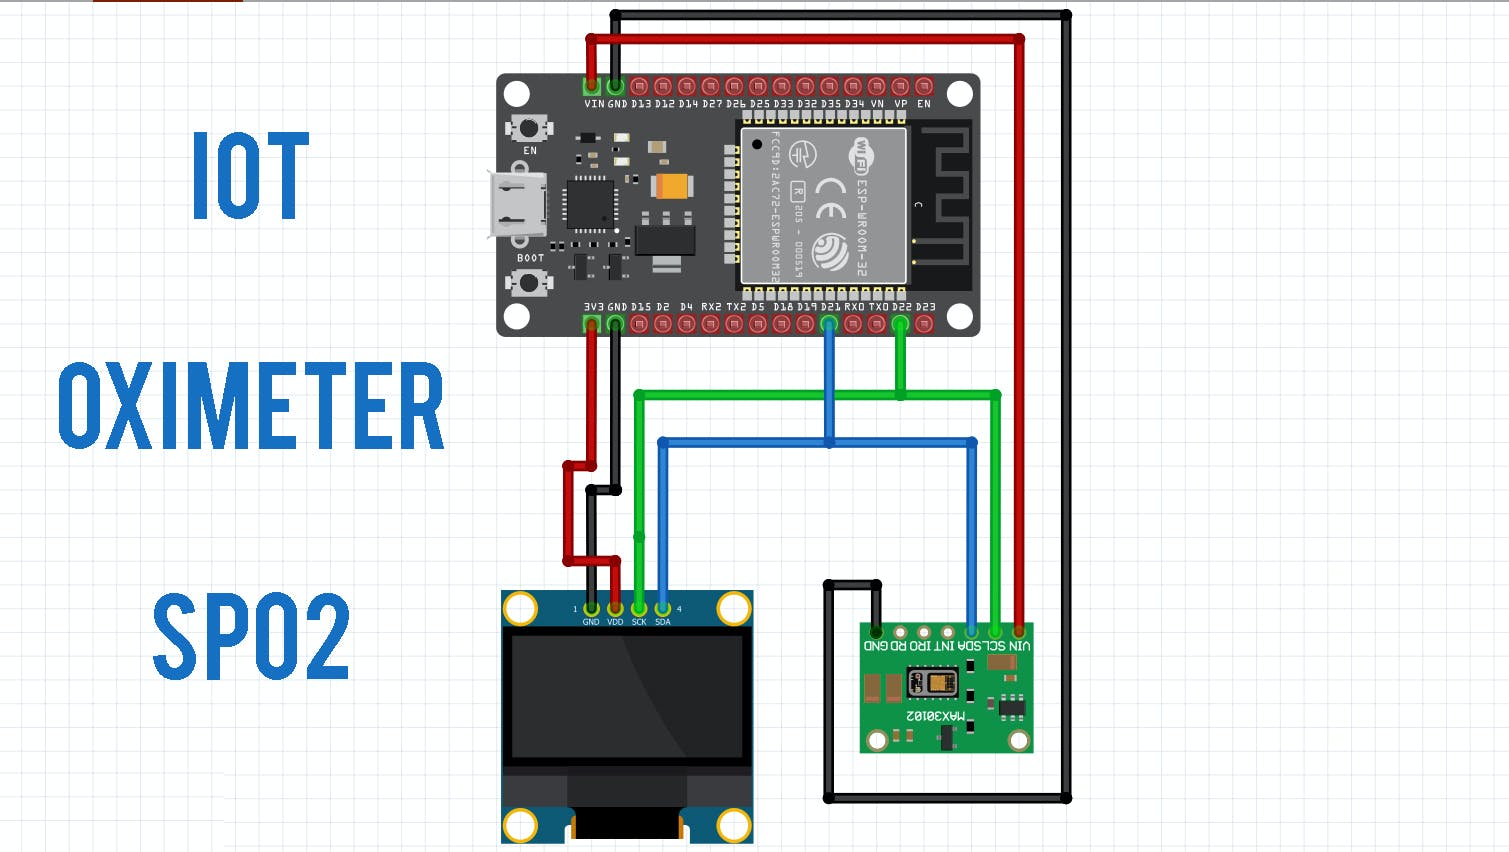
poYBAGNkXYKANc-OAAIOkPOEiOM944.jpg
电路
 

该物联网脉搏血氧仪的电路组件非常简单。

OLED 显示屏和 MAX30100 血氧计传感器均可与 I2C 配合使用。因此,将两个模块的 I2C 引脚(SCL 和 SDA)与 ESP32 的 D21 和 D22 引脚连接。

同样,为 VCC 提供 3.3V 电源并将两个传感器的 GND 引脚接地。基本上,您可以按照电路图进行连接。

我不会讲太多细节,我已经在我们的博客上写了一些信息

MAX30100 脉搏血氧仪与 ESP32 的接口

5:为物联网脉搏血氧仪设置 Blynk 应用程序

现在从适用于 AndroidiOS 的 Play 商店/应用商店下载此 Blink 应用程序。

使用您的电子邮件地址和密码注册 Blynk IoT 云。

现在,单击新项目为您的项目命名。我让“血氧计”选择 ESP32 开发板和连接类型为 Wi-Fi然后点击创建。

现在单击“+”号以添加小部件。

我们需要读取 BPM 和 SpO2 的值。因此,选择一对名为 Value Display & Gauge 的小部件。

顺便说一句,您访问我们的网站并从中扫描代码,您将获得一个预制的小部件,这对您来说很容易

单击此处(为 IoT 脉搏血氧计设置 Blynk 应用程序

第 6 步:软件和库


poYBAGNkXYyAffSpAAIl_4hiDCM256.png
 
1 / 2
 

硬件设置完成,现在我们需要将代码上传到 NodeMCU ESP8266-12E Board。但在此之前,您需要安装一些库。

库文件可以从这里下载:

1. Arduino MAX30100 库

2. OLED库

3. Adafruit GFX 库

4.简单眨眼

第 7 步:编码

/*
  
  ## Hardware Connections (ESP32 <- OLED <- MAX 30102):

  -VIN = 3.3V
  -GND = GND
  -SDA = 21 (or SDA)
  -SCL = 22 (or SCL)

*/


/*================================================================================================================================== */

char auth[] = "qjZaiBBH26yK40yj29wXwZ8LXOoeQmtR";  
char ssid[] = "nextpcb";      // Your WiFi Name (SSID) (**case sensitive).
char pass[] = "111222444"   // Your WiFi Password.

/*================================================================================================================================== */


//DiY Projects Lab
#define BLYNK_PRINT Serial
#include 
#include 
#include 
#include  //OLED libraries
#include 
#include 
#include "MAX30105.h" //sparkfun MAX3010X library
//#include "heartRate.h"
SimpleTimer timer;
MAX30105 particleSensor;


#define INTERVAL_MESSAGE2 60000
unsigned long time_2 = 0;
int period = 2000;
unsigned long time_now = 0;
double avered = 0;
double aveir = 0;
double sumirrms = 0;
double sumredrms = 0;
int i = 0;
int Num = 100; //calculate SpO2 by this sampling interval

int oxygen;
double ESpO2 = 95.0;    //initial value of estimated SpO2
double FSpO2 = 0.7;     //filter factor for estimated SpO2
double frate = 0.95;    //low pass filter for IR/red LED value to eliminate AC component
#define TIMETOBOOT 3000 // wait for this time(msec) to output SpO2
#define SCALE 88.0      //adjust to display heart beat and SpO2 in the same scale
#define SAMPLING 5      //if you want to see heart beat more precisely , set SAMPLING to 1
#define FINGER_ON 3000  // if red signal is lower than this , it indicates your finger is not on the sensor
#define MINIMUM_SPO2 0.0

const byte RATE_SIZE = 4; //Increase this for more averaging. 4 is good.
byte rates[RATE_SIZE];    //Array of heart rates
byte rateSpot = 0;
long lastBeat = 0; //Time at which the last beat occurred
float beatsPerMinute;
int beatAvg;

#define SCREEN_WIDTH 128 // OLED display width, in pixels
#define SCREEN_HEIGHT 64 // OLED display height, in pixels
#define OLED_RESET -1    // Reset pin # (or -1 if sharing Arduino reset pin)

Adafruit_SSD1306 display(SCREEN_WIDTH, SCREEN_HEIGHT, &Wire, OLED_RESET); //Declaring the display name (display)

//Logo2 and Logo3 are two bmp pictures that display on the OLED if called
static const unsigned char PROGMEM logo2_bmp[] =
{ 0x03, 0xC0, 0xF0, 0x06, 0x71, 0x8C, 0x0C, 0x1B, 0x06, 0x18, 0x0E, 0x02, 0x10, 0x0C, 0x03, 0x10,
  0x04, 0x01, 0x10, 0x04, 0x01, 0x10, 0x40, 0x01, 0x10, 0x40, 0x01, 0x10, 0xC0, 0x03, 0x08, 0x88,
  0x02, 0x08, 0xB8, 0x04, 0xFF, 0x37, 0x08, 0x01, 0x30, 0x18, 0x01, 0x90, 0x30, 0x00, 0xC0, 0x60,
  0x00, 0x60, 0xC0, 0x00, 0x31, 0x80, 0x00, 0x1B, 0x00, 0x00, 0x0E, 0x00, 0x00, 0x04, 0x00,
};

static const unsigned char PROGMEM logo3_bmp[] =
    {0x01, 0xF0, 0x0F, 0x80, 0x06, 0x1C, 0x38, 0x60, 0x18, 0x06, 0x60, 0x18, 0x10, 0x01, 0x80, 0x08,
     0x20, 0x01, 0x80, 0x04, 0x40, 0x00, 0x00, 0x02, 0x40, 0x00, 0x00, 0x02, 0xC0, 0x00, 0x08, 0x03,
     0x80, 0x00, 0x08, 0x01, 0x80, 0x00, 0x18, 0x01, 0x80, 0x00, 0x1C, 0x01, 0x80, 0x00, 0x14, 0x00,
     0x80, 0x00, 0x14, 0x00, 0x80, 0x00, 0x14, 0x00, 0x40, 0x10, 0x12, 0x00, 0x40, 0x10, 0x12, 0x00,
     0x7E, 0x1F, 0x23, 0xFE, 0x03, 0x31, 0xA0, 0x04, 0x01, 0xA0, 0xA0, 0x0C, 0x00, 0xA0, 0xA0, 0x08,
     0x00, 0x60, 0xE0, 0x10, 0x00, 0x20, 0x60, 0x20, 0x06, 0x00, 0x40, 0x60, 0x03, 0x00, 0x40, 0xC0,
     0x01, 0x80, 0x01, 0x80, 0x00, 0xC0, 0x03, 0x00, 0x00, 0x60, 0x06, 0x00, 0x00, 0x30, 0x0C, 0x00,
     0x00, 0x08, 0x10, 0x00, 0x00, 0x06, 0x60, 0x00, 0x00, 0x03, 0xC0, 0x00, 0x00, 0x01, 0x80, 0x00};

#define USEFIFO

void setup()
{
  Serial.begin(115200);
  Serial.println("Initializing...");
  display.begin(SSD1306_SWITCHCAPVCC, 0x3C); //Start the OLED display
  display.display();
  display.clearDisplay();
  Blynk.begin(auth, ssid, pass);

  // Initialize sensor
  while (!particleSensor.begin(Wire, I2C_SPEED_FAST)) //Use default I2C port, 400kHz speed
  {
    Serial.println("MAX30102 was not found. Please check wiring/power/solder jumper at MH-ET LIVE MAX30102 board. ");
    //while (1);
  }
  Serial.println("Place your index finger on the sensor with steady pressure.");

  //Setup to sense a nice looking saw tooth on the plotter
  byte ledBrightness = 255; // 0x7F Options: 0=Off to 255=50mA
  byte sampleAverage = 4;   //Options: 1, 2, 4, 8, 16, 32
  byte ledMode = 2;         //Options: 1 = Red only, 2 = Red + IR, 3 = Red + IR + Green
  int sampleRate = 400;     //1000 is best but needs processing power//Options: 50, 100, 200, 400, 800, 1000, 1600, 3200
  int pulseWidth = 411;     //Options: 69, 118, 215, 411
  int adcRange = 16384;     //Options: 2048, 4096, 8192, 16384
  // Set up the wanted parameters
  particleSensor.setup(ledBrightness, sampleAverage, ledMode, sampleRate, pulseWidth, adcRange); //Configure sensor with these settings
  particleSensor.enableDIETEMPRDY();
  timer.setInterval(500, sendUptime);
}

void sendUptime()
{
  Blynk.virtualWrite(V4, oxygen);
  //Blynk.virtualWrite(V5, beatAvg);
}

void loop()
{
  Blynk.run();
  timer.run(); // Initiates SimpleTimer

  uint32_t ir, red, green;
  double fred, fir;
  double SpO2 = 0; //raw SpO2 before low pass filtered

#ifdef USEFIFO
  particleSensor.check(); //Check the sensor, read up to 3 samples

  while (particleSensor.available())

  { //do we have new data
#ifdef MAX30105
    red = particleSensor.getFIFORed(); //Sparkfun's MAX30105
    ir = particleSensor.getFIFOIR();   //Sparkfun's MAX30105
#else
    red = particleSensor.getFIFOIR(); //why getFOFOIR output Red data by MAX30102 on MH-ET LIVE breakout board
    ir = particleSensor.getFIFORed(); //why getFIFORed output IR data by MAX30102 on MH-ET LIVE breakout board
#endif

    i++;
    fred = (double)red;
    fir = (double)ir;
    avered = avered * frate + (double)red * (1.0 - frate); //average red level by low pass filter
    aveir = aveir * frate + (double)ir * (1.0 - frate);    //average IR level by low pass filter
    sumredrms += (fred - avered) * (fred - avered);        //square sum of alternate component of red level
    sumirrms += (fir - aveir) * (fir - aveir);             //square sum of alternate component of IR level
    if ((i % SAMPLING) == 0)
    { //slow down graph plotting speed for arduino Serial plotter by thin out
      if (millis() > TIMETOBOOT)
      {
        if (ir < FINGER_ON)
          ESpO2 = MINIMUM_SPO2; //indicator for finger detached
        //float temperature = particleSensor.readTemperatureF();
        if (ESpO2 <= -1)
        {
          ESpO2 = 0;
        }

        if (ESpO2 > 100)
        {
          ESpO2 = 100;
        }

        oxygen = ESpO2;

        Serial.print(" Oxygen % = ");
        Serial.println(oxygen);
      }
    }
    if ((i % Num) == 0)
    {
      double R = (sqrt(sumredrms) / avered) / (sqrt(sumirrms) / aveir);
      // Serial.println(R);
      SpO2 = -23.3 * (R - 0.4) + 100;               //http://ww1.microchip.com/downloads/jp/AppNotes/00001525B_JP.pdf
      ESpO2 = FSpO2 * ESpO2 + (1.0 - FSpO2) * SpO2; //low pass filter
      //Serial.print(SpO2); Serial.print(","); Serial.println(ESpO2);
      sumredrms = 0.0;
      sumirrms = 0.0;
      i = 0;
      break;
    }
    particleSensor.nextSample(); //We're finished with this sample so move to next sample
    //Serial.println(SpO2);
  }

  long irValue = particleSensor.getIR();
  //Serial.println(irValue);

  if (irValue > 7000)
  {                                                     //If a finger is detected
    display.clearDisplay();                             //Clear the display
    display.drawBitmap(5, 5, logo2_bmp, 24, 21, WHITE); //Draw the first bmp picture (little heart)
    display.setTextSize(2);                             //Near it display the average BPM you can display the BPM if you want
    display.setTextColor(WHITE);
    display.setCursor(50, 15);
    display.println("SpO2");
    display.setCursor(50, 50);
    //display.println(beatAvg);
    display.print(oxygen);
    display.println("%");

    display.display();
  }

  if (irValue == true)
  {

    display.clearDisplay();                             //Clear the display
    display.drawBitmap(0, 0, logo3_bmp, 32, 32, WHITE); //Draw the second picture (bigger heart)
    display.setTextSize(2);                             //And still displays the average BPM
    display.setTextColor(WHITE);
    display.setCursor(50, 15);
    display.println("SpO2");
    display.setCursor(50, 50);
    //display.println(beatAvg);
    display.print(oxygen);
    display.println("%");
    display.display();

   
  }

  if (irValue < 7000)
  { //If no finger is detected it inform the user and put the average BPM to 0 or it will be stored for the next measure
    //beatAvg=0;
    display.clearDisplay();
    display.setTextSize(1);
    display.setTextColor(WHITE);
    display.setCursor(30, 10);
    display.println("WiFi Connected ");
    display.setCursor(30, 25);
    display.println("Please Place ");
    display.setCursor(30, 4
    0);
    display.println("your Finger ");

    
    display.display();
  }

  if (millis() > time_2 + INTERVAL_MESSAGE2 && oxygen < 93)

  {
    time_2 = millis();

    Blynk.notify("Alert! Oxygen Saturation below 93% Detected");
    Serial.print("Alert called");
  }

#endif
}

第 8 步:从 MAX30100 ESP32 输出 Blynk 上的观察值和读取值


poYBAGNkXY-AA3MsAAFl3erGWG0388.png
 
1 / 3
 

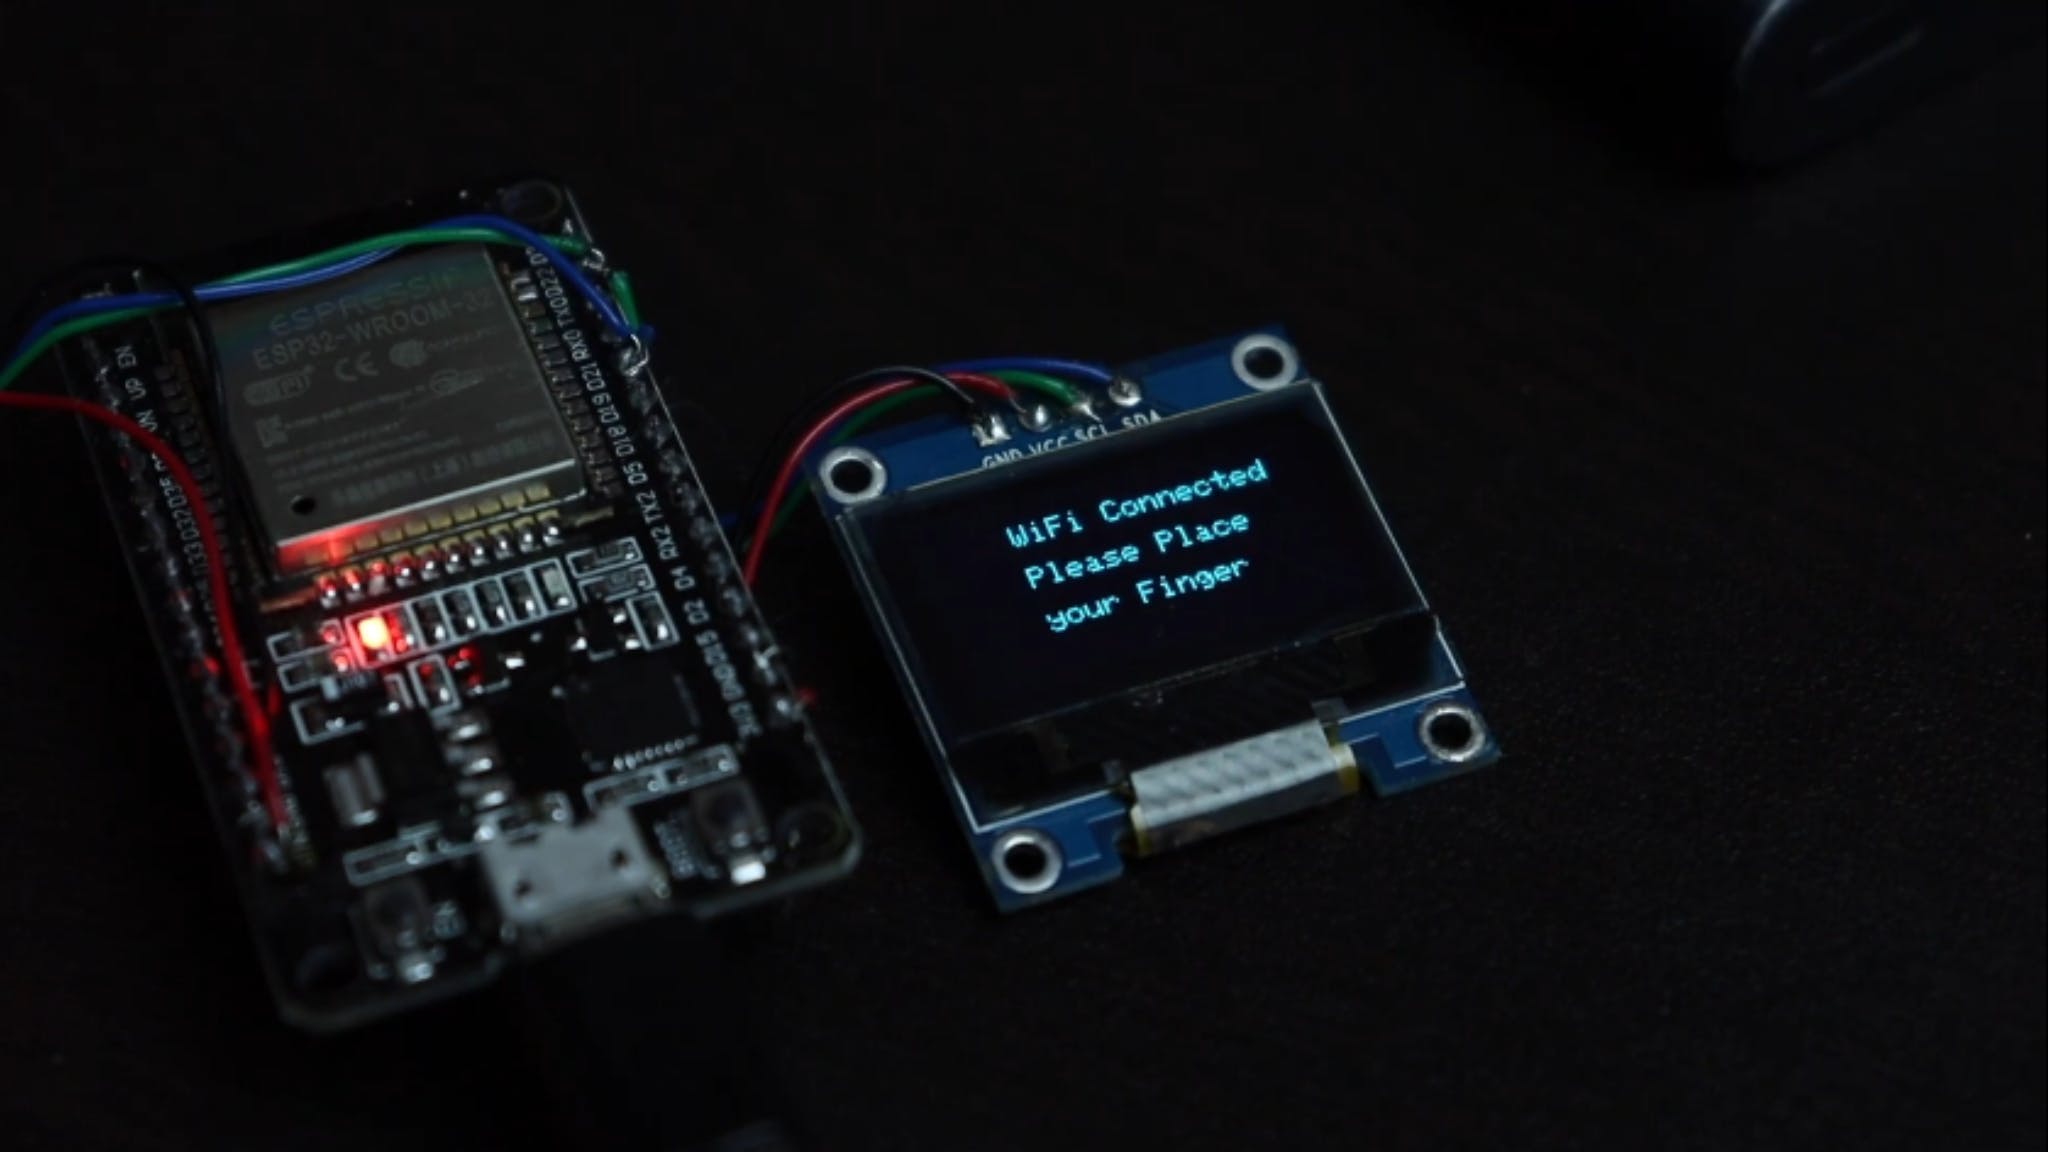
在 Android 应用程序上,BPM 和 SpO2 值会在一秒钟后上传,您可以看到仪表和显示参数的变化。

访问我的网站DiY Projects Lab拥有超过 25 个很棒的详细项目

第 9 步:DIY 和购买

我将我的血氧仪与专业血氧仪进行了比较,它显示出几乎 99% 的准确度。

谢谢 NextPCB:这个项目之所以顺利完成,是因为有 NextPCB 的帮助和支持

伙计们,如果您有 PCB 项目,请访问他们的网站并获得令人兴奋的折扣和优惠券。

这是仲夏销售的 NextPCB

1. PCB 订单最高可享受 30% 的折扣

2. PCBA 订单最高 20% 折扣


评论

查看更多

下载排行

本周

  1. 1山景DSP芯片AP8248A2数据手册
  2. 1.06 MB  |  532次下载  |  免费
  3. 2RK3399完整板原理图(支持平板,盒子VR)
  4. 3.28 MB  |  339次下载  |  免费
  5. 3TC358743XBG评估板参考手册
  6. 1.36 MB  |  330次下载  |  免费
  7. 4DFM软件使用教程
  8. 0.84 MB  |  295次下载  |  免费
  9. 5元宇宙深度解析—未来的未来-风口还是泡沫
  10. 6.40 MB  |  227次下载  |  免费
  11. 6迪文DGUS开发指南
  12. 31.67 MB  |  194次下载  |  免费
  13. 7元宇宙底层硬件系列报告
  14. 13.42 MB  |  182次下载  |  免费
  15. 8FP5207XR-G1中文应用手册
  16. 1.09 MB  |  178次下载  |  免费

本月

  1. 1OrCAD10.5下载OrCAD10.5中文版软件
  2. 0.00 MB  |  234315次下载  |  免费
  3. 2555集成电路应用800例(新编版)
  4. 0.00 MB  |  33566次下载  |  免费
  5. 3接口电路图大全
  6. 未知  |  30323次下载  |  免费
  7. 4开关电源设计实例指南
  8. 未知  |  21549次下载  |  免费
  9. 5电气工程师手册免费下载(新编第二版pdf电子书)
  10. 0.00 MB  |  15349次下载  |  免费
  11. 6数字电路基础pdf(下载)
  12. 未知  |  13750次下载  |  免费
  13. 7电子制作实例集锦 下载
  14. 未知  |  8113次下载  |  免费
  15. 8《LED驱动电路设计》 温德尔著
  16. 0.00 MB  |  6656次下载  |  免费

总榜

  1. 1matlab软件下载入口
  2. 未知  |  935054次下载  |  免费
  3. 2protel99se软件下载(可英文版转中文版)
  4. 78.1 MB  |  537798次下载  |  免费
  5. 3MATLAB 7.1 下载 (含软件介绍)
  6. 未知  |  420027次下载  |  免费
  7. 4OrCAD10.5下载OrCAD10.5中文版软件
  8. 0.00 MB  |  234315次下载  |  免费
  9. 5Altium DXP2002下载入口
  10. 未知  |  233046次下载  |  免费
  11. 6电路仿真软件multisim 10.0免费下载
  12. 340992  |  191187次下载  |  免费
  13. 7十天学会AVR单片机与C语言视频教程 下载
  14. 158M  |  183279次下载  |  免费
  15. 8proe5.0野火版下载(中文版免费下载)
  16. 未知  |  138040次下载  |  免费