 迷你Kossel3D打印机
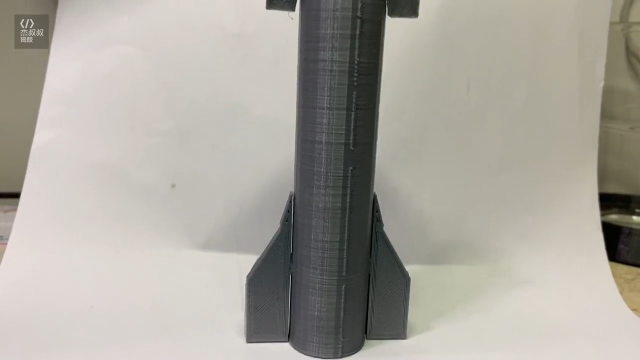
I’ve been busy building the mini kossel 3D printer on and off for about a year now. Unlike the Desi 3D printer that I’d build entirely from scratch, this time I decided to splurge on some decent off the shelf parts. I really like this printer design, its clean, simple, fast and economical.
I collected all the parts over the course of couple of months at the beginning of this year (2014).It still looks a little messy. Need to find a better solution for those unruly wires.
The controller is a RAMPs board combined with an Arduino Mega. The extruder is an all-metal bowden that I bought while I was visiting Shenzhen, China.The hot-end is a MKV J-Head with 0.4mm nozzle.The dimensions of the first print are off by about 0.6mm and the first layer is a little too squished, but I’ll be able to get that down with some fine tuning.
One nice thing about this design is that it has an auto bed leveling mechanism which allows the printer to self calibrate before every new job. The original design uses an allen key connected to a limit switch to gently tap on different location on the print bed to self calibrate. I decided to try out a new design based on Johann’srecent experiments on using force sensor underneath the bed and using the hot-end itself to tap on the bed.
The FSR sensors are currently held in place by tape while a felt pad provides support for the above glass bed. I still need to find a more permanent solution to this.I’ll put up more detailed post on the build soon. In the meantime, calibrate, calibrate, calibrate.
自动翻译仅供参考
迷你Kossel3D打印机
我一直忙于建设微型科塞尔3D打印机和关闭了大约一年了。不像德西3D打印机,我会完全从头构建,这一次我决定挥霍一些体面的现成部件。我真的很喜欢这台打印机的设计,它的清洁,简单,快捷,经济。
我收集了全国各地的数个月的过程中,部分在今年(2014年)的开始。它仍然显得有些凌乱。需要找到那些不守规矩的导线更好的解决方案。控制器是一个坡道板结合一个Arduino兆。该挤出机是我买的,而我访问深圳,中国的全金属钢缆。热到底是MKV J-头采用0.4mm喷嘴。第一次印刷的尺寸是关闭的0.6mm左右的第一层是有点过于压扁,但我就可以拿到下来一些微调。
这个设计的一个好处是,它有一个自动床整平机制,使每一个新的作业之前打印机校准自我。最初的设计采用了六角扳手连接到限位开关轻轻敲击在打印床上的自校准不同的位置。我决定尝试基于Johann‘srecent实验一个新的设计使用力传感器的床底下,并用热端本身挖掘在床上。
因此,FSR到位传感器,目前持有的磁带,而毡垫提供上述玻璃床的支持。我还需要找到一个更永久的解决这个。我会提出了更详细的岗位上构建很快。在此期间,校准,校准,校准。
-
3D打印
+关注
关注
26文章
3470浏览量
107653
发布评论请先 登录
相关推荐
汉思新材料提供打印机打印头更优的金线包封用胶方案


 工商网监
工商网监
评论