 如何利用计时器中断来保持一切正常运转
设置
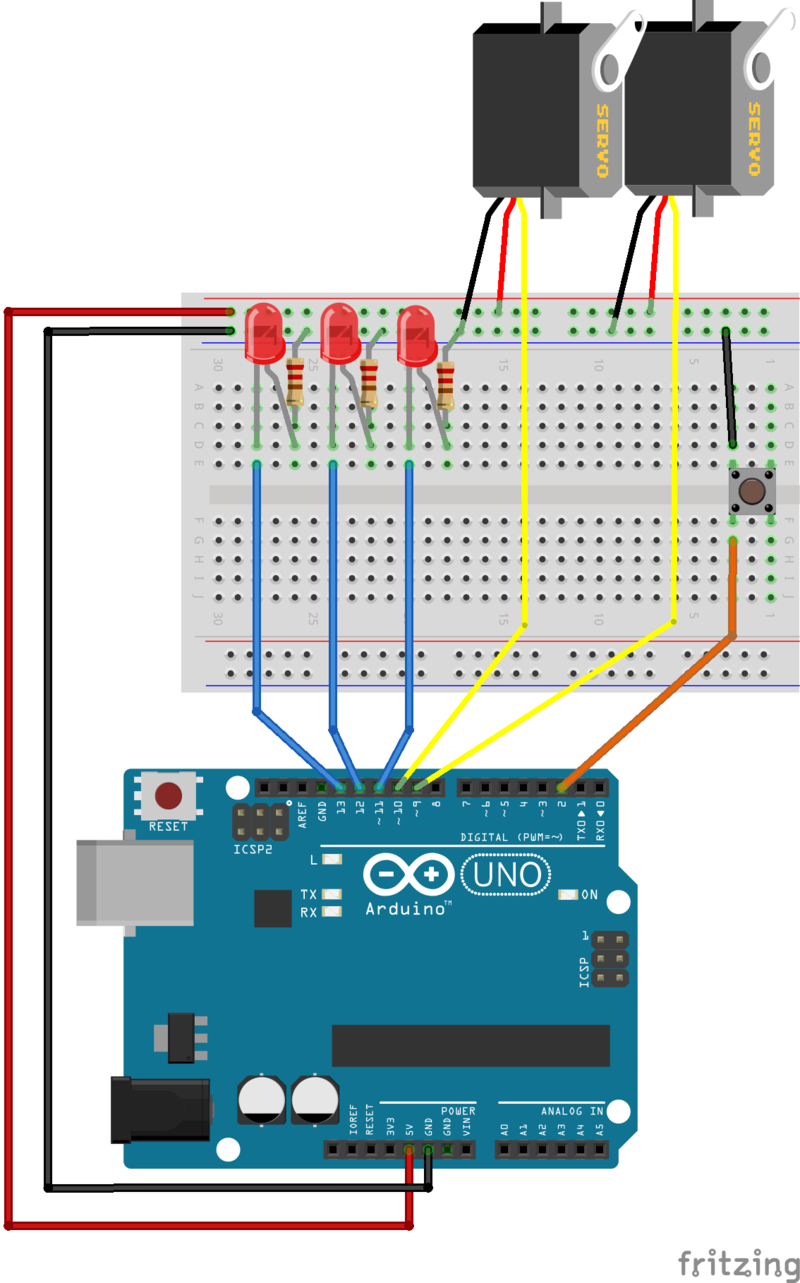
对于本指南中的所有示例,将使用以下接线:
什么是中断?
中断是一个信号,告诉处理器立即停止其正在执行的操作并处理一些高优先级的处理。这种高优先级处理称为中断处理程序。
中断处理程序与任何其他void函数一样。如果编写一个并将其附加到中断,则在触发该中断信号时将调用该中断。当您从中断处理程序返回时,处理器将返回以继续之前的操作。
它们来自何处?
可以生成中断
外部中断由于外部中断引脚之一的状态改变而引起的外部中断。
Pin-change中断是由于一组引脚中任何一个引脚的状态改变。
它们有什么用?
使用中断,您无需编写循环代码即可连续检查高优先级中断条件。您不必担心由于长时间运行的子例程而反应迟钝或错过了按键操作。
当中断发生时,处理器将自动停止正在执行的操作并调用中断处理程序。您只需编写代码以响应中断。
定时器中断

请勿致电给我们,我们会打电话给您
在本系列的第1部分中,我们学习了如何使用millis()进行计时。但是为了进行这项工作,我们每次都要在循环中调用millis()来查看是否该做某事了。一毫秒多次调用millis()只是发现时间没有改变,这是一种浪费。如果只需要每毫秒检查一次,那会不会很好?
计时器和计时器中断让我们可以做到这一点。我们可以设置一个计时器来每毫秒中断一次。计时器实际上会打电话给我们,让我们知道现在该检查时钟了!
Arduino计时器
Arduino Uno有3个计时器:Timer0,Timer1和Timer2。已经将Timer0设置为生成毫秒中断,以更新millis()报告的毫秒计数器。既然这就是我们要寻找的东西,我们也将得到Timer0来为我们生成一个中断!
频率和计数
定时器是简单的计数器,它们以从16MHz系统时钟。您可以配置时钟分频器以更改频率和各种不同的计数模式。您还可以将它们配置为在计时器达到特定计数时生成中断。
Timer0是8位,从0到255计数,并在溢出时生成中断。默认情况下,它使用64的时钟分频比为我们提供976.5625 Hz的中断率(就我们的目的而言,足够接近1KHz)。我们不会弄乱Timer0的频率,因为那样会破坏breakmillis()!
比较寄存器
Arduino定时器具有许多配置寄存器。可以使用Arduino IDE中定义的特殊符号来读取或写入这些符号。 有关所有这些寄存器及其功能的详细说明,请参见下面的“ 进一步阅读”中的链接。
我们将建立一个《计时器0的strong》比较寄存器(该寄存器称为OCR0A),在该计数中间的某个位置产生另一个中断。在每次滴答时,计时器计数器都会与比较寄存器进行比较,并且当它们相等时,将产生一个中断。
只要计数器值超过0xAF,下面的代码就会产生一个“ TIMER0_COMPA”中断。
下载:文件
复制代码
// Timer0 is already used for millis() - we‘ll just interrupt somewhere
// in the middle and call the “Compare A” function below
OCR0A = 0xAF;
TIMSK0 |= _BV(OCIE0A); // Timer0 is already used for millis() - we’ll just interrupt somewhere
// in the middle and call the “Compare A” function below
OCR0A = 0xAF;
TIMSK0 |= _BV(OCIE0A);
然后,我们将为定时器中断向量(称为“ TIMER0_COMPA_vect”)定义一个中断处理程序。在此中断处理程序中,我们将完成循环中所有的工作。
下载:文件
复制代码
// Interrupt is called once a millisecond,
SIGNAL(TIMER0_COMPA_vect)
{
unsigned long currentMillis = millis();
sweeper1.Update(currentMillis);
//if(digitalRead(2) == HIGH)
{
sweeper2.Update(currentMillis);
led1.Update(currentMillis);
}
led2.Update(currentMillis);
led3.Update(currentMillis);
} // Interrupt is called once a millisecond,
SIGNAL(TIMER0_COMPA_vect)
{
unsigned long currentMillis = millis();
sweeper1.Update(currentMillis);
//if(digitalRead(2) == HIGH)
{
sweeper2.Update(currentMillis);
led1.Update(currentMillis);
}
led2.Update(currentMillis);
led3.Update(currentMillis);
}
这给我们留下了一个完全空的循环。
下载:文件
复制代码
void loop()
{
} void loop()
{
}
您现在可以在循环中做任何您想做的事情。您甚至可以decade废并使用delay()!闪光灯和扫地机将不在乎。无论如何,它们仍然会每毫秒被调用一次!
进一步阅读:
这只是计时器可以执行的简单示例。有关不同类型的计时器及其配置方式的更多详细信息,请查看“库和链接”页面。
源代码:
以下是整个代码,包括闪光灯和扫地机:
下载:文件
复制代码
#include
class Flasher
{
// Class Member Variables
// These are initialized at startup
int ledPin; // the number of the LED pin
long OnTime; // milliseconds of on-time
long OffTime; // milliseconds of off-time
// These maintain the current state
int ledState; // ledState used to set the LED
unsigned long previousMillis; // will store last time LED was updated
// Constructor - creates a Flasher
// and initializes the member variables and state
public:
Flasher(int pin, long on, long off)
{
ledPin = pin;
pinMode(ledPin, OUTPUT);
OnTime = on;
OffTime = off;
ledState = LOW;
previousMillis = 0;
}
void Update(unsigned long currentMillis)
{
if((ledState == HIGH) && (currentMillis - previousMillis 》= OnTime))
{
ledState = LOW; // Turn it off
previousMillis = currentMillis; // Remember the time
digitalWrite(ledPin, ledState); // Update the actual LED
}
else if ((ledState == LOW) && (currentMillis - previousMillis 》= OffTime))
{
ledState = HIGH; // turn it on
previousMillis = currentMillis; // Remember the time
digitalWrite(ledPin, ledState); // Update the actual LED
}
}
};
class Sweeper
{
Servo servo; // the servo
int pos; // current servo position
int increment; // increment to move for each interval
int updateInterval; // interval between updates
unsigned long lastUpdate; // last update of position
public:
Sweeper(int interval)
{
updateInterval = interval;
increment = 1;
}
void Attach(int pin)
{
servo.attach(pin);
}
void Detach()
{
servo.detach();
}
void Update(unsigned long currentMillis)
{
if((currentMillis - lastUpdate) 》 updateInterval) // time to update
{
lastUpdate = millis();
pos += increment;
servo.write(pos);
if ((pos 》= 180) || (pos 《= 0)) // end of sweep
{
// reverse direction
increment = -increment;
}
}
}
};
Flasher led1(11, 123, 400);
Flasher led2(12, 350, 350);
Flasher led3(13, 200, 222);
Sweeper sweeper1(25);
Sweeper sweeper2(35);
void setup()
{
sweeper1.Attach(9);
sweeper2.Attach(10);
// Timer0 is already used for millis() - we‘ll just interrupt somewhere
// in the middle and call the “Compare A” function below
OCR0A = 0xAF;
TIMSK0 |= _BV(OCIE0A);
}
// Interrupt is called once a millisecond, to update the LEDs
// Sweeper2 s not updated if the button on digital 2 is pressed.
SIGNAL(TIMER0_COMPA_vect)
{
unsigned long currentMillis = millis();
sweeper1.Update(currentMillis);
if(digitalRead(2) == HIGH)
{
sweeper2.Update(currentMillis);
led1.Update(currentMillis);
}
led2.Update(currentMillis);
led3.Update(currentMillis);
}
void loop()
{
} #include
class Flasher
{
// Class Member Variables
// These are initialized at startup
int ledPin; // the number of the LED pin
long OnTime; // milliseconds of on-time
long OffTime; // milliseconds of off-time
// These maintain the current state
int ledState; // ledState used to set the LED
unsigned long previousMillis; // will store last time LED was updated
// Constructor - creates a Flasher
// and initializes the member variables and state
public:
Flasher(int pin, long on, long off)
{
ledPin = pin;
pinMode(ledPin, OUTPUT);
OnTime = on;
OffTime = off;
ledState = LOW;
previousMillis = 0;
}
void Update(unsigned long currentMillis)
{
if((ledState == HIGH) && (currentMillis - previousMillis 》= OnTime))
{
ledState = LOW; // Turn it off
previousMillis = currentMillis; // Remember the time
digitalWrite(ledPin, ledState); // Update the actual LED
}
else if ((ledState == LOW) && (currentMillis - previousMillis 》= OffTime))
{
ledState = HIGH; // turn it on
previousMillis = currentMillis; // Remember the time
digitalWrite(ledPin, ledState); // Update the actual LED
}
}
};
class Sweeper
{
Servo servo; // the servo
int pos; // current servo position
int increment; // increment to move for each interval
int updateInterval; // interval between updates
unsigned long lastUpdate; // last update of position
public:
Sweeper(int interval)
{
updateInterval = interval;
increment = 1;
}
void Attach(int pin)
{
servo.attach(pin);
}
void Detach()
{
servo.detach();
}
void Update(unsigned long currentMillis)
{
if((currentMillis - lastUpdate) 》 updateInterval) // time to update
{
lastUpdate = millis();
pos += increment;
servo.write(pos);
if ((pos 》= 180) || (pos 《= 0)) // end of sweep
{
// reverse direction
increment = -increment;
}
}
}
};
Flasher led1(11, 123, 400);
Flasher led2(12, 350, 350);
Flasher led3(13, 200, 222);
Sweeper sweeper1(25);
Sweeper sweeper2(35);
void setup()
{
sweeper1.Attach(9);
sweeper2.Attach(10);
// Timer0 is already used for millis() - we’ll just interrupt somewhere
// in the middle and call the “Compare A” function below
OCR0A = 0xAF;
TIMSK0 |= _BV(OCIE0A);
}
// Interrupt is called once a millisecond, to update the LEDs
// Sweeper2 s not updated if the button on digital 2 is pressed.
SIGNAL(TIMER0_COMPA_vect)
{
unsigned long currentMillis = millis();
sweeper1.Update(currentMillis);
if(digitalRead(2) == HIGH)
{
sweeper2.Update(currentMillis);
led1.Update(currentMillis);
}
led2.Update(currentMillis);
led3.Update(currentMillis);
}
void loop()
{
}
外部中断
最好是退出循环
与定时器中断不同的是,外部事件会触发外部中断。例如,当按下按钮或从旋转编码器接收到脉冲时。但是,就像计时器中断一样,您不需要继续轮询GPIO引脚以进行更改。
Arduino UNO有2个外部中断引脚。在此示例中,我们将按钮附加到其中一个按钮,并使用它来重置我们的清扫器。首先,在我们的清除程序类中添加一个“ reset()”函数。 reset()函数将位置设置为0,并立即将伺服器放置在此处:
下载:文件
复制代码
void reset()
{
pos = 0;
servo.write(pos);
increment = abs(increment);
} void reset()
{
pos = 0;
servo.write(pos);
increment = abs(increment);
}
接下来,我们将添加对AttachInterrupt()的调用以连接外部中断
在UNO上,中断0与数字引脚2相关联。我们告诉它在该引脚上寻找信号的“ FALLING”沿。当按下按钮时,信号从HIGH降到LOW,并调用“重置”中断处理程序。
下载:文件
复制代码
pinMode(2, INPUT_PULLUP);
attachInterrupt(0, Reset, FALLING); pinMode(2, INPUT_PULLUP);
attachInterrupt(0, Reset, FALLING);
这是“重置”中断处理程序。它仅调用清除程序重置功能:
下载:文件
复制代码
void Reset()
{
sweeper1.reset();
sweeper2.reset();
} void Reset()
{
sweeper1.reset();
sweeper2.reset();
}
现在,每当您按下按钮时,伺服器就会停止其正在执行的操作,并立即寻找到零位置。
源代码:
这是带有计时器和外部中断的完整草图:
下载:文件
复制代码
#include
class Flasher
{
// Class Member Variables
// These are initialized at startup
int ledPin; // the number of the LED pin
long OnTime; // milliseconds of on-time
long OffTime; // milliseconds of off-time
// These maintain the current state
volatile int ledState; // ledState used to set the LED
volatile unsigned long previousMillis; // will store last time LED was updated
// Constructor - creates a Flasher
// and initializes the member variables and state
public:
Flasher(int pin, long on, long off)
{
ledPin = pin;
pinMode(ledPin, OUTPUT);
OnTime = on;
OffTime = off;
ledState = LOW;
previousMillis = 0;
}
void Update(unsigned long currentMillis)
{
if((ledState == HIGH) && (currentMillis - previousMillis 》= OnTime))
{
ledState = LOW; // Turn it off
previousMillis = currentMillis; // Remember the time
digitalWrite(ledPin, ledState); // Update the actual LED
}
else if ((ledState == LOW) && (currentMillis - previousMillis 》= OffTime))
{
ledState = HIGH; // turn it on
previousMillis = currentMillis; // Remember the time
digitalWrite(ledPin, ledState); // Update the actual LED
}
}
};
class Sweeper
{
Servo servo; // the servo
int updateInterval; // interval between updates
volatile int pos; // current servo position
volatile unsigned long lastUpdate; // last update of position
volatile int increment; // increment to move for each interval
public:
Sweeper(int interval)
{
updateInterval = interval;
increment = 1;
}
void Attach(int pin)
{
servo.attach(pin);
}
void Detach()
{
servo.detach();
}
void reset()
{
pos = 0;
servo.write(pos);
increment = abs(increment);
}
void Update(unsigned long currentMillis)
{
if((currentMillis - lastUpdate) 》 updateInterval) // time to update
{
lastUpdate = currentMillis;
pos += increment;
servo.write(pos);
if ((pos 》= 180) || (pos 《= 0)) // end of sweep
{
// reverse direction
increment = -increment;
}
}
}
};
Flasher led1(11, 123, 400);
Flasher led2(12, 350, 350);
Flasher led3(13, 200, 222);
Sweeper sweeper1(25);
Sweeper sweeper2(35);
void setup()
{
sweeper1.Attach(9);
sweeper2.Attach(10);
// Timer0 is already used for millis() - we‘ll just interrupt somewhere
// in the middle and call the “Compare A” function below
OCR0A = 0xAF;
TIMSK0 |= _BV(OCIE0A);
pinMode(2, INPUT_PULLUP);
attachInterrupt(0, Reset, FALLING);
}
void Reset()
{
sweeper1.reset();
sweeper2.reset();
}
// Interrupt is called once a millisecond,
SIGNAL(TIMER0_COMPA_vect)
{
unsigned long currentMillis = millis();
sweeper1.Update(currentMillis);
//if(digitalRead(2) == HIGH)
{
sweeper2.Update(currentMillis);
led1.Update(currentMillis);
}
led2.Update(currentMillis);
led3.Update(currentMillis);
}
void loop()
{
} #include
class Flasher
{
// Class Member Variables
// These are initialized at startup
int ledPin; // the number of the LED pin
long OnTime; // milliseconds of on-time
long OffTime; // milliseconds of off-time
// These maintain the current state
volatile int ledState; // ledState used to set the LED
volatile unsigned long previousMillis; // will store last time LED was updated
// Constructor - creates a Flasher
// and initializes the member variables and state
public:
Flasher(int pin, long on, long off)
{
ledPin = pin;
pinMode(ledPin, OUTPUT);
OnTime = on;
OffTime = off;
ledState = LOW;
previousMillis = 0;
}
void Update(unsigned long currentMillis)
{
if((ledState == HIGH) && (currentMillis - previousMillis 》= OnTime))
{
ledState = LOW; // Turn it off
previousMillis = currentMillis; // Remember the time
digitalWrite(ledPin, ledState); // Update the actual LED
}
else if ((ledState == LOW) && (currentMillis - previousMillis 》= OffTime))
{
ledState = HIGH; // turn it on
previousMillis = currentMillis; // Remember the time
digitalWrite(ledPin, ledState); // Update the actual LED
}
}
};
class Sweeper
{
Servo servo; // the servo
int updateInterval; // interval between updates
volatile int pos; // current servo position
volatile unsigned long lastUpdate; // last update of position
volatile int increment; // increment to move for each interval
public:
Sweeper(int interval)
{
updateInterval = interval;
increment = 1;
}
void Attach(int pin)
{
servo.attach(pin);
}
void Detach()
{
servo.detach();
}
void reset()
{
pos = 0;
servo.write(pos);
increment = abs(increment);
}
void Update(unsigned long currentMillis)
{
if((currentMillis - lastUpdate) 》 updateInterval) // time to update
{
lastUpdate = currentMillis;
pos += increment;
servo.write(pos);
if ((pos 》= 180) || (pos 《= 0)) // end of sweep
{
// reverse direction
increment = -increment;
}
}
}
};
Flasher led1(11, 123, 400);
Flasher led2(12, 350, 350);
Flasher led3(13, 200, 222);
Sweeper sweeper1(25);
Sweeper sweeper2(35);
void setup()
{
sweeper1.Attach(9);
sweeper2.Attach(10);
// Timer0 is already used for millis() - we’ll just interrupt somewhere
// in the middle and call the “Compare A” function below
OCR0A = 0xAF;
TIMSK0 |= _BV(OCIE0A);
pinMode(2, INPUT_PULLUP);
attachInterrupt(0, Reset, FALLING);
}
void Reset()
{
sweeper1.reset();
sweeper2.reset();
}
// Interrupt is called once a millisecond,
SIGNAL(TIMER0_COMPA_vect)
{
unsigned long currentMillis = millis();
sweeper1.Update(currentMillis);
//if(digitalRead(2) == HIGH)
{
sweeper2.Update(currentMillis);
led1.Update(currentMillis);
}
led2.Update(currentMillis);
led3.Update(currentMillis);
}
void loop()
{
}
库和链接
有关计时器的更多信息
可以将计时器配置为以各种频率运行并以不同的模式运行。除了产生中断,它们还用于控制PWM引脚。以下链接是了解如何配置和使用计时器的出色资源:
Arduino PWM的机密
计时器/PWM速查表
计时器库
网上有许多Arduino``计时器‘’库可用与本系列第1部分中所做的一样,许多人仅监视millis()并要求进行持续轮询。但是实际上有一些配置可以让您配置定时器以生成中断。
Paul Stoffregan出色的TimerOne和TimerThree库处理了许多定时器中断配置的低级细节。 (请注意,TimerThree不适用于UNO。它可以与Leonardo,Mega和某些Teensy板一起使用)
TimerOne和Timer 3库
引脚更改中断
对于2个不足的情况
Arduino UNO只有2个外部中断引脚。但是,如果您需要两个以上的中断,该怎么办?幸运的是,Arduino UNO在所有引脚上都支持“引脚更改”中断。
引脚更改中断类似于外部中断。区别在于,在8个相关引脚中的任何一个引脚上都会因状态变化而产生一个中断。这些操作要稍微复杂一点,因为您必须跟踪所有8个引脚的最后一个已知状态,以找出8个引脚中的哪个导致了中断。
Arduino Playground的PinChangeInt库实现了一个方便的引脚更改中断接口:http://playground.arduino.cc/Main/PinChangeInt
PinChangeInt库
计时器和中断礼仪
中断就像超市的快速通道。考虑周全,将其保持在10件以下,一切都会顺利进行。
如果一切都是高水平的,那么没有什么是高度优先的。
中断处理程序应仅用于处理高优先级,对时间敏感的事件。请记住,在中断处理程序中时,禁用了中断。如果您尝试在中断级别执行过多操作,则会降低对其他中断的响应。
一次仅一个中断。
ISR,中断被禁用。这有两个非常重要的含义:
在ISR中完成的工作应保持简短,以免丢失任何中断。
在ISR中的代码不应调用任何需要激活中断(例如delay()或使用i2c总线的任何中断)。这将导致程序挂起。
将冗长的处理推迟到循环中。
如果您需要进行大量处理以响应中断,请使用中断处理程序仅执行必要的操作,然后设置易失性状态变量(参见下文)以指示需要进一步处理。当您从循环中调用更新功能时,请检查状态变量以查看是否需要任何后续处理。
重新配置计时器之前需要检查 《计时器是一种有限的资源。 UNO上只有3个,它们用于许多用途。如果您弄乱了计时器配置,则其他某些功能可能不再起作用。例如,在Arduino UNO上:
Timer0 -用于引脚5和6上的millis(),micros(),delay()和PWM
》
Timer1 -用于Servos,WaveHC库和引脚9和10上的PWM
Timer2 -由Tone和PWM引脚上使用11&13
安全共享数据
因为中断将暂停,无论处理器正在处理该中断如何,我们必须小心在中断处理程序和循环中的代码之间共享数据。
易失性变量
有时,编译器会尝试优化代码以提高速度。有时,这些优化会将常用变量的副本保留在寄存器中以便快速访问。问题是,如果这些变量之一在中断处理程序和循环代码之间共享,则其中一个变量最终可能会查看陈旧的副本而不是真实的副本。将变量标记为易失性会告诉编译器不要对优化进行潜在的危险操作。
保护较大的变量
Evan标记变量 volatile 是不够的如果它的变量大于整数(例如字符串,数组,结构等)。较大的变量需要几个指令周期来更新,并且如果在更新的中间发生中断,则数据可能会被破坏。如果您具有与中断处理程序共享的较大变量或结构,则在从循环中更新中断时应禁用中断。 (默认情况下,已在中断处理程序中禁用了中断。)
责任编辑:wv
-
中断
+关注
关注
5文章
884浏览量
41020 -
计时器
+关注
关注
1文章
395浏览量
32148 -
Arduino
+关注
关注
184文章
6426浏览量
184792
发布评论请先 登录
相关推荐
STM32F407VET6 TIM1定时器中断,低频中断正常,高频中断异常时间不对是哪里的问题?
ModusToolbox™生成时如何调用systick计时器ISR?
光电计时器的原理和使用
求助,请问CSR time计时器的频率是多少?
M031使用计时器和GPIO来进行软件反弹实验
M451使用计时器来驱动RGB LED
NANO100B利用计时器触发PDMA
使用计时器和GPIO来进行软件反弹实验
EDA程序设计之计时器设计
如何使用计时器驱动RGB LED
如何用ULN2003驱动器和M480计时器控制28 BYJ- 48继电器发动机
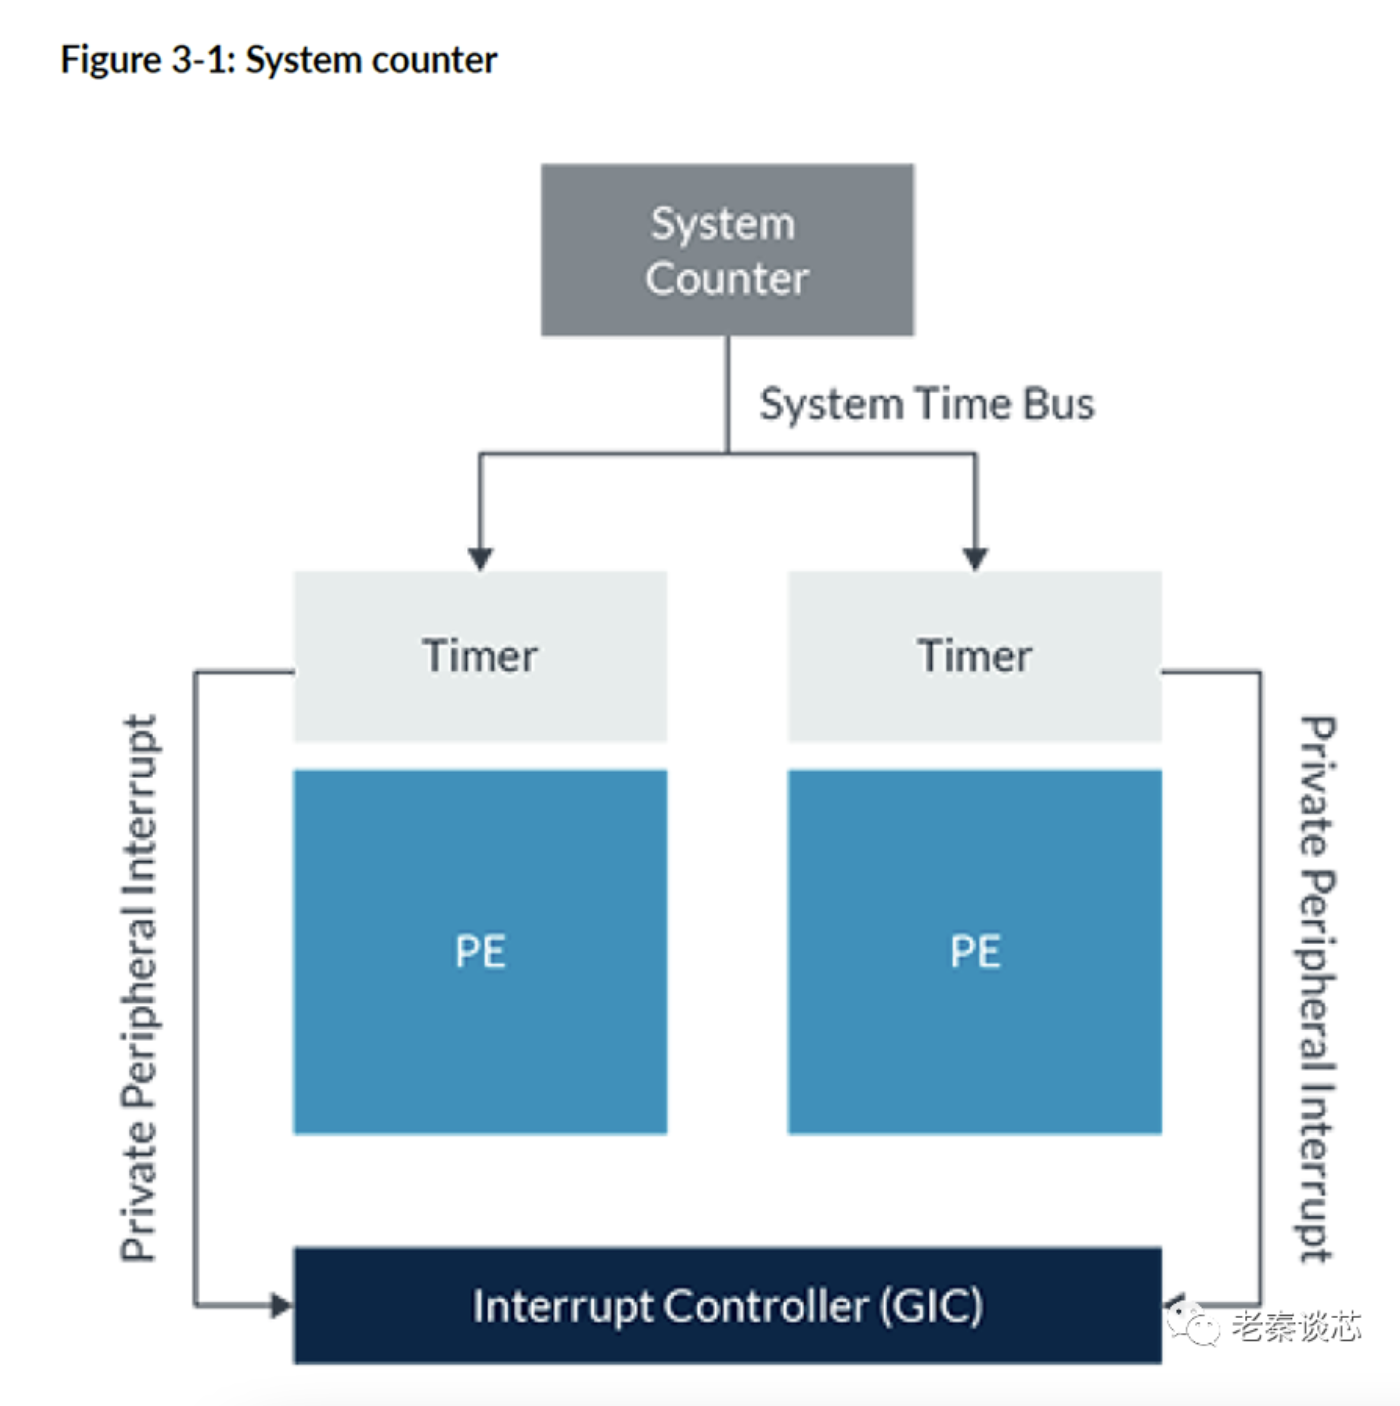
研究ARMv8-A中的一个概念:通用计时器


 工商网监
工商网监
评论